Introduction
Updated 2/24/2009: Added DNS setting info in Method 2

As we expand our networks with computers, a NAS, VoIP devices, Xboxes, PS3s, etc, many of us find we need more wired network ports. A simple solution is to go buy a new network switch. Times are tough though, and reusing an idle device is cheaper than going out and buying a new one.
If you have an old router gathering dust, you can put it to work, save money and keep it out of the landfill. We already described how to turn a wireless router into an access point. This article will show you two ways of using an old router to expand the number of Ethernet ports available on your LAN. The difference between the two methods is in the number of ports that you gain.
I’ll refer to the router that is connected to the Internet as the upstream router and the old router that we are converting as the downstream router as shown in Figure 1.

Figure 1: The Basic Setup
Method One – Converting A Router To A Switch
The five steps are:
- [Optional] Put a piece of electric tape over the WAN port so it doesn’t get used.
- Disable the DHCP server.
- Change the downstream router’s LAN IP.
- [Optional] Turn off the wireless radio on the downstream router.
- Connect an Ethernet cable from a LAN port on the upstream router to a LAN port on the downstream router.
Step 1: Putting a piece of electric tape over the WAN port isn’t necessary. But it is a good way to prevent future problems caused by someone plugging a device into that port.
Step 2: Log into the downstream router, look for the DHCP configuration section, and disable the DHCP server. For example, on a Dlink DI-614+, DHCP server configuration is a menu in the Home configuration section as shown in Figure 2.

Figure 2: D-Link DI-614+ DHCP Server controls
Step 3: Change the downstream router’s LAN IP to an unused IP in the same subnet as the upstream router. Log into the upstream router and find the DHCP server controls. Figure 3 shows a typical set of DHCP server controls. You can see that 192.168.3.200 – 250 is the range of addresses that will be issued by this router’s DHCP server.

Figure 3: Finding the upstream router network
You can use any IP address outside (above or below) this range, except for 0 and 255, which are reserved. You also can’t use the IP address used by the upstream router. This is usually 1, which in this case is 192.168.3.1. But if you log into your upstream router’s admin screens using an IP address with anything other than 1 as the last octet, i.e. XXX.XXX.XXX.1, then just don’t use that address.
Thus, a safe LAN IP address for the downstream router that isn’t used by the upstream router is an address from 192.168.3.2 to 192.168.3.199. So I assigned my downstream router a LAN IP of 192.168.3.3 (Figure 4).

Figure 4: Changing the downstream router IP address
Step 4: [Wireless routers only] Disable the downstream router’s wireless function. It doesn’t hurt to unscrew the antennas from the downstream router as well if they are detachable. This gets them out of the way since you aren’t using them anymore. Figure 5 shows the wireless disabled for a D-Link DGL-4300.

Figure 5: Disable the wireless radio
Step 5: Connect the downstream router. Run an Ethernet cable from a LAN port on the upstream router to a LAN port on the downstream router. The LAN ports are the ports that often grouped together and not labeled as WAN or Internet, as shown in Figure 6.
![]() NOTE: For any router manufactured in the last few years, you don’t have to worry about using a crossover cable. All current routers have Auto MDI/X ports, which will automatically adjust to the needs of whatever is plugged into them.
NOTE: For any router manufactured in the last few years, you don’t have to worry about using a crossover cable. All current routers have Auto MDI/X ports, which will automatically adjust to the needs of whatever is plugged into them.

Figure 6:Locating the LAN ports
You should now be good to go with three open ports on the downstream router to connect additional devices. Devices connected to the downstream router will get an IP address from the upstream router and access the Internet just as if they were directly connected to the upstream router.
Note that we only gained two network ports because we used one port on the upstream router and one port on the downstream router to connect the two devices. To gain three network ports, we need to get a bit trickier with the downstream router configuration.
Method Two – Router with Static Routes
There are a few more steps to this option, but they are quick and easy:
- Turn off NAT.
- [Optional] Disable Firewall / SPI
- Change the downstream router’s LAN IP.
- [Optional] Turn off the wireless radio on the downstream router.
- Assign a Static IP to the downstream router’s WAN port.
- Create a Static Route on the upstream router.
- Connect an Ethernet cable from a LAN port on the upstream router to a WAN port on the downstream router.
Step 1: Disable Network Address Translation (NAT) in the downstream router. NAT is the function that enables a router to share a single Internet connection with multiple devices. But this can interfere with network connectivity to corporate VPNs, VoIP, and other services connected through the downstream router because of the "Double NAT" configuration. So Figure 7 shows NAT disabled on a Linksys BEFW11S4.

Figure 7: Disabling NAT
There are a several things to note here, however. First, not all routers have the option to disable NAT, such as D-Link’s DIR-655. If your downstream router doesn’t allow for disabling NAT, you could be better off with Method One described above.
Other routers have a configuration that disables NAT and routing, such the D-Link DGL-4300’s "Bridge Mode" which essentially turns the device into a switch, or in the case of a wireless router, a switch and wireless access point. If your router has a Bridge Mode, then all you need to do is enable it and you have your extra ports.
Finally, yet other routers may call disabling NAT something different, such as the Netgear FVS336G which refers to its non-NAT mode as "Classical Routing" as shown in Figure 8.

Figure 8: Another method of disabling NAT
Step 2: [Optional] Disable the firewall on the downstream router. Your upstream router has a firewall, so running a second firewall inside your LAN is likely not doing anything for you. Figure 9 shows the radio button to disable the firewall on a Linksys WRT54G. This step is optional because not all routers provide a firewall disable. If your router has a control to disable SPI (Stateful Packet Inspection), you can disable that, too.
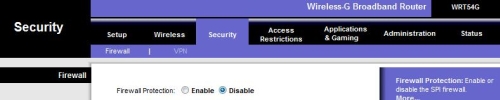
Figure 9: Disabling the firewall
Step 3: Change the downstream router’s LAN IP to a different subnet than the upstream router. Connect a PC to the upstream router, open a command window and type ipconfig. For example, my PC shows an IP address of 192.168.3.201 from my upstream router. So I need to set the IP address of the downstream router to a different subnet, using a number (between 1 and 253) for the third octet. I chose 192.168.199.1 as shown in Figure 10. The key is to ensure the numbers in the third section of the IP address are different on the upstream and downstream routers.

Figure 10: Downstream router IP address set to new subnet
Note that we’re leaving the DHCP server on in the downstream router. Usually, the DHCP server will automatically adjust the IP address range to be in the same subnet as the IP address assigned to the LAN interface. In Figure 10, I have configured the LAN IP to 192.168.199.1. Notice that the DHCP server range is now 192.168.199.100 to 149.
Step 4: [Optional] Disable the downstream router’s wireless if it has it, for the same reasons described in Method One.
Step 5: Assign a static IP address to the downstream router’s WAN port. Use the same procedure described in Method One, Step 3. But change the WAN IP, not the LAN IP. You will also need to enter the LAN IP address of the upstream router as the downstream router’s gateway, 192.168.3.1 in my case. You can leave the subnet mask set to 255.255.255.0
Figure 11 shows that I assigned a WAN IP of 192.168.3.158 to my downstream router and entered 192.168.3.1 for the Gateway.

Figure 11: Setting the downstream router WAN IP
Updated 2/23/2009
NOTE: With a static IP address on the downstream router’s WAN port, you may or may not need to set the DNS IP address used by the downstream router WAN. DNS problems are usually indicated when you can’t reach a website by its domain name, but can by entering its IP address.
If devices connected to the downstream router can’t access the web, first check the downstream router WAN status information. Most routers today support DNS proxy, which means the downstream router can use the upstream router’s gateway address as the DNS IP address.
Figure 12 shows WAN status from a D-Link DGL-4300. The Gateway and DNS Server IP addresses are the same, indicating that DNS proxy is supported by the upstream router.

Figure 12: WAN status showing DNS server
If the downstream router is not showing an DNS server IP address, you’ll need to enter the proper IP address in the downstream router’s WAN settings. An easy way to do this is to let the downstream router first obtain its WAN IP information automatically, then use that same information (except for the WAN IP address) for the static settings.
Step 6: Create a static route on the upstream router so packets targeted for the LAN of the downstream router can reach their destination. In Figure 13, I’ve configured my upstream router to send all packets with a destination IP address of 192.168.199.x, i.e. the downstream router’s subnet to the WAN IP address (192.168.3.158) of my downstream router.

Figure 13: Adding a static route
Step 7: Connect the routers. This time, plug an Ethernet cable into a LAN port on the upstream router to the WAN port on the downstream router. This leaves all four LAN ports on the downstream router available for use!
The value of this solution is two-fold. You have gained an extra port over Method One. And by routing between the upstream and downstream LANs, you’ve effectively created a broadcast separation between the two networks, which can improve overall network performance in a busy LAN.