Introduction
| At a Glance | |
|---|---|
| Product | hField Technologies Wi-Fire (HFWFG10) |
| Summary | 802.11b/g USB adapter with integrated 10dbi directional antenna |
| Pros | • Easy to install • Compact size for easy portability • Good utility |
| Cons | • Awkward to use for on-the-go notebook users • You may not see an improvement • Expensive |

You can never be too rich, too thin or have too much wireless range. And while hField Technologies might not be able to help you with the first two, they think they have something to aid in your efforts to extend your WLAN’s reach into those hard-to-reach spots in your home or office. The Wi-Fire is an 802.11b/g USB 2.0 client adapter combined with a 10dBi panel antenna and unique mounting apparatus.
This isn’t the first time that this has been tried (see our review of Hawking’s Hi-Gain Wireless USB adapter), but it’s the first solution I’ve had my hands on that combines a USB 2.0 11g adapter and an antenna of such high gain.
Figure 1 shows the product with the mounting gear stretched out flat. The product shots up above and in Figure 2 should give you an idea of how the gear works to perch the Wi-Fire on a notebook screen.
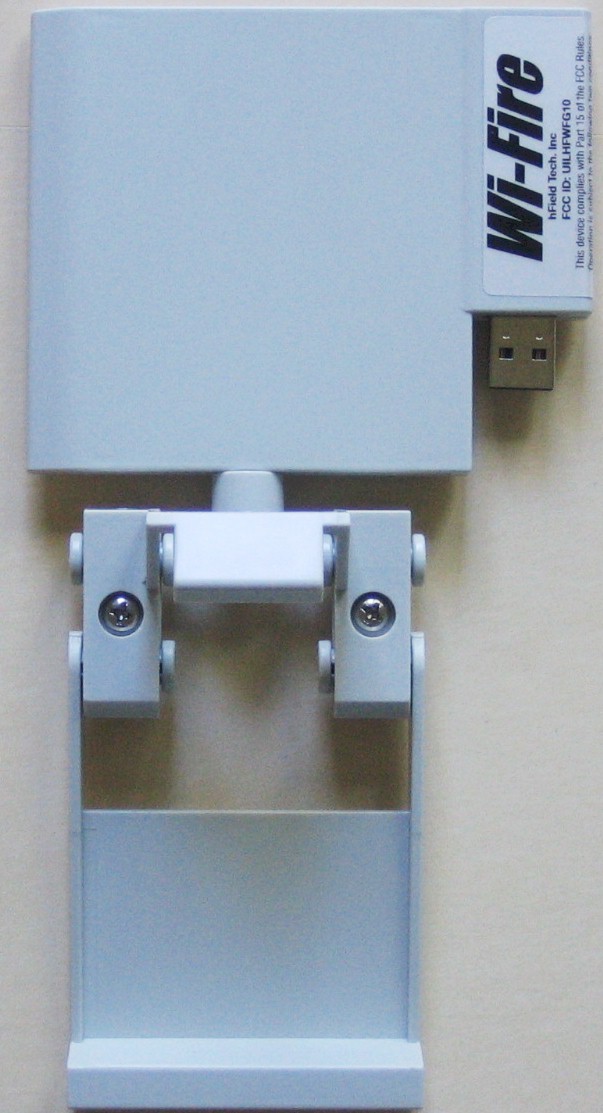
Figure 1: Wi-Fire closeup
The mounting apparatus has a short and long jaw and is articulated so that the antenna can both swivel and tilt. You mount it to a notebook screen (or any other surface that can be clamped on) by closing the friction-loaded jaws until you’re satisfied that the Wi-Fire will stay put. The jaws are not spring-loaded so as to not pinch your notebook’s LCD screen too tightly.

Figure 2: Wi-Fire on notebook
Even though the surfaces of the jaws are smooth, I would have liked to have seen hField put some sort of soft padding on at least the short jaw that touches the screen. This would perhaps keep Wi-Fire from sliding around when the notebook is moved and provide extra protection against screen scratches. hField includes a retractable Zip-Linq USB cord with the Wi-Fire that you may or may not like. (I ended up liking it…sorta.)
Internal Details
Figure 3 shows that the Wi-Fire literally is a USB 2.0 WLAN adapter connected to a high-gain antenna.

Figure 3: Internal view in enclosure (click image to enlarge)
Figure 4 lets you see that the adapter uses a TI chipset consisting of TNETW1450 BB/MAC, TNETW3422 Direct Conversion Radio and TNETW3426 radio frequency front end.

Figure 4: Board and antenna detail (click image to enlarge)
The Wi-Fire’s spec sheet says the antenna has 10.4 dBi of gain, minimum receive power of -98 dBm and +15 dBm (32 mW) of transmit power. The transmit power and receive sensitivity aren’t anything out of the ordinary, so it’s up to the antenna to provide the range-boosting mojo. hField doesn’t provide any information about the antenna coverage pattern, but directs the user to point the leading edge toward the signal source. I thought this was an unusual orientation for a panel-design antenna, but my experience during testing generally confirmed this advice.
Update 11/12/2006 – A few readers wrote to tell me that the antenna is a Yagi, not a panel. That would account for the instructions to point the edge toward the signal source.
Setup and Configuration
The Wi-Fire installs like any other USB adapter. You just run the mini-CD on your Windows XP (only) system to install the driver and client utility and then plug the Wi-Fire into a USB 2.0 port once your system completes a mandatory reboot. Note that you can use the product on a system with only USB 1.X ports, but you’ll get only 802.11b-like speeds (around 5-6 Mbps max). Note that there is no blinking LED to indicate wireless activity. To me, this isn’t a big deal, since I don’t think I’ve ever paid much attention to them on other adapters anyway.
The Wi-Fire utility automatically takes care of disabling Windows’ built-in Wireless Zero Configuration utility when it launches, but allows you to go back to using it simply by simply right-clicking on Utility’s System Notification area icon and choosing “Configure using WZC”. Figure 5 shows the Wi-Fire Utility’s Main screen (Figure 5).

Figure 5:Wi-Fire Utility Main screen (click image to enlarge)
The Main screen nicely summarizes most of what you need to know about the Wi-Fire’s status and includes quick-responding Tx (Transmit) Rate, Rx (Receive) Rate and Siqnal Quality meters that are the primary tools for aiming the Wi-Fire for maximum performance. The Information screen (Figure 6) contains other interesting info including the adapter’s IP address (which I would have liked to have seen on the Main screen). I also noticed that the only indication or information that is available about the connetion security mode is a lock icon that appears next to the SSID on the Main screen.

Figure 6:Wi-Fire Utility Information screen (click image to enlarge)
The Profile Manager tab is where you access the Wi-Fire’s settings for each wireless LAN that you connect to. The Profile Configuration screen (Figure 7) contains controls for all adapter settings including Power Save mode, Transmit Power level and Transmit rate. I think the Wi-Fire is the first adapter I’ve seen where you must use its utility to access any of the adapter settings. So if you’re old-school and like to use the network adapter properties window Advanced tab, you don’t have that option.

Figure 7:Wi-Fire Utility Profile Configuration screen (click image to enlarge)
As good as the Wi-Fire Utility is, there are some improvements that I’d like to see. The Signal Quality meter, while very responsive, seems to have a bug that causes a “No signal” indication at a reading of – 82. A signal quality vs. time plot would also be a nice touch, although I must confess that I was able to use the existing Signal Quality meter just fine for aiming the Wi-fire. I’d also like to see a more useful signal-bar type System Notification area (tray) icon, or at least a mouse-over Tool Tip that provides the same info you get from the built-in XP utility’s icon. This is handy for checking what’s happening with the Wi-Fire without having to open the utility and take up valuable screen space.
Performance
I really wanted to use the Azimuth W-Series WLAN Test Platform that I’ve used for my recent MIMO testing to plot throughput vs. range curves for the Wi-Fire. But time pressures made me abandon that idea – at least for now. So instead I used IxChariot to run tests at my five indoor test locations. (The complete setup is described here.) I used a Linksys WRT54G wireless router as my AP, primarily because it is so commonplace in home setups.
Since I’ve been unpleasantly surprised recently by severe throughput reduction with WEP and/or WPA enabled in some draft 11n MIMO products, I’ve resumed taking a closer look at performance in these modes for all wireless products. I checked Location 1 throughput with the Wi-Fire set to WEP 128, WPA-PSK TKIP and WPA2-PSK (AES) modes and was pleasantly surprised to see no significant throughput difference among modes.
Note that the Wi-Fire supports WPA TKIP only and not the optional AES encryption supported by some products. AES is, of course, supported in WPA2 modes. I also found that enabling “Enterprise” in the Privacy Super Profile setting enabled PEAP – MS-CHAP-V2, PEAP – GTC and TLS options. “Enterprise” mode also turned on the “Enable CCX mode” checkbox that is unavailable with Privacy Super Profile set to “Personal”.
The main reason you’ll buy the Wi-Fire, however, is to improve your WLAN connection and there I had not exactly convincing results. Figure 8 is a composite IxChariot plot of one minute throughput runs in my five indoor test locations. Throughput in Locations 1 through 3 are pretty much the same, as I typically have found with other wireless products. Note that in Locations 4 and 5, I used the Wi-Fire Utility to find the strongest signal before running the test. I do not normally try to find the best signal before running the tests, but instead use the same notebook placed in the same position for each test.

Figure 8: Wi-Fire Downlink Throughput vs. Range (click image to enlarge)
The Wi-Fire actually does quite well in the tougher Locations 4 and 5, compared even to many of the MIMO notebook Cardbus adapters I’ve tested. But it doesn’t provide significantly better performance than the best adapters I’ve tried. Figure 9 shows another composite IxChariot plot, but this time using my test notebook’s built-in wireless adapter.
The adapter is a dual-band Gigabyte GN-WPEAG mini-PCI board using an Atheros Super AG chipset that I installed myself shortly after getting the notebook last year. Figure 9 shows that the internal notebook adapter actually turns in higher average throughput in most cases, primarily thanks to the lack of the periodic throughput “dropouts” that the Wi-Fire has. Note that I also positioned the notebook for best throughput before running the complete tests.

Figure 9: Notebook Downlink Throughput vs. Range (click image to enlarge)
Table 1 pulls together the average throughput values from both runs, where you can see that the only place that the Wi-Fire bests my notebook’s internal adapter is in Location 4.
| Location | Wi-Fire | Internal Notebook |
|---|---|---|
| 1 | 16.7 | 21.1 |
| 2 | 20.9 | 20.4 |
| 3 | 19.4 | 21.0 |
| 4 | 10.2 | 8.2 |
| 5 | 5.3 | 7.5 |
Table 1: Downlink Throughput vs. Test Location Comparison
Conclusion
Improving a weak wireless connection is a tricky proposition for many Wi-Fi users, mainly because they lack the knowledge of what is causing the poor connection. Many manufacturers take advantage of this lack of customer knowledge and just put increasingly larger speed numbers on product packaging, leaving the purchaser to imagine that a bigger number means better performance. Maximum speed, of course, doesn’t necessarily yield better performance, especially when your wireless problems are caused by interference from an abundance of neighboring networks.
To hField’s credit, they provide good advice to potential buyers on both their website and the User Manual that comes with the product. The advice boils down to the fact that the Wi-Fire can make a weak signal stronger, but may not be able to provide connection to WLANs that are currently beyond the range of your current adapter. I think hField is taking the right approach with the advice, since, as a small company selling the product directly, they can’t afford to have a lot of product returns.
If you are currently using a notebook with built-in WLAN, you may have an experience similar to mine and not see a significant improvement. Part of this is the superior antenna orientation provided by having the antennas embedded in the vertical notebook screen, which is a big improvement over the low, horizontal antenna orientation afforded by a plug-in Cardbus card. The Wi-Fire, with its movable antenna, provides a definite advantage over both built-in and Cardbus WLAN adapters because it lets you position the antenna for maximum signal independent of your computer’s orientation.
But also, as in my case, the chipset in your current wireless adapter can also make a big difference. Adapters using Atheros Super G and Airgo True MIMO chipsets already have excellent receive sensitivity and can provide throughput vs. range performance equal to or perhaps better than the Wi-Fire.
In the end, the Wi-Fire puts the methods that have the greatest chance of success for wireless signal performance improvement – a higher-gain antenna and the ability to flexibly position it – in a handy package that can be used for both notebooks and desktops. Whether it helps or not, however, depends on what you are starting with.