Introduction
It wasn’t too long ago that the basic premise of this article—using a managed switch in a home / SOHO network—would have had a pretty limited audience. After all, if you only spent $50 or so for a router, why pay hundreds of dollars for a switch?
But prices have come down dramatically, as feature sets and ease of use have expanded and improved. With eight-port Gigabit "smart" switches now available for under $100, the question may be more "Why not?" than "Why?".
In this series, I’ll first provide a brief tutorial on what makes a smart switch "smart". But most of the focus will be on going through the feature set of a typical inexpensive switch and providing examples of why you might want to use particular features and how to do it.
But first, let’s define "smart" and "managed" switches. Basically, smart / managed switches have features that can be configured to perform network management functions. These functions can be as simple as setting the link speed of a port or disabling it entirely, or more complex like limiting bandwidth or grouping devices into VLANs.
At this point, the difference between "smart" and a "managed" switches is strictly marketing. The term "smart" switch was coined when network product manufacturers first introduced lower-priced managed switches. Part of the reason for the new term was to just get some attention for these new products. But a more important reason was to attempt to create a differentiation between the new (and typically less-expensive) devices and older (and typically more expensive) products.
When smart switches first appeared, they typically had fewer features than managed switches and were managed via web interfaces instead of the Telnet / command line interfaces. But, as I noted earlier, the feature sets of smart switches have expanded, so that now you have to look pretty closely to see a difference between similarly-priced managed and smart switches. For all intents and purposes, you can now use the terms interchangeably.
One thing you do have to pay attention to, however, is a switch’s OSI Layer of operation. In general, smart switches are Layer 2 devices, just like unmanaged switches. Both operate at the Data Link layer, which handles physical addressing. Simply put, Layer 2 devices can look only at the MAC address and LLC portions of a data packet’s Ethernet frame.

Figure 1: Ethernet Type II Frame (courtesy Wikipedia)
On the other hand, you can find managed switches in both Layer 2 and Layer 3 flavors. Layer 3 switches operate at the Network Layer, which provides network path determination and logical addressing functions. In most cases, this means that Layer 3 switches handle packets based on their IP address, which allows them to perform basic routing functions. That’s all I’m going to say about Layer 3 switches, which are way beyond the requirements (and budget) of small networks.
NETGEAR GS108T
Two popular eight-port smart switches under $100 are Cisco’s SLM2008 and NETGEAR’s GS108T. I’m going to use the GS108T (Figure 2) for this series since I have one on long-term loan for testing NAS link aggregation.

Figure 2: NETGEAR’s GS108T
The GS108T is a managed version of NETGEAR’s popular unmanaged GS108. Both have eight auto MDI/X 10/100/1000 ports with front-mounted connectors with integrated link / activity LEDs. I prefer front-mounted ports because I’m constantly connecting and disconnecting devices. But if you like rear-mounted ports, the Cisco SLM2008 has you covered.
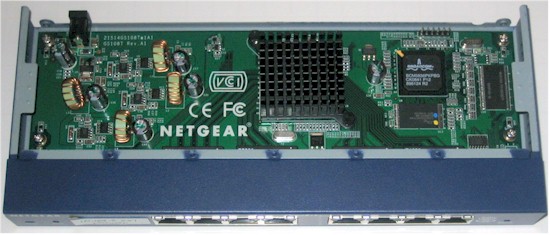
Figure 3 is a photo of the GS108T’s board. You can see only the Broadcom BCM5836P Communications Processor, 16 MB of RAM and 4 MB of flash. The switch itself under the heatsink is a BCM5398 8-Port GbE Switch with 8 Integrated PHYs and LoopDTech.
Figure 3: GS108T board
NETGEAR has implemented a uniform interface for their web-managed switches. The System Information login landing pages for the GS108T (Figure 4) and an older FS728TS 10/100 smart switch (Figure 5), updated with Version 3 series firmware, illustrate the family resemblance
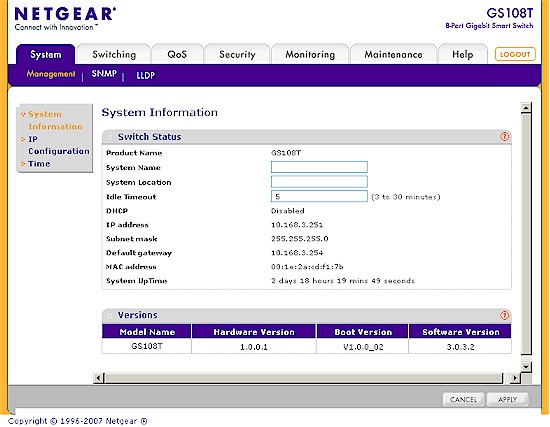
Figure 4: GS108T System Information
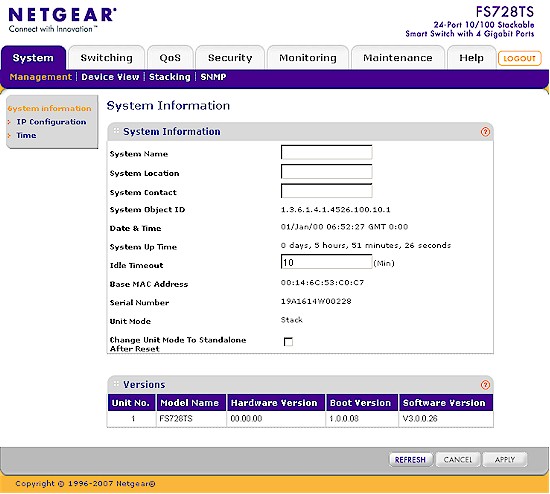
Figure 5: FS728TS System Information
Playing with Ports
 Note: All features and functions described can be supported by both “smart” and “managed” switches unless otherwise noted.
With the definitions out of the way, let’s dig into the benefits that a smart switch can provide. The most basic smart switch functions involve basic port control and monitoring.
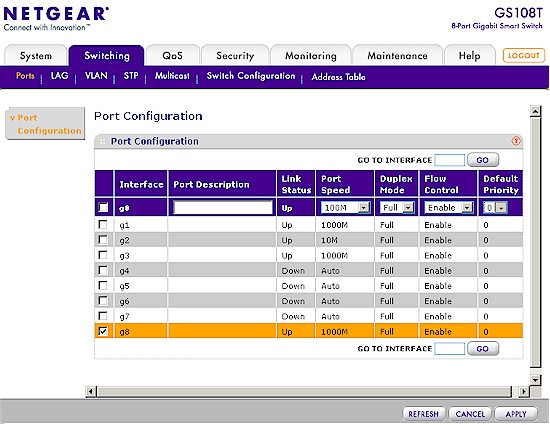
In the GS108T, some of these features are located on the Switching > Ports page (Figure 6).
Figure 6: Port Configuration screen
The Port Configuration page both summarizes link status and enables setting of port speed and mode and disabling flow control. There is also a Default Priority control that allows you to set a priority from 0 (lowest) to 7 (highest) for untagged packets coming into the port.
Things you can do with these settings are:
- Shut off troublesome users/devices – The Port Speed control can be set to 100M, 10M, Auto and Disable. The last setting effectively unplugs the device from the network. Although you could always yank a cable out, a smart switch lets you do it remotely. This can be handy if the switch is located someplace where you, the network administrator, usually are not, like a basement or closet.
- (Crudely) control bandwidth – Setting port speed also provides brute-force bandwidth control. By forcing a port to 10 or 100 Mbps, you can put a real crimp in local bandwidth hogging. I say local because the resolution of this setting isn’t fine enough to provide effective bandwidth control of Internet traffic. If you have only 5 Mbps of Internet download speed, setting Suzie’s port speed to 10 Mbps isn’t going to limit her ability to hog the family Internet connection.
Tracking Traffic
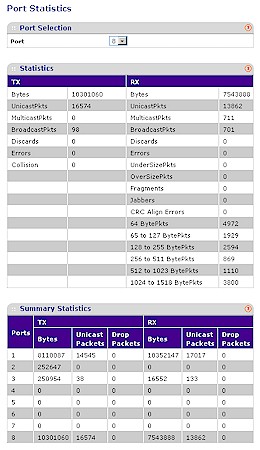
But how do you know who is hogging bandwidth? All you need to do is check the port statistics. In the GS108T, these are on the Monitoring > Ports page (Figure 7). I would have preferred that the positions of the Summary and selected port statistics were reversed, since you generally have to look at the overall picture before you drill down to a specific port.
Figure 7: Port Statistics
One glance at the Summary Bytes fields shows that Port 8 has the highest traffic, which makes sense because it is used to uplink the switch to my main LAN switch. The upper part of Figure 7 shows the detailed statistics for Port 8, which show nothing particularly unusual.
In addition to seeing where your bandwidth is going, statistics can also help you troubleshoot slow or intermittent connection problems. The Summary Drop Packets field could be helpful for finding overloaded uplink ports, but it only reflects packets dropped due to Flow Control back pressure or switch memory overload. More helpful fields might be the Errors and Collision fields for Transmit and Error, Fragments, Jabbers, UnderSizePkts and OverSizePkts fields.
Mirroring to Sniff
The last basic port feature provided by smart switches is port mirroring, which is used when you need to packet sniff with Wireshark. Doug Reid’s series will take you through the basis of using this popular, free packet capture and analysis program. But unless the traffic you want to analyze is flowing to or from the system that Wireshark is running on, you’ll need to mirror the port(s).
In the days before inexpensive switches, network hubs were used to create LANs. Hubs are Layer 1 devices, which simply copy all data coming into each port out to all other ports in the hub. This was bad for busy LANs because individual ports could easily become overloaded by traffic on other ports. But it was great for packet sniffing, since you could simply plug your sniffer into any port and see traffic on all other connected devices.
Switches send received data only to the port that connects to the device with the data packet’s destination MAC address. So plugging a packet sniffer into a switch port will only detect traffic intended for the device that the sniffer is running on.
But port mirroring lets you copy data on other switch ports to a destination port. Figure 8 shows the GS108T’s port mirroring (Monitoring > Mirroring) configured to copy transmit and receive data on port 8 to port 1. (You can also configure transmit only or receive only mirroring.) Since port 8 is being used as the uplink port, this would allow me to sniff all traffic in and out of the switch.
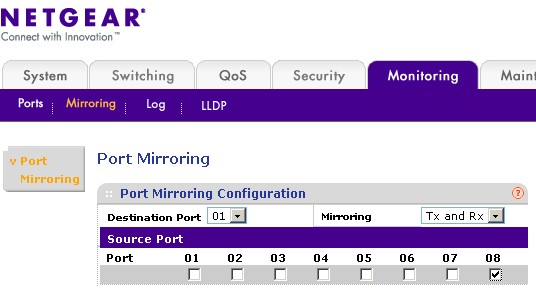
Figure 8: Port mirroring
These are some of the most basic features that smart switches provide. Next time, we’ll explore features that can enhance your small LAN’s security.

