Introduction
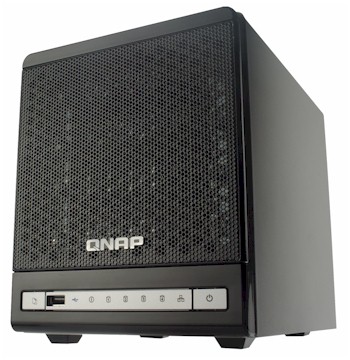
| At a Glance | |
|---|---|
| Product | QNAP Turbo NAS (TS-409 Pro), (TS-409) |
| Summary | Four-drive BYOD NAS with support for RAID 0, 1, 5, 5+ hot spare and 6. |
| Pros | • Hot-swappable drives • Online volume expansion and RAID migration • Automatic rebuild to hot spare • Built-in LAMP server, DLNA multimedia server, FTP, iTunes • USB support for external storage, UPS or up to 3 printers |
| Cons | • Media Center didn’t function well with large music library • Thumbnails didn’t automatically generate • No US-based phone support |
If you’re considering a NAS to expand your network storage, you have three different types to choose from. First, there’s the simple, single-drive device that merely adds storage capacity but provides no fault tolerance. All of your data is stored on a single drive, and if that drive crashes, you’ll lose your data (unless you’ve done proper backups).
Next, there are two-drive models. Virtually all of the NAS manufacturers offer two-drive models. You have the option of RAID 0, RAID 1, or JBOD. If you configure for RAID 1, all of your data from one drive is mirrored onto the second drive.
However, it’s the four-drive NASs that offer the most options for fault tolerance. When you start looking at four-drive devices, you’ll notice that in these devices, different manufacturers include different features for RAID configuration. Some allow for RAID 0, 1 and 5. Other devices include RAID 10, RAID 6, or RAID 5 with a hot spare. More importantly, some support hot swappable drives. In this review, I’ll be looking at the QNAP TS-409 Pro.
Last fall, we reviewed the QNAP TS209. In that review, Jim Buzbee found that the TS209, a dual-drive version of the TS101, was a full-featured, hot-swappable NAS with full LAMP server capabilities. The feature set of the TS-409 mirrors that of the TS209 with additional RAID capabilities available in the four-drive model. Thus, I won’t spend much time describing features already covered in previous reviews.
NOTE: Like the TS-209, the 409 comes in two versions: the TS-409 and TS-409 Pro. Following the approach taken with the TS-209, both 409 versions use the same hardware and differ only in support for Active Directory and NFS in the 409 Pro.
Product Tour
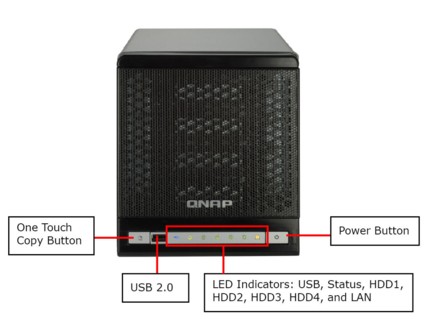
Figure 1: QNAP TS-409 Front Panel
The front panel of the TS-409 is quite similar to the TS209. There are seven LEDs as identified above, along with one of the unit’s three USB 2.0 ports. The One Touch Copy Button allows you to copy the contents from an external USB storage device to a pre-defined volume on the server, or depending on your configuration, copy from the NAS to the USB storage device.
The screened front panel is secured with only a flimsy plastic tab-and-slot style latch. For security, I would have preferred a front panel that locks to physically secure the drives, or at least a latch that will withstand more wear and tear.
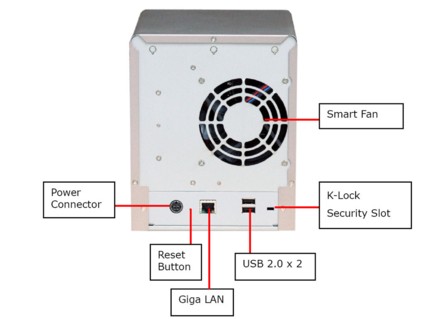
Figure 2: TS-409 Rear Panel
Product Tour – more
The rear panel of the TS-409 is quite simple. There’s a gigabit Ethernet port, security slot, power connector that connects to the 12VDC 8 Amp “brick” and the remaining 2 USB 2.0 ports. The USB ports can be used for external storage, for print servers or for connection to a compatible UPS. The TS-409 supports up to three printers.
UPS support includes APC USB auto detect, APC with SMNP management, or MGE Ellipse premium UPS support. The Smart Fan is temperature controlled and runs at low speed below 40C and at high speed above 48C. You can also manually configure the low and high-speed temperatures in either Celsius or Fahrenheit.
On The Inside
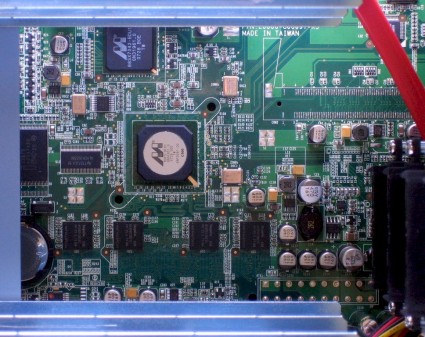
The TS-409 is powered by a 500 MHz Marvell 5281 processor and has 256 MB of DDR2 RAM and 8 MB of Flash. This is the same processor used in the Synology CS407, but the QNAP has double the memory and double the flash of the Synology device. The TS-409 also has a Marvell 88e1118 Gigabit Ethernet controller, a Marvell 88SX7042 PCIe to Serial ATA Controller, and a Genesys Logic GL852 USB2.0 Hub controller.
Figure 3: TS-409 Pro board
The TS-409 runs a Linux 2.6.21 kernel with a bash 3.2.0 shell.
![]() See the slideshow for more inside details
See the slideshow for more inside details
Setup
Setting up the TS-409 is quite simple. After securing the drives to the drive tray and inserting them into the drive bay, all you have to do is plug in the Ethernet and power cables and turn it on. After about a minute and 45 seconds, I heard a beep, and the LED status indicator showed that the unit was up.
The CD contains a detailed 196-page user manual and several applications. The (Windows-based) QNAP find program identifies the TS-409 on your network and takes you to the configuration page. By default, the TS-409 operates on port 8080. A simple 5-step wizard guides you through basic network settings, naming the NAS, changing the default administrator’s password, and setting time zone/NTP server settings.
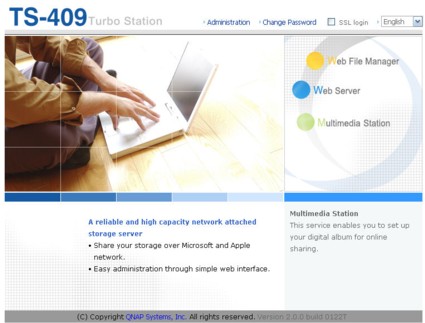
Figure 4: Home page of the TS-409
The home page of the TS-409 provides access to the administration home page for the server and access to the Multimedia Station, the Web Server, and the Web File manager. I’ll comment briefly on each one:
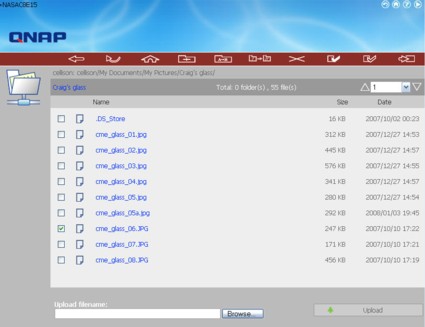
Web File Manager—this provides you with access to all of the files that your login credentials would normally provide, but using this interface, you can access them through a web browser.
Figure 5: Web File Manager Interface
As you hover above each of the icons at the top of the screen, the corresponding functions pop up. You can navigate through directories, copy, move, delete, and create folders. If you click on a file, say, one of the.jpgs as shown above, the picture will open in your browser. You can upload files to the server using the browse/upload feature, but to download, you need to right-click on a file and “save as.”
Setup – more
Web Server—The QNAP TS-409 has a built-in web server with MySQL and PHP support. By default, the server runs on the standard default port 80, but you can change the port. Web server files are stored in a share named \qweb, and only the administrator has rights to the server. The default page shows you how to upload your own pages to the TS-409.
MultiMedia Station—The TS-409 also lets you browse your multimedia content from the web. To test this feature, I created both a \music directory and a \photos directory in the default multimedia share named \qmultimedia. I copied my entire music library, some 23.9 GB consisting of 7315 files and 1447 directories. The photo directory consisted of three directories, 148 files, and 157MB of photos.
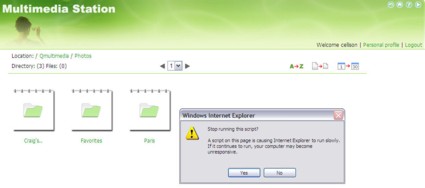
When I clicked on the Multimedia Station icon and logged in with my user name/password both IE6 and IE7 reported that a script on the page was causing it to run slowly.
Figure 6: Internet Explorer Script Error
I clicked “Yes” to stop the script running. I then clicked on one of the photo directories above, and the server responded with “Thumbnails generating – Remained [sic] photos in this page 18”. However, the number never decremented and I was not able to browse my photos. If, however, I let the script run, thumbnails were eventually created for the current directory photos.
Thumbnails are supposed to be automatically created at midnight each day, but apparently that feature isn’t working. QNAP is looking into this issue, but as of this writing, it remains unresolved. QNAP did say that they are planning on updating the Multimedia component of the product in a future firmware release.
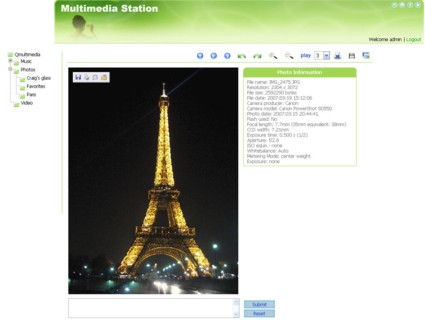
With the script stopped, I could browse my music directories and click on files to play them. Once the thumbnails were generated, I could also browse the photos, see large versions along with EXIF file information, or run a slide show.
Figure 7: Enlarged photo from the Multimedia Station showing EXIF information
In addition to the web-based applications, the TS-409 has a built-in DLNA compatible UPnP AV server and an iTunes server. I tested the iTunes server on both the Mac and PC platforms; the server appeared as a shared resource on both, and I was able to play music from the TS-409.
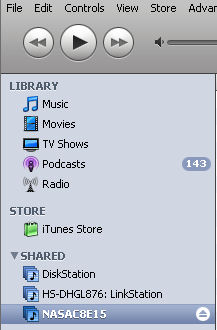
Figure 8: TS-409 iTunes Server
FTP and Logs
The TS-409 also has a built-in FTP server. You can optionally enable/disable anonymous access and secure FTP. You can also change the default FTP port from the default port 21. For remote access, you have your choice of both Telnet and SSH. QNAP allows root level access with the admin user name/password.
As with FTP, you can also change the default ports for both services. Other network services include support for NFS, and AFP for legacy Macs. It includes a basic (no reservation table) DHCP server and support for five DDNS service providers. The TCP/IP configuration page is also where you can configure jumbo frames with a maximum MTU of 9000 Bytes.
The TS-409 supports email notification for either critical errors or critical errors and warnings. Email can be sent to two different addresses, and the server supports authenticated SMTP—a shortcoming found in some other NAS devices.
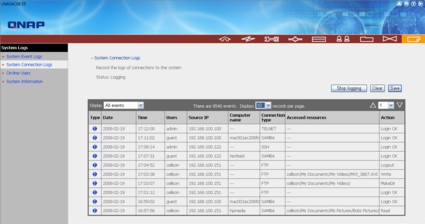
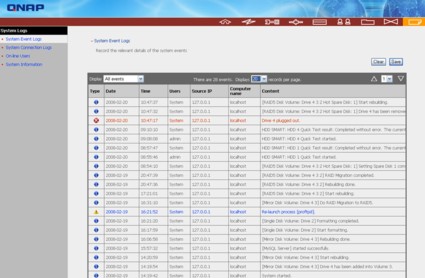
In addition, the TS-409 has very good logging capabilities. There are both a System Event log that keeps track of events such as service startup and shutdown or changes in RAID structures, and a System Connection Log.
The System Connection log keeps track of all logins for all services (telnet, SSH, Samba, HTTP, FTP, etc.) and activities including reading/writing files, making directories, etc. Though the QNAP server doesn’t support syslog, the logging is some of the best I’ve seen on NAS products.
Figure 9: TS-409 Connection log showing Telnet, SSH, SAMBA and FTP connections
RAID
The real reason you buy a four-drive NAS is for not only the additional capacity, but for the fault tolerance you gain through RAID. The TS-409 supports RAID 0, 1, 5, 5+spare, and 6. One of the unique features of this device is support for RAID expansion without taking the NAS offline. In addition, the TS-409 lets you also change RAID levels online.
When I started testing the device, each drive was mounted, but a volume hadn’t yet been created. I decided to first create a Single Disk Volume, i.e. each of the four disks separate and running without fault tolerance. When creating shares, I had to decide which drive to assign for each share. It’s interesting to note that all of the system default shares were placed on drive 4.
I proceeded to load my photos and music files onto the multimedia share. I also placed users’ private directories, a feature supported by the TS-409 when creating users, on drive 1. This left drives 2 and 3 without data.
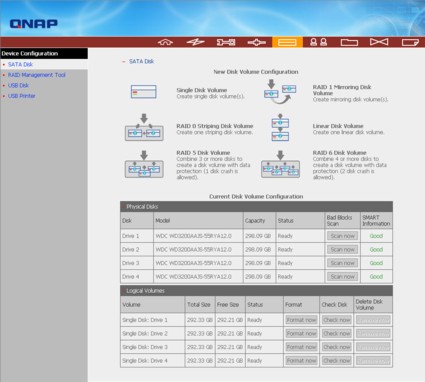
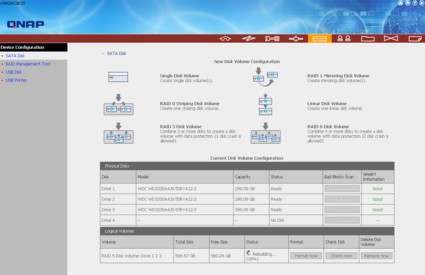
Here’s what the drive page looked like after this initial configuration.
Figure 10: New Disk Volume Configuration Page
Next, I decided to create a RAID 1 volume with drive 4 mirrored to drive 3. Using the Migrate option, I selected drive 4 and then chose drive 3 as the target. Of course, all data on drive 3 would be wiped during this process. The migration and RAID rebuild for a drive with about 30GB of data took almost exactly 2 hours. No data was lost during this process.
For my next test, I decided to migrate the RAID 1 configuration to a three-drive RAID 5 by adding drive 2. I started the process, but for some unexplained reason, the process stopped part way through and the RAID management tool indicated that drive 4 had failed. At this point, the device was in “safe” mode. None of the shares was available on the network.
I restarted the TS-409 through the management interface and upon rebooting, drive 3 and drive 4 re-mirrored without losing any data. Drive 2 was un-mounted, so I re-formatted that drive. After the re-mirroring completed, I was able to successfully create the RAID 5 configuration without incident.
With 30GB of data, this process took about 4 hours and 16 minutes and for the first 50 minutes of the migration, the shares on the RAID were read only. Thereafter, as the RAID was being rebuilt, at 50% completion, the TS-409 beeped and the RAID was returned to read/write status. Throughout this process, no data was lost.
RAID – more
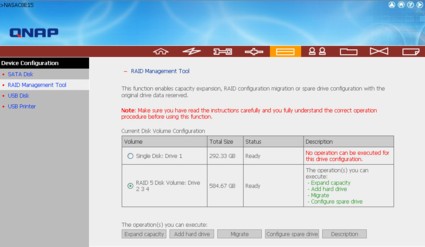
For the next test, I decided to add the remaining drive (drive 1) as a hot spare. From the RAID management page, I selected the RAID 5. Once selected, you can see in the box at the right and the icons across the bottom, that I had a number of options. I chose Configure Spare Drive.
Figure 11: RAID Management Tool showing three-drive RAID 5 and a single drive.
I had previously created several shares on drive 1. Through the Share Management utility, I could change the path for those shares to the RAID 5 volume, but in doing so, the data was not migrated. You have to do that manually. A nice feature would be to give the user the option of migrating the data when changing the location of the share. Once I selected Drive 1 as the spare and clicked on Configure spare drive, Drive 1 was added as a hot spare almost instantly.
Drive Fail Tests
You can probably see where this testing is headed. Now with the TS-409 configured for RAID 5 with a hot spare, I decided to “fail” one of the drives. I opened the front panel and removed drive 4. After about 15 seconds, the TS-409 beeped four times.
Checking both the System Event Log and the RAID Management Tool, I could see that drive 4 had been removed, and that the RAID 5 was being rebuilt using the hot spare (drive 1). I also received an email to both configured addresses indicating that drive 4 had been removed. On the front panel, the LED for drive 4 went out, and the status LED blinked red, indicating RAID rebuild.
During the rebuilding process, the shares were still available for read/write. This process took 3 hours and 30 minutes and completed successfully without data loss. When this process completed, I plugged in drive 4, and the system automatically designated it as the hot spare.
Figure 12: System Event Log showing re-mirroring, migrating to RAID 5, setting a hot spare and failing one of the drives in the RAID.
Figure 13: RAID 5 rebuilding onto drive 1, which was the hot spare before drive 4 was removed.
Since I know you’ll ask, I also tested to see whether a RAID 6 configuration could really withstand two drive failures. You’ll be happy to know that it can, although the process was not completely uneventful. I first reformatted and reinitialized the device for RAID6. Initialization didn’t take too long, but a complete resync took a little over 9 hours. During that time, I was also copying 25GB of data to the device.
When the resync and copying was done, I pulled drives 2 and 3 out in rapid sequence. I received email notification only of the removal of drive 2, perhaps because I didn’t wait for the device to beep between drive removals. Still, the management utility showed both drives 2 and 3 removed and that the device was operating in a degraded mode. However, even with two drives removed, I still had access to the shares.
Next, I re-inserted drive 2 and 3, again one right after the other. The log showed only drive 2 being plugged in, but the drive management utility again showed both drive 2 and drive 3. Drive 3, however, showed 0 MB available.
The RAID array first successfully added drive 2 (the first on reinserted) back into the array (including another 9 hour resync). But drive 3, the second drive inserted, continued to show 0 MB available and a “scan drive” on that drive failed. It wasn’t until I rebooted, that drive 3 was recognized, and added back into the RAID 6 array (including yet another 9 hour resync).
Performance
Our NAS Performance Charts let you compare the performance and features of any of the products tested and reviewed. Filters let you home in on exactly what’s most important to you. Since you can do your own in-depth comparisons, I’ll only comment briefly on top-level performance.
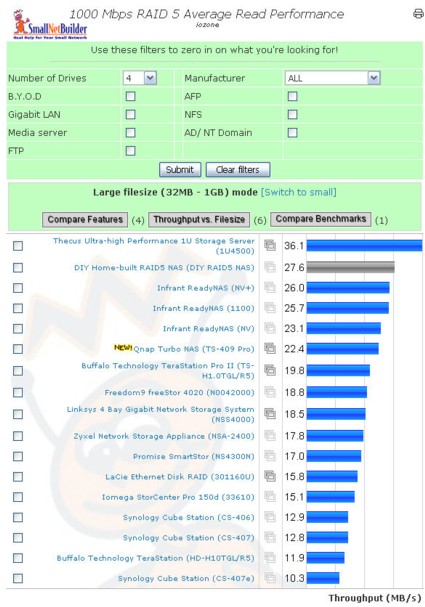
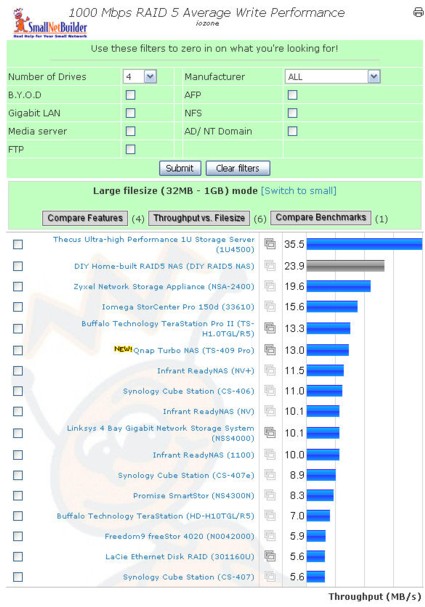
For the charts below, I filtered based on devices with four drives and looked only at gigabit Ethernet performance. Since many people purchase four-drive units for RAID 5 capabilities, I looked at those tests.
Figure 14: 1000 Mbps RAID 5 Average Read Performance
For RAID 5 read performance, the TS-409 placed 6th out of 17 products, edging out the Buffalo TeraStation Pro II. However, if you compare performance at various file sizes, Buffalo edges out the QNAP at file sizes of 32MB and 64MB, but drops below the QNAP for larger file sizes.
Figure 15: 1000 Mbps RAID 5 Average Write Performance
Here, for RAID 5 write performance, the Buffalo TeraStation Pro II just barely edges out the QNAP for 6th place. The detail charts show, however, that the QNAP has a slight performance edge for 64, 128, and 256MB file sizes. Though not the fastest NAS, the TS-409 certainly falls in the top 40% in these tests.
Final Thoughts
The TS-409 Pro is a feature-rich NAS that includes a number of features not found in many competing products. Most importantly, the TS-409 supports both online expansion—so that you can increase the capacity of your NAS without taking it offline—and online RAID migration.
Though I did have one issue related to what might have been a hardware failure—in migrating from single drive to RAID 1, and from RAID 1 to RAID 5—I didn’t lose any data. Likewise, the RAID automatically rebuilt itself to the hot spare after I failed a drive—without intervention—with no loss of data or data availability.
Though reconfiguring RAID or migrating to a new RAID level isn’t one of the errors reported in email, the removal of the drive and the addition of the drive was reported. It was also in the System Event log, and the LEDs on the front panel let you know that the drive was operating in a degraded condition. Both the SATA Disk page and the RAID Management tool showed the status of the rebuild, but I think that a notice on the home page indicating that the NAS was rebuilding or operating in a degraded mode would have been useful.
I also liked that the SATA drives are hot-swappable. If you’re interested in continuous data availability, you want a device with both hot-swappable drives and one that will automatically rebuild to a hot spare. Both of these features were missing in the Buffalo TeraStation Pro II. The TS-409 is also fairly unique in that it supports RAID 6. With RAID 6, the array will continue to function if any two of the four drives fail.
Both versions of the TS-409 are loaded with all of the networking options you need, including Telnet, SSH, FTP, and support for AFP and the Pro version also includes support for Active Directory and NFS. For those Linux mavens who like to hack their systems, the QNAP device is not locked down. You merely telnet or SSH to the device (if you enabled those services) and log in with the admin user name/password. The QNAP also has excellent logging facilities for both system events and system connections. It also supports authenticated SMTP email notification. Both of these features have been missing in other NAS products I’ve reviewed.
My main disappointment was in the Multimedia Center capabilities. Thumbnail generation should be automatic and IE should not return a script error—even with a fairly large music library. I hope that QNAP will address those problems with their next version of the multimedia center. When I reviewed the Synology CS407, its photo station had no problems with the images I loaded. However, like the Buffalo TeraStation Pro II, it, too, lacked hot-swappable drives.
My main concern about QNAP relates to customer support. The instruction manual lists only email, web, and Skype support. In contrast, Synology has a US-based (Washington) phone number and a number in Taiwan for European/Asian support. Similarly, Buffalo also has US-based phone support (Texas). Therefore, if you expect to be able to pick up the phone when you have a problem, you won’t be happy with QNAP.
Support concerns aside, the TS-409 offers a unique set of high-end features—including online RAID migration and expansion and hot swappable drives—that make it one of the best four-drive NASes I’ve seen.

