Introduction
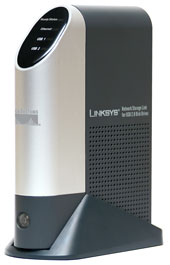
Figure 1: The Linksys NSLU2
When I first read the review of the new Linksys Network Storage Unit device (NSLU2) I was definitely interested. It looked to be small, silent, inexpensive and flexible enough to provide backup and file storage to my network.
My only concerns were reports that it would only work with Microsoft Windows and that it formatted its disks with a proprietary filesystem. But throwing caution to the wind, I found a deal on the web, ordered it and a couple of days later, it arrived in the mail.
After I hooked up an external drive, connected to it with my web browser and configured it using the web interface, the NSLU2 was serving files on my home network in no time. Despite Linksys’ documentation to the contrary, using it with MacOS X and Linux was no problem, since both operating systems support the Microsoft SMB file server protocol used by the box. Installation complete, right? Wrong. I was just getting started.
As nice as this tiny silent unit was, I couldn’t leave well-enough alone. I knew it had more potential since internally the little box ran Linux. With dual USB 2.0 ports and a 10/100 Ethernet connection, this little box has many possibilities. How about NFS along with SMB ? Or maybe a print server to go with the file storage?
Using a USB/Serial converter I could use my X10 interface unit to do some simple home automation. A USB/Ethernet converter could turn the unit into a little router, or a USB/802.11bg converter could create a wireless access point. Full control of the USB ports would really open up new possibilities, but how to get into it?
|
Finding a back door
A quick port-scan looking for open ports showed nothing of interest. Searching through all of the standard menus was fruitless as well. It was time to get creative.
A standard technique for accessing the internals of device such as these is to look for back doors. Developers of these devices need easy visibility into the running system and often leave a way to get in or to run tests. Sometimes this requires special development hardware, but it is also common for developers to get into the device through the a network connection.
The obvious place to start looking was in the web interface. I had noticed that all of the Administration menus were in a web subdirectory named Management. Since I knew that webservers can provide a listing of the contents of a directory depending on the webserver configuration, I decided to try this simple exploit by typing http://192.168.3.77/Management/ into my web browser. Bingo! I was rewarded with a complete listing of all of the files in the directory.
Ed. Note: This directory listing ability has been removed as of the V2.3R25 NSLU2 firmware
Included in the list of jpg and html files was a little gem called telnet.cgi. Step one complete. A potential back door discovered. Execution of the script showed the following screen:

Figure 2: Telnet enable screen
Disregarding the warning, I pushed the “Enable Telnet” button. The web page refreshed and I was greeted with the same screen except the message indicated that Telnet was now enabled! One step closer…
A dead end and a way around
From a terminal window, I tried it out using an account I had set up during the device initialization:
# telnet 192.168.1.70
Trying 192.168.1.70...
Connected to 192.168.1.70.
Escape character is '^]'.
NSLU2 login: tom
Password: No directory, logging in with HOME=/
Cannot execute /dev/null: Permission denied
Connection closed by foreign host.
Close but no cigar. A telnet server was running and my username and password were accepted, but the account had the shell set to /dev/null. This told me that users set up with the web interface were valid Linux accounts, but only second-class citizens as far as access. This is a common practice for users who can use some services, but are not allowed to have an interactive login.
Attempting to login as root – a standard Linux account – failed because I didn’t know the password and the obvious ones (admin, root, etc.) didn’t work. It was time to come at the problem from a different angle.
Linksys documentation claimed that a disk initialized by the NSLU2 can only be used with the NSLU2, but I didn’t believe it. A file system is a complicated piece of software and it wasn’t likely that Linksys wrote a new one for this little box. Some write-ups indicated (and a Linksys spokesperson confirmed) that the filesystem was a Linux ext3 filesystem because of the partition type, but as far as I could tell, no one had tried mounting it.
Being too lazy to take my NSLU2 initialized disk downstairs to my Mandrake Linux system, I downloaded ext2 (a subset of ext3) drivers for my MacOs X iBook and plugged the disk into its USB port.
Tip: The Mac OS X ext2 drivers I used can be downloaded from the ext2 for Mac OS X SourceForge project. There is also a read-only ext2 driver for Windows NT/2000/XP that you can try here. It was used to create the screenshot shown in Figure 3.
Up popped two mounted filesystems: a large filesystem with all of my data files on it, and a small filesystem with several configuration files including my favorite, passwd.
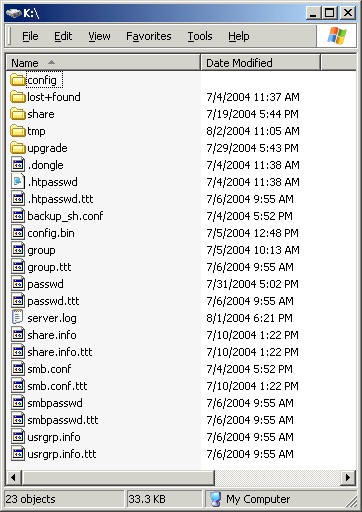
Figure 3: The filesystem containing configuration files
As expected, the passwd file showed the user accounts I had created with a /dev/null for the shell. But there were two accounts that had a real shell: root and an interestingly named account – ourtelnetrescueuser, that looked like a back door account used for debugging or recovery purposes.
root:WeeOvKUvbQ6nI:0:0:root:/root:/bin/sh
bin:x:1:1:bin:/bin:
lp:x:4:7:lp:/share/spool:
mail:x:8:12:mail:/var/spool/mail:
ftp:x:14:50:FTP User:/:
nobody:x:99:99:Nobody:/:
ourtelnetrescueuser:scFf7ZMXBMl4I:100:100::/home/user:/bin/sh
guest:scEPG0VnVyqmE:501:501:::/dev/null
admin:sclzZZfodiRXY:502:501::/home/user/admin:/dev/null
test_user:scEPG0VnVyqmE:2000:501:::/dev/null
test2:scEPG0VnVyqmE:2001:501:::/dev/null
test3:sc50wKPq.zChw:2002:501:::/dev/null
But in order to use these accounts, I would need to have their passwords. I started down the path of cracking the passwords before I came out of my stupor and realized all I had to do was edit the passwd file and replace the encrypted password with a known encrypted password from one of my other accounts! I could also just add a valid shell to one of my accounts, but for starters, decided to just put a new password in for root and leave the rest of the accounts alone.
Are we in yet?
As I rebooted the device, I feared my changes would be overwritten or that the modified password file would be detected by a checksum comparison. If this occured, the NSLU2 could to refuse to mount the drive or insist on re-initializing it.
But as I waited, I heard the familiar beeps from the NSLU2 indicating everything was normal. After re-enabling Telnet, I tried it out:
# telnet 192.168.1.70
Trying 192.168.1.70...
Connected to 192.168.1.70.
Escape character is '^]'.
NSLU2 login: root
Password: No directory, logging in with HOME=/
BusyBox v0.60.4 (2004.07.01-03:05+0000) Built-in shell (ash)
Enter 'help' for a list of built-in commands.
#
Success! I had a command prompt. The ability to get a shell completely opened up the device. I could now review the software and hardware architecture of the box, looking for ways to extend it. Since this device naturally manages a hard drive, it should be possible to place new scripts, executables, and drivers on the box. Time now for the hard work to begin.
In Part 2, I’ll go into detail on how to add features to this interesting little box. In the meantime, you can keep up with my adventures on my Linux on the NSLU2 page.