Introduction
| BuffaloTech Fully Customizable NAS shell | |
|---|---|
| Summary | Fully customizable Linux/PPC server. You supply the IDE hard drive – HG model also available with upgraded processor, memory and gigabit Ethernet |
| Update | 28 Oct 2004 – Corrected “kuro” translation |
| Pros | • Open source development platform with real manufacturer support • Can use existing Linux / PowerPC development projects • Uses internal 3.5 IDE drive |
| Cons | • Development tools are pretty rough • Small (but growing) developer community • Supports only 1 internal drive |
If you’re interested in embedded Linux, there are a lot of little devices to experiment with these days. Everything from routers to access points to network storage appliances are available at your local electronics store. I’ve been spending a lot of time lately making Linksys’ consumer Network Storage Device, the NSLU2 [reviewed here], do tricks it was never intended to do. [Ed. note: Read Jim’s Hacking the Linksys NSLU2 series starting here.] This time, however, I’m going to look at a similar Linux-based device that the manufacturer built to be hacked.

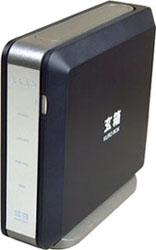
Figure 1: The Kuro Box helps with breakfast
The Kuro Box (KB) from Buffalo Technology (actually a new division called Revolution by Buffalo) is being marketed as a 100% open source based Network Storage Appliance that can be easily extended. The Kuro Box (“Kuro” is Japanese for “expert” or “specialist”) is the the first in a line of products aimed at VARs, resellers and just plain folks who like to customize their own computer gear. First, let’s do a little comparison between the NSLU2 and the Kuro Box.
Unlike the NSLU2 that uses external USB disk drives, the Kuro Box is designed to hold its 3.5 inch drive internally. Since the box contains the drive, it’s bigger than the NSLU2, taking up about as much space as a typical toaster (Figure 1). So while the NSLU2 may be smaller, using an internal drive has its advantages.
First, transfer performance can be better with an internal drive compared to an external drive because we don’t have to send data through the USB 2.0 subsystem. Second, for many users, using an internal drive also addresses a common complaint that NSLU2 users have – hard drive power control. While the NSLU2’s external drive never spins down, Linux’s hdparm command can easily set the spin-down time for an internal IDE drive.
In terms of cost, the NSLU2 is about half the cost of the Kuro Box, but the NSLU2’s price does not include the cost of an external drive enclosure. This forces users to either buy an enclosure themselves for an existing spare IDE drive they’d like to use, or purchase a USB external drive product, either of which is more expensive than just a raw drive. But with USB 2.0 drive enclosures going for as low as $35, the NSLU2 can still beat the $160 Kuro Box on price. So BuffaloTech may have some work to do in this area to beat back the Linksys pricing juggernaut.
Buffalo and Linksys have also taken different paths with support of developers. Linksys has taken the approach of minimal involvement, while Buffalo has taken an approach of embracing and supporting open source developers and marketing a product made to be hacked. Buffalo’s developer community support includes a web site with developers forums, contests, tools and source code, and the forums are frequented by Buffalo Tech employees.
But that’s enough comparison, let’s look at the Kuro Box itself.
Features and Setup
The KB is essentially a developer’s version of Buffalo’s consumer NAS product, the Linkstation. The main hardware difference between the Linkstation and the Kuro Box is that the Kuro Box comes without a hard drive. So KB purchasers will first need to install an IDE hard drive of their choice.
Internally, the Kuro Box has a 200 Mhz PowerPC processor with 64 MB of RAM and 4 MB of flash running a Linux 2.4.17 kernel, and sports a single USB 2.0 port and one 10/100 Ethernet port. Kernel developers will be happy to learn that there’s an internal connector for a serial port that will be handy for debug and watching the boot-time messages. A small fan is used to keep the box cool.
Setup of the box is a bit different than a product one would pluck off the shelf at the local discounter. Following the PDF instructions downloaded from the Kuro Box web site, the box has to be almost totally disassembled in order to install the hard drive. Also note that in order to keep the device as small as possible, the disk is a tight fit in the box.

Figure 2: Kuro Box exposed!
(click on the image for a larger view)
To show you what I mean, Figure 2 shows the KB with one of its covers removed. In order to reach the hard drive, you need to flip up the circuit board and remove the metal bracket clearly shown in Figure 3. The hard drive (which is unfortunately black so doesn’t show well) is nestled under the bracket.

Figure 3: The unfolded view
(click on the image for a larger view)
The result is that it takes a little bit of effort to get everything in the right place, but this shouldn’t be a problem for anyone attracted to a do-it-yourself box like this one. Once the drive is installed, the box can be plugged into your local network and is ready for initialization.
More Setup
Unlike many devices that provide a web interface for initial setup, the Kuro Box takes a bit of a different approach. Curiously, the initial setup for the box is accomplished via a Windows executable that appears to run best in Windows 98 and below! Fortunately, I had an old Windows box on my network that I could use, but other users in the Kuro Box forums have had mixed experiences running the installation program.
However, one developer documented a way to do the entire installation by telneting into the box and performing the setup from the command prompt. So if you want, or need, to take this approach, the installation is documented here in the Kuro Box forums on their web site. Once the device is initialized, it boots into its default software configuration, running a Samba-based Windows file server, AppleTalk file server, telnet server, ftp server, and more!
Tip: Another approach is to use run the Windows KuroBoxSetup.exe program in Wine on Linux as described here.
The Kuro Box was initially released in Japan, and it’s just getting started in the US, so in some places the heritage and relative immaturity of the box show. Detailed documentation is sparse, and by default, the web configuration user interface is in Japanese. Fortunately, if you’re not fluent in Japanese, there’s a separate download from the Kuro Box web site Downloads page to overlay the web directory with English language files.
Unfortunately, the download does not install cleanly. Each file in the cgi-bin directory has a MSDOS style line ending that causes execution to fail. So before the scripts can be executed, the line-endings have to be changed. A couple of developers on the forums have posted small scripts to automate the change, but as of this writing, the bad overlay is still in place.
In addition to the cgi-bin issue, the user interface shows other problems such as mislabeled buttons, a reference to setting up a Network Time Protocol client, but nowhere to set the server, nowhere to manually select a DNS server etc. In defense of the state of the web interface, this box is marketed toward custom developers who will be rewriting or removing the interface anyway. The delivered interface should just be considered an example or base to work against.

Figure 4: KB configuration web User Interface
Making it your Own
For the purposes of this review, I pretty much ignored the web interface and proceeded to configure the box manually. It turns out this was fairly simple because unlike the off-the-self NSLU2, the hard drive contains all of the boot-time configuration files and a telnet server is running by default. For example, setting up the box for my Domain Name Server was as easy as adding an entry to the /etc/resolv.conf file. If you’re familiar with Linux, configuring this box is little different than what you’d do on your desktop system, but familiar enough that you should have no problem after you get the lay of the land.
To assist developers in the process of modifying the box, Buffalo provides a zip file on their web site containing pre-built packages such as perl, python, ssh, nfs, etc. These tools make the job of add adding new functionality easy. The complete native compilation tool-chain that Buffalo provides in particular eases installation of new functionality. This means that many open-source packages build locally with no modifications! For example, I was able to build and install an Apache web server with three steps:
./configure
make
make install
If you’re not inclined to build your own software, there are a few sources (besides Buffalo) of pre-built programs for this box. The Linux/PPC architecture is fairly well supported in the Linux community at large, so often times binaries built for other systems will run on the KB. For example, I downloaded a pre-built MySQL installation from mysql.com and it ran without problem. Some developers have reported using binaries built for Yellow Dog Linux and others are using binaries for a PPC version of Debian Linux. Some developers have gone as far as replacing the entire Buffalo installation with a PPC version of Debian Linux!
Kernel modifications are a bit more difficult than just adding applications. The kernel on this box is stored in flash, so creating a new kernel image requires burning flash. A procedure for replacing the kernel has been posted on the developers forums, but I’ve not yet tried it out.
Fortunately, adding drivers for new devices is a bit easier than replacing the entire kernel. Since the box was previously released in Japan, there are also a number of Japanese web sites devoted to Kuro Box development. A little digging found a site with additional pre-built device drivers for the kernel used in the box. By adding these drivers to my system, I was able to use a number of USB devices on the Kuro Box including a Web Cam, a USB to Ethernet adapter and a USB to Serial adapter. The single USB port could be an issue with some users, but I just plugged my devices into a USB hub and had all running simultaneously.
Summary and Conclusions
The Kuro Box is a powerful little home server, easy to develop for, and powerful enough to handle the needs of a home network. After a few days of casual experimenting, I was able to configure it with Apache, MySQL, an X10 home-automation program, a Web Camera, an iTunes server and more.
Compare this to the months it has taken me (and a band of dedicated NSLU2 hackers) to get close to that point with the NSLU2, and it’s obvious that Buffalo has delivered an open source developer-friendly product. And while the lack of documentation and the faulty web interface are annoying, they’re no show-stopper for the targeted audience.
As far as a comparison to the NSLU2, I’m happy to have both on my home network, as they fill different needs. The NSLU2 has a much more active developer community and for many uses, its lower-cost and smaller footprint is the deciding factor. In other cases, the more powerful (and expensive) Kuro Box with its easy-to-develop-for software baseline will be a better fit. It’s great to have choices!