Introduction
| At a Glance | |
|---|---|
| Summary | An improvement over HomePlug 1.0, but buyers could feel duped due to unusually large difference between the advertisted “85Mbps” and real performance. |
| Pros | • 4X maximum real throughput of HomePlug 1.0 products • Variety of form factors available |
| Cons | • 10Mbps is what you’re most likely to get • Need Windows machine to set security code and access diagnostics • 2X price premium vs. HomePlug 1.0 |

HomePlug technology never quite made it as a mainstream networking technology in the U.S., mainly because it was pushed to the back of the “alternative” (to Ethernet) networking technology pack by cheaper and faster wireless LAN products. Instead, it found an more appreciative audience in Europe and with companies like Corinex that have used it to wire hotels, apartment buildings and other multi-dwelling units (MDUs) for Internet access.
One of the key things holding HomePlug 1.0 (the current version) back has been its best-case 5 Mbps application-level throughput. Although this speed is just fine for networking broadband Internet connections around a home for web browsing and email, it’s way too slow for handling heavy local activity such as large file transfers, and barely adequate for video streaming.
Since the high speed version – HomePlug AV – has been just around the corner for about three years now, the big dog of HomePlug chipmakers – Intellon – needed something to respond to the IPTV service providers hammering on them for a solution that could reliably supply the 5 Mbps or so needed to support one of their video streams. What they came up with is HomePlug “Turbo” (officially dubbed HomePlug 1.0 with Turbo) technology, which was introduced at last year’s CES 2005, with retail devices finally starting shipments around the end of last year.
Intellon specs HomePlug Turbo’s maximum raw data rate at 85Mbps vs. plain ol’ HomePlug 1.0’s 14Mbps. This potential 6X throughput improvement could expand HomePlug’s usefulness beyond networking basic Internet connectivity, and support Intellon’s goal of handling IPTV streams. So I sent out a call for HomePlug Turbo adapters and ended up with products from Actiontec, NETGEAR and SMC to put to the test.
The Products
Actiontec‘s “MegaPlug” line actually comes in three flavors: single Ethernet, four port “hub” (actually a switch) and a 802.11b/g wireless extender. I opted to test only the two wired models, since the wireless wasn’t available at the time of review.
The HPE100T Ethernet adapter is about the size of two stacked decks of playing cards and plugs directly into a wall outlet. The plug blades are not polarized, so you can orient the adapter as your needs dictate. The single 10/100 Ethernet jack is on the bottom of the adapter and Power and Ethernet Link lights adorn the front panel.
|
Actiontec
|
HPE100T MegaPlug 85Mbps Ethernet Adapter |
$60
|
|
HPE400T MegaPlug 85Mbps 4-Port Hub |
$90
|


The 4-Port “hub” version is about the size of a slim paperback novel with very tiny lights on the front panel for Power, HP (HomePlug connectivity), and Link/Activity lights for the four 10/100 switched Ethernet ports on the back. It connects to the wall with a supplied line cord.
The NETGEAR XE104 has the best design of the bunch, providing both a wall-wart form factor and four port 10/100 switch in a compact, cleanly-designed case. Front panel indicators include Power and separate Link/Activity lights for HomePlug and Ethernet. Like the Actiontec HPE100T, the XE104’s power plug blades are not polarized.
|
NETGEAR
|
XE104 85 Mbps Wall-Plugged Ethernet Switch |
$75
Check latest price |

For the SMCHT-ETH, just visualize a version of the Actiontec “hub”, but with a single 10/100 Ethernet port and a different indicator light arrangement on the front panel that has only one Ethernet Link/Activity indicator.

Note that all of these devices are designed as bridges. So regardless of the number of Ethernet ports they have, they’ll support connection of up to 253 clients. All Ethernet ports also have auto MDI / MDI-X capability built in, so you can connect any Ethernet device you like without having to find a crossover cable.
Inside Details
Since Intellon came up with the HomePlug 1.0 plus Turbo technology, it’s no surprise that the three products tested use the same Intellon INT5500 chipset. Figure 1 shows the Actiontec Ethernet adapter internals, where you can see the Intellon chipset, Realtek RTL8201CP Single-Port 10/100M Fast Ethernet PHYceiver and other components that complete the powerline interface and form the DC power supply to power the adapter.

Figure 1: Actiontec HPT100 internal view
(click image to enlarge)
Figure 2 confirms that the 4-port “hub” Actiontec offering actually features a 10/100 switch, courtesy of the Marvell 88E6060 6-Port Fast Ethernet Switch that is a member of Marvell’s Link Street switch chip line. I’d like to see Actiontec both change the product name, plus add the Ethernet port speed to its product literature, to better inform consumers of what they’re buying.

Figure 2: Actiontec HPT400 internal view
(click image to enlarge)
The NETGEAR XE104 innards pictured in Figures 3 and 4 show essentially the same electrical design (which I’m guessing is a copy of an Intellon reference design), but with a stacked two-board approach. This is necessary to get everything into a nicely-designed wall-wart format.

Figure 3: NETGEAR XE104 internal assembled view
(click image to enlarge)

Figure 4: NETGEAR XE104 internal disassembled
(click image to enlarge)
Finally, at first glance, you might mistake the SMC board shot in Figure 5 for the Actiontec “hub” in Figure 2, which also uses a separated-at-birth plastic enclosure that differs only in its larger size. But a closer look shows a board design that’s essentially the same as the single-port Actiontec with things moved around to accomodate SMC’s choice of desktop box vs. Actiontec’s wall-plugged “wart” form factor.

Figure 5: SMCHT-ETH internal view
(click image to enlarge)
Setup & Administration
HomePlug devices are protected with 56 bit DES encryption incorporating a user-settable 4 to 24 character alphanumeric, case-sensitive key. All the utility applications supplied with the products refer to the key as the “Private Network Name”. In the case of all the tested devices, this name came set to “HomePlug”. The good thing about this is that you can just plug in the devices and (hopefully) be up and running without having to load any software or configure anything.
The bad news is that HomePlug technology is capable of reaching into adjacent apartments, dorm rooms and even your next-door neighbor’s home. So if you don’t change the default Network name and your neighbor also decides to use a HomePlug device, your networks could be accidentally joined and security compromised.
The further bad news is that Intellon has seen fit to create a password change utility only for Windows, leaving Mac OS, Linux and users of any other non-Windows OS with no choice but to run with the default password. In addition, since none of the devices come with a physical reset-to-factory-default switch, those users are also out of luck if they happen to inherit HomePlug devices that have had their default password changed.
If you are running Windows, you might want to load up the utility at some point because it provides some useful performance and troubleshooting data. Figure 6 shows the info displayed by the NETGEAR utility about the other four adapters plugged into various outlets around my home. Of course, the Rate shown is the MAC layer, i.e. raw data, rate and not the application-level, i.e. usable throughput. More on this shortly.

Figure 6: NETGEAR Utility Main screen
Setup & Administration – more
All the utilities are bascially customized versions of the PowerPacket Utility supplied by Intellon and the versions supplied by NETGEAR and SMC are functionally identical (SMC didn’t even bother to change the PowerPacket name or icon). Only Actiontec has chosen to dumb things down by combining the Security and Main tabs, eliminating the Diagnostics tab, and removing the Rate information as shown in Figure 7.

Figure 7: Actiontec’s censored Advanced screen
Speaking of the Diagnostics tab (Figure 8), it contains a bit more info for the curious to glance through. I thought it interesting that the only device that displayed any info in the Diagnostics > Vendor column (you need to scroll to see it) was NETGEAR.

Figure 8: NETGEAR Diagnostics screen
If you do need to change the Private Network Name, you’ll first need to enter the 16 character password printed on each device’s label that you wish to change and then execute the change. Actiontec makes the process easier than SMC and NETGEAR by allowing you to do both the device password entry and execution on one screen instead of clicking between two.

Figure 9: SMC Privacy screen
The password-setting process seems to have been tightened up since the last time I played with HomePlug gear, which is a good thing. It may be a pain to have to enter the 16 character “password” from each device, but this method ensures that your neighbor can’t accidentally (or on purpose) change your HomePlug device security.
Performance
I’ve established five test locations around my home that I use for wireless product peformance testing. Since they represent places where one might want to place networked devices, I figured it would also be reasonable to use them for testing “alternative” networking products, such as HomePlug. Go here if you want the details on the locations and distances.
I used Ixia’s IxChariot and set up two copies of the standard throughput.scr script to run simultaneously, one from the IxChariot console to a remote endpoint (for transmit), and the second with endpoints swapped (for receive). I used TCP/IP, changed the file size to 300,000 Bytes from the 100,000 Byte default, and set the scripts to loop for one minute. Note that I didn’t mix products between manufacturers for the tests.

Figure 10: Throughput results
(click image to enlarge)
Figure 10 summarizes the total average throughput measured for the simultaneous receive and transmit tests in all five locations for the three manufacturers’ products. You can see that best case average throughput of just under 25 Mbps was clocked for the NETGEAR XE104 pair for Location 1, which had both adapters plugged into outlets on the opposite sides of an approximately 13 ft. X 13 ft. room. This throughput is only about 30% of the 85Mbps prominently featured in the products’ literature. Note that the difference between the NETGEAR and Actiontec results is about 5% and probably within the margin of error of my test methodology.
Figure 11 shows an IxChariot plot of the simultaneous receive and transmit runs so that you can see the throughput variation.

Figure 11: Location 1 NETGEAR throughput
(click image to enlarge)
Performance – more
Even more distressing than the large difference between the throughput number on the box and best-case actual performance, is that throughput fell off quickly and was between 7 and 10 Mbps in most other locations. Figure 12 shows the NETGEAR XE104 pair again, but for Location 3.
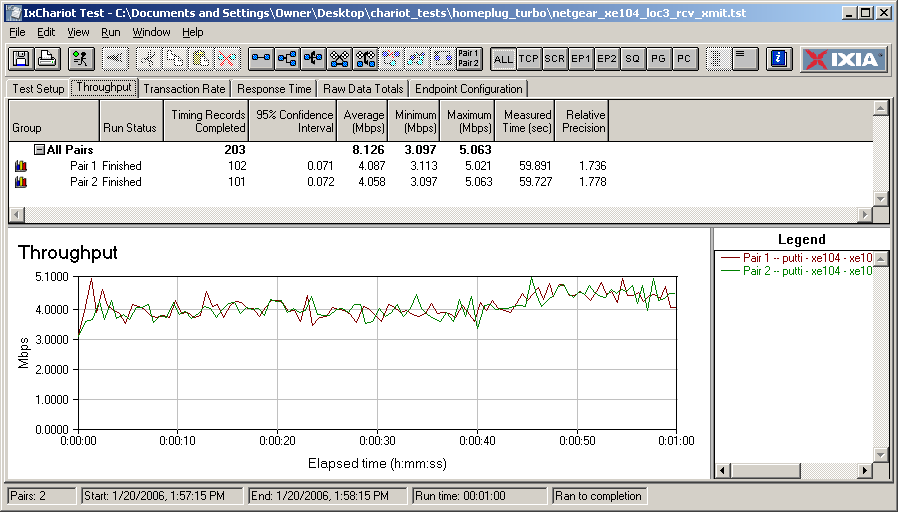
Figure 12: Location 3 NETGEAR throughput
(click image to enlarge)
I don’t know what the deal is with the outlet used in Location 4, since it doesn’t represent the farthest distance and is only about 10 feet away from the farthest Location 5 outlet. But it looks like Location 4 is as deadly for HomePlug networking as it is for wireless, since that’s where most wireless products I test show worst-case performance, too. Figure 13 shows the difficult time that the Actiontec pair of devices had maintaining a connection there.

Figure 13: Actiontec Location 4 throughput
(click image to enlarge)
Since throughput fell off so quickly, I figured that something must be wrong with my test setup or methodology. So after rerunning tests and obtaining similar results, I fired off an email to Intellon for a sanity check of the results. However, Product Manager James Mentz essentially confirmed that my results were within the expected performance for HomePlug Turbo products, saying “If you go around a house and do a random outlet-to-outlet walk you should find that over 90% of the paths get at least 10 Mbps“.
Mentz also provided data from HomePlug 1.0 (non-Turbo) field trials that said that technology can provide 1.5 Mbps of application-level UDP throughput 99% of the time and 4 Mbps of application-level UDP throughput 80% of the time. Note that UDP performance is usually faster than TCP/IP due to UDP lower protocol overhead.
By the way, the lower throughput of the SMC adapters was very repeatable. But when I substituted a NETGEAR XE104 for each adapter (one at a time), throughput jumped up to the range of the Actiontec and NETGEAR pairs. This is certainly curious, especially since the Diagnostic screen of the supplied utilities reported that all adapters were using the same Intellon firmware (version 1.5).
Wrapup
I think the NETGEAR XE104 wins this roundup for its compact design, built-in 10/100 four-port switch and relatively aggressive pricing. You’ll also be more likely to find it discounted given that both Actiontec and SMC focus mainly on sales to resellers and VARs instead of retail.
But shame on Intellon and all these companies for not coming clean about what the Turbo technology really delivers for throughput. Prominently displaying a high throughput number that will never be seen in actual use is not fair to the average consumer, who usually doesn’t read past the front of the product box. And adding “up to” that high number in small print on the back of the box doesn’t cut it either, since they’re just weasel words intended for manufacturers to hide behind instead of providing real information consumers can use to make an informed choice about what they’re buying.
Sure, consumers can return products, but given that virtually all retailers now charge a 15 to 20% restocking fee, it doesn’t seem right that buyers should have to pay to find out how over-optimistically spec’d products really perform, not to mention the wasted time and effort in doing so.
So unless you really need 10 Mbps vs. the 3-5Mbps you’ll get from non-Turbo HomePlug, and are ok with paying twice as much for the privilege, I suggest leaving HomePlug Turbo products on the shelf. You’ll not only save yourself money and disappointment, but maybe also send a message to manufacturers that you’ve had enough of their performance claim games and are not gonna take it any more!