Introduction
| Linksys EtherFast Cable/DSL Firewall Router with 4-Port Switch/VPN Endpoint | |
|---|---|
| Summary | 4 port SPI-based router with two tunnel IPsec VPN endpoint. Has dedicated LAN DMZ port. |
| Update | None |
| Pros | • 2.5Mbps VPN tunnel throughput • Supports NetBIOS broadcast through tunnel • Many logging features |
| Cons | • Schedulable access control applies to all traffic only • UPnP NAT Traversal does not appear to work |
We’ve seen a number of VPN-endpoint routers appear since Linksys launched their BEFVP41 a few months ago. But, unlike the VP41, none have included a hardware co-processor, so they’ve been able to save a few bucks and undercut the VP41’s price.
The new BEFSX41, however, is LInksys’ next move in the VPN endpoint router wars. It’s dropped the IPsec co-processor, which has allowed Linksys to now undercut the other guys in price. But the SX is anything but a me-too product, and had some surprises in store in both the VPN and regular Throughput departments…
The Basics
The SX41 looks pretty much like Linksys’ other 4 port routers. All indicators, including Link/Activity, Full Duplex/Collision, and 100Mbps for each of the four LAN ports are on the front. A closer look at the front panel, however, reveals a few subtle differences. The WAN port gets the same three LEDs as the WAN ports, which means that the WAN port is 10/100Mbps auto-sensing. In addition to the usual Power and Diag lights, there’s also a DMZ light that indicates when you enable this feature (more later).
All four switched 10/100 LAN ports are on the rear panel, along with the 10/100 WAN port, power socket, and Reset / Reset-to-Factory button. You won’t find a Normal/Uplink switch or shared Uplink port because all the SX’s ports are auto MDI / MDI-X. This means they’ll figure out how to connect to whatever you plug in, and whether you use a Normal or Crossover cable, too.
You don’t get any cables, but you do get a printed “Fast Start” poster, and CD. The CD has a PDF copy of the User Guide, Router Setup Wizard, and Adobe Acrobat installer. It appears that Linksys has jettisoned the “Tech Helper” application in favor of the Router Setup Wizard (more in the Setup section), and taken a step back by not providing a printed User Guide.
By the way, the SX41 is bucking the trend of many of the latest round of inexpensive routers and using the Conexant CX82100 single-chip ARM940T-based processor, instead of the ADMtek 5106 Home Gateway Controller. We’ll see later on that it looks like Linksys got themselves one hot little CPU!
Setting Up
The admin screens of the SX are very similar to those of the VP41, but with some key differences that I’ll point out as we go along. The Setup Tab, where you’d do most of your WAN configuration is identical (including default address of 192.168.1.1) and has all the same options as the VP41, so I won’t repeat that info here. Instead, I’ll spend some time describing the new Router Setup Wizard.
Seems like everyone has a router setup “wizard” these days, and Linksys is no exception. The Router Setup Wizard for the SX comes on the CD and is Windows-only, which will limit its usefulness to some purchasers. I wasn’t able to find any documentation describing it, nor could I find a reference to using it in either the “Fast Start” poster or User Guide. The CD sleeve that it comes in, however, does have a big red STOP sign and “Run Me First” printed in big, red, letters. The diagram on the back explains that it’s meant to be run before you install the router and while the PC you run it on is connected to your cable modem or DSL connection.
I have neither, but gave it a run to see what it did. Basically, it presents a series of instructions describing how to connect the router, modem, and PC, then asks you to choose a cable modem or DSL connection. It then probes the Internet connection, and reads info from the attached computer. If you choose the DSL option, it asks you to enter your Host (it grabs the Windows Computer name of the attached PC as the default) and Domain names. I was puzzled that it didn’t ask me for PPPoE login info, but that could be because I wasn’t connected to a real DSL connection.
If you choose the Cable Modem option, it takes you through another set of connection instruction screens, probes your PC, then asks you to enter Host and Domain names, and a MAC address. It presents the MAC address of the computer that you’re running the Wizard on as the default, or lets you enter a different MAC address, but doesn’t allow you to leave the factory-default MAC address alone. This probably won’t get you into any trouble, but I’d like that option anyway. After you enter the DSL or Cable Modem data, it programs the router with the info, reboots it, and if you’re successful, takes you to the Linksys website to register.
I guess Linksys had to come up with some sort of Wizard, given their competitors’ moves in this area. But I guess I’ve played with too many of these things to be able to effectively judge how good a job they’ve done in providing something that lowers the likelyhood of their getting a Tech Support call from a first-time router user. You’ll need to decide.
With Wizard, or without, the SX supports pretty much every authentication method you’ll find, including the more obscure SingTel RAS (special for SingTel), PPTP (for some European BSPs), and HBS (HeartBeat Signal – used by some Austrailian BSPs).
Like other current generation routers, the VP41 automatically checks an NTP time server (you can’t select which one, however) for the correct time once it gets connected to the Internet. So all you have to do is select your Time Zone on the Setup screen and all your log entries will be properly date/time stamped.
Let’s move on to the Firewall features.
Firewall, Port Mapping, & Filters
The SX’s firewall has a different interface than that on its predecessors, but more importantly, it looks like Linksys may finally have an SPI implementation that works! There has been an “SPI” button on the Filters page for some time in previous models, but the implementation appears to be buggy and/or misunderstood by many users. The result is that the Linksys “SPI” feature has gotten the reputation for best working when it’s set to OFF.
It looks that this is going to change with the new SX routing engine, whose implementation appears to be quite different. And from my limited testing, it looks like it actually works, too!

Figure 1: Firewall screen
(click on the image for a full-sized view)
Figure 1 shows what you see when you click on the Advanced Firewall Protection Enable radio button. This puts the SPI firewall into effect and,as you can see, gives you some other options that have been offered by competing SPI firewalls. You also get URL keyword blocking for 10 keywords of, if my count is correct, 79 characters each. Keywords can be full or partial URLs, or any text you want. If the text appears in the URL that a user tries to access, they browser will either hang or report that the page isn’t available, since the SX doesn’t put a “Blocked by Linksys” message or anything similar up.
Moving down the page you see a Time Filter setting, but don’t get too excited. Although this feature provides time schedulable control of your LAN users’ Internet access, your choices are limited to Block All Outgoing, Block All Incoming, or Block Both. There’s no ability to limit the blocking to specific services (ports), and the scheduling doesn’t apply to the Blocked URL Contents either. Scheduling flexibility is limited to one time period, which is applied to whatever range of consecutive days you choose. You get a nice little time grid display of the blocked periods, though.
The other firewall features are found on the Filters and Forwarding pages. Figure 2 shows the Filters page (top and bottom cut off), where you set up the port filtering features of the SX.
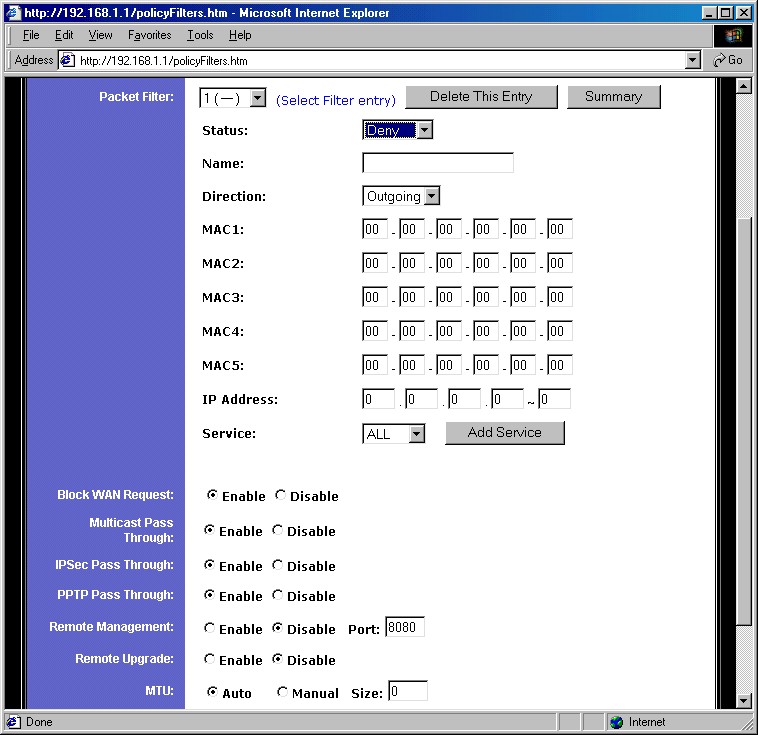
Figure 2: Filters screen
(click on the image for a full-sized view)
This page takes a new approach to the Filter setup for Linksys. You can program up to 20 filters, each of which can be set to apply to Deny or Allow a selected service for both 5 MAC addresses and one range of IP addresses. You select the service you want from a pick list of pre-defined common services (DNS, POP, HTTP, etc.), or you can create new services, specifying both port range and TCP, UDP, or ICMP protocols. Filters can also be left programmed, but disabled, which I always find handy for test purposes. The main negative for the Filters feature vs. competitive products is that you can’t schedule them, nor can you specify a trusted user, to whom the filters don’t apply.
The other settings on the Filters page are ones you’ve seen before. You can set the router to not respond to ping requests (Block WAN Request), enable Multicast Pass Through and set the MTU (Maximum Transmission Unit) size (helpful for getting some DSL/PPPoE connections to work).
Also the same is the SX’s remote administration, i.e. from the WAN, features. You can enable access to the router’s admin interface (Remote Management) and separately allow upgrading (Remote Upgrade) from the WAN side. One improvement is that you now can set the port used by Remote Administration (the default is port 8080).
On the minus side, you can’t limit Remote access to specific IP addresses or ranges and surprisingly, you can’t access the admin interface of the router at the other end of an IPsec tunnel (or at least if you can, I couldn’t figure out how!). You also can’t soft reboot the router remotely (although you can force a reset to factory defaults). You can also have multiple users logged into the admin interface at the same time without getting a message telling you that you’re not alone. I never got logged out of the router during testing, and you can’t manually log out either.
Moving along to the Forwarding page, Figure 3 shows that the main page looks the same as other Linksys routers, except for the addition of the UPnP Forwarding button.
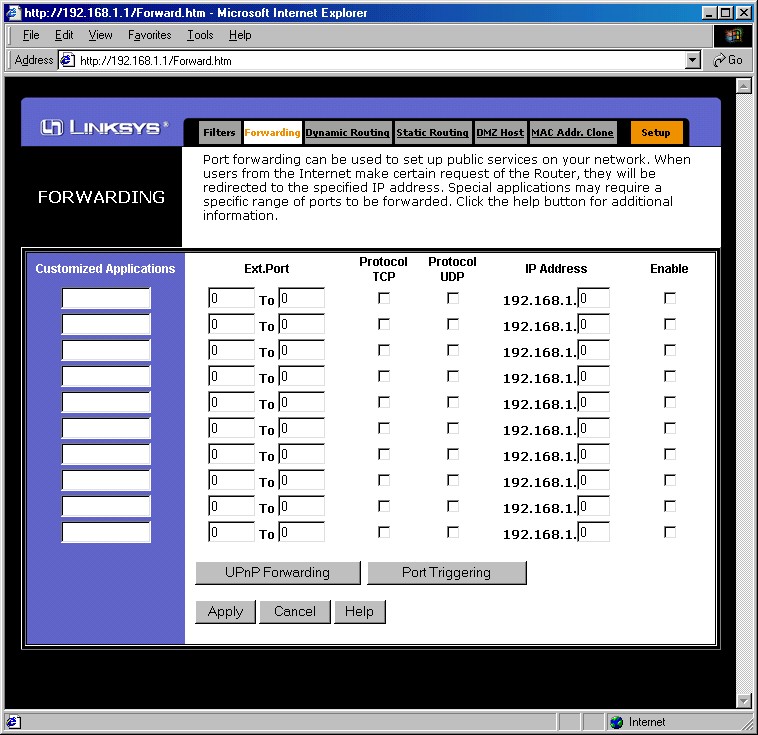
Figure 3: Forwarding screen – Port Ranges
(click on the image for a full-sized view)
Although this page (Figure 4) looks like it just provides access to single port mappings, it turns out that it really does interact with UPnP.
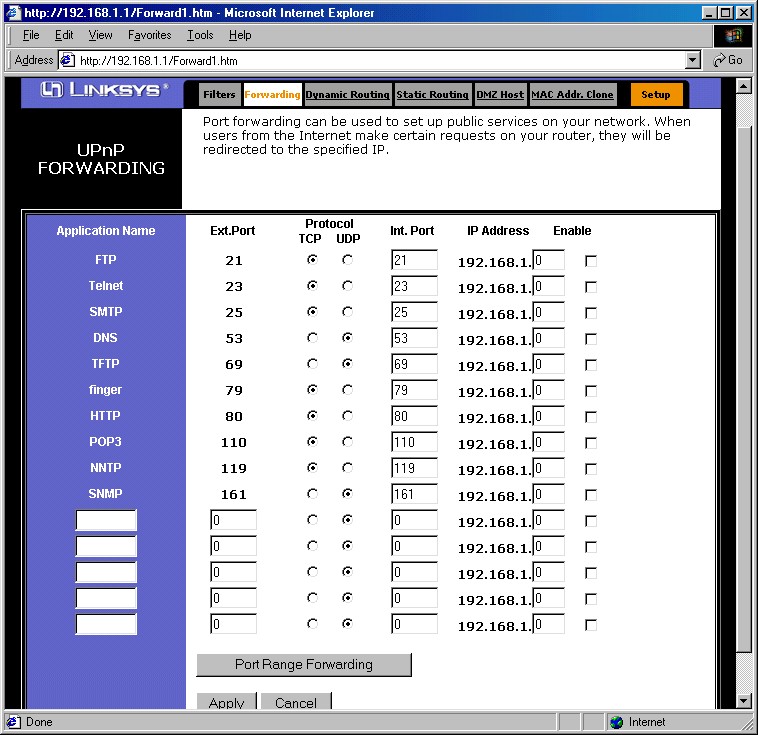
Figure 4: UPnP Forwarding screen
(click on the image for a full-sized view)
Since this is the first router I’ve tested that performs this particular little trick, I thought I’d spend a little time talking about it.
UPnP Features
If you’re unfamiliar with Universal Plug and Play, I suggest you read our FAQ and Need to Know, which will give you some background on the information that follows. I found that the SX is the first UPnP-enabled router that actually interacts with the UPnP Advanced Settings > Services window that you’ll find via your XP-powered computer. Although you get only one port and protocol per service, and you still must fill in the correct IP address for the computer that you’re establishing the service to, a service change you make via XP is displayed in the UPnP Forwarding screen and vice versa! Although it seems like an obvious thing, I haven’t found this behavior on other UPnP-enabled routers… other Linksys products included!
Unfortunately, though, it looks like UPnP’s NAT Transversal feature, which should automatically open ports in the router firewall for applications that support the feature, either doesn’t work, or doesn’t give any user-accessible indication that it’s working. I use Windows Messenger to check for this, and didn’t see any services opened for in the Internet Connect Advanced Settings > Services window, nor did I see anything opened in the other SX Forwarding screens.
So hats off to Linksys for doing something that should be included in all router UPnP implementations. Now let’s get NAT Transversal working, including automatic user notification when it pokes holes in the firewall!
Let’s move on to the VPN features and performance.
VPN Performance
The SX41’s VPN setup and capabilities are identical to the VP41’s as far as I could see, so hop over to that review if you need the details. The main difference is that you can define only two tunnels vs. the VP41’s 70. I like having the Connect and Disconnect buttons, and the Summary pop-up window is handy too. It’s also nice that NetBIOS broadcast is supported so that Windows network browsing, i.e. Network Neighborhood or My Network Places works without the hassle of having to Find computers on the other end of the tunnel.
The key difference between the SX41 and VP41 is that the SX doesn’t use an IPsec co-processor, similar to most other consumer-priced VPN endpoint routers. VPN throughput for no-coprocessor products has typically measured about 700kbps, which is what I expcected for the SX41. But Linksys’ choice of the Conexant CPU looks like a good one, since as the Performance table below shows, the SX’s tunnel throughput was a surprising 2.4Mbps… almost 3.5 times that of other non-coprocessor routers! This definitely makes it viable for SOHO VPN applications, since the throughput exceeds the speed of most broadband connections, and therefore won’t be a bottleneck.
Since the results were so good, I thought I’d run some other tests. I used Chariot to set up a test that ran the TCP throughput script simultaneously through the VPN tunnel and through the normal non-VPN LAN-WAN direction. Four computers were used for the test – two for the VPN tunnel and two for the LAN-WAN connection. Figure 5 shows that the VPN tunnel throughput dropped to about 1.9Mbps (lower plot line), while the data through the non-VPN path chugged along at a respectable 2.7Mbps (upper plot line). Not bad at all!
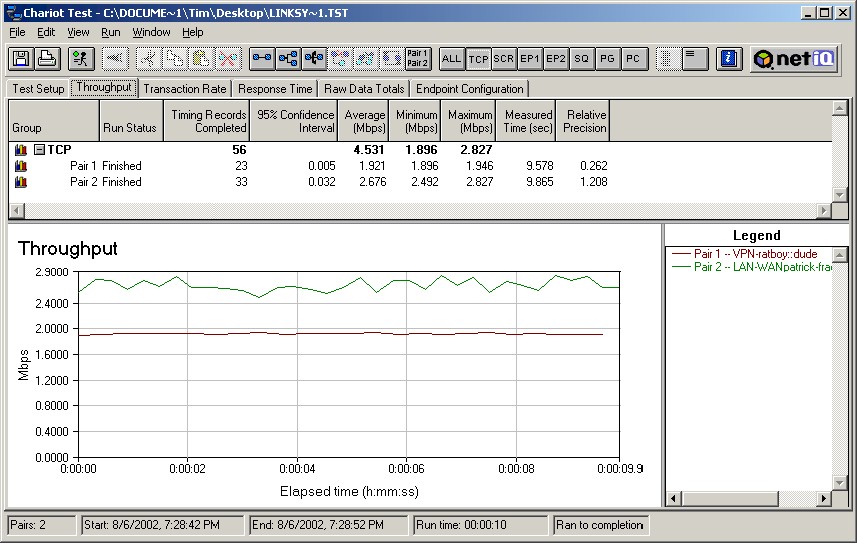
Figure5: VPN 2 pair test
(click on the image for a full-sized view)
Dropped tunnels seem to be a common complaint for some of these inexpensive endpoint routers, so I thought I’d beat on the SX a little to see how it did. I again used Chariot, but this time set up a single pair that used the Chariot FTPget script, started it up, and let it run for an hour. This script simulates logging into an FTP server, downloading a 100,000 Byte file, then logging off…over and over again. While that was running, I carried on my normal Internet activities using another computer that was connected to another SX LAN port. The result was that the tunnel connection never skipped a beat, and operation through my non-VPN computer was trouble-free.
I also ran a similar experiment using one SX41 connected to a VP41. Throughput was, of course, limited to the lower 2.4Mbps of the SX41, but I didn’t have any problems with this extended test, either.
While my experiments won’t promise you a trouble-free VPN experience, I have to say that I was pretty impressed!
IPsec VPN Performance Test Results
| Test Description | Transfer Rate (Mbps) [1 MByte data size] |
Response Time (msec) [10 iterations 100 Byte data size] |
UDP stream [10s @ 500kbps] |
|
|---|---|---|---|---|
| Actual throughput (kbps) | Lost data (%) | |||
| Local to Remote | 2.4 | 4 (avg) 5 (max) |
346 | 30 |
| Remote to Local | 2.5 | 5 (avg) 6 (max) |
379 | 24 |
| Firmware Version | 1.43 May 22 2002 | |||
Logging and other Features
The SX41’s logging is essentially the same as provided in the rest of the Linksys router product line. Logging is disabled by default, but once you turn it on, it will separately log Outbound and Inbound traffic. LAN IP, Destination URL/IP, and Service/Port Number are logged for Outbound traffic, and Source IP and Destination Port Number are logged for Inbound requests.
One new feature is the View Logs button. This opens a window that allows you to select the log you want to view. You can choose from System, Access, VPN, Firewall, or see the entire log stream if you select All. You can’t get the Incoming or Outgoing Access logs in this window, although the Access selection will give you the same data, but in a little more difficult to read form.
NOTE! If you change any of the VP41’s settings, both logs will be cleared when you Apply the changes.
If you want an ongoing record of the logs, or need log analysis features, you can set an IP address that the logs will be sent to. Linksys uses SNMP TRAP messages broadcast on UDP port 162 to send the logs, and there are a number of applications available from both Linksys and third parties that will crunch the logs to your heart’s delight.
The usual Linksys collection of other features is still available, i.e.:
- you can set static routes (useful in networks that have more than one subnet)
- dynamic routing protocols RIP1, RIP1 compatible (transmit only) and RIP 2 send and receive are supported
- firmware upgrades are done entirely via web browser (after you download the zipped firmware file).
Note that you can’t save or load the router’s configuration to a local file.
Routing Performance
• WAN to LAN tests are all run with LAN endpoint in DMZ
• LAN to WAN tests are run with LAN endpoint not in DMZ, except UDP Stream
Like SMC’s 7004VBR, the SX has a SPI-based firewall that has the ability to disable the SPI features and fall back to plain-old NAT as its firewall mechanism. This makes testing a little more complicated, but gives us more insight into the drag that SPI places on the router’s performance.
If you compare the results in the chart above to other recent SPI-based routers, you see the SX beats them by a wide margin, especially on the WAN-LAN tests, which typically run under 2Mbps on other products. But the SX’s almost 17Mbps throughput beats the other guys for best-case SPI-disabled performance, too!
If you really want to be impressed, though, check out the chart below. This table, which I also did for the SMC7004VBR review shows Throughput and Response time results for various combinations of DMZ and SPI. Remember that WAN-LAN tests can be run only with DMZ on, so that’s why there are no DMZ off results for that direction.
|
Case Number
|
Test Description |
Intrusion Detection Settings | DMZ |
Transfer Rate (Mbps) |
Response Time (msec) |
|
1
|
WAN-LAN |
SPI enabled (defaults) | on |
16.8 |
48 (avg) |
|
2
|
WAN-LAN |
SPI disabled | on |
34.0 |
1 (avg) |
|
3
|
LAN-WAN |
SPI enabled (defaults) | off |
16.6 |
48 (avg) |
|
4
|
LAN-WAN | SPI enabled (defaults) | on | 12.2 | 65 (avg) |
|
5
|
LAN-WAN |
SPI disabled | on |
20.2 |
1 (avg) |
|
6
|
LAN-WAN | SPI disabled | off | 32.3 | 1 (avg) |
I couldn’t believe the 33Mbps throughput results either, so I double-checked the Qcheck results by doing a Chariot run, which showed that the throughput actually varied from 26 to 38Mbps!!! Un-bee-leeve-able!
Conclusion? Let’s just say that you can run the SX with whatever settings you want and not even think twice about the throughput effects of your choice.
Routing Performance Test Results
| Test Description | Transfer Rate (Mbps) | Response Time (msec) | UDP stream | |
|---|---|---|---|---|
| Throughput (kbps) | Lost data (%) | |||
| WAN – LAN | 16.8 | 48 (avg) 74 (max) |
499 | 0 |
| LAN – WAN | 16.6 | 48 (avg) 56 (max) |
493 | 0 |
| Firmware Version | 1.43 May 22 2002 | |||
Wrapping it up…
Although the original Linky (SR41) and all its variations have put Linksys at the top of the SOHO router heap, the design was showing its age and it was time for a change. Linksys hasn’t said so, but I suspect the SX’s Conexant CX82100-based design will become their new, next-generation platform, on which most routers for the next 12 to 18 months will be based.
The SX41 looks like an excellent first member of this new generation. It allows Linksys to play the undercut-the-competition game, but in a higher-priced category (VPN endpoints) that should allow them to stay out of the under-$50-mud-wrestling-match that D-Link started with their DI-604.
If you can do without scheduled port filters or forwarding, and don’t need email alerts of “hack” attacks, the SX’s performance and features make it the obvious choice if you need to have a VPN tunnel to only a couple of remote locations. And at a street price as low as $73 (at time of review), you better grab one quick before Linksys realizes what a steal you’re getting!