Introduction
| At a Glance | |
|---|---|
| Product | Western Digital NetCenter 500GB Network Drive (WDXE5000KS) |
| Summary | Single-drive NAS with basic feature set and uninspiring performance |
| Pros | • Fanless • MacOS and Windows support • Relatively Inexpensive |
| Cons | • Few advanced features • Lackluster performance |

There are plenty of Network Attached Storage (NAS) devices in the market these days. Consumers have found these products handy for backing up data and for sharing files on their home network. Networked drives are fairly cheap, easy to use and allow a good deal of flexibility. Many different companies sell NASes, but they seem a most natural fit for hard-drive manufacturers. I’ve previously reviewed a couple of NAS units from Maxtor, but in this review I’ll take a look at an offering from another disk drive manufacturer: Western Digital’s NetCenter.
The NetCenter is constructed with lightweight, two-tone gray plastic and comes in sizes ranging from 160-500 GB (WD sent the 500 GB version). The front of the unit, shown above, has a single lighted power button. The back of the unit, shown in Figure 1, has a 10/100 Ethernet connection, power connector, locking slot and two USB 2.0 ports that can be used either for additional disks or a printer.
One thing you won’t see is a fan vent. The NetCenter doesn’t use a fan for cooling, relying instead on passive cooling. This is a nice feature that will allow the unit to run silently unlike many of its competitors. However, in order for the cooling to work properly, the unit must be mounted vertically using the included stands.

Figure 1: NetCenter back panel
Setting Up & Features
The NetCenter acquires its initial IP address via DHCP. So as long as you have a router or other network device that acts as a DHCP server, getting it running is just a matter of plugging in the power and network cable and hitting the power button. Installation software is provided for both Window and Macintosh systems and the configuration process is very similar for both systems.
Figure 2 shows the initial screen of the configuration process from my Macbook in which the NetCenter is located on the LAN. The status warning on this page indicates that the device is in its initial state and has not been updated with a custom users, passwords, etc.

Figure 2: Configuration setup
The “Connect to Server” button is used to mount a network share from the device using the default configuration. If this is all you need, mount the share and you’re done. If you want more custom features, the “Configure” button spawns off a web browser for advanced settings. Figure 3 shows the initial configuration page viewed from a web browser.

Figure 3: Main Configuration Menu
The “System Summary” is an overview screen that allows viewing of various status values such as disk capacity and current usage, printer status, firmware version, etc. The “General Setup” option allows basic setup of the box with options for changing administration username and password, the IP address, workgroup name, device name and time. I would have liked to see an option here for specifying a NTP server, so that the time could be maintained automatically, but the only option was to manually set the time (Figure 4).

Figure 4: Setting the time
The “File Sharing” option is designed to allow the creation of new shares besides the default pre-defined share. Figure 5 shows the basic setup screen where shares can be created, deleted, or renamed. For security, the share can be protected with a username/password combination.

Figure 5: Share Creation
Features – more
One interesting feature shown on this screen is support for NFS (Figure 6). NFS is a sharing protocol that is commonly found in most Unix systems and in the Macintosh.

Figure 6: NFS Support
The Mac can use the CIFS/SMB Windows file-sharing protocol that is used by default on the NetCenter, but NFS is more of a natural fit. Unfortunately, I couldn’t get the NFS capabilities to work. When mounting a NFS share, the client must use the full path of the disk on the server, but I couldn’t find this path documented anywhere and query to WD didn’t reveal the answer either.
Besides this path, another thing I didn’t see in this section (or anywhere else) was the ability to create individual users or set up space quotas for the users. These options are provided in many NAS devices, but evidently Western Digital is evidently marketing to the home-user who has more simple needs.
Moving on, the “Printer Sharing” menu shown in Figure 7 allows setup of a printer that can be shared across the network. Instructions are provided for accessing the shared printer under both Windows and Macintosh systems.

Figure 7: Printer Status
The “Drive Management” menu allows sophisticated control of the drives on the system. Figure 8 shows a SMART status screen where an internal drive is listed along with a both a USB key and an external USB drive I plugged into the USB ports. FAT32 formatted drives that are plugged in are automatically exported as network shares by default and this capability appeared to work well.

Figure 8: Disk Health Status
You can also plug in a NTFS formatted external drive, but it will be mounted in read-only mode. I’ll note that my FAT32 USB hard-drive was divided into four partitions, and all four were properly mounted and exported. But along with this automatic behavior, the NetCenter has some additional capabilities.
If you’re willing to format your external drive for use only on the NetCenter, it can be added to an existing share as contiguous space. In other words, if you plug in an external 500GB external drive to your 500GB NetCenter, you can make your network share look like a single 1TB partition. This is a fairly unique capability among the NAS devices I’ve tested, but I couldn’t check this feature out, since I didn’t have a spare, empty USB drive.
Complete client backup software is supplied for both Windows and Macintosh systems. The backup software appeared to be fairly full-featured with support for incremental backups, full backups, scheduled backups, etc.
My tour through the menus revealed the lack of a few features commonly found on similar NASes:
- Logging: Although handy for letting you know when the disk is getting full, or when errors are occurring, the NetCenter lacks both logging and emailed alerts
- Programmable Idle spindown or shutdown: I didn’t find any way to shut down the drive after a programmable idle period. However, the NAS will enter a “sleep” mode after a fixed period of 10 minutes of inactivity
- Drive copy: There is no ability to copy from a plugged-in USB drive to the internal drive or vice-versa
Performance
In order to gauge performance our standard NAS test procedure was run using the version 1.1.0.0003 firmware that came installed on device. Figures 9 and 10 show the NetCenter’s performance using a 64 kByte record size and file sizes from 32 MB to 1 GB, plotted along with comparable previously-reviewed products.
As you can see in the charts below, the performance of the NetCenter was generally low as compared to other NAS devices in its class. In the read test, the NetCenter falls well short of its competitors, often being 25% slower than the Synology DS-106e which led the pack.
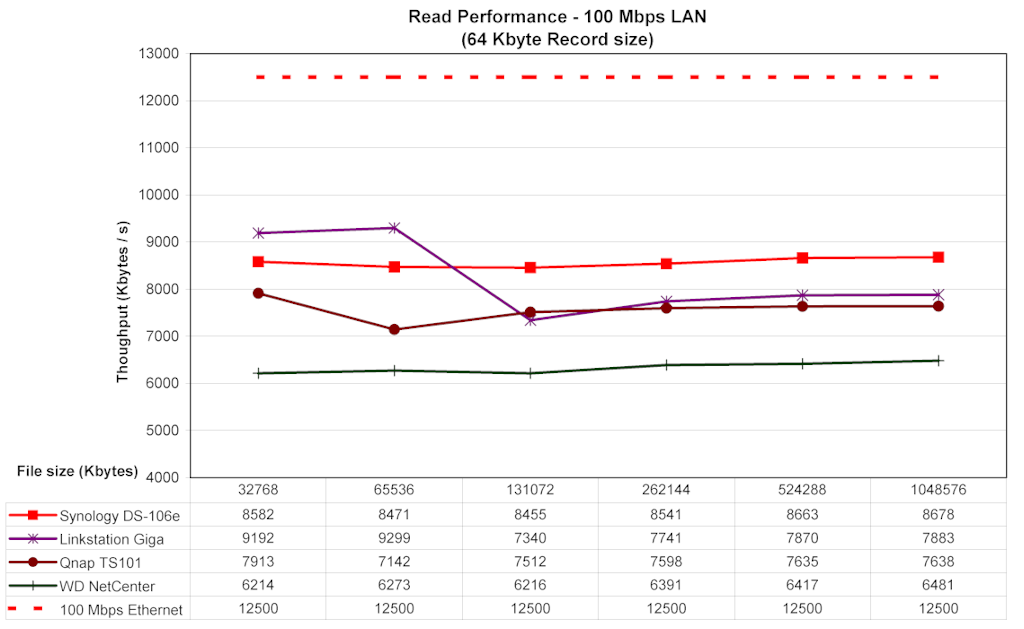
Figure 9: Read Comparison (click image to enlarge)
In the write test, the NetCenter avoided the bottom of the scale, but was still quite a bit slower than the DS-106e.
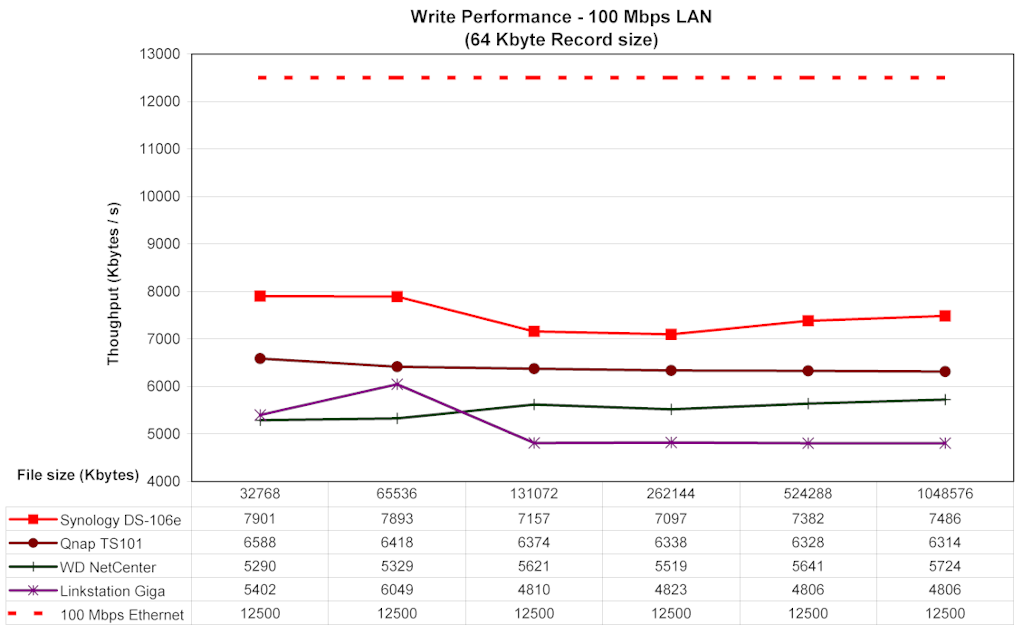
Figure 10: Write Comparison (click image to enlarge)
To give another perspective on performance, I did a simple drag-and-drop test of moving a directory tree back and forth to the NetCenter. This tests were run with Windows XP SP2 running natively on my MacBook Pro – a 2 GHz Intel Core Duo with 1.5 GB of RAM. (This is a different machine than that used for the iozone tests.)
The directory tree I copied contained 4100 files using up just over a gigabyte. Moving from XP to the Netcenter (i.e. write) took on average 4 minutes and 45 seconds. Moving the same directory back to my XP system (i.,e. read) averaged 4 minutes and 30 seconds.
To compare this performance to the full set of devices we’ve tested over the last couple of years, visit our Network Storage Charts.
Under the covers
I recently picked up one of those little devices that measures electricity usage of a plugged-in device. Using this little box, I measured the usage of the NetCenter at 12 W while in use and 4W when the drive spun down after 10 minutes. So think of it as using about the same amount of electricity as a night light.
In terms of the hardware used on the box, I usually like to open up the case to photograph the main board, but the NetCenter’s case was tightly sealed with plastic compression clips. I didn’t want to risk breaking or marring this loaner unit, so I used software techniques to get some hints about the hardware.
Like nearly all consumer NASes, it was clear that the NetCenter runs Linux internally. A port-scan of the box told me the OS used is based on a Linux 2.4 kernel. But for more detailed information about the software running on the box, Western Digital provides a download link where I grabbed the GPL components used in the product. Those brave enough to build their own custom firmware will also find a full compilation tool-chain at this site.
Digging through the provided source tree turns up the usual components found in these products. For basic utilities, busybox is used and CIFS support comes courtesy of Samba. The tree also contains utilities for managing a Reiser filesystem, so that’s a strong hint regarding the internal filesystem. I was also interested to see an FTP server and number of utilities related to the use of VPNs, but I found no evidence that these features used internally.
The presence of these unused packages may just indicate that this source tree is used in other products, or it could also give some indication of future direction for Western Digital with this product. It was fairly clear that the internal processor used on the box was from Broadcom. A number of Broadcom directories were present along with references to a 4710 chip which provides the main CPU as well as network connectivity. In another Broadcom directory, I found an IDE driver for an Acard ATP864 chip.
Closing Thoughts
In general, I found the NetCenter easy to set up and use. It was good to see both Windows and Mac support for both setup and backup, and I appreciated its fanless design. The fact that it has NFS support was interesting, but I was disappointed that I couldn’t get it to work. The ability to treat the USB drive as a contiguous partition is also a unique feature.
The NetCenter had a couple of nice capabilities, but in general there’s just not a whole lot else to make the NetCenter stand out from the NAS crowd. Many of the devices now support gigabit Ethernet, have better performance and sport a larger feature set than the NetCenter.
But when it comes to price, the NetCenter, appears to be very competitive. I found the 500 GB version online for as little as $270, where the cheapest I could find a 500 GB Maxtor Shared Storage was $320. A 500 GB Buffalo Linkstation also turned up around $340. So if you’re willing to trade-off lower performance and fewer features with price, the NetCenter might well fit your needs as an inexpensive, light-duty, backup and sharing storage device.