Introduction
In Part One of this series, we established a working definition of our target, i.e. what has to be done, and in what order, to Cerberus the lowly IDS firewall to make it a UTM Appliance.
As we saw, there are six areas that need to be upgraded to grab the prize: IDS/IPS, Anti-Virus, Content Filtering, Traffic Control, Load Balancing and Failover, and finally Anti-Spam. We’ll step through each of the six functional areas and show you how to install and configure the required packages.
Once we have everything set up, we’ll look at performance and see if Cerberus with PFSense is able to be called a UTM appliance. But first, we need to attend to some prerequisites, which include setting up a second WAN interface for load balancing and fail-over and installing Squid, a critical piece needed for content filtering and anti-virus.
Multiple WAN Setup
For the purposes of this upgrade, we’ve ordered service from another ISP. You may remember we had previously set up a little-used guest wireless interface to use for our second ISP WAN connection for testing. Now we need the real thing.
The setup is straightforward—enable the interface using parameters provided by your ISP. In most cases this is just DHCP. Note, the FTP Proxy should be disabled on all WAN interfaces, including this one. Figure 1 shows the settings.
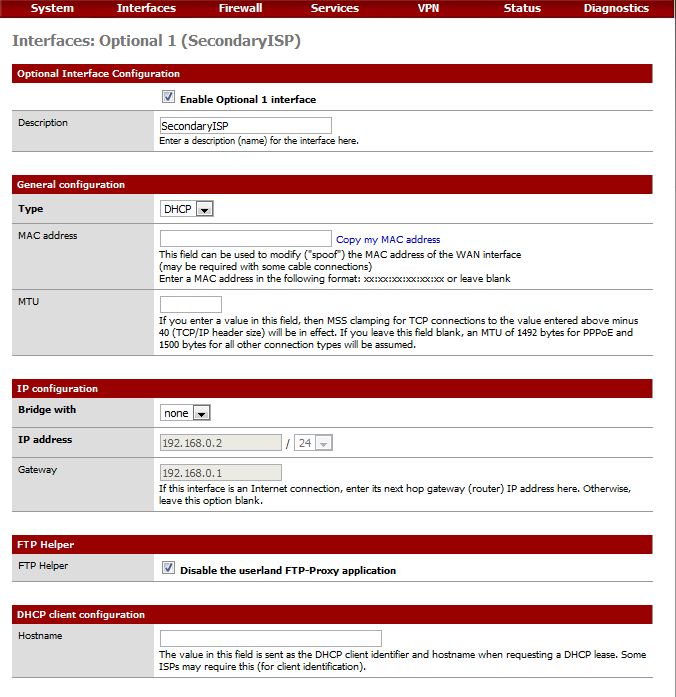 Figure 1: Enabling the second WAN interface
You can test your second WAN interface by changing the gateway on the already-established LAN routing rule, the one that directs LAN traffic through our current default gateway. Get the gateway for OPT1 from Status Interfaces, then under Firewall->Rules, edit the LAN rule, changing the gateway drop-down value to the OPT1 gateway IP as shown in Figure 2.
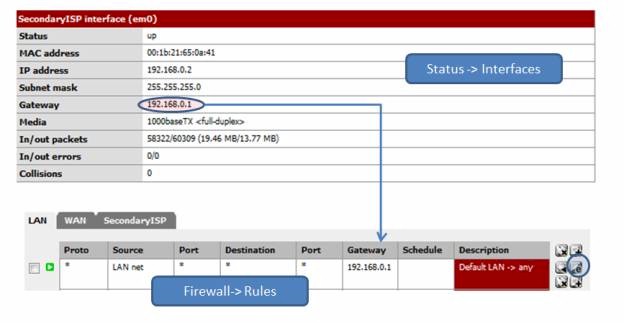
Figure 2: Testing the second WAN
Now from a web browser, visit the GRC Shields-Up Site. Your IP should correspond to your IP address from the secondary ISP. If you can’t reach any web site, verify that the link is active by going to your modem/router diagnostics. If the IP Address corresponds to your primary ISP, turn on logging for the routing rule, close your browser, and reboot your installation. Check the log once you are back up. If you still don’t see the new IP address, verify your gateway settings. But hold off changing it back to the default gateway until after we’ve tested our IDS changes below.
That’s it, done. We can now hang Snort on the Secondary WAN interface and set up the needed proxy servers. Load balancing and failover will come later.
Install Squid
Squid provides a tunable HTTP cache with traffic throttling. As with all cache servers, it trades disk I/O for network I/O. Your performance gain is largely dependent your bandwidth, the number of users, traffic volume, and the diversity of that traffic.
Significantly, there is a pretty cool chain here, and Squid is the heart of the whole thing. HAVP, the anti-virus proxy, runs as the parent of Squid, which in turn uses SquidGuard to filter content. All web requests travel through Squid’s cache that contains (at least) twice-filtered content. This saves both bandwidth and scanning cycles for any subsequent reference to that content.
All packages are installed through the Packages menu on the System pull-down. Once installed, you need to configure Squid from Services->Proxy Server. We need to configure General settings and cache settings.
Most of the General settings are self-explanatory and PFSense has a tutorial to assist. The easy answer is that five fields have to be set as shown in Table 1.
| Setting | Explanation | Value |
|---|---|---|
| Proxy Interface | Interface Squid is bound to | LAN |
| Allow Users on Interface | Do not require separate subnet enumeration. | Checked |
| Transparent Proxy | Operate without separate network client configuration, everything through the proxy. | Checked |
| Log Store Directory | Where the logs live. | /var/squid/log |
| Proxy Port | Where other processes can find the proxy server, the default | 3128 |
Table 1: Squid general settings
Figure 3 shows the settings for Cerberus.
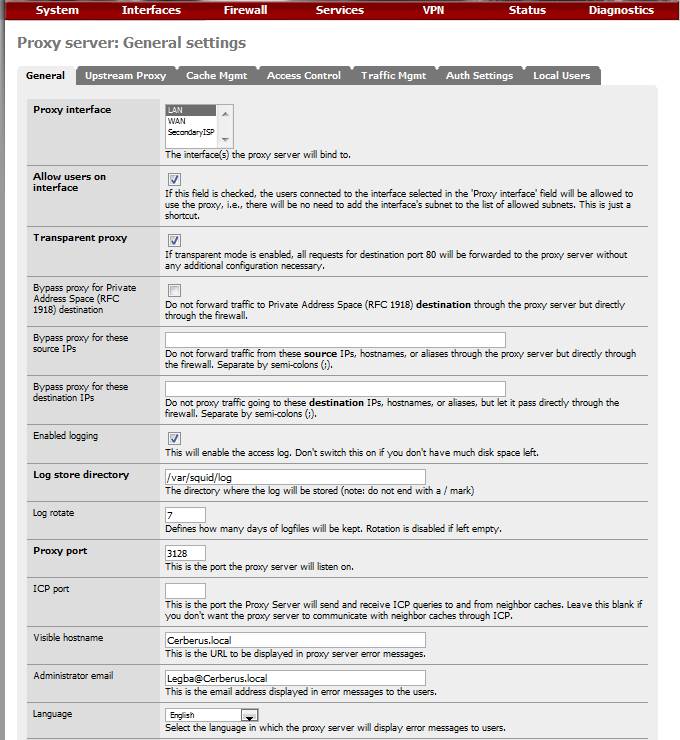
Figure 3: Squid proxy settings
And Figure 4 has a few more.
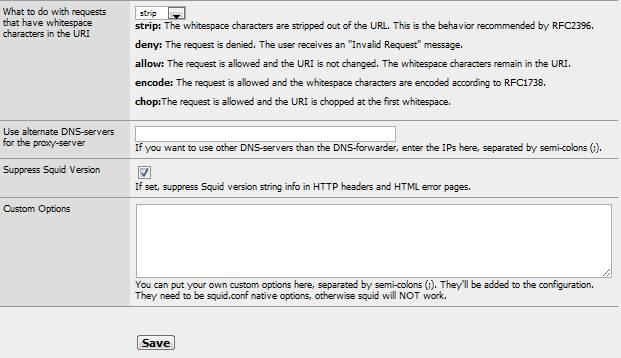
Figure 4: More Squid proxy settings
General Settings are now done. So save’ em and move on to the Cache Management Tab.
We need to do some math before we determine cache size values. The temptation, since we have gobs of our 250 GB disk available, is to use a large chunk for web caching. The thing is that Squid uses an in-memory index to address the cache. So it is best to balance memory against disk cache size.
The Squid User Guide recommends 5 MB of memory for every Gigabyte of disk cache (you don’t want to be thrashing, incurring a high swap rate). So determine how many megabytes of memory you have to spare for caching, divide that by 5, and you have the number of Gigabytes you should allocate to your cache.
With Cerberus under load and largely due to Snort, I run at 80% memory usage (according to System->Status), giving me about 600 MB free. I want some headroom for processing peaks, about half, so I have 300 MB available for my in-memory cache. Dividing that by the 5 to 1 guideline, I end up with a disk cache size of 60 GB.
Having calculated our sizes, we are ready to fill in the Cache Management configuration tab values, as summarized in Table 2.
| Setting | Explanation | Value |
|---|---|---|
| Hard disk cache size | Disk size limit in megabytes | 61400 |
| Hard disk cache location | Where the cache is stored | /var/squid/log |
| Memory cache size | Megabytes of memory cache | 300 |
| Minimum Object Size | Smallest object to cache, in kilobytes. | 0 (no limit) |
| Maximum Object Size | Largest object to cache, in kilobytes | 256 |
Table 2: Squid Cache Management configuration tab values
I have also tweaked the optional tuning values: used threaded access to the UFS file system and since I have cycles to spare and a large cache, I’ve doubled the number of level 1 directories. I’ve also changed the memory replacement policy to Heap-LFUDA (Least Frequently Used with Dynamic Aging).
Figure 5 shows the settings for Cerberus.
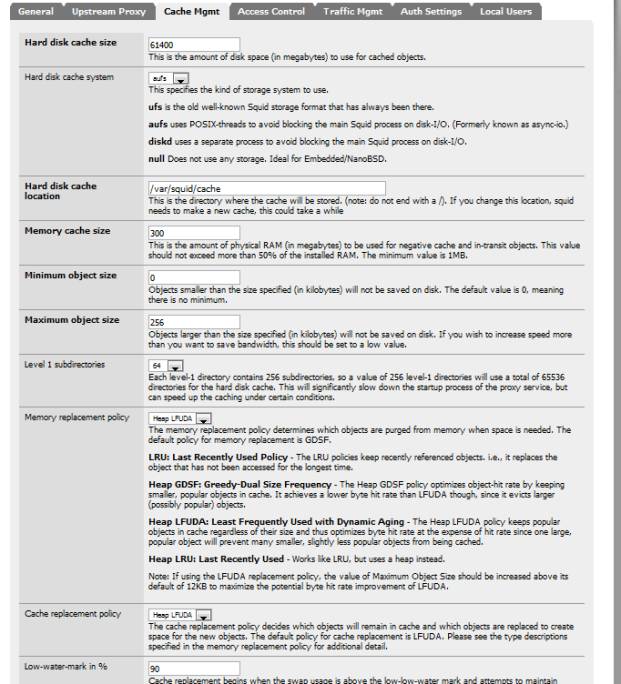
Figure 5: Squid Cache Management settings
To verify your Squid install, check the System Log (Status->System Log). If you need to track down any issues, there is a more detailed log you can use. Execute a BSD command (Diagnostics->Command) to access it; it is located here: /var/squid/log/cache and should look like Figure 6.
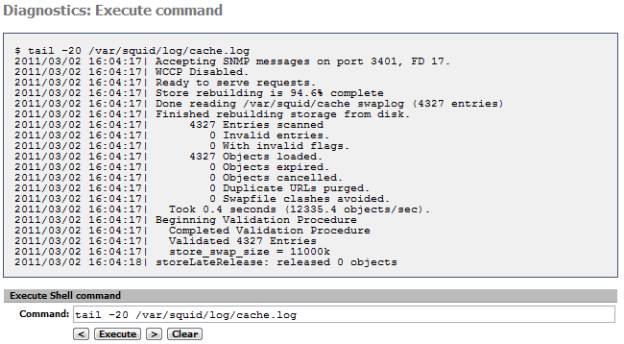
Figure 6: Squid cache.log
Additionally, to review web accesses, you can take a look at the access.log file in the same directory. Or install the partially-integrated Squid reporting tool, LightSquid, which gives you a view of cache hits, including Top Sites and hit percentages.
With Squid installed, we are done with the prerequisites. Let’s start the main event, the functional upgrades needed to become a UTM.
Intrusion Detection and Prevention Configuration
Cerberus is already an IDS Firewall. In the previous article Build Your Own IDS Firewall With pfSense the installation and configuration of Snort was covered in detail. So there is little that needs to be done further for it. We do need to add our new OPT1 WAN connection, however and rearrange our rules.
We are going to want the same overall protection on both WAN interfaces. So under Services->Snort, add both the new OPT1 interface and your LAN interface. The OPT1, Secondary ISP interface should be a clone of your Primary Interface, i.e. same pre-processor settings, same rules, as shown in Figure 7.

Figure 7: Squid interfaces
The LAN interface, on the other hand, is lightweight with just the pre-processor defaults and HTTP Inspect checked. It should handle just a few categories of rules. The idea here is to offload a few categories from your WAN interfaces to the LAN’s where it would be good to know which LAN IP is being attacked and whether the attacks are coming from the inside. Examples categories would be NetBios and ICMP.
Your mileage may differ and you may want to expand the categories that generate alerts. Figure 8 shows the selected categories on Cerberus.
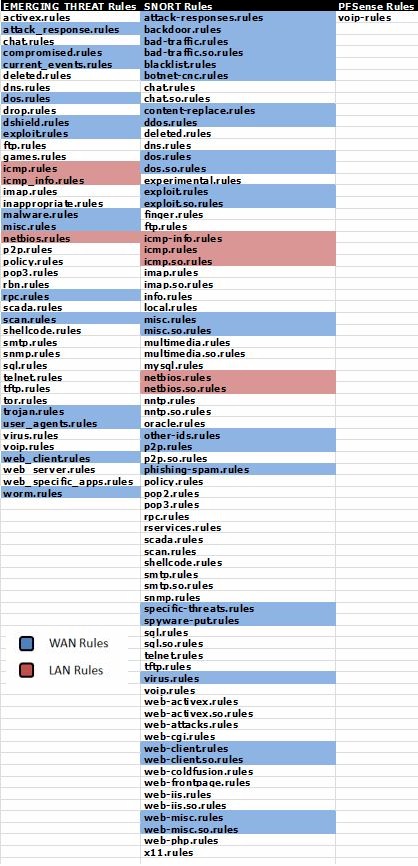
Figure 8: Alert categories
Remember, the more rules you select, the higher the probability of false positives, which can be an administration headache.
After adding the additional interfaces and configuring them, start Snort by clicking the green arrow next to the interface definition. We can test these additions to Snort by using the GRC Shields-Up Site to scan the added Secondary ISP WAN interface. Your Snort Alert log should look something like Figure 9.
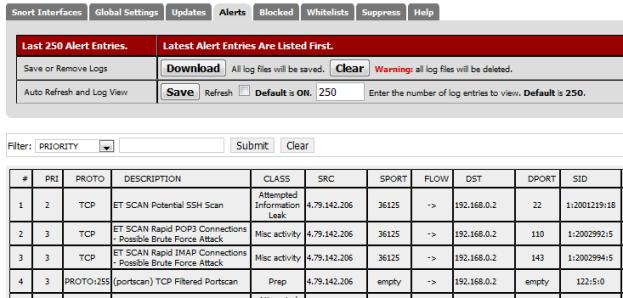
Figure 9: Snort Alert log
If you have an ISP-provided router instead of just a modem, you need to either put pfSense in the DMZ or configure your router to run as a transparent bridge. Since ISP routers are a known attack vector, transparent bridging is recommended.
For example, out of the box, the Qwest branded Actiontec Q1000 has multiple ports open, including HTTPS for remote administration. For the purposes of obscuring my logged IP address in this article, Cerberus has just been put in the DMZ.
Once this is complete, you will want to reverse the changes made when testing your multi-WAN configuration and change your LAN traffic rule back to using the default gateway (our primary ISP).
Anti-Virus
HAVP, our anti-virus solution, has pretty much a point and shoot setup. Once installed, there are only a few settings (Services->Anti-Virus) to change on the HTTP proxy tab:
| Setting | Explanation | Value |
|---|---|---|
| Enable | Turn on scanning | Checked |
| Proxy mode | Define Run Mode | Parent of Squid |
| Proxy port | Connection Port. Must be different than Squid port | 3125 |
Table 3: Anti-virus settings
There are several other discretionary settings including file types to scan, logging, etc. Figure 10 shows the settings for Cerberus.
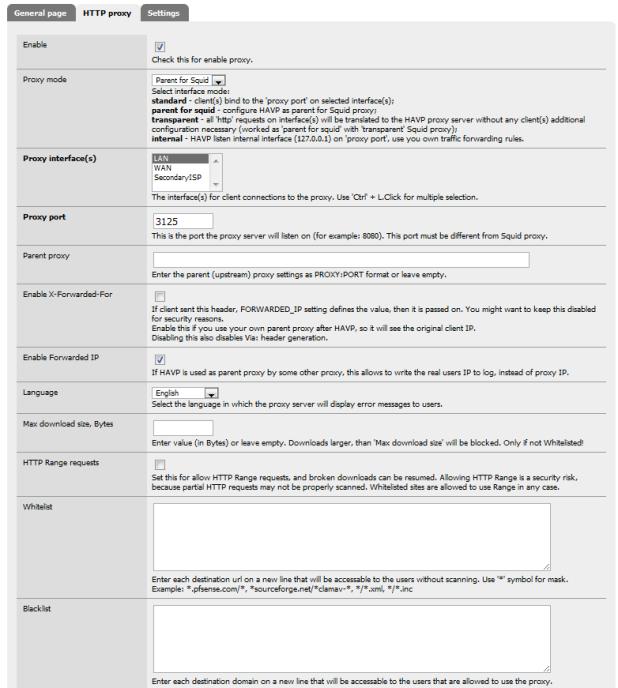
Figure 10: HTTP proxy settings for anti-virus
And a few more in Figure 11.
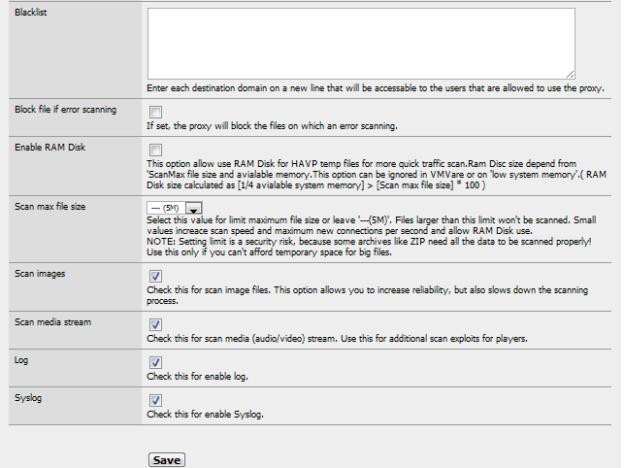
Figure 11: More HTTP proxy settings for anti-virus
There are also some minor settings under the Settings tab dealing with update frequency and logging. Figure 12 shows how Cerberus is configured.
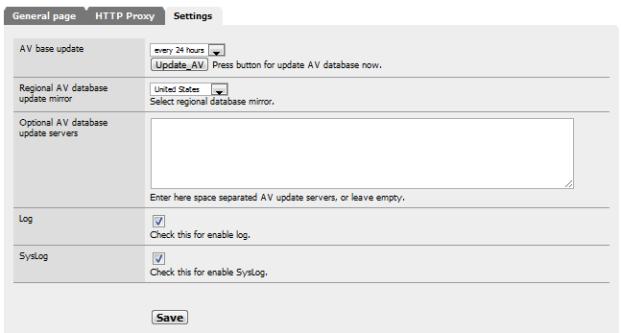
Figure 12: Miscellaneous AV settings
Once you have saved your settings, you can verify that both the HAVP proxy and the ClamAV scanning engine are running under the General page tab:
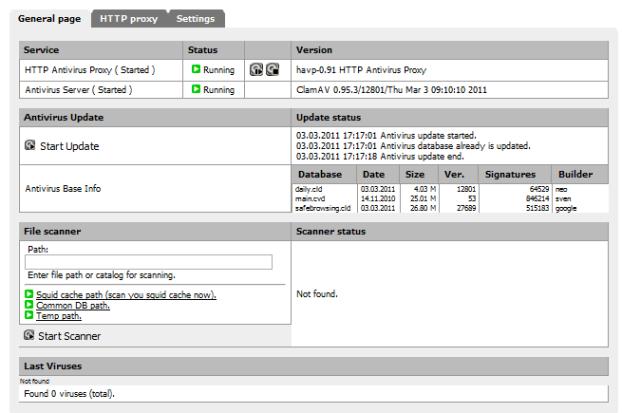
Figure 13: HAVP and ClamAV running
Once you are fully updated (should take about ten minutes), you can test your install using safe virus simulation files provided by Eicar.org.

Figure 14: Eicar.org virus test file
Only two of the test files are recognized as threats. Files with the extension COM are not scanned, and embedded archives are not tested, underlining the need for separate anti-virus on each host machine.
Anti-Virus is now up and running.
That’s it for this installment. Next time, we’ll continue the conversion to UTM with Content Filtering setup and plenty more.
