| At a Glance | |
|---|---|
| Product | TRENDnet THA-101 Home Smart Switch with Wireless Extender [Website] |
| Summary | Smart switch with 2.4 GHz N300 Wi-Fi Extender |
| Pros | • Doesn’t block adjacent duplex outlet • Thermal overload protection • Supports Android and iOS • WPS button turns on/off load without using a mobile device • Scheduled events • Mobile apps show power consumption |
| Cons | • Iffy device discovery • 31 entry limit in site survey • No IFTT (If This Then That) support • No dimming • Not Wi-Fi Certified • Buggy setup |
Introduction
It was only a matter of time before someone created a mashup of a smart switch and a Wi-Fi range extender. The TRENDnet THA-101 Home Smart Switch with Wireless Extender is the first one we’ve seen. With a price hovering just above $53 on Amazon (eligible for Prime), it’s like buying a smart switch like D-Link’s DSP-W215 and getting a N300 class range extender for free.
Like most Smart Switches that remotely control power to an AC load, the THA-101 is designed not to block the second socket in a standard U.S. duplex outlet. As shown in the product shot above, there’s an switch on the right side of the unit that lets you turn the device On/Off. On the front, in addition to the three pronged load socket, there are LEDs to show power and Wi-Fi status.
On the lower left, there’s a pushbutton that doubles as a WPS (Wi-Fi Protected Setup) button (if held for 5 seconds) and as a switch to turn power on/off to the load socket. On the left side, there’s a small factory default reset hole.

TRENDnet THA-101 doesn’t block the top plug
In the box with the device, you’ll find a printed multilingual (English, French, Spanish, German and Russian) quick start guide and a CD containing the Quick Start guide in multiple languages along with the user manual in English. Taped to the plastic bag that contains the device, there’s a label with setup information. It has an adhesive backing, so you can peel it off and apply it to the back of your device once you have finished your configuration. It’s a good idea to hold onto this – you might need the information if you run into difficulties during the setup process.
The image below is the label that came with my Smart Switch. The QR code is unique to the device and you can use it within the iOS or Android app to facilitate setup. The Wi-Fi Name/SSID is also unique to your device.

TRENDnet THA-101 setup label
Setup
One of the features promoted on the retail box is “Quick app-based setup”. There is an app for Android devices in the Play store and a corresponding iOS app in the Apple App store. The Quick Start Guide provides step-by-step setup instructions for setting up the THA-101 using WPS or for setting it up manually for each platform, so there are four sets of setup instructions.
The easiest method for setting up the Smart Switch is by using WPS.
- Step 1: Plug in the THA-101 Switch
- Step 2: Download and install the TRENDnet Smart Home app for your mobile device’s platform.
- Step 3: Press the WPS button on your router, then press the WPS button for 5 seconds on the THA-101
- Step 4: Open the Smart Switch app on your mobile device and then tap the add icon.
- Step 5: Search for the device, type in the default password and click save.
I’ve included a short gallery to show how to set up the device on an iOS device. Though the app is an iPhone app, it ran fine on my iPad. You just have to rotate the iPad and use it in portrait mode. The Android application has the same look and feel and works the same way.
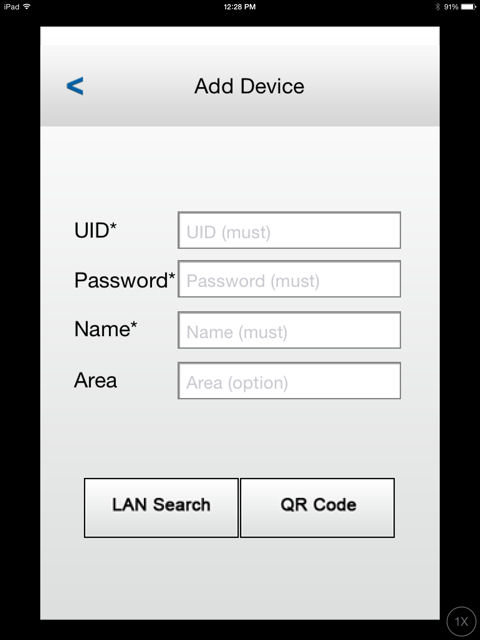
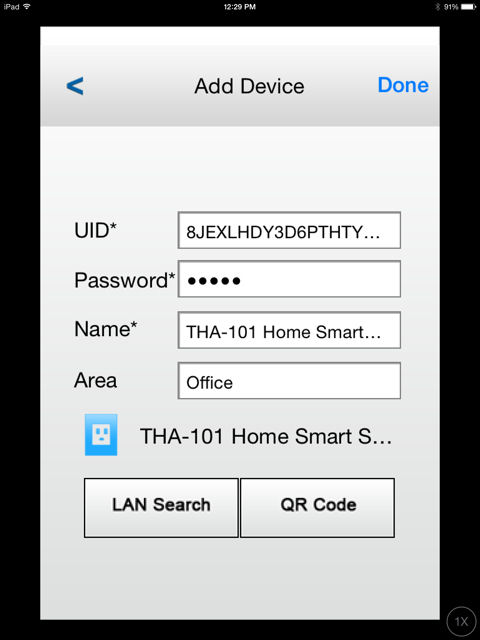
After clicking on Add device, you can search for the Smart Switch on the LAN or scan the QR Code on the label.
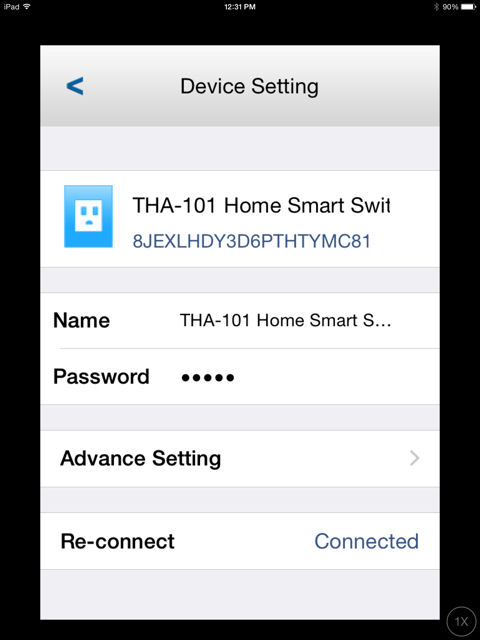
Device detail
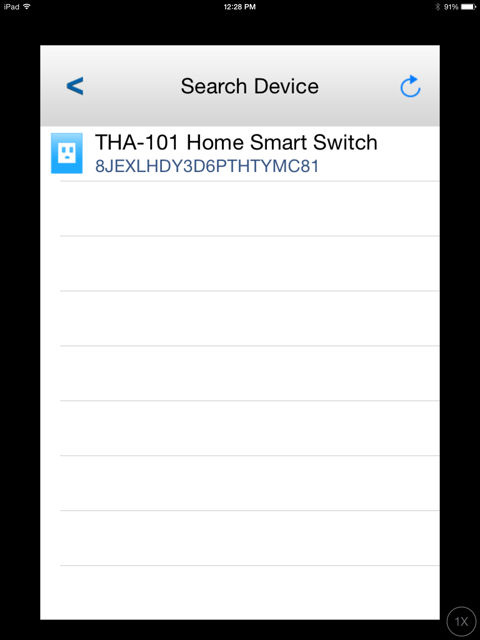
Device found
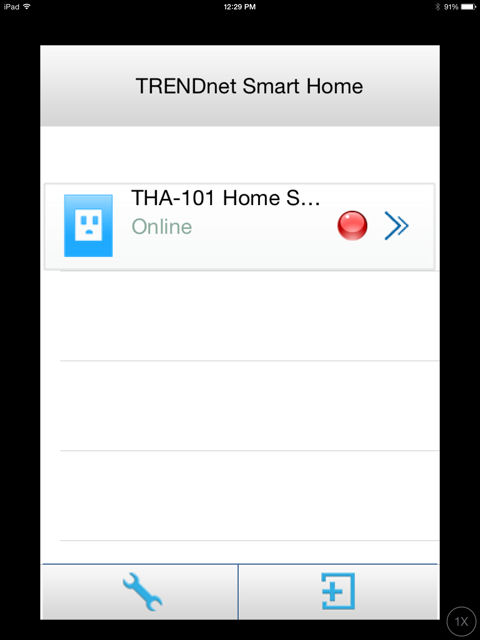
Home page showing configured device online
The Advance Setting menu takes you to the Advanced settings menu
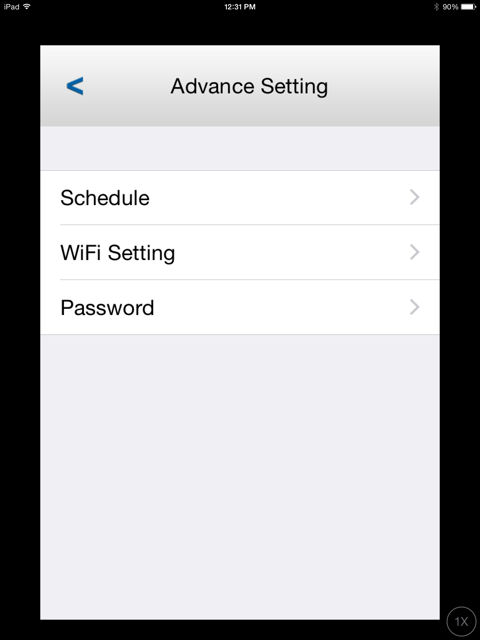
Set schedules, passwords or scan for Wi-Fi Networks
As noted, there are also instructions for connecting and configuring your device if you can’t or don’t use WPS.
Hands On
I tried setting up the device using both the WPS and manual methods and ran into a couple of glitches. Using the WPS method, I launched the app on my Samsung S5 and clicked on LAN search. The Smart Switch had successfully negotiated a connection with my wireless network and the Samsung was on the same Wi-Fi network. But the app reported that it couldn’t find any devices. I tried the LAN search several more times with the same results.
I then clicked on the QR Code icon, which turns on your device’s camera so you can scan the QR code. The QR code contains the THA-101’s unique 20 digit device ID code, which the app automatically pastes it into the correct field. By searching for the device ID, I was able to find the device on the network and continue with the configuration. I’m not sure why it was unable to find the device by scanning. Perhaps the timeout for the search is too short. My network had 25 active devices at the time the scan was performed, and perhaps the scan didn’t have enough time to scan all of the devices to find the Smart Switch.
For the manual method, using the app-based Wi-Fi site survey also was problematic. The site survey found 22 networks, but failed to find my own two networks. I had a similar problem with the Web-based UI (more on that later), which seemed to have a limit of 31 networks.
I will admit that my condo-based office is in an area with a lot of Wi-Fi networks. Most people in our community have Comcast as an ISP, which has been providing wireless routers with Wi-Fi enabled for every customer – whether they use it or not. The number of visible wireless networks, along with those that don’t broadcast their SSIDs, appeared to be more than the app could handle.
Once you’ve connected to your network, the Wi-Fi range extender is configured. After connecting the device to my home network using WPS, the THA-101 still appeared in my network list asTHA-101_C058. When I attached to that network name and provided the default password, I had Internet access, which showed that the range extender was working.
If you want to change the name of the wireless network on the extender, it’s easy to do with the web browser interface (see section below). Some people may prefer to have an extender use the same SSID as the network it is extending. In fact, that’s how Linksys configures the RE6500 wireless extender. I usually append "-Ext" to my WLAN’s SSID when using wireless extenders, so that I know for sure which AP I’m connecting to.
To test the THA-101’s range extender, I moved the device to another room in my condo. Granted, my condo isn’t too large and is mostly adequately covered with my D-Link DIR-880L. However, from my upstairs office, I connected to the THA-101 which I had located downstairs. Attached to the extender, I successfully streamed HD video from Hulu Plus without interruption, jitter or pixelizing.
Once configured, you’ll be able to control the switch from anywhere. TRENDnet’s app appears to use some sort of relay, because it didn’t require that I manually open router ports or enable UPnP on my router. I tested the app using public Wi-Fi at a local restaurant as well as on my 4G LTE cell phone with Wi-Fi disabled and was able to control the switch just fine.
Once you fire up the app, you’ll land at the home page shown in the left panel of the composite image below. If you tap on the power outlet icon to the left of the device name, you will land at the Device Status page. It will show that the load socket on the device is either energized (center), or turned off (right). Tapping on the large power icon will toggle the load socket off or on.

TRENDnet THA-101 iOS mobile app Home page and Device Status pages
It is very easy to set up a schedule using the browser-based interface or either of the mobile apps. The composite image below shows the creation of an “On” schedule on Saturday. The left two panes show the scheduling on iOS. On my Samsung S5, the aspect ratio is somewhat different than the iPad, so the day of week selection appears on the same page rather than on a separate page.
 and Android (right) apps")
TRENDnet THA-101 schedule creation with iOS (left and center) and Android (right) apps
Web Browser Interface
You can also log into the device’s web browser interface if you’re connected to your local network. With the browser interface, you can configure every feature of the THA-101, including creating schedules. If you haven’t changed the factory default settings, you can attach to the THA-101’s wireless network using the name found on the label. Once connected, you can go to http://192.168.10.100 and use the default login credentials of admin/admin as shown on the label. NOTE: If 192.168.10.X isn’t your router’s IP subnet, you’ll need to change the IP of the device you’re connecting to the THA-101 to an IP address in that range.
I didn’t connect to the Web browser interface until after I had configured the THA-101 using the mobile apps. So finding the IP address of the configured device can be a bit of a challenge. Most of our readers will probably feel comfortable logging into their router and looking for the device in the device or DHCP lease table. You can also ping the default host’s name, THA-101, to determine the IP address as shown below.
 to determine the IP address")
Ping the default host name (THA-101) to determine the IP address
On my iPad, one of my favorite iOS network utility apps is Overlook Soft’s Fing. It scanned my local network for active IP addresses and services and easily found the THA-101 at 192.168.1.44.

iOS app Fing also found the IP addres of the THA-101
Here’s the status page from the browser-based interface.

TRENDnet THA-101 Web UI status page
I’ve included a gallery showing additional screenshots from the web UI. It’s much like what you’d find on a wireless extender, plus the additional features of power control and scheduling. Interestingly, you can add/remove schedules, but you can’t edit previously saved schedules.
After clicking on Add device, you can search for the Smart Switch on the LAN or scan the QR Code on the label.
Device detail
Device found
Home page showing configured device online
The Advance Setting menu takes you to the Advanced settings menu
Set schedules, passwords or scan for Wi-Fi Networks
Closing Thoughts
I followed the setup instructions in the Quick Start Guide, as that’s probably what many consumers would do – assuming they read directions at all. I was disappointed that the device wasn’t found on the local network with the LAN search feature and that the site survey within the apps didn’t find either of my two wireless networks, despite multiple attempts. It appears that there’s a limit of how many wireless networks both the apps and the web UI can display.
I’ll admit that, for a SOHO network, I have a significant number of connected devices and that my 2.4 GHz RF environment is terribly crowded with sometimes upwards of 40 in-range networks. Both of those conditions may have contributed to my setup issues. Consumers with less crowded wireless environments may not experience either of the problems that I ran into.
Having set up hundreds of browser-based devices, I was tempted to go directly to the web UI and skip the instructions in the QSG. You might try the same thing if you experience setup problems. I did find that using the QR Code was a sure-fire way for the apps to find the device on the local network. And, if you have a device that doesn’t have a camera to scan the QR code, you can enter in the 20 digit device ID code – it’s printed on the back of the device.
Once configured, the device performed flawlessly. The range extender did what it was supposed to do. I streamed video via the extender from a normally low-signal room without any problems. I was also able to turn devices on and off remotely—something I like to do while I’m away on vacation—as well as on the defined schedules. I especially like that you can see how much power is flowing through the THA-100. I plugged various devices into a power strip just to see how much energy they were using.
So if you’re looking for a simple single band N300 range extender or a smart switch, why not get both with the TRENDnet THA-101?