| At a glance | |
|---|---|
| Product | Insteon HomeKit Enabled Hub (2243-222) [Website] |
| Summary | One of the first available Smart Home hubs that works with Apple’s HomeKit |
| Pros | • Dual mesh architecture for robust connection • Supports many devices • Hierarchical structure eases large network management • Siri Voice control of devices, zones, rooms, and scenes |
| Cons | • iPhone app only • Not all Insteon products are supported • Relatively expensive • No email, SMS or in-app notifications • Requires Apple TV for remote access • Siri still a work in progress |
Typical Price: $0 Buy From Amazon
Introduction
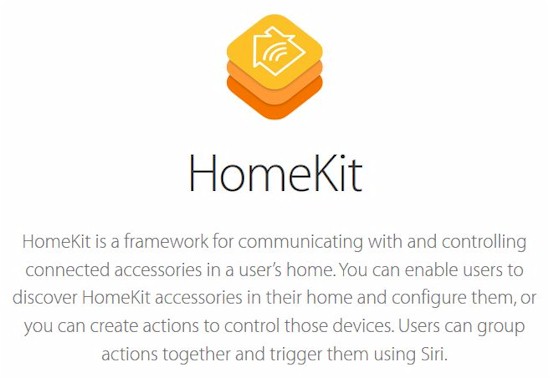
Apple’s HomeKit is "a framework for communicating with and controlling connected accessories in a user’s home" that was announced at the June 2014 WWDC. It has been anticipated with both excitement and dread. Excitement by consumers hoping for a way out of the morass of incompatible products that define today’s SmartHome market. Dread by the makers of those incompatible products.
A spate of HomeKit product announcements earlier this year at CES 2015 helped keep interest alive and now about a year after HomeKit was unveiled, the first products are starting to trickle onto store shelves. Here’s a page that shows the current handful of products that work with HomeKit. One of those first products is Insteon’s HomeKit Enabled Hub (aka Hub Pro model 2243-222) that is the focus of this review. But first a little HomeKit background.
HomeKit is a set of protocol specifications that enable Smart Home products to communicate. It’s part of Apple’s MFi Program ("Made for iPhone/iPod/iPad"), so could hold the same potential for Smart Home focused Apple partners to make money on Apple-blessed devices as it has provided for iPhone/iPod/iPad accessory makers.
HomeKit primarily focuses on devices that use Wi-Fi and Bluetooth / Bluetooth LE to connect. But Apple has allowed devices using ZigBee, Z-Wave and other proprietary technologies to also communicate via HomeKit-enabled bridges. However, 9to5Mac reported Smart Home / Home Automation devices already connecting over Wi-Fi will need to have HomeKit native versions, as will many Bluetooth-based products.
Another interesting factoid is that all HomeKit certified devices must contain a HomeKit chip obtainable only from Apple. So that’s why manufacturers can’t simply HomeKit-enable existing products by simply upgrading software / firmware and passing Apple’s HomeKit Certification process.
So what’s the big deal with HomeKit? In a word, Apple. HomeKit imparts the same easy-to-use-by-the-rest-of us aura to a category of products that currently are loved more by DIY home improvement geeks than Apple’s traditional fanbase. By having a “Works with Apple HomeKit” certification, consumers will know that products interoperate and have Apple’s blessing.
![]()
Works With Apple HomeKit Logo
Finally, there’s Siri. If you’ve dreamed of talking to your house and having it obey, HomeKit will be for you. Siri plays a key part in HomeKit, as we’ll see later.
Insteon
Insteon has been around since the late 90s, when founder and CEO Joe Dada acquired two product-engineering firms to speed up development of a proprietary home-networking protocol that in 2005 became the mesh networking technology that is at the core of all Insteon products. Insteon uses a dual-mesh network that combines powerline and RF media vs. the single RF network (ZigBee, Z-Wave, BlueTooth, Wi-Fi) used by other Home Automation technologies
The dual-mesh network provides redundancy and higher reliability for delivering signals to connected devices. An Insteon whitepaper highlights key dual-mesh network advantages:
- INSTEON is a true peer-to-peer dual-mesh network. Its most important property is its simplicity.
- INSTEON messages are fixed in length and synchronized to AC powerline zero crossings. Because messages propagate by synchronous simulcasting, no network controllers or routing tables are necessary—a three-byte source and destination address in each message suffices.
- Optimized for home command and control, INSTEON allows infrastructure devices like light switches, clocks, thermostats, security sensors and remote controls to be networked together at low-cost. In turn, these devices can appear as nodes on larger networks, such as Wi-Fi LANs, the Internet, telephony and broadband entertainment distribution systems, because INSTEON can connect to them using internetworking devices.
For further technical drill-down, check this white paper.
I found several interesting comparative charts on the Insteon site. The first chart compares Insteon with the other popular HA networking methods. As you can see, Insteon uses the 915 MHz band for one of its Physical Layers. The lower frequency propagates farther in the home than 2.4 GHz radios and Wi-Fi can’t interfere with Insteon products.

Comparison of Insteon and other HA architectures
The chart below, developed by Insteon, shows a comparison of sensors and features available with competing Home Automation Systems. Several things are worth noting: First, WeMo also has ZigBee devices such as the WeMo Light bulbs.
Second, and more importantly, not all of Insteon’s devices shown in the chart are currently compatible with the Hub Pro and its companion Insteon+ app. Essentially, lights, dimmers and switches are currently compatible. Sensors (open/close, leak sensors, motion sensors), thermostats and cameras are currently not supported, but Insteon plans to include at least some of these devices in the future. Here’s a link that shows current Insteon+ compatability with Insteon devices.

Insteon comparison to other HA systems
Product Tour
The Hub Pro is priced at $149.99. This is relatively expensive compared to other HA hubs which, when bundled in starter kits, cost between $30-$50.
Since there really aren’t many true HomeKit devices available, I’ll be testing the Insteon Hub Pro with three supported products Insteon shipped in the review kit:
- Insteon Lamplinc 2457D2 Plug-in Lamp Dimmer Module ($49.99)
- Insteon 2635-222 On/Off Module ($49.99)
- Insteon 2672-222 LED Bulb ($29.99)
There’s really not much to talk about when it comes to the physical product. Most of the HomeKit “secret sauce” is in the Insteon+ app. The Hub Pro itself includes Apple HomeKit chip I talked about earlier. The Insteon Hub Pro is built in a glossy white plastic box measuring 1.5″ H X 7.0″ W X 3.75″ D. On the front top left corner, there’s a single multi-color LED that indicates status. On the rear, there’s a single 10/100 Mbps Ethernet port, two USB 2.0 ports that are reserved for future use, a reset button a set button used for linking some devices and AC power connector. The callout below shows the front and rear panel layouts.

Insteon Hub Pro front and rear callouts
The Insteon Plug-in Lamp Dimmer Module measures 3.2″ H X 2.05″ W X 1.05 ” D and comes in a glossy white plastic case that matches the Hub Pro and the On/Off switch. On the bottom, there’s a two pin polarized outlet. The callouts below show the set button and the Up/Down switches which can be used to manually dim lights up/down, or turn the lights on/off. The module has a maximum load capacity of 300 W.

Insteon Plug-in Lamp Dimmer callouts
The Insteon On/Off module looks very similar to the dimmer module. Its dimensions vary slightly as it uses a three pin grounded plug and a three pin NEMA 5-15 outlet for the control socket. It measures 3.24″ H X 2.08″ W X 2.02 ” D. The load rating for general appliances and resistive loads is 15A Max. For incandescent lights, it can handle up to 1800 W Max. It can also be used to switch on motors up to 1 HP maximum. The callout shown below is functionally identical to the dimmer module with the exception of the ground plug and receptacle.

Insteon On/Off Switch callouts
The Insteon light bulb is slightly wider and taller than a traditional light bulb. It measures 2.8″ (72mm) diameter and 4.7″ (119mm) tall. According to the Insteon spec sheet, a regular bulb measures 2.66″ diameter and 4.28″ tall. The bulb is a 60W equivalent device that draws 9 W. The color temperature is rated 2534K – warm white. LED life is rated at 52,000 hours.
While the bulb supports programmable ramp rates, that feature is a custom feature not supported by the Hub Pro or Insteon+ application. While most Insteon bulbs and dimmers support ramp rates, that is not part of the HomeKit specification. So Insteon didn’t include that feature, to remain consistent with other HomeKit devices.
Inside
The Hub Pro is about twice as large as Insteon’s Hub (2245-222). That’s power board is on the right in the FCC ID photo below. The crude-looking thing on the left is a temporary RF shield that had to be cobbled together during FCC certification testing to get the unit to pass. I didn’t open my review sample, but persumably, that’s been neatened up in production units.

Insteon Hub Pro inside
Here’s a bettter view of the logic board without the big shield on the left. That little board again crudely tacked on, has RF filters that needed to be added.

Insteon Hub Pro boards
Most of the components that do the work are on the underside of the logic board. That’s another tacked-on shield, covering a Microchip PIC16F9 something (the whole part number was unreadable) 8 bit microcontroller that could be a custom model.

Insteon Hub Pro logic board bottom
There’s also a Microchip PIC18F25J10 8 bit microcontroller on the bottom of the power board highlighted in red. The other components were not clear enough to identify.

Insteon Hub Pro power board bottom
Installation
I’ll be going into quite a bit of detail for the Insteon+ application, which is required to work with the Insteon Hub Pro. Right now, Insteon+ is iPhone only; the iPad app is currently in development. If you are using an iPad and go to the App store and search for the Insteon+ app, you won’t find it. Again, the Insteon app (sans "+") won’t work with the Hub Pro.
Since I have a Samsung S5 and not an iPhone, I initially thought I wasn’t going to be able to review the product. However, on the Insteon.com’s home page, there’s a link that takes you to the Insteon+ app’s iTunes web page, which I used to download the app onto my iPad. The app ran on my iPad, and I noticed some screen layout issues, as expected. But I was able to use the app to complete this review. Note Insteon+ requires iOS 8.3 or later.
Like virtually all Home Automation programs, the first step of the setup process is to create an account. All of the installation and configuration, including the account creation, it performed using the Insteon+ app.
Until you add some devices, zones and rooms, the Insteon+ app is barren. The landing page will look like the image on the left. By default, there is only one Home, but Insteon+ is flexible enough for you to create multiple homes should you be lucky enough to own more than one. If you click on the Home icon, the page on the right appears. Of course, at this point the all devices is barren, too. Click on the + in the upper right corner (highlighted) to start building your Insteon system.
 and all devices (right)")
Insteon+ Home screen (left) and all devices (right)
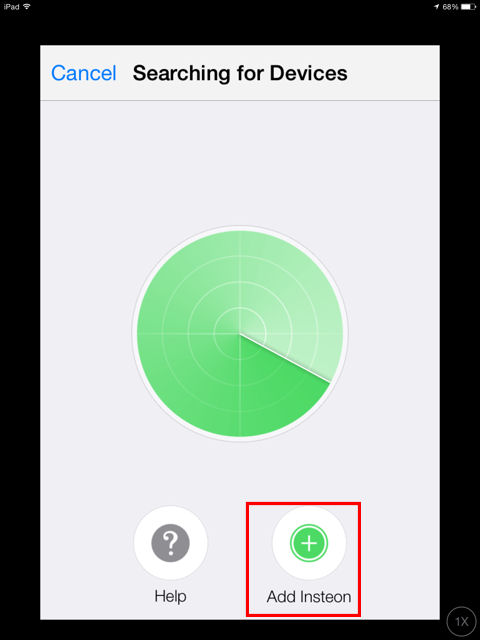
After you create your account, you need to discover the Hub Pro. Click on Add Device (highlighted), and the app will start searching and should discover your hub. Once found, you will be prompted for an eight digit number in the format XXX-XX-XXX. You can find this unique number on a label on the bottom of your Hub. After the Hub is added, you will be given the opportunity to name the Hub (default is Hub Pro) and to select an appropriate icon for the hub. The image below shows the Extend Your Home page (left), as well as the prompt for the unique hub identifier prompt (right).
, Enter Hub ID (right)")
Insteon+ Add device (left), Enter Hub ID (right)
Hierarchy
The Insteon+ architecture is hierarchical. At the top of the hierarchy, you have Home. The next level down is Zones. Depending on your environment, Zones can be a good way to segment your devices. In my testing, I created two Zones: First Floor and Second Floor.
The next level is Rooms, which can be assigned to Zones. For my Insteon network, I created the rooms Office and Living Room. As you create Rooms, you can assign them to one of your Zones. I assigned Office to the Second Floor Zone, and Living Room to the First Floor Zone.
At the lowest level of the hierarchy you’ll find Devices. You assign Devices to Rooms. From a setup standpoint, it doesn’t really matter too much which you use to set up your network. You can add all of your Devices and leave them unassigned until you create Rooms and Zones. Alternatively, you can start at the top and create Zones and Rooms first and as you add Devices to your network, you can just assign them directly to Rooms.
At this stage of my setup, I now had two Zones and two Rooms. Each Zone had one Room assigned to it. Next, I added some Devices. Adding an Insteon device is slightly different than adding a HomeKit device. On the Add Device page, you click on Add Insteon. You are then prompted for a six digit hexadecimal number for the device you want to add. That unique number is printed on each Insteon device.
Gallery 1 below shows the process for adding an Insteon Device.
From the Add Device page, click on Add Insteon
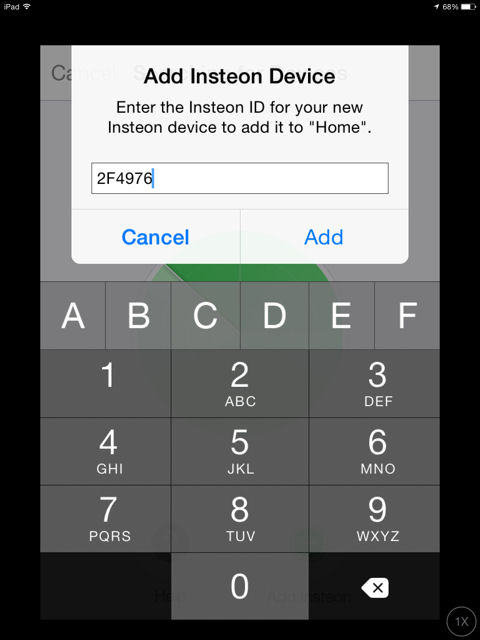
Enter the six digit address found on the Insteon device being added to your network.
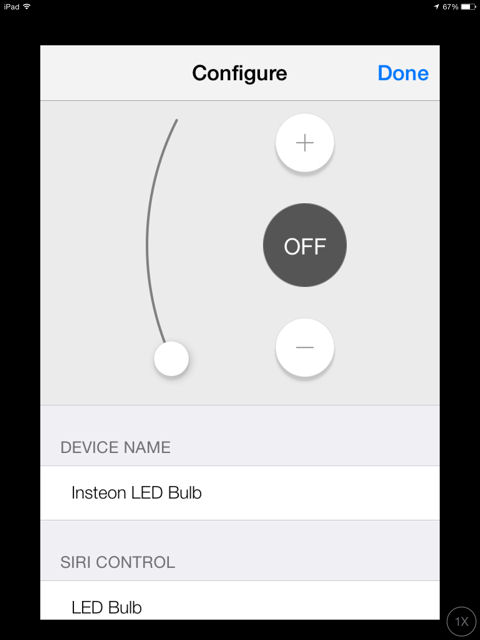
You can configure the device name, Siri Control. Not seen on this page are selection of an icon, or the assignment to a room.

Here, I changed the Siri Control to a name that is easier to remember and pronounce
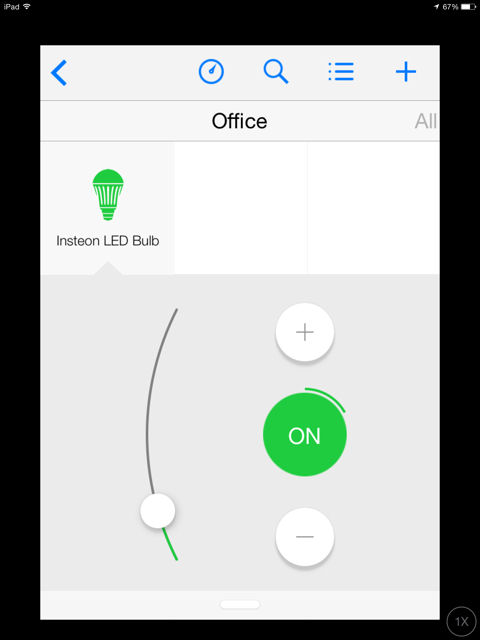
This shows that the bulb was assigned to the room "Office" The light is currently turned on at about 25% brightness. You can drag your finger up and down the arc or use the plus or minus key to change brightness. Both green icons turn gray when the bulb is turned off.
As you add a Device to your network, one of the fields you can change is Siri Control. This is that name used with Siri to directly address the device. For the Insteon LED bulb, the Insteon+ app suggested "LED Bulb". But I renamed the bulb “Office Light”. I thought that the name was more descriptive, not to mention easier to say. Remember, whatever names you assign to Zones, Rooms or Devices need to be something that Siri can easily recognize. The image below, also included in the gallery, shows renaming the Siri Control (name) to “Office light”.

Give your devices a Siri Control that’s easy to remember and pronounce
Creating a Zone is quite easy. From the Extend Your Home Screen, accessed by the “+” icon, just tap Add a Zone. Fill out the name of the Zone, select an appropriate icon and select the room(s) to be included in that zone. Similarly, adding a new Room is simple. Just tap Add a Room, give the room a name, select an icon, select the zone and select the device(s) to be included. The composite screenshot below shows the entire process for Adding a room to your network.

Insteon+ Add Room
Scenes & Schedules
So far, we’ve talked about Zones, Rooms and Devices and that they are arranged in a hierarchy. We have just a couple more topics left to discuss before we get to the “fun” stuff.
Unlike some other Home Automation systems I’ve looked at, Insteon+ doesn’t let you directly schedule a device. Instead, you schedule a Scene, which is an action for a Device or group of devices. In the gallery below, I created a scene named “5 O’clock Somewhere”. I added the dimmable LED bulb as well as the Lamp Dimmer module to the scene.
Each Device in the Scene can be individually configured (custom), or you can configure similar Devices as one. I set each Device to turn on at ~ 25% brightness. Since Scenes include selected hardware, those selections transcend Room and Zone assignments. Scene Devices can be anywhere in the hierarchy. This provides a lot of flexibility. Each Scene can be executed directly from the Dashboard, shown in the navigation section below.
From the Add Device page, click on Add Insteon
Enter the six digit address found on the Insteon device being added to your network.
You can configure the device name, Siri Control. Not seen on this page are selection of an icon, or the assignment to a room.
Here, I changed the Siri Control to a name that is easier to remember and pronounce
This shows that the bulb was assigned to the room "Office" The light is currently turned on at about 25% brightness. You can drag your finger up and down the arc or use the plus or minus key to change brightness. Both green icons turn gray when the bulb is turned off.
Now that we’ve created a scene, we can create a Schedule using that scene. A Schedule can include more than one Scene. I found the scheduling options lacking compared to other Smart Home apps I’ve reviewed. Missing, for example, is the ability to schedule scenes for sunrise or sunset.
Repeat options are similarly limited. For the Daily repeat option, there are no options. It will run every day of the week. You can’t, for example, select only Monday Wednesday and Friday. Nor are there weekday-only or weekend-only options. For weekly repeats, you can’t choose more than one day per week. If you wanted a Schedule for Monday and Friday each week, you’d have to create two Schedules. The Monthly Repeat Frequency also has a limitation of a single day per month. Each Schedule is fully editable, and there’s a toggle to enable or disable each Schedule. You can also add / remove Scenes to / from a Schedule.

Insteon+ Schedule Scene
Navigation
Insteon+ provides tools for navigating through the hierarchy. From the Zones page (one level down from Home), you’ll see some navigation icons at the top of the screen. This navigation bar also appears on Room pages, individual Zone pages and the All Devices page. The screenshot below shows the All Devices page with the navigation icons across the top of the screen. Highlighted in red is the Dashboard icon. Highlighted in green is the search icon (obviously). The Menu icon, highlighted in blue takes you to the Configure your Home screen. Here you can edit Devices, Rooms, Zones, Schedules and Scenes.
, Search (green) and Configure Your Home (blue)")
Insteon Navigation showing Dashboard (red), Search (green) and Configure Your Home (blue)
The composite screenshot below shows the Dashboard (left) Search (center) and Configure you Home (right) submenus. The Dashboard is fully editable, and you can configure which items you see and which one are suppressed. The Dashboard gives you a quick summary including a listing of which devices are on.
 Search (center) and Configure you Home (right) submenus")
Dashboard (left) Search (center) and Configure you Home (right) submenus
In the Search screen, I’ve shown 2 scenarios. At the top of the screen, I tried to search for the scene that I created earlier – 5 O’Clock Somewhere. This shows that the search works only across Devices, Rooms and Zones. You can’t search for scenes or schedules. The bottom image shows searching for “First” and the results turned up First floor under zones.
From the Configure Your Home screen you can edit virtually anything. Editing includes deleting Devices, Zones, Rooms, Schedules and Scenes.
Siri
One of the promises of HomeKit is that you’ll be able to use Siri to control your jome using only your voice. And, indeed, you can…. sort of. The image below, taken from the Insteon Hub Pro instruction manual, shows the command sturcture Siri uses. As you can see, the vocabulary is fairly limited. And, as noted, some of the examples shown are for devices that haven’t yet been implemented in Insteon+.

Insteon + Siri commands
To use Siri to control your Insteon/HomeKit devices, you just double tap the button on your iPhone, say the action you want to perform, the Device or Scene and optionally, the location. You can also skip the Device/Scene step and say, for example, “Turn off First Floor”. The composite screenshot below shows, starting from the top down, controlling the entire home, a Zone, a Room, and a Device. It also shows several tests for dimming various devices or locations.

Insteon+ collection of Siri tests
For the most part Siri successfully executed the commands issued. However, there were some instances when Siri reported back that it had dimmed both bulbs when I directed it to dim only a Device or a room with a single bulb. I also had some frustration using Siri.
Probably the biggest problem I had was Siri misinterpreting the command Dim. Since Dim is such a major command, I would have thought Siri could nail it every time. But it didn’t. Sometimes, the response from Siri was “Which Jim?” followed by a list all of the Jims from my contact list. Another time, Siri said it couldn’t edit a specific “Jim” contact because the contact was synchronized from Exchange.
The web is full of “Epic Siri fails”. I’m not sure that Siri’s shortcomings with controlling Insteon devices rise to the level of epic, but some of them were amusing. The screenshot below shows Siri’s reponse when I tried to “Jim (sic) lamp dimmer to 50%”.

Insteon+ HomeKit – Siri had trouble with the word “Dim”
I’ve also included a short gallery of “Jim” Siri fails below. Once out of frustration, I asked Siri “why can’t you understand the word dim”. The fourth slide shows Siri’s reply. In fairness, Siri does have a “tap to edit” feature, so you could change Jim back to Dim using the keyboard, but on an iPhone, that’s a bit difficult. It also somewhat negates the advantage of using voice for control – at least for that command. Of course, Siri might like your pronunciation of “Dim” better than mine. Perhaps the promised Siri improvements in iOS 9 will make Siri’s recognition and interpretation more accurate.
From the Add Device page, click on Add Insteon
Enter the six digit address found on the Insteon device being added to your network.
You can configure the device name, Siri Control. Not seen on this page are selection of an icon, or the assignment to a room.
Here, I changed the Siri Control to a name that is easier to remember and pronounce
This shows that the bulb was assigned to the room "Office" The light is currently turned on at about 25% brightness. You can drag your finger up and down the arc or use the plus or minus key to change brightness. Both green icons turn gray when the bulb is turned off.
Closing Thoughts
As noted in the opening, this review is as much about HomeKit as it is Insteon’s Hub Pro. Since we couldn’t get our hands on any pure HomeKit devices, using Insteon’s Hub Pro and its proprietary protocol devices was the next best thing. Our thanks to Insteon for providing one of the first group of HomeKit enabled Hubs for this review.
HomeKit faces several hurdles that competing Home Automation systems don’t. First, it’s iOS only, so that eliminates a huge market segment. Second, we were a bit hampered in the review by the lack of an iPad app. But the iPhone app, once found, ran on the iPad well enough to provide a good feel for working with HomeKit.
Third, if you want remote access to your HomeKit system, you’ll need to make an additional purchase of an Apple TV (3rd generation or later with software version 7.0 or later according to this Apple Support doc). While you can buy a refurbed 3rd Gen Apple TV from Apple for $59, it’s an additional expense to incur as well as an additional hassle to set up. Most of the other Smart Home products I’ve reviewed have remote access baked right into them and setup is part of the initial configuration.
Like all other Smart Home devices with the exception of Belkin’s WeMo, the Insteon Hub Pro requires an internet connection to work, even locally. When I pulled the internet connection for my usual test, I lost the ability to control anything connected to the Hub Pro.
Insteon’s Hub and devices were easy to set up and configure. But I had to adjust to the Insteon+ app’s HomeKit scheduling method. Most HA systems allow scheduling devices directly. With HomeKit, you schedule Scenes that can contain one or more devices – regardless of where the devices are assigned in the Home/Zone/Room hierarchy. Scheduling features, as pointed out above, need some additional work.
I encountered a disturbing issue that popped us just as I was wrapping up the review. While I shut down all devices last evening using Siri and my “Turn off home” command, this morning I was unable to connect and control any devices. In fairness, we had an electrical storm last night and my power fluctuated briefly.
After trying less drastic measures, Insteon instructed me to do a factory reset. That solved the problem, but I had to re-create everything: Zones, Rooms, Scenes, Schedules and Devices. It would be nice if a future release supported saving a configuration file – much like you can do with most consumer routers. Hell, since the Hub is internet connected anyway, I should have been able to restore my configuration from Insteon’s cloud. My setup was small enough that the reset was a minor inconvenience. With a larger setup, I would really have been an unhappy camper.
In the end, HomeKit’s is unlikely to rock the Smart Home / Home Automation world based on features, at least not in its present form. Other systems have more features (programmable dimming ramp rates, sunrise / sunset schedules, geofencing, etc.) and have remote access supported in the base product. And Amazon’s Echo has already stolen the thunder from one of HomeKit’s signature features—Siri voice control. Echo already supports Belkin WeMo switches, Philips Hue lights and Wink-compatible lighting products from GE, Leviton, and Lutron, albeit at a significant $180 price.
HomeKit’s biggest asset is Apple’s ability to attract companies to the product ecosystems it establishes. In a world of frustrated Smart Home product buyers wandering alone in the world trying to figure out what works with what, one system to rule them all looks mighty attractive. At least owners of HA systems built with Insteon’s deep catalog of products now have a bridge to Apple’s brave new HomeKit world.