Introduction
Users of WinXP and Win2000 frequently can connect to the Internet, but have problems getting File and Printer sharing to work properly. Sometimes it doesn’t work at all, sometimes only some machines on a network can share, and sometimes machines can share, but only in one direction.
I can, and did, feel your pain, since I battled this problem myself and ended up reinstalling XP to get rid of it (yes, there’s one tip right there). But this article will share tips for less drastic steps you can take to get your My Network Places happy happy again.
TIP: This article assumes that your network connection is basically working. If you need help making that so, try Troubleshooting Home Networking in Windows XP (Microsoft Knowledge Base Article – 308007)
This article will focus on WinXP, but some of the solutions – with modification – should work for Win2000, too.
Tip 1: Check the Basics
WinXP configures TCP/IP as its default network protocol and it’s all you need for both Internet and file sharing. If your Internet connection is working, then TCP/IP is installed and working, so you can at least cross that off your troubleshooting list. However – as anyone reading this article already knows – a working TCP/IP connection does not guarantee that file sharing is alive and well.
WinXP should also install and enable Client for Microsoft Networks and File and Printer Sharing for Microsoft Networks service – both of which are required to share files and printers – on all network adapters. But you should first visit the Local Area Connection Properties (Start > Settings > Network Connections) for your network adapter (Figure 1) and make sure both are there and have their boxes checked.
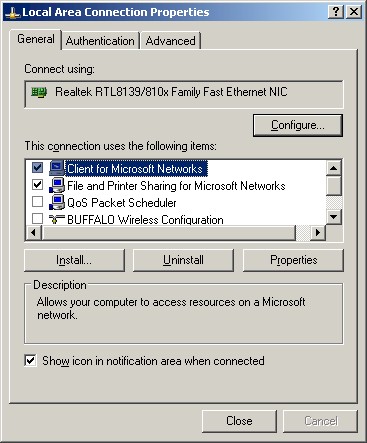
Figure 1: Local Area Connection Properties
Since you’ve got this window open, scroll down to the Internet Protocol (TCP/IP) protocol, click the Properties button, and the Advanced button on the window that opens. Figure 2 shows where you want to check next and what it should look like. The Enable NetBIOS over TCP/IP setting is needed because NetBIOS is what Windows uses for file and printer sharing.
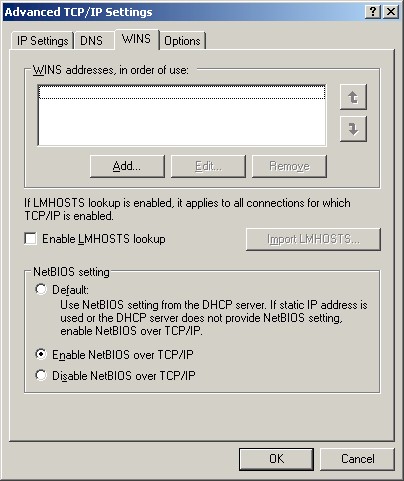
Figure 2: Checking NetBIOS over TCP/IP
Tip 1: More Basics
As long as you’re checking the basics, open the System Control Panel and go to the Computer Name tab. You can name each computer as you like (as long as each one has a different name). But make sure the Workgroup name on all systems is the same.
Given the limitations of previous versions of Windows and my own paranoid tendencies (at least when it comes to Windows networking…), I only use numbers and letters for both names and always use ALL CAPS for the Workgroup name.
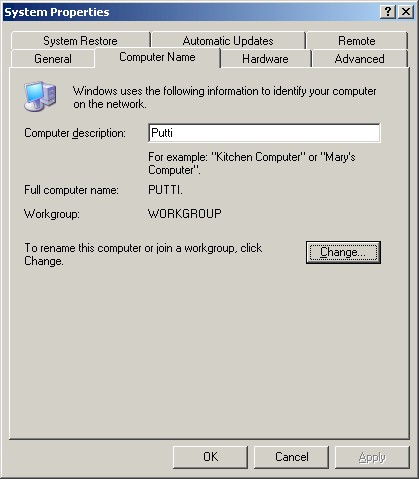
Figure 2: Computer and Workgroup Names
I’m assuming that most LANs will be running off a single router with clients set to be DHCP clients (obtain address automatically). This should put all clients in the same Class C subnet with all IP addresses having the same first three “octets” (Example: 192.168.0.X).
But, what the heck, check the IP addresses on each computer anyway, to make sure they’re following this rule. XP makes it easy, as shown in Figure 3.
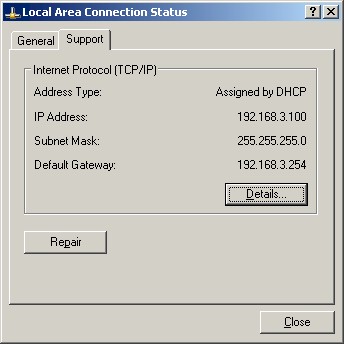
Figure 3: Verifying IP address info
The last basic we’ll check is the Server service that actually shares the files. This is normally started when Windows boots up, but sometimes those helpful little “Wizards” that come with various pieces of networking gear or applications can get carried away and disable the service.
Open the Services Management Console (Start > Programs > Administrative Tools > Services) and scroll down until you find the Server service shown in Figure 4.
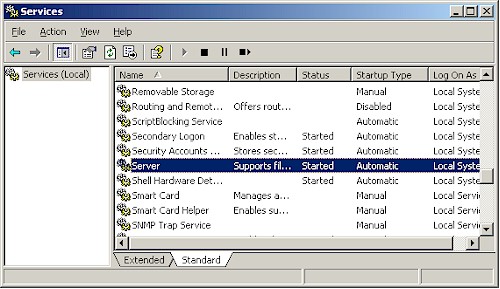
Figure 4: The Server service
Double click it to open its Properties window and make sure it looks like Figure 5.
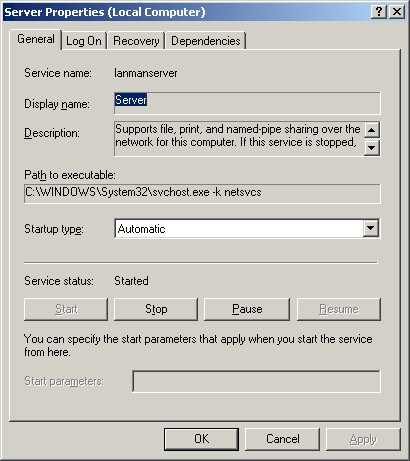
Figure 5: The Server service’s Properties
If you make any changes, close each window by hitting the OK button, and you’ll probably want to reboot. If no changes are made, just close [X] or cancel all windows. [Thanks to Dan Withers for submitting this Tip!]
Tip 2: Shut off or configure Personal Firewalls
Personal firewalls (XP’s Internet Connection Firewall [ICF], Norton Internet Security, ZoneAlarm, etc.) monitor (and block) all network traffic in and out of the machines they run on, which usually includes file and printer sharing requests.
The first stop in this category is to make sure that ICF is disabled on every computer on your LAN. ICF is pretty basic, i.e. non-configurable, and only intended to be run on machines directly connected to the Internet. If it’s enabled on computer that are behind a hardware router’s firewall, that machine is guaranteed to have problems with File and Printer sharing. Figure 6 shows where ICF is located and how it should look when disabled.
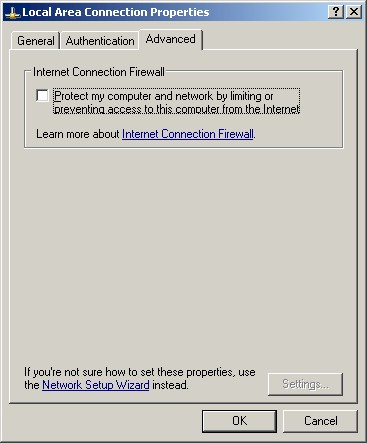
Figure 6: Internet Connection Firewall disabled
Most other personal firewalls are configurable and can be set to let Microsoft Networking traffic pass without problems. But if you don’t know how to do this, you better disable, or better yet, uninstall them until you get file sharing working.
Tip 3: Virtual LANs and Wireless “Privacy”
Consumer networking gear is getting more sophisticated with features appearing that previously were only available in “enterprise” grade equipment. Although it’s unlikely, your router could have Virtual LAN (VLAN) capability that could prevent file sharing from working.
A primary purpose of VLANs is to allow computers on different physical networks to behave as though they were all on the same network. But that same capability can also be used to isolate computers attached to the same router or switch so that they can’t communicate with each other.
Unless your router (or switch) specifically states that it has VLAN capability (and provides a means to control it) you can safely assume it’s not VLAN capable. If your networking gear is VLAN-enabled, then dig into the manual and find out where the settings are and make sure that all the settings are cleared.
Wireless Access Points and routers, however, are a different story. Some products implement a “wireless privacy” feature (it’s also known by other names) that allows wireless stations to connect to the wired LAN, but not to another wireless client. If wireless client-to-client file sharing isn’t working, check your access point or wireless router’s settings carefully and look for this setting.
Tip 4: Network Browsing problems
If you’ve gotten this far, your problem is likely caused by Windows Network Browsing having gotten itself confused. What’s Network Browsing? Let’s see what Microsoft has to say:
From Description of the Microsoft Computer Browser Service (Microsoft Knowledge Base Article – 188001)
The primary function of the browser service is to provide a list of computers sharing resources in a client’s domain along with a list of other domain and workgroup names across the wide-area network (WAN). This list is provided to clients that view network resources with Network Neighborhood or the NET VIEW command.
In other words, the Network Browsing function keeps track of the computers on the network and causes them to appear in Network Neighborhood / My Network Places. It’s not actually required for file sharing, so it’s possible to still share files and printers by bypassing this function.
To see if Network Browsing problems are what’s ailing you, try the following:
Step 1: Find the IP addresses for two computers that aren’t file sharing properly.
Step 2: Start > Run and type in ipaddress where ipaddress is the IP address of the other computer you’re trying to reach.
If a window opens showing the shares of the desired computer, then file sharing is actually working fine, but Network Browsing isn’t.
Note that the shortcut will work only as long as that computer’s IP address stays the same. So if you’re going to rely on this workaround, I recommend you assign static IP addresses to all your LAN’s machines.
One of the things that can go wrong is the Master Browser election process. There is only one Master Browser allowed on the network and its job is to collect all the “Hey, I’m computer X at IP address Y” announcements sent by each computer, compile them into a list, then make that list available to all computers on the network. This list is what your computer uses to populate the Network Neighborhood / My Network Places window with available computers.
You can see which computer is currently the browse master by running the nbtstat -n command on each machine. Figure 7 shows the result on the computer that is Master Browser. Your result will probably be different, but you should see your the computer’s name, the Workgroup it belongs to and, most importantly the ..__MSBROWSE__. line.
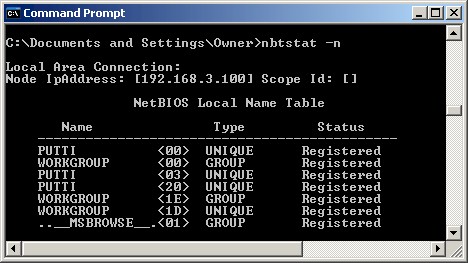
Figure 7: Browse master
Figure 8 shows what you’ll see on the other computers in the workgroup – basically everything except the ..__MSBROWSE__. line.
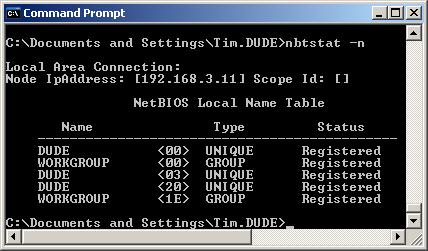
Figure 8: Not the Browse master
Only one Master Browser is allowed per network segment and all the computers on a segment are supposed to get together and decide which one is the Master Browser. This process normally works fine as long as computers join and leave the network in a controlled way. When the Master Browser shuts down, for example, it politely announces that it’s leaving the network and the other computers once again elect a Master Browser.
Problems can occur, however, when the Master Browser suddenly drops off the network. Windows crashes are one cause of an abrupt exit, but wireless networks can have plenty of less-than-graceful departures of stations due to all the wonderful things that happen in a wireless network. So you can see that if a wireless computer happens to get elected Master Browser, then you’re probably in for trouble.
What happened in my case was that my wireless laptop – which get subjected to all sorts of networking mayhem as my test client – of course won the election as Master Browser at some point. This generated the dreaded one-way sharing problem that drove me nuts, until I wised up and worked around it via the ipaddress trick mentioned above. I eventually ended up doing an XP reinstall (but not a reformat and reinstall), but you may want to try something less drastic – essentially rigging the Master Browser election process, which I’ll describe next.
Tip 4 (continued): Controlling the Master Browser election
Before WinXP “improved” networking, you could control whether a computer participated in Master Browser elections via a Property in the File and Printer Sharing for Microsoft Networks service (Figure 9).
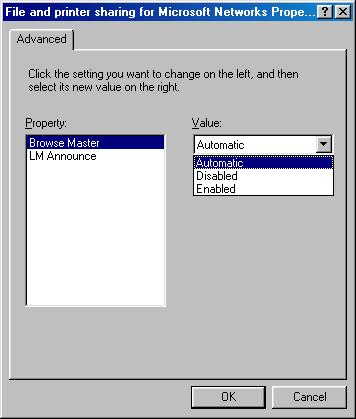
Figure 9: Controlling Browse Master election – Win98SE
You can still do this in WinXP, but the control has been moved to the Services Management Console (Start > Programs > Administrative Tools > Services) shown in Figure 10.
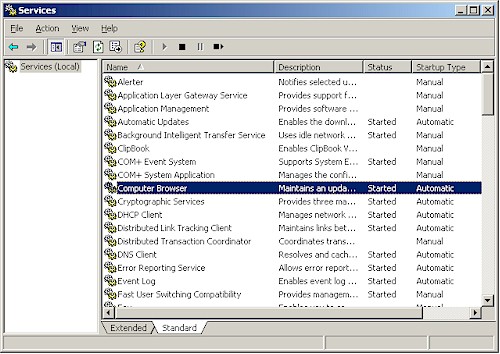
Figure 10: Browse service in WinXP
To stop a computer’s participation in the Master Browser election process, just double click on the Computer Browser service and set it as shown in Figure 11. This doesn’t prevent the computer from obtaining the network list from whichever computer becomes the Master Browser, but just keeps a computer from becoming the Master Browser.
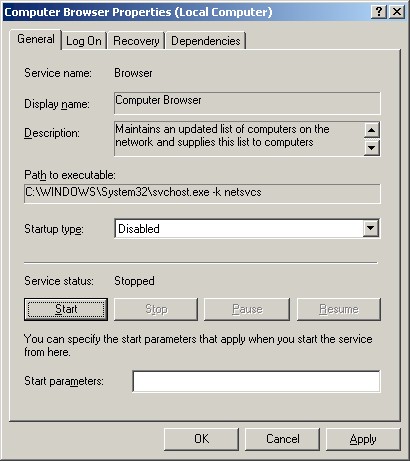
Figure 11: Browse service disabled
If Registry hacks are more your thing, Start regedit and navigate to (Figure 12):
HKEY_LOCAL_MACHINESYSTEMCurrentControlSetServicesBrowserParameters
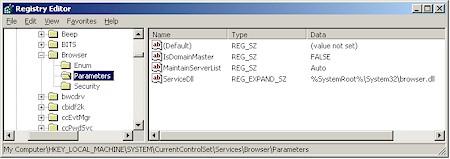
Figure 12: Browse service Registry key
Change the MaintainServerList key to No, save the key, close regedit and reboot.
No matter which method you use, select one computer that’s always or most frequently on that doesn’t have a wireless network connection and let it run the Browse Master service.
Tip 5: If all else fails…
If you’re still reading, then it’s time for brute force. Here a few other things to try.
First, try a System Restore to a point before you started having file and printer sharing problems. If you’ve never had occasion to use System Restore before, it’s located in the System Control Panel, System Restore tab.
Next, you can try resetting the TCP/IP stack. In Win98 you could just uninstall and reinstall the TCP/IP protocol from the Network Properties, but, once again, XP has its own way of doing things. See the How to Reset Internet Protocol (TCP/IP) in Windows XP (Microsoft Knowledge Base Article – 299357) for the how-to. [Thnx to Ethan Frome for this tip!]
Finally, if all else fails, then, what the heck, do an XP reinstall. In my case, I didn’t even do a clean install (including a disk format), and it worked like a champ!