Introduction
In the recent DDoS (Distributed Denial of Service) attacks that affected Internet access on the east coast, millions of infected network devices such as routers, cameras, DVRs, and other network devices simultaneously sent out DNS (Domain Name System) requests targeting specific DNS servers. This attack essentially overwhelmed those DNS servers, resulting in anyone who uses those servers unable to surf the Internet.
Perhaps one of the devices on your network is infected and participated in this attack? How would you know? This article will show you how to find all the devices using your network and see a bit about what they’re up to. I’ll be using a Linksys LRT224 router and Ubiquiti UniFi Wi-Fi Access Point to illustrate the techniques. The menus and options on other network equipment may vary, but the screenshots shown below should give you the general idea of each point.
Inventory
It’s important to know the devices using your network, especially since Wi-Fi makes it possible for people to get on your network from outside your house.
There are automatic network tools for device discovery, which I’ll discuss next. But only active devices will be discovered with these automatic tools. So it is useful to also do a physical inventory. Walk around your entire location and write down the make and model of all devices that connect to your network, and how they are connected. Here’s my list:
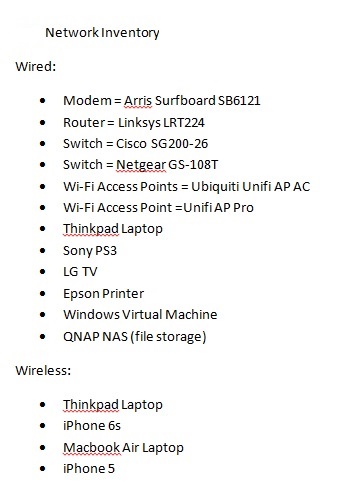
Network Inventory
Next, look at the DHCP (Dynamic Host Configuration Protocol) table of your router. To communicate on a network, a device needs an IP address. Most devices that connect to a network get an IP address from a DHCP server, which is typically running on your router. Your router maintains a DHCP table that lists the IP addresses it has issued over a period of time, typically the last 24 hours.
Log into your router and look for a menu option that says DHCP. On my Linksys LRT224 router there is a menu called DHCP and a submenu called DHCP Status that provides a listing of devices that have received an IP address in the past 24 hours, shown below.

DHCP Table
Note the DHCP table will show all wired and Wi-Fi devices on your network that have received an IP address via DHCP. Devices that have been configured with a static IP address, such as my network switches, won’t show up in the DHCP table. Devices that haven’t been turned on in the past 24 hours or more, such as my PS3, also don’t show up in the DHCP table.
Your router may behave differently. Some routers’ DHCP tables show all the devices that have ever been issued an IP address since the router was powered up.
Another tool to determine devices on your network is to look at the devices connected via Wi-Fi. In addition to the DHCP table, most Wi-Fi routers have a menu to see connected Wi-Fi clients. I use a UniFi Access Point for Wi-Fi on my network. The screenshot below shows I currently have an iPhone, iPad and laptop connected to my Wi-Fi network.

Wi-Fi Client Listing
Since all three of these Wi-Fi devices are using DHCP to get an IP address, they are also displayed in the DHCP table shown previously.
There are also automatic tools for device discovery. Fing makes network scanner devices, as well as free apps that run on Apple and Google handhelds and tablets. Load and fire up Fing on your phone and within seconds it will discover virtually every active device on your network and produce a list of those devices by IP address and MAC address. Devices with both static and DHCP issued IP addresses will be discovered.
Fing may also display the device’s name and manufacturer. It’s a good idea to name your devices if you can; device names can often be configured on the device. For example, on a Windows PC, you can assign the Computer name in Control Panel > System Properties, under Computer description. On an iPhone, you can assign the device name in the Setting > General > Name menu. The manufacturer’s name is discovered based on the first 6 characters of the device’s MAC address.
To give Fing a challenge, I turned on a bunch of extra devices in my network to see how many would be discovered. Below is a screenshot of the devices Fing discovered on my network within seconds.
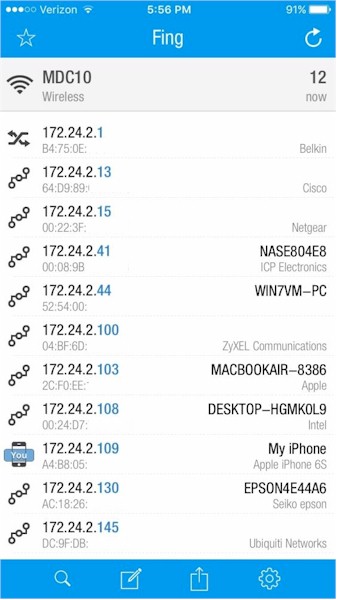
Fing Device Detection
It’s a good idea to go through both the DHCP table and the Fing discovery output to make sure you recognize all the devices currently using your network. An unknown device could simply be something your kids added that you don’t know about, or an appliance that you didn’t know had Wi-Fi. It could also be an indicator that someone you don’t know is using your network, perhaps an unauthorized user on your Wi-Fi!
If you discover a physical device you don’t think should be on your network, or one you aren’t using, disconnect it and turn it off. If there is an unidentified Wi-Fi device using your network, change your Wi-Fi SSID and security key immediately!
Bandwidth Use
A possible indicator of unknown traffic on your network is excess bandwidth use. If an unauthorized device is using your network, it may be consuming a measurable amount of your bandwidth. So you’ll first have to establish how much bandwidth your network normally uses.
Start by measuring the speed of your Internet connection. The best way to measure this is to run a speed test from a computer connected via an Ethernet cable directly to your router, with all other devices disconnected. This will ensure you’re getting as accurate a measurement as possible. You should log into your router and temporarily disable Wi-Fi, then disconnect all Ethernet cables except the cable connecting computer you’re using to run the speed test. If you find you’re not getting the speed you’re paying for and call your Internet provider to report slow Internet speeds, your service provider will probably ask you to run a speed test in a similar manner.
You can run a speed test from a Wi-Fi connected device, but the results may not show your actual speed. The distance to your Wi-Fi router, wireless interference, and other factors can cause lower speed test results from a Wi-Fi connection.
It’s a good idea to run a speed test from two different test servers. Many Internet providers provide a speed test tool. Time Warner has a speed test site available on your account page, as do most ISPs. Here’s one for Verizon and one for CenturyLink. You can find your ISP’s speed test by a simple internet search.
A third party speed test tool I like to use is Speedtest.net. Speedtest.net also has an app you can load on Apple and Google handhelds and tablets. (Again, speed test results over Wi-Fi may not be accurate!) Below are screenshots showing my Internet connection speed test results from a wired computer using speed test tools from Time Warner and speedtest.net.
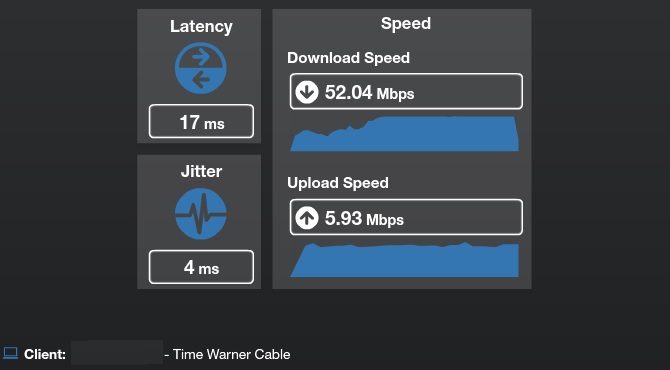
Time Warner Speed Test

Speedtest.net Speed Test
As you can see, Time Warner measured my Internet speed at 52.04 Mbps down and 5.93 Mbps up and Speedtest.net measured my Internet speed at 48.58 Mbps down and 5.97 Mbps up. Speed test results can vary and aren’t always accurate. But if you run the test several times as I’ve described, your results should be pretty close to what you’re paying for. If not, contact your Internet provider and report possible slow Internet speeds and share your test setup and results.
Note, many speedtest sites are unable to accurately measure ultra high speed Internet connections, such as Google Fiber. The speedtest site itself may not have the network connectivity to fully support gigabit or higher connections. Google has it’s own speedstest site here for Fiber customers.
Some routers have bandwidth monitoring tools. My router has a simple statistics menu showing received and sent packets and bytes for the WAN and LAN interfaces. To measure bandwidth utilization on my network, I rebooted my router to zero out the statistics and wrote down the date and time of the reboot. I then let it run for 24 hours and took a screenshot of the statistics page, shown below.
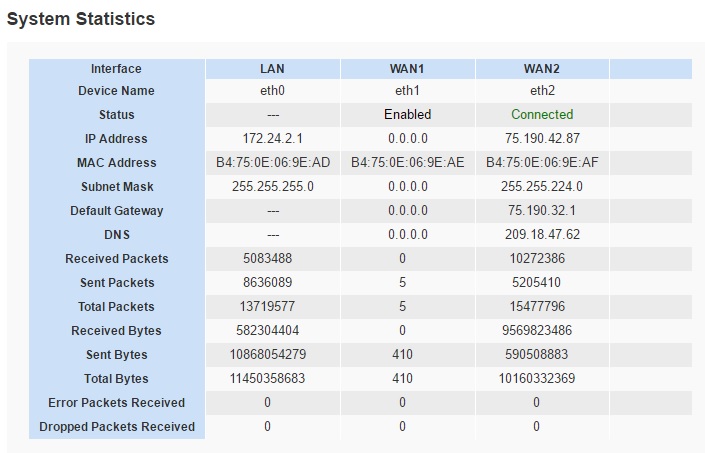
Bandwidth Statistics
I’m mostly interested in the volume of “Received Traffic” on my active WAN interface, which is WAN2. As you can see in the image, WAN2 received 9,569,823,486 bytes. With an online bit calculator, I can see my WAN2 interface received 73,011 megabits (Mb).
On data networks, the busiest hour of traffic is usually 15-25% of the whole day. Let’s say my busiest hour was 25%. This means I received 18,252 Mb during the busiest hour. Divide by 3600 (= total seconds in an hour), and my average usage was approximately 5.07 Mbps during that busy hour of that day. Clearly, I’m not taxing my 50 Mbps Internet connection, which is understandable since there are usually only a few people using my home network. On the other hand, if my bandwidth utilization went up considerably without additional users, that might be an indicator of unauthorized network activity.
Alternatively, I can look at my ISP support page. Time Warner, and many other ISPs provide total bandwidth usage reports for Internet customers. Logging into Time Warner’s Account page, I can see that my month-to-date usage for October 1-24 is 140 GB (gigabytes) which, according to the online bit calculator, is 1,146,880 Mb. Divide by 24 days, multiply by 25%, and divide by 3600 and I get an estimated peak usage of 3.3 Mbps. Clearly, my 50 Mbps Internet connection is sufficient for my usage.
If I were a Netflix customer, my usage would probably be higher. Netflix has a nice table listing the amount of bandwidth needed for each SD, HD, and Ultra HD video, ranging from 3 Mbps to 25 Mbps, per video stream. If two or more users are streaming HD video at 5 Mbps simultaneously on your network, your bandwidth needs could be higher, and possibly explain periods of network slowness.
If you’re looking for more advanced bandwidth monitoring, DD-WRT router firmware can add more detailed bandwidth monitoring to many different makes and models of small network routers.
As a side note, measuring bandwidth use will likely become more important in the future. ISPs may start charging for excess bandwidth use. Starting November 1, Comcast is rolling out a one terabyte data cap in 18 markets.
Basic Security
Good security practices are an important first step in preventing network intrusions. Too many people just plug in their network devices and forget about them. Unfortunately, that’s what hackers are expecting!
Make sure the user name and password for each of your network devices is secure. Change the default username and passwords and configure credentials that are at least 8 characters long and have a combination of upper and lower case letters, numbers, and non-alphanumeric characters. Do this on routers, switches, access points, cameras, DVRs, and anything that connects to the Internet. Disable remote access to your router and other devices if you don’t need it.
Most routers allow management access from their LAN side, but typically you have to enable remote access to allow access from the WAN side. This screenshot shows the menu options to enable/disable remote access and to enable/disable secure HTTPS if remote access is permitted.
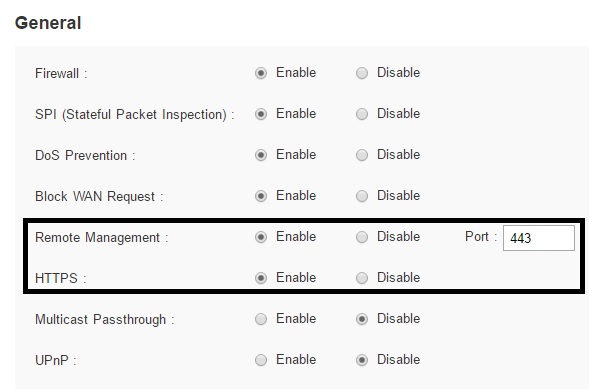
Remote Access Config
If you enable remote access to your router, you’ve made it possible for anyone to attempt to log in from outside your network. To mitigate risk, enable HTTPS to encrypt packets sent between your PC and router. Also, make sure you’ve disabled the default credentials and created a strong username and password longer than 8 characters with a mix of upper and lower case letters, numbers, and non-alphanumeric characters. Also, it’s a good idea to use an obscure port instead of 8080, 8088, etc. However, some routers don’t let you change this port.
If you desire more secure remote access to your network, I recommend using a router that supports VPN access, which will allow you to access your LAN via a password-protected encrypted connection. With VPN access, you can disable the remote access feature, yet enjoy more secure remote access to your router and internal devices. Many routers now support OpenVPN, which is a relatively easy to use VPN solution.
To secure Wi-Fi, configure your Wi-Fi network to use WPA2/AES security and make sure your Wi-Fi key is secure. If you haven’t changed the Wi-Fi security credentials on your network recently, do so. It may be a pain to change your Wi-Fi key because everyone will have to update their Wi-Fi clients. But changing the key will disconnect unauthorized users, at least until they recover the key again.
Finally, update the firmware on your network devices to apply any security updates that may have been released. Disabling UPnP (Universal Plug and Play) is also a good idea. UPnP is a set of communication protocols that allows network devices to discover eac hother and make modifications to pass network traffic. Subsequently, UPnP is a target for hackers. Many people also advise disabling Wi-Fi Protected Setup (WPS) due to known security vulnerabilities.
Closing Thoughts
I’ve covered three essential steps you can take to get a better handle on your network’s security.
- Take inventory of your network devices
- Watch for unusual bandwidth use
- Take basic security measures
In a future article, I’ll show you how to tell when something’s up on your network by looking at your router’s logs. In the meantime, if you have a favorite technique for knowing when something’s up on your network, please share it in the SNBForums thread. Thanks!
