This article is a reprise of my previous article on launching a cloud computer via Amazon’s AWS service. Here, I’m going to use Rackspace as my cloud provider instead of Amazon.
Rackspace is a well known hosting provider. Rackspace offers three main product lines: Managed Hosting, Cloud Hosting, and Email & Apps Services. The Cloud Hosting services include Servers, File Storage, and Web Hosting. In this article, I’m going to set up a simple cloud server using Rackspace’s Cloud Servers product..
Rackspace offers 16 different Linux server images to choose from, including multiple different versions of Fedora, CentOS, Debian, Oracle, Red Hat, Ubuntu, ArchLinux, and Gentoo. There are also five different Windows server images, with two versions of Windows 2003 Server and three versions of Windows 2008 Server. I chose CentOS 5.4 for my Cloud Server, as I have some familiarity with this distribution.
I thought setting up a cloud computer on AWS was relatively easily, and perhaps my experience with AWS made the experience with Rackspace go even more smoothly. Still, I found setting up and accessing a server on Rackspace ridiculously easy, as you’ll see.
Building and Launching a Rackspace Server
Step 1: Set up an account on Rackspace. You’ll need to create a user name and password, address, as well as enter a credit card for billing information.
Step 2: Click Add Server This option brings up a menu to choose the amount of memory and disk space you want on your server, along with the hourly price. I chose the basic server with 256 MB of RAM and 10 GB of disk space, for only 1.5 cents per hour as shown in Figure 1.
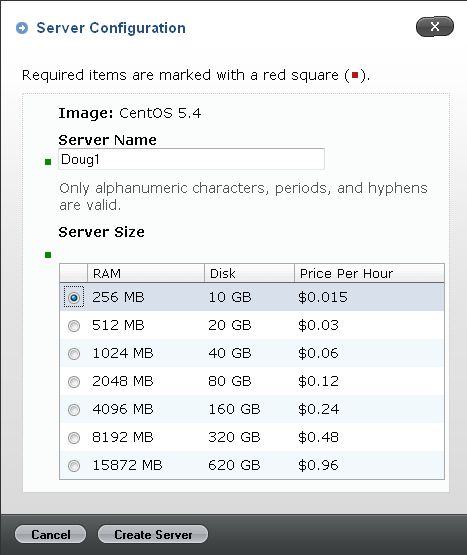
Figure 1: Basic cloud server configuration
Step 3: Click Create Server. There’s a delay after clicking Create as the server is prepared for launch. You are then taken to web page that shows your new server. A message appears on the top of the screen showing the root password for your new system. Copy this password, since you’ll need it to access and manage your server.
It took a minute or so before the web page showed that my server was up. Once complete, my server was running, and the public IP address to my server was listed on that web page.
Just three steps and my server was up! I didn’t have to go through the steps to download a key pair and configure firewall rules as I did with AWS.
Figure 2 shows the status screen of my active servers on Rackspace. You’ll see that I set up two servers, one with 256 MB of RAM, the other with 512 MB. I didn’t really need the second server, I just had to fire up a second server to confirm how easy it was. Note, the actual display on Rackspace will show your server’s IP address under Primary IP, but I deleted them from the picture to keep them secure.

Figure 2: Cloud server status
Connecting to a Rackspace Server
Accessing my server for setup was just as easy. I fired up PuTTY and started an SSH connection to the IP address of my server as shown in Figure 3. Any SSH client software will work, but PuTTY is free, and I’m a big fan of free.
Enter the IP address of your Rackspace server in PuTTY, press enter, and you’ll connect and be prompted to log into your new server. I used root as my user name and the root password I copied in Step 3 above.
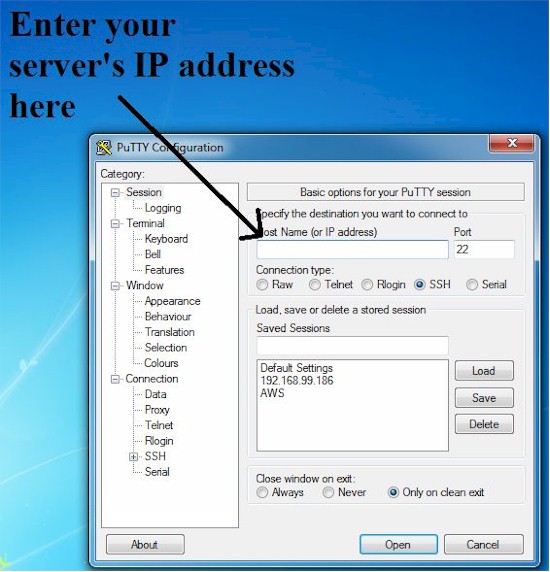
Figure 3: PuTTY connect
An alternative means of accessing your Rackspace server is via a console connection. To connect to the console, simply click on your server name in the status page shown in Figure 2. There you’ll find a toolbar with icons for Console, Reboot, Rescue, Rebuild, Reset Password, and Delete.
Clicking Console will fire up a connection to your server, where you’ll be prompted for user name and password. Input root and your password, and you’re in, as shown in Figure 4.
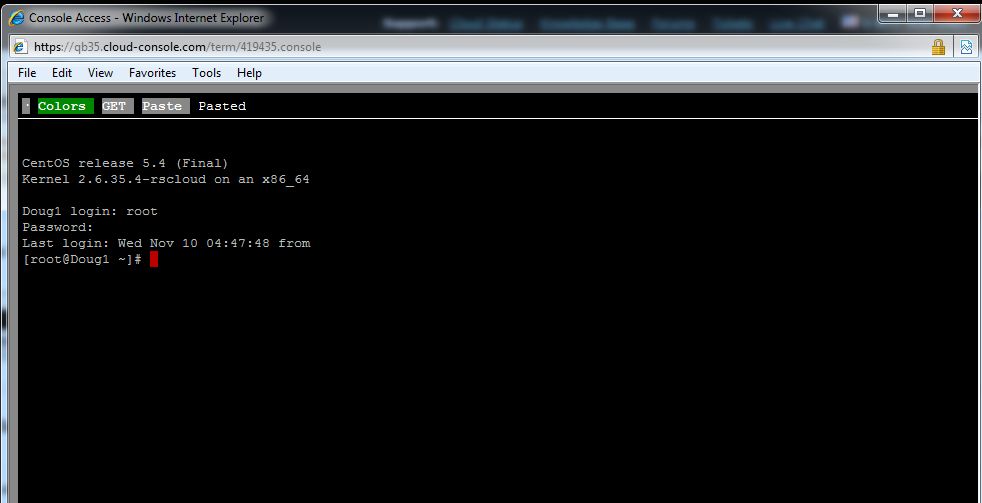
Figure 4: Web-based server console
Console access via the web page is handy. If you mess up your network interface or firewall on your server, a console connection is another way of accessing the machine. I preferred using putty to access my cloud server as the command line performance is faster, but console access is a useful option.
Analysis
As with AWS, I was now successfully logged into my own real computer running in the cloud, and have complete root level control over the machine.
Using Linux commands cat /proc/cpuinfo, free, and df -h, as shown in Figure 5, I was able to determine my Rackspace cloud computer is running on a Quad-Core AMD Opteron 2.4Ghz CPU with 256 MB of RAM and 10 GB or hard drive space.
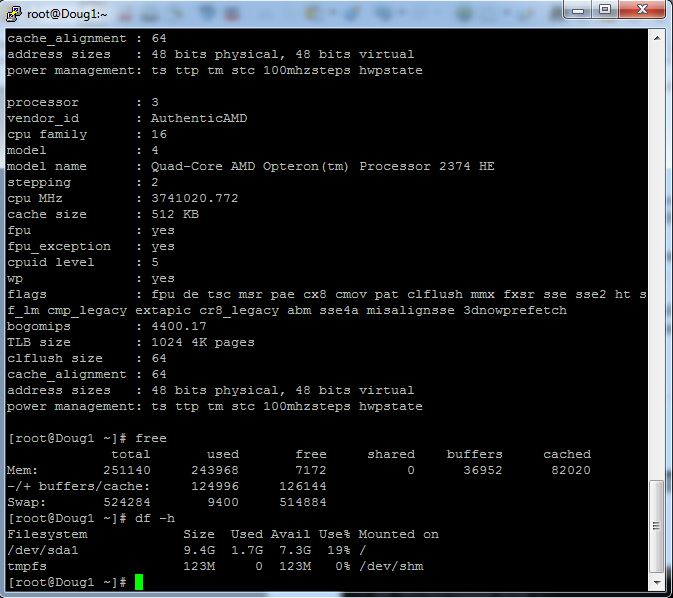
Figure 5: Cloud server info
My Rackspace server had two network interfaces. One with the public IP address, the other with a private IP address. The second interface is connected to an internal Rackspace network. I used that second interface to connect from one of my servers to the other. As with my AWS server, I could ping other devices and network addresses, verifying my server has Internet access.
One of the beauties of cloud computing and on demand servers is you can turn them off or delete them, and they no longer cost a thing. When you’re done with your Rackspace server, just chose the Delete option from the tool bar on the status page and it’s gone as shown in Figure 6.
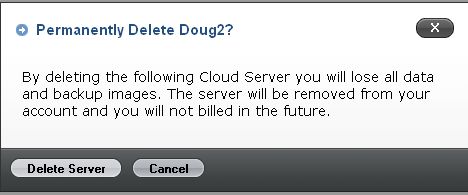
Figure 6: Deleting the cloud server
As a side note, I love the fact that a cloud computer doesn’t take up space, make noise, or consume electricity at my location. All these issues are the cloud provider’s problem while I get the full benefit of the computing service without the hassles created by the hardware.
Conclusion
There were several things I found superior to Amazon AWS with Rackspace. A Rackspace cloud server automatically has a public IP address, and you are provided with the root password when you set up your server, eliminating the AWS issue with creating key pairs and downloading a special file.
Configuring a Linux firewall can be a bit tricky, and if you goof up, you could lock yourself out of the network interface. For that reason, I appreciated Rackspace’s Console tool, which would provide access to my server if I got locked out.
For my testing, I also found Rackspace was cheaper than AWS. The small On Demand server I set up on AWS was 8.5 cents per hour, although I could have used a Micro server for 2 cents an hour. Actually, my AWS experiment would have been free, had Amazon’s Free Tier plan been in place when I wrote my article. More of Amazon’s pricing is listed here.
Rackspace provides a lower price point at the entry level, starting at 1.5 cents per hour. But Table 1 shows that, in general, Rackspace pricing is higher than AWS.
| AWS | Rackspace | ||
|---|---|---|---|
| Memory | Price per hour | Memory | Price per hour |
| 256MB | $0.015 | ||
| 613MB | $0.020 | 512MB | $0.030 |
| 1.7GB | $0.085 | 2GB | $0.120 |
| 7.5GB | $0.340 | 8GB | $0.480 |
| 15GB | $0.680 | 15GB | $0.960 |
Table 1: AWS vs Rackspace cloud hosting charges
Figure 7 is taken from Rackspace’s cloud server pricing page, which also has a handy server cost calculator. Note that bandwidth is charged separately, as it is with AWS. There is also a separate charge for storaging server images.
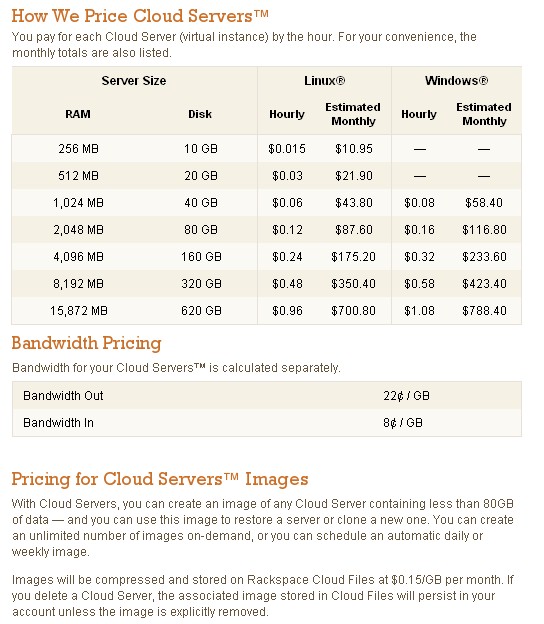
Figure 7: Rackspace cloud hosting charges
Overall, I had a good experience using Rackspace and its web site has useful guides and instructions. For sever setup and access, I found a Rackspace cloud server much easier than Amazon’s AWS. If you’re looking to get started with cloud computing, I recommend Rackspace. Heck, how can you go wrong at only 1.5c per hour?!
