| At a Glance | |
|---|---|
| Product | Space Monkey [Website] |
| Summary | Storage appliance bundled with crowd-sourced cloud backup service |
| Pros | • Easy CD-less wireless setup • Fault-tolerant, secure architecture • Inexpensive 1 TB cloud synchronization solution • Bandwidth controls • Support for Windows / MacOS • iOS and Android apps back up photos automatically |
| Cons | • Requires constant internet connection • Device must be powered on and connected 24/7 • No client-based estimate of time or number of files pending upload • Upstream speed appears to max out at 1.6 Mbps • Occasional Android app hangs |
Introduction
Last year, Hurricane Sandy was a stark reminder to those of us on the east coast that a good backup plan has to include off-site data storage. For many consumers, cloud-based backup of critical files is part of a well thought out backup strategy.
Many companies, large and small, offer some type of cloud storage. Apple’s iCloud can be upgraded to 50 GB for $49.99/year. Microsoft offers an upgrade to Sky Drive – 200 GB for $100/year. Dropbox Pro sells a 100 GB plan for $9.99/month. Similarly, SugarSync has a 100 GB plan for $9.99/month or $99.99/year.
For many consumers, 100 -200 GB will be plenty of online storage. But what if you want to store 1TB of data online? That can get pretty expensive. Microsoft and Apple currently don’t offer a 1TB option. A 1TB Google Drive will cost you $49.99/month. And SugarSync charges $55/month or $550/year for 1 TB.
If you can’t really afford that much but need lots of cloud-based storage, take heart. If you are willing to participate in a crowd-based storage solution, you can store large amounts of data for a fraction of the cost of conventional cloud storage.
In October of 2012, I reviewed Symform. Symform is a crowd-sourced storage and sync service that lets you share your excess storage capacity in return for free storage. If you share 200 GB of your space, you get 100 GB of cloud-based storage free. You provide the storage and the internet bandwidth, and Symform provides the cloud infrastructure.
Your files are encrypted and distributed, with redundancy similar to a RAID architecture, to other Symform member’s committed storage. Your shared storage becomes part of a shared storage network that receives files from other Symform members. Thus, you are utilizing both upstream and downstream bandwidth. The downside is that your computer running the Symform client software has to be powered on and connected to the internet 24/7 to be a reliable member of the network.
In this review, we’ll be looking at Space Monkey, a new player in the crowd-based cloud storage market. Space Monkey was announced in the Spring of 2012 and much of the development was completed that year using funding from venture capitalists and angel investors. Space Monkey turned to Kickstarter for additional funding in April of 2013 to help ramp up production and provide initial production units. Space Monkey raised 3 1/2 times its original $100,000 goal with the help of 2989 backers. Be sure to check out the Kickstarter site if you’re interested in the history and background of the project.
Space Monkey (SM) uses an architecture similar to Symform. However, the big difference is that Space Monkey is a storage appliance. Unlike Symform, you don’t have to dedicate a computer and local storage in order to participate in the crowd-based cloud backup network. The SM appliance consists of a CPU, network interface and either a 2 TB or 3 TB hard disk. 1TB is for storing your “stuff” and the other 1 or 2 TB is used for storing encrypted chunks of other Space Monkey members’ files.
The appliance connects to your network and creates a mapped drive “Z” on your Windows computer using setup software. Any files that you copy to the device are processed and uploaded to the Space Monkey distributed storage network. Once the files are copied to your Space Monkey, you can shut off your computer if you wish. Space Monkey takes care of sending your data to the cloud in the background, while still remaining available to receive files from other Space Monkey members.
Product Tour
The product shot at the top of the review gives you a pretty good idea about the form factor of the Space Monkey. When you purchase a Space Monkey, you have your choice of colors: Black or White. Since we got our SM by being an original Kickstarter backer, we didn’t get a choice and received a black unit with a matte, not glossy, finish. The product shot shows this finish is a dust magnet.
Located below the black front bezel, there’s a single blue LED. If it’s pulsing slowly ( ~ once/second), your device is online and connected. On the rear panel, there’s a single 10/100 Ethernet port, power jack, pin reset pinhole and USB 2.0 port – presumably for future features.
Inside
The gallery below shows a couple of images of the construction and PCB. I “harvested” these photos from the Kickstarter site. The company doesn’t identify the processor used. But it’s probably a safe bet that it’s a Marvell or similar storage SoC.

This view shows how the Space Monkey is constructed.
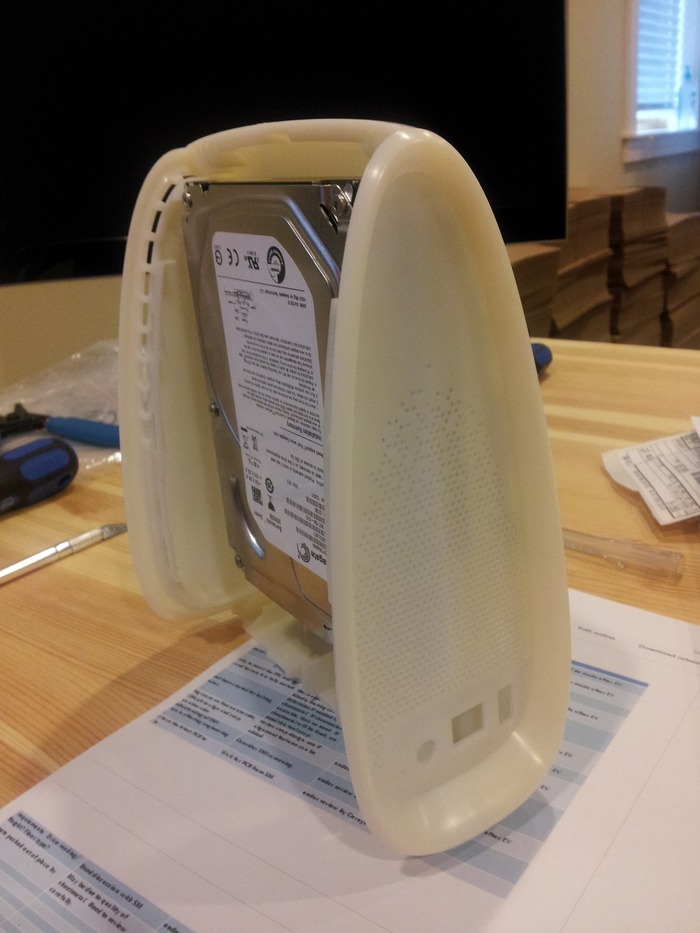
Case with the rear panel removed to expose the hard drive

Current PCB – this is the third version of the PCB
Space Monkey innards
Setup
There’s not really much involved with the installation. Kickstarter products were pre-provisioned using the Kickstarter backer’s email address prior to shipment. There’s virtually no documentation included with the product, except for a single page quick start guide with an infographic that directs you to www.spacemonkey.com/install.
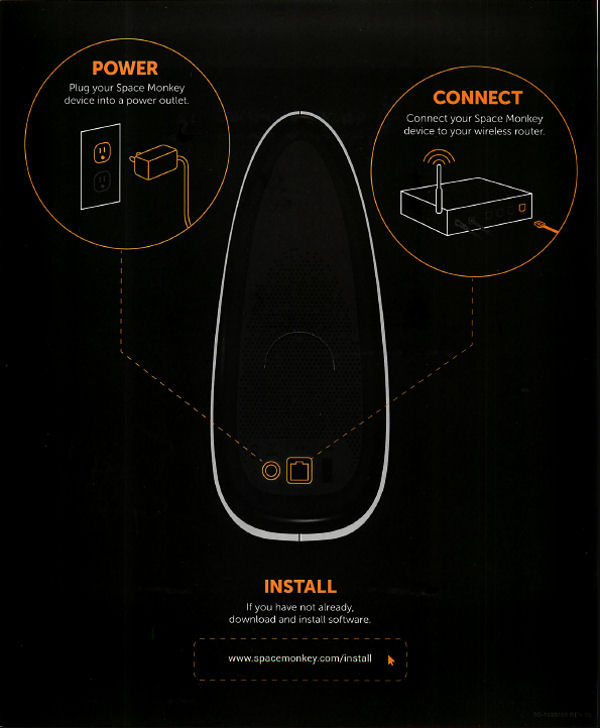
Space Monkey Quick Start Guide
The installation link from the Quick Start Guide takes you to the page shown below. For desktop applications, you currently have your choice of either Windows or MacOS, with Linux support promised soon. There are also apps for iOS and Android that I’ll discuss separately later.
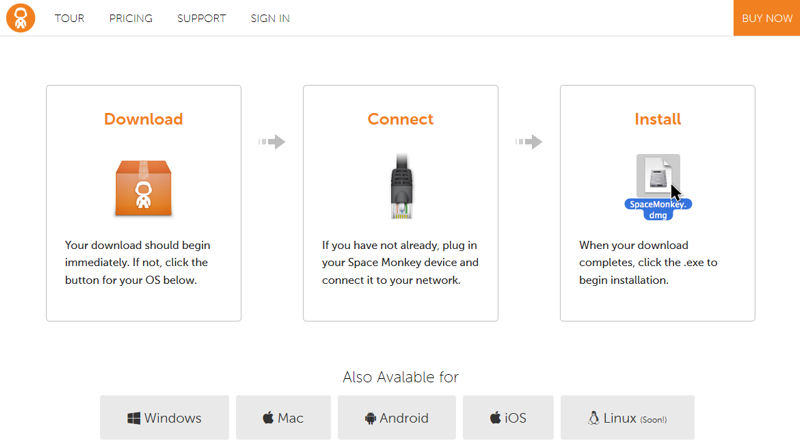
Space Monkey install page from QSG link
Space Monkey relies on articles in its customer portal, A.K.A. Mission Control to help you through setup, installation and usage questions. It’s well worth your time to read through the articles both on the general page as well as those related to your desktop operating system.
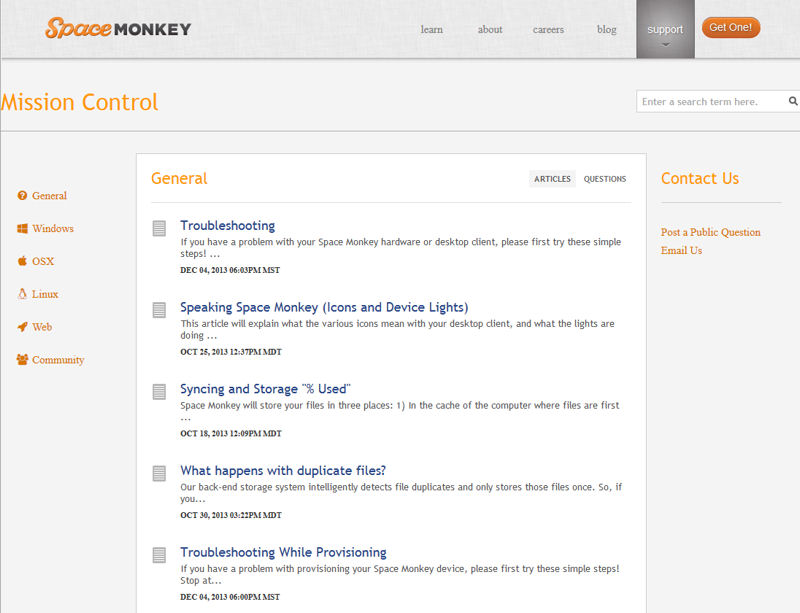
Space Monkey Portal
Hands On
In order to isolate and measure traffic generated by Space Monkey, I installed a second router behind my primary router. I used a Buffalo WHR-300HP router loaded with Buffalo’s version of DD-WRT firmware because it has bandwidth tracking capabilities. The Space Monkey and the Windows 8.1 test bed computer were the only two devices connected to the LAN ports on the Buffalo router. I’m happy to report that the Space Monkey had no problems living in a “double NAT” environment. After connecting it to the test router, SM initialized and connected without any intervention on my part.
After installing the client on a Windows 8.1 computer, Space Monkey appeared as drive Z:. I selected a number of folders on the Windows computer that contained music files and dragged the folders onto the Music folder of drive Z. (Windows Explorer showed that the selected directories contained ~ 1GB of data.)
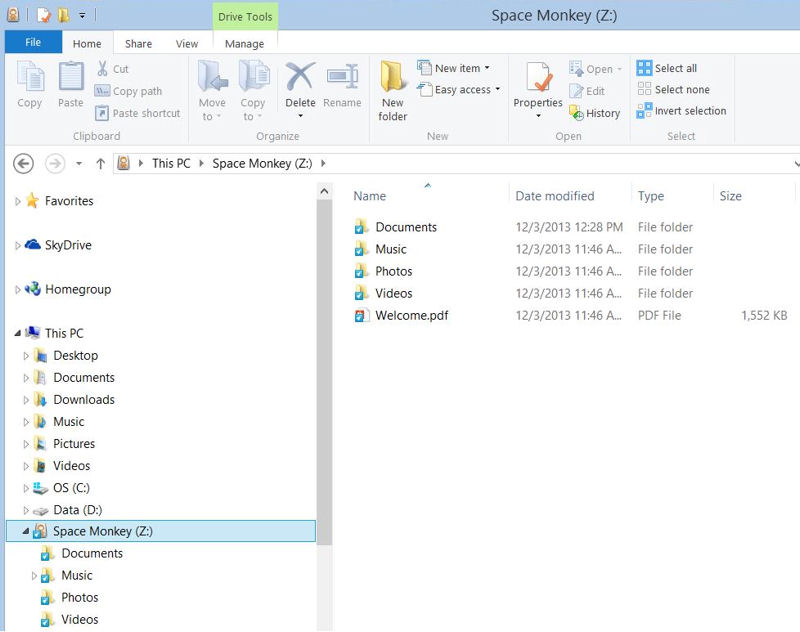
Windows Explorer showing Space Monkey as drive Z:
Space Monkey also appears in the Windows Notification Area. If you hover over the icon, it will show your connection status – hopefully it will show connected. If you right click on the icon, a menu appears. The composite image below shows (clockwise from the lower left corner) the system tray icon, menu and two of the preferences screens.
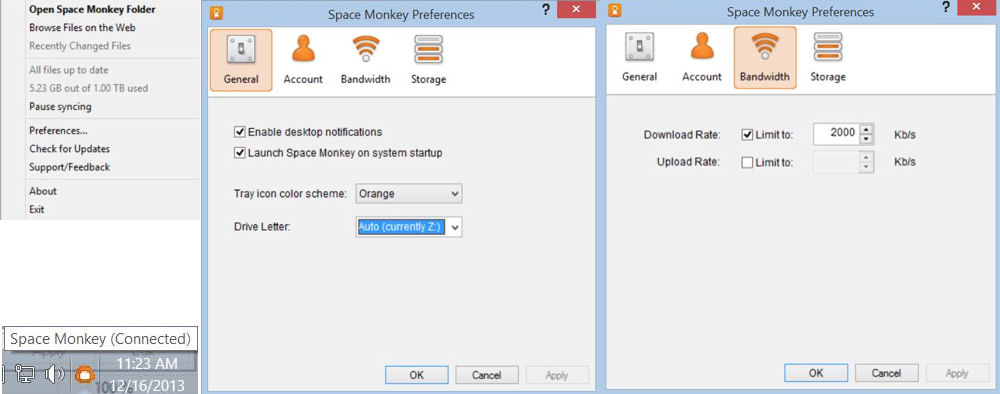
Space Monkey system tray icon, menu and preferences
It appeared that each folder generated its own “import” session while transferring (copying) files to the Space Monkey appliance. The importing process wasn’t particularly fast – each group of ~ 1GB of files took approximately 10 minutes (about 1.7 MB/s).
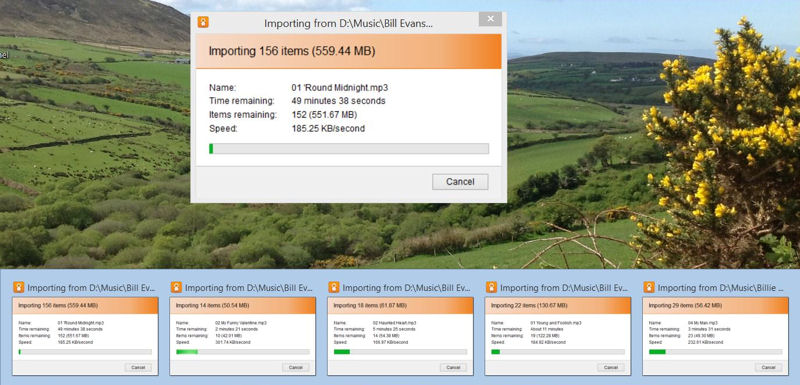
Space Monkey “import” creates a separate import session for each directory
In the course of our testing, Space Monkey improved this import process. I upgraded the Windows client to 0.4.13. You can now right-click on files and folder and select “Import to Space Monkey”. Their latest project update on 12/14/2013 explained:
“Using this feature skips the local cache, which means syncing to the device can occur faster and your local free disk space is preserved. However, since syncing to the device happens without the cache via this method, it does usually result in a copy dialog. This feature is available in the latest Windows and OSX clients today.”
Skipping the local cache made the files transfer to the Space Monkey device at normal LAN file copy speeds. Clicking on the Space Monkey system tray icon, you could see that the files were syncing in the background, as the file counter kept decrementing. When the Space Monkey system tray menu shows “all files up-to-date”, the Space Monkey cloud knows about the files, but they aren’t necessarily uploaded yet. The client doesn’t really tell you how many files remain to be uploaded to the cloud or provide an estimate of time remaining. Hopefully, that feature will make it into future client upgrades.
Upload to the Space Monkey cloud starts immediately as the files are imported to your Space Monkey device. If you transfer a lot of data, it can take a significant amount of time for your files to be fully synchronized with the cloud. The default upstream bandwidth allocated to the Space Monkey is 300 Kbps, so even a few Gigabytes of data could take a long time. My initial imports to the Space Monkey device totaled about 2.8 GB. After ~ 24 hours, the Space Monkey website showed that about 1.5 GB remained to be synchronized.
The screenshot below shows the My Space Monkey page you can access after logging in. Across the top of the screen, you can upload files or create new folders. It’s hard to read, but below the directory listing it says, “You can drag files here to upload them from your computer”. In the lower left corner, your device status along with total storage used is shown. The lower right corner will show either the amount of data remaining to be uploaded, or will indicate all files backed up.
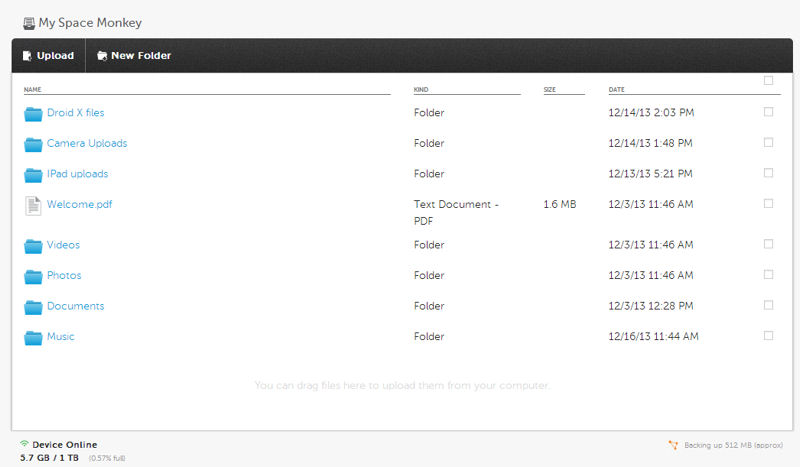
My Space Monkey landing page
As noted above, Space Monkey defaults to 300 Kbps for upstream bandwidth throttling. In our tests, it appears that the device does respect the 300 Kbps limit. The screenshot below shows both the LAN (top) and the WAN traffic (bottom) with the default settings enabled.
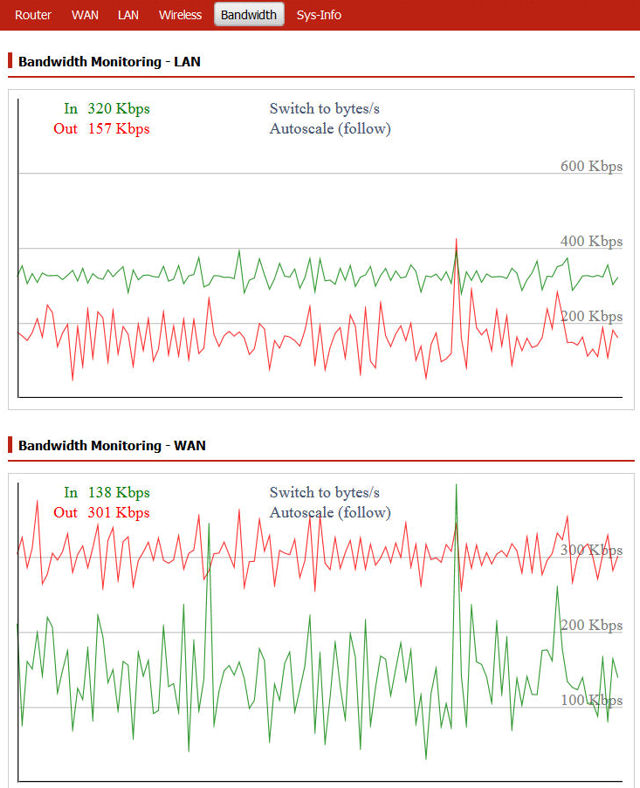
Space Monkey bandwith utilization with default settings
I used speedtest.net to test my internet connection prior to installing Space Monkey, so that I could determine how much bandwidth I could allocate to the device. My internet performance measured 57 Mbps downstream and 11 Mbps upstream. I decided to remove the upstream limits to see how much of my upstream bandwidth Space Monkey would use.
Space Monkey appears to be limited by something other than available upstream bandwidth. With upstream limits removed, the highest upstream utilization that I observed was approximately 1.6 Mbps – nowhere the available 11 Mbps. While at times the upstream was very consistent as shown below, many times the throughput hovered around 200-300 Kbps before suddenly jumping up to what appears to be the maximum of 1.6 Mbps and then later falling back to the 200-300 Kbps range.
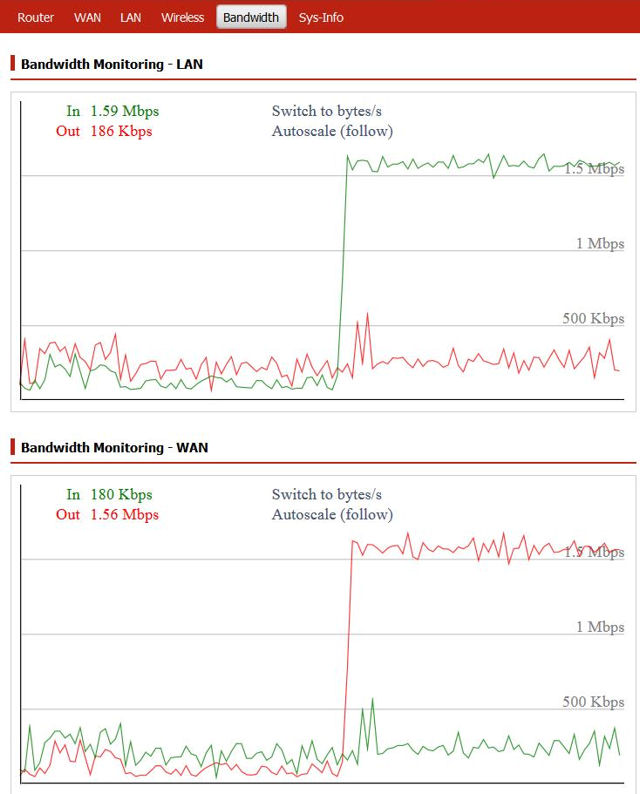
Space Monkey bandwidth with upstream limits removed
More Tests
Drag and drop
Using a computer on a different network, I attempted to create a new directory and then drag-and-drop images into the Web UI. I used the Chrome browser for this test. I was unable to create a directory, so I dragged the individual files to the top level Photos directory.
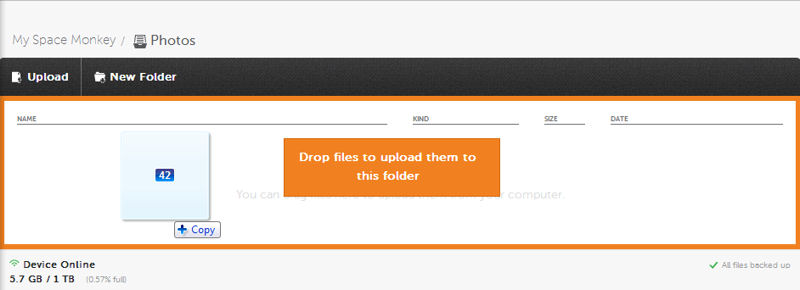
Space Monkey Web UI for drag and drop file uploads
The files all listed, but all failed to upload as shown below. I re-ran the same test using the Windows client that was on the same IP subnet as the Space Monkey and was successful both in creating a new folder and uploading all of the files.
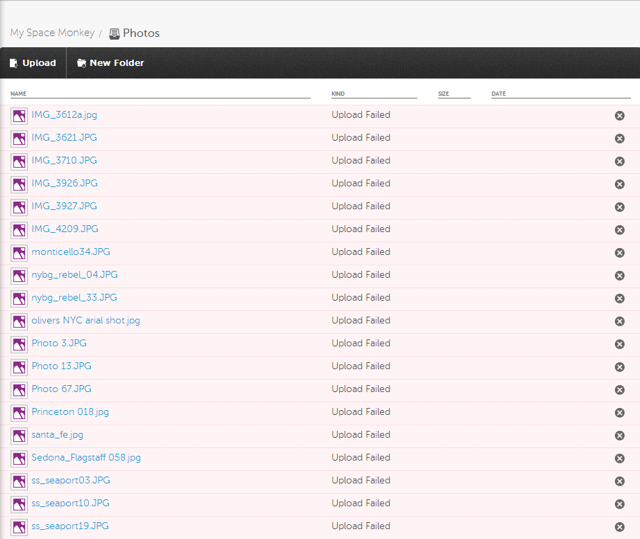
Space Monkey Drag and Drop
Space Monkey Offline
I disconnected the Ethernet cable on the Space Monkey to see what would happen. First, the steadily blinking blue front panel LED switched to a rapidly pulsing red LED. That made it easy to see that there was a problem. I refreshed my browser and Space Monkey displayed the message shown below.
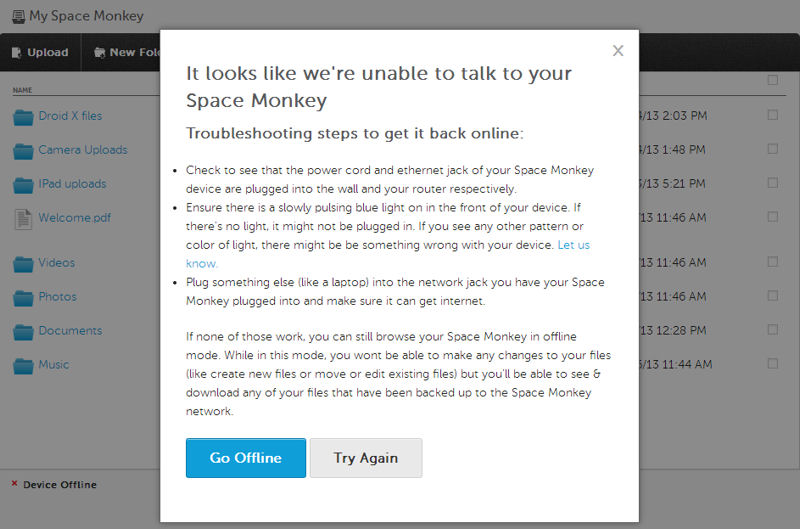
Space Monkey offline
Space Monkey went into an “offline reader mode”. I was able to see and download any of the files that had already been uploaded to the Space Monkey cloud. The recently uploaded photos hadn’t been uploaded yet, so they weren’t available yet.
On my test computer with the Windows client installed, drive Z was still available for read, and I could drop files onto drive Z which undoubtedly went into the local cache pending the Space Monkey coming back online.
Finally, I plugged the Ethernet cable back into the Space Monkey. The LED switched to rapidly blinking blue for about 45 seconds before it returned to its normal online state.
Mobile Apps
In addition to Windows and MacOS desktop applications, Space Monkey also has apps for the iOS and Android platforms. For the iOS app, be sure to search for iPhone apps – there isn’t a dedicated iPad application.
The application for both platforms supports automatic uploading of photos directly to Space Monkey. You can specify Wi-Fi only connections for photo uploads or allow photos uploads over your cellular network, as well. Both applications allow you to generate a link and share a file from Space Monkey. In addition, on the Android platform, you can add a file from your Android file system – not just photos. Unfortunately, you don’t appear to have access to the root of the file system or the ability to change from internal memory to the external SD card.
Both applications were able to upload photos in the background. The iOS interface operated more smoothly and seemed more polished than the Android application. The Android app stopped several times and I sent error reporting data back to Space Monkey. On Android, even though screenshots aren’t stored in the normal camera directory, the application found the screenshots and uploaded them to the Space Monkey device. If you accept the application default download location, your images are automatically uploaded to the “Camera Uploads” folder, which is automatically created by the application. Subdirectories with individual device names are also automatically created for those of you who upload from multiple platforms. As files are uploaded, monthly date subdirectories are created, and photos are placed in those folders for you automatically.
While the applications for each mobile platform share most functionality, obviously there are differences – mostly related to the platforms. Currently, in addition to the Windows and MacOS desktop clients, you can use your iOS device for the initial device setup. According to the latest Space Monkey Kickstarter update, this functionality is coming soon for Android devices.
To give you a feel of how the apps work, I’ve created short photo galleries for both the iOS…

This view shows how the Space Monkey is constructed.

Case with the rear panel removed to expose the hard drive

Current PCB – this is the third version of the PCB
iOS gallery
…and Android Space Monkey apps.

This view shows how the Space Monkey is constructed.

Case with the rear panel removed to expose the hard drive

Current PCB – this is the third version of the PCB
Android gallery
Closing Thoughts
Space Monkey has come a long way since completing its Kickstarter funding in May of this year, but there’s still a lot of development to do. In fact, the login page still says https://alpha.spacemonkey.com. Space Monkey is continuing to communicate with its current user base through the updates section of their Kickstarter page and emails to original backers. If you’re interested in the direction they are headed, I urge you to read the most recent posts.
The initial waves of product have already been shipped, with the remaining two waves in transit to their warehouse. Where Space Monkey goes from here depends on how many more people buy into the SM concept and trust a startup in a business that has questionable economics for much more experienced and deeper-pocketed competitors.
Note that Space Monkey’s pricing scheme has changed multiple times since its initial offering. For Kickstarter backers, their initial investment rewarded them with a device and a 1 year subscription. Thereafter, the ongoing subscription was $10/month for 1 TB of storage. In that model, however, backers didn’t actually own the Space Monkey device. (Ed note: I did not realize this. Wonder how they are going to reclaim the appliance when I don’t renew service?)
Many Kickstarter backers wanted to own their own device, so Space Monkey is offering an upgrade path. For $79, Kickstarter backers can upgrade to own their Space Monkey device and get an additional 6 months of free service. Thereafter, the subscription drops to $49/year. If they don’t upgrade, they can continue to use the device and pay $10/month, but the $79 upgrade pays for itself pretty quickly. New subscribers can join Space Monkey for $199 which includes 1 year of service and ownership of the device. Thereafter, the subscription costs $49/year. Got all that?
As I said, there is still plenty of work to do. On the desktop clients, you can’t currently see how many files are pending upload to the cloud, nor is there an estimate of the remaining time that the uploads will take. The mobile applications, barring the occasional hangs I experienced with the Android app, seem somewhat more finished and polished than the Windows desktop app. I like that you can automatically upload photos on either platform. In fact, that feature alone saved me quite a bit of time when I generated screen shots for the two mobile device galleries.
While Kickstarter backers might be more technically adept, Space Monkey will need to provide better documentation or possibly phone-based support in order to appeal to a broader audience. However, I will note that during the review period, multiple queries to support were answered within a few hours. We didn’t get or ask for special treatment as a reviewer (we bought our Space Monkey as a Kickstarter backer), so this is encouraging.
My most serious technical concern relates to the speed of the Space Monkey network. The default upstream throttle of 300 Kbps resulted in about 24 hours to upload 1.3 GB. At that rate, it would take about a month to upload 40 GB and would take years to reach your 1 TB limit. This sort of reminds me of an all-you-can eat buffet: It’s not really a good deal if you can’t eat very much…
Even with the upstream limit completely removed, the maximum upload speed was only ~ 1.6 Mbps and that often dropped back to about the 300 Kbps level. In this regard, Space Monkey suffers from the same problem as larger, more established cloud storage / backup companies—the miserly uplink throughput that many of us have. But that’s only half the SM throughput battle, since SM data still has to traverse many unpredictable downlink paths before they are safely ensconced in the SM crowd-sourced cloud.
I like the idea of crowd-based cloud storage. It eliminates the need for data centers. And its built-in redundancy and encryption, along with the distributed data model, provides a high level of security. Of course, ISPs won’t be thrilled if this model takes off – utilization could increase dramatically.
But because the current upload speeds limit your ability to quickly backup large amounts of data and because of the initial $199 cost, some potential Space Monkey customers will find it more time and cost efficient to back up static data to a portable USB drive for off-site storage and use a low cost conventional cloud service to back up their dynamic data. For now, that includes me. Besides, I already use Symform and it doesn’t cost me a dime.
