Introduction
Welcome to the second part of our special feature on setting up a world class LAN Party. In Part 1, I described how to organize a smooth-running LAN party and get it powered properly. In this article, I will focus on the LAN Party’s network infrastructure.
We all know that attendees come to LAN Parties for the fastest ping times possible and smoothest game play. In this installment, I’ll be describing the how-to’s of selecting and setting up the LAN’s switching gear and provide some cabling tips to ensure that everything produces the desired state of gaming LAN bliss!
The Pulse of the Network
When setting up a network, you need to understand the kinds of traffic it will be handling and their flow. Someone who is familiar only with corporate networks can be at a disadvantage when setting up a LAN Party network. Because while the equipment itself is the same, the data traffic and flow can be quite different.
Both corporate and LAN Party networks use TCP/IP as the primary protocol. Some very old games still use IPX/SPX, but all major games currently played at LAN Parties work over IP using UDP (User Datagram Protocol).
UDP was designed to handle packet loss more effectively than TCP over low-quality connections (like the Internet). With TCP, a single dropped packet could cause a significant delay as the protocol attempts to locate and/or resend the lost packet. UDP does not recover lost packets, but simply ignores them and continues to allow the application itself to compensate for this lost information.
Lost packet compensation is done by programmed algorithms that estimate or “predict” movements of other players and objects within the game world. By using this technique, games are playable on the Internet where packet loss is prevalent. Interestingly enough, even if your LAN network isn’t set up properly, games should still work and will compensate the same way they do if you are on the Internet, but the glitches will be more dramatically noticeable on a LAN for some older games that don’t allow you to tweak settings for LAN vs. Internet speeds.
Another type of traffic that is found on a LAN Party network is known as a broadcast – a type of packet that is not sent just from one computer to another, but instead from one computer to every computer on the network. Broadcasts are very important to a LAN Party network, but can affect performance dramatically as the number of machines on the LAN increases.
Another big difference between corporate and LAN Party networks is in the traffic patterns. A LAN Party usually has a number of players connected to a game server, which is not always placed on a super-fast link connected to the root of your network. Many times, a player connected to a floor switch will start a server from his own PC right on the floor. This dramatically increases the importance of connectivity from the floor switches to be very fast and reliable because packet loss occurs when uplinks are saturated. I’ll discuss this further in the LAN Topology section.
Additionally, centralized services such as DHCP and DNS services may not be available on a typical LAN Party network. However with some simple instructions in our next article, we will show you how to set up some of these services to reduce the burden of broadcasts on your network.
Finally, you will find all kinds of file sharing and random activities on a LAN Party network that require connections all over the place. In a business, users are usually primarily connecting to central servers or gateways connected to the core switch. In a LAN Party, one PC is just as likely to be talking to another PC as to a server!
LAN Topology
Designing a high performance LAN Party network that doesn’t lag under pressure requires understanding several factors. I’ll first discuss balancing bandwidth throughout the network.
If you’re running a small LAN of less than 24 nodes (or ports or players) and don’t expect to grow beyond that, a simple unmanaged 10/100 switch with 24 ports should handle your needs just fine. Many manufacturers (Linksys, Dell, HP, and others) provide inexpensive models that are plug-and-play, so shop around for a good price.
On the other hand, if you plan to expand beyond 24 players, your should definitely consider starting with switches that feature at least one Gigabit Ethernet (GigE) port in addition to the 24 10/100 ports. With less than 48 nodes, you can easily connect two table switches by a single Gigabit connection between the two 24-port switches and have great bandwidth between them.
These switches do not need to be managed since you will only be maintaining a single switch link. The nice thing about starting at this level of switch also provides for your later progression into the large LAN scenario I’ll discuss next. This preserves your equipment investment!
TIP: While you’re switch shopping, make sure any purchase candidates have enough bandwidth to handle full speed on all ports simultaneously. This is usually referred to as “non-blocking” in specifications, but it’s a good idea to also check the switch’s bandwidth or switching capacity spec to make sure the numbers add up. (The info you need is sometimes listed under “switch fabric”, too.)
For a 24-port 10/100 Mbps switch at full duplex (100 Mbps both directions) the switch bandwidth specification should be at least 4.8 Gbps – 100 Mbps per port x 2 (transmit and receive) x 24 ports. Note that each 10/100 port adds 200 Mbps and each gigabit port adds 2 Gbps to the switch’s bandwidth requirement. Make sure you add in bandwidth for dedicated uplink ports, which count just like normal ports.
If you can’t find the spec for 10/100 standalone switches, don’t sweat it, since it’s unlikely you’ll find any current-design products that aren’t non-blocking. But make sure you check the spec for any gigabit gear you’re considering. There are switches out there that say they’re “non-blocking”, but whose bandwidth numbers don’t support the claim. For example, a 24 port gigabit switch should have 48 Gbps of bandwidth. Anything less, and you’re not getting “non-blocking” performance.
Thinking Big
Once you pass 48 seats, you need to start thinking BIG. While it is possible to purchase big switches with hundreds of ports on a single chassis, it’s neither cheap nor practical for a large LAN Party network. For this reason you will be combining many table switches in a tree-like structure shown in Figure 1.
Figure 1: Basic LAN Party Network Topology
(click image to enlarge)
At the base of the tree you will find a piece of equipment commonly called a “core switch”. The core switch is used to tie the rest of your network together with super-fast non-blocking all-gigabit performance. Gigabit Ethernet is necessary in the core switch to prevent data flow from being bogged down by dozens of 100 Mbps Ethernet clients.
Once you’re connecting more than two tables and / or a server row switch, you’re definitely to the point where you need to investigate managed solutions as well. If you’ve ever run a large LAN Party using all unmanaged switches, you will agree that locating a performance problem is almost impossible without shutting everything down and starting things up one at a time until you locate the problem. For your own sanity, be sure to pick a good managed gigabit switch for your core. I’ll have some recommendations for you shortly.
LAN Topology – more
In Figure 1 you will notice that all switches connect directly to a port on the core switch. (This is usually referred to as a “star” topology.) If you were to “cascade” switches in your LAN topology (Figure 2) – plugging additional switches into the floor or table switches instead of into the core – you would be introducing additional potential points of failure that will be difficult to track down. You’ll also potentially place additional strain on the uplink ports to the core switch because more nodes will be feeding the port.

Figure 2: Not the way to connect switches
The probability of 24 100 Mbps connections completely filling a 1000 Mbps uplink is much lower then 48 or more 100 Mbps links. Don’t cascade switches unless someone is holding a gun to your head (or you’re risking possible lynching by 24 gamers that can’t get on the LAN because your last uplink is taken!)
Gigabit vs. Fast Etherchannel
As you’ve read earlier, traffic patterns on a LAN Party’s network are very random and unpredictable, so it’s very important to provide enough bandwidth between the table switches and the “core” of the network for a number of people at a given switch to be sending or receiving traffic at full speed across their connection.
What this means is, if you have two or three people transferring at 100 Mbps to / from a given server (maybe they’re downloading a game patch, or a hot new game demo) their traffic should not be creating a bottleneck with the other players on the same switch who may be playing low bandwidth, low latency games and / or running Voice over IP applications. The sum of their bandwidth needs to be below the total available bandwidth through to the core of the network.
In this example, a combined 300 Mbps of bandwidth is required for the high bandwidth applications, so at least that amount should be available. This is best achieved by connecting all of the table switches using gigabit Ethernet connections. It is also possible to connect tables to a core by multiple 100 Mbps connections using a technology called Fast EtherChannel, invented by Cisco Networks.
However, this method has inefficiencies that may prevent you from achieving the full potential of the combined bandwidth available. In addition to not being as efficient or as fast as gigabit Ethernet, you will also spend more money on more expensive fully “managed” switches that are required to configure multiple ports for Fast Etherchannel at both ends of the link.
Server Connectivity and Reliability Tips
In small and medium sized LANs with one or two switches, servers can be connected to either switch. However, in larger networks with core switches, more careful server connection is required. The suggested LAN topology in Figure 1 shows a server row switch connected to the core switch via redundant gigabit links. Game servers should generally be connected here, once again, to maximize performance and simply troubleshooting.
I also recommend that servers used for basic network services such as DNS, DHCP and Internet connectivity be connected directly to the core switch. This places the network services provided by these systems within a single hop from any location on the network.
Many LAN Parties run tournaments that require the highest reliability possible. Those servers should be connected directly to the core switch as long as ports are available. Other servers either brought in by participants or by the party staff can be plugged into the server row switch. The server row switch is still quite important in comparison to table switches since players from a number of tables will likely be playing off of these servers.
As mentioned above, I recommend that the server row switch be connected to the core switch via redundant gigabit Ethernet connections. While the bandwidth of dual gigabit is almost certainly not likely to be needed, the hot redundancy provided is essential to keeping everything running smoothly. Modern switches implement a technology called Rapid Spanning Tree Protocol (RSTP) that works like a dream in failing over from one link to another with only a split second pause. Tests in live scenarios with hundreds of connections showed that all connections transparently moved to the alternate link and not a single user noticed the failover!
Selecting your gear
You’ve probably read about a switch being “managed” or “unmanaged” but wasn’t really sure what that means. Basically a managed switch has an operating system running inside it that provides the ability to change various functions of each port and keeps track of traffic statistics.
Port management functions include things like being able to view port status, disable ports, mirror one port to another (handy for connecting a packet analyzer) and more. Statistics include packet, Byte, and error counts and other useful information. If you run into problems, you can quickly check these statistics and locate problems on your network without having to rip everything apart and try one thing at a time!
While it’s nice to have managed switches at every position on the network, it’s pretty uncommon to actually need them for your floor switches. The reason for this is that problems at the floor level typically cause problems only for one or two people at a time. Problems at the core switch, however can affect entire tables of users.
Of course cost is also a major factor – managed switches cost 2-3 times more than comparable unmanaged switches. So I recommend you purchase unmanaged switches for your table / floor switches and managed switches for core and server row switches. I also suggest having at least one spare managed switch for testing purposes or as a backup in case you have another switch go out on you at the event.
Switch recommendations
Please accept my apology if I sound like a sales guy for HP, but I have nothing bad at all to say about them. Their latest gear has an excellent and user-friendly web interface, a very powerful command line interface and all of the features you could ever want for a LAN Party – much less most enterprise businesses. Top all of that off with a lifetime warranty and you’ve got what I think is the best equipment available.
For the core switch of LANrental’s (my company) network, we use an HP Procurve 2824 24-port 10/100/1000 (GigE) switch (Figure 3) with a very powerful backplane that is non-blocking at 48 Gbps of switching capacity.
![]()
Figure 3: HP Procurve 2824
To handle our server row area, we use the HP Procurve 2626 24-port 10/100 switch (Figure 4) with dual 10/100/1000 (GigE) uplink ports. The Procurve 2626 is also non-blocking with a 8.8 Gbps backplane. We have configured the gigabit ports in a redundant configuration (using both uplinks) and RSTP.
![]()
Figure 4: HP Procurve 2626
For table switches, pretty much any brand of unmanaged 24-port 10/100 Ethernet Switch with at least one gigabit Ethernet uplink will work fine. Just make sure to check the specifications to ensure that its bandwidth supports all the ports and uplink(s). The model switch that LANrental uses is the Dell Powerconnect 2124 – it works well for us. Note that the 2124 is no longer available, but the 2324 that replaces it should work just as well, and has two gigabit uplink ports.
![]()
Figure 5: Dell Powerconnect 2124
Cabling
It’s impossible to set up a LAN Party without the LAN and the one thing in common to every LAN is the cabling connecting everything together. To be assured of top performance and reliable connectivity, it helps a lot to know what you’re working with when it comes to cabling.
The three primary attributes of cabling you will want to be familiar with are the category of the cable, the core type, and the jacket type. Almost every conceivable combination is available, but knowing which combination is best will save you a lot of time and money! The cable category is the first decision you’ll need to make.
You can read through Table 1, which contains a summary of the commonly-available UTP (Unshielded Twisted Pair) cabling Category types. But the short story is that you should only use either CAT 5e or CAT 6 cabling.
| Cable Category | Generally used for |
|---|---|
| 3 | Telephone wiring, legacy 10 Mbps-only Ethernet, legacy 4-Mbps token-ring |
| 4 | 16-Mbps token-ring. Not commonly used |
| 5 | 10 / 100 Mbps Ethernet. Considered “legacy” and replaced by CAT 5e |
| 5e | 10 / 100 / 1000 Mbps Ethernet |
| 6 | 10 / 100 / 1000 Mbps Ethernet. CAT 6 cable supports higher bandwidth (200 MHz vs. 100 MHz) and has better electrical characteristics than CAT 5e. |
| Table 1: UTP cable categories | |
As with any commodity product, manufacturers try any way they can to differentiate their products. This is especially true with the most widely-used CAT 5e cabling. You may run across terms like “+” or “Enhanced”, brand names like “MegaLAN”, or even the use of a big “E” (CAT 5E), all of which are meant to indicate higher performance than required by the official TIA / EIA (Telecom/Electronic Industry Association) 568B spec.
In general, most of this is marketing hype and if you want to pay more for performance headroom or peace of mind, go for CAT 6 instead of “enhanced” 5e cabling. Check out this FAQ if you want more CAT 6 info, but keep in mind it’s written by an industry consortium created to promote CAT 6 products.
Once you’ve chosen the cable category, you next need to decide on solid or stranded cable. Solid cable retains the most signal strength over distance, so I prefer to use it for cable runs between floor and core switches as these links will typically be 100 or more feet. One disadvantage to solid cable is that it is less flexible than stranded, so it’s best used when punched down at a patch panel and not moved. Repeated flexing or bending of solid cable can cause wire breaks and connector pin disconnects. Since LAN parties force moving these cables for each event, you should use a cable tester on each cable during setup at each event.
Stranded cabling is very flexible and is typically used for short runs since it tends to lose more signal strength over distance when compared to solid core wire. Stranded cable also maintains a solid connection with an RJ45 connector, making it the ideal cable for use with your gaming rig or servers since you will move these more often and will not be putting them far from their connection.
The last choice you’ll need to make when purchasing your cabling is the jacket type. Ethernet cable with a standard PVC jacket is the least expensive, but can emit poisonous fumes if exposed to flame. But for LAN Party purposes, this is not an issue, since all cabling is visible and not permanently installed.
Plenum jacketed cable is designed to be used for permanent installations in ducts or any space that is used to distribute air in a building. Plenum-rating cabling is designed not to burn easily and won’t give off toxic fumes when exposed to heat or flame.
The latest jacket type that’s even more costly than plenum is known as “LC” or Low Combustion. This type of jacket is specifically designed to simply “melt” when burned – burning this cable simply leaves a puddle of what looks like wax on the table. Many states are now requiring use of this cabling in raised floors of datacenters and utility companies, such as power and gas. LC is way overboard for LAN Parties – don’t bother unless you have a major hook-up on the price.
To pull all of this info together, I suggest the following types of cabling for your LAN Party’s network:
- For switch uplinks from tables to core, go with solid core Category 5e or 6 cabling with a standard jacket
- For cables for servers and / or game PCs, stick with stranded core Category 5e or better with a standard jacket
The decision you make between Category 5e (or its various enhanced flavors) and 6 is strictly one of pricing. For gigabit Ethernet there’s no difference in performance with current technology switches and NICs. If the cost difference between CAT 6 and CAT 5e is minimal, and you like the idea of buying a little performance headroom, go ahead and spring for the upgrade. If CAT 6 turns out to break the bank, don’t worry – 5e will do just fine for anything you’re likely to need in the near future.
Makin’ cables
Ready-made Ethernet cables can be purchased in most any length you’ll need or made yourself. Manufactured cables are a convenient option, however there are a few reasons you might consider making them yourself:
- Building the cabling is usually cheaper
- Having complete control of the length of the cable allows you to better size the cables to fit the venue’s configuration. Having less spare cable at the end of the cable reduces the likelihood of a foot getting caught in it and jerked, possibly causing a serious accident
- Shorter / correctly-sized cables also provide better signal strength
- It’s usually difficult to locate pre-made cabling that uses solid core wire
- You’re likely going to need to repair a cable at some point, so you might as well get used to learning how they are made
To make your own Ethernet cables, you will need the following items:
- Spool of the appropriate type of cable as described above – usually sold in boxes of 1000 feet
- A supply of RJ-45 Ethernet plugs – we like to call these “crystals”
- A basic knife or other cutting tool for cutting the right length of cable from the spool
- An RJ-45 crimping tool either with appropriate jacket-shaving blade or two separate tools
- A UTP cable tester or known-good network connector for testing
The assembly process goes like this:
- Pull the desired length of cable from the spool
You can either measure by physically running the box from the first location to the desired destination, or measure the actual distance and use the footage markers on the jacket of the cable. (You know, the number that’s on the outside of the jacket that you never paid attention to before?) If you decide to pull from one location to the other, be sure to add a few extra feet to account for things like distance from floor to switch, corners, etc. - Cut the cable from the spool
Nothing special here, just need to make sure everything is cut nice and neat. - Strip the PVC jacket about an inch from the end of the cable
An inch will expose enough wire to be more easily managed by big fingers. - Fan out the 4 separate colored pairs
This makes identification easier as you match colors. - Carefully arrange the wires in the proper order
95% of the time, you will be making a straight-through type cable. The only time you need a crossover cable is when uplinking switches that don’t have uplink ports or a feature called Auto MDI-X that automatically cross-connects the transmit and receive wire pairs on any port as needed.Figure 6 shows the RJ45 connector pinouts for 568A and 568B standards. It doesn’t matter which one you choose as long as you manufacture all cables using the same standard.
Figure 6: UTP RJ-45 connector pinouts
(click image to enlarge)
Makin’ cables – more
- Trim the wires
Flatten and straighten the wires neatly with your thumb and index fingers then use the cutting blade on your crimping tool to make the end of the wires nice and even – exposed wire should be about half an inch. This makes the crystal fit better and make good contact with the entire surface of the jack’s pins. -
Insert the wires into the connector
Place the crystal over the wires with the tab side down. Consistency is essential – make sure that everything looks nice and clean, if it doesn’t you should start over at Step 3 with a fresh cut. -
Crimp the connector
Put the jack into your crimping tool’s RJ-45 slot and press down firmly. You won’t hear a click or anything like that (unless you have a more-expensive ratcheting crimp tool) but make sure to apply good pressure. Remove and inspect – compare to something that you know works and if it looks good, you’re done with that one! -
Repeat steps 3-8 for the other end of the cable
- Test the cable
Either substitute the cable into a known-good network connection, or preferably use a UTP or Ethernet cable tester. It’s a good idea to give each connector a firm tug before testing, to make sure that the crimp is nice and strong.

Figure 7: Test each cable to make sure it’s good
Cabling Do’s and Don’ts
While unpacking, setting up, and breaking down all of your network equipment, it’s important to keep a few things in mind when handling cables:
-
Unpacking
Make it a policy that as you remove each cable from storage, immediately check it with an Ethernet cable tester. Check continuity, check for kinks in the cable and other general problems that could lead to trouble later. If a cable doesn’t test out perfectly, hit up your cable reserve – you can mess with the broken one later when you have more time. - Placement
After you’ve tested and replaced any defective cables, use a numbering scheme where rows have a number, and put a label on each end of the cable indicating the table it’s running to. Then insert that cable into the matching number port on your core switch.Example: Table 1’s switch should have a cable labeled #1 on both ends and then plugged into port #1 on the Core switch. This will help later if you are forced to make an emergency cable replacement, since you won’t have to trace the cable down to the Core to see what needs to be disconnected. (Figure 8)

Figure 8: Match up table and port numbers
If any Ethernet cables have to cross a walkway, try to converge them into a single location. Then route them across the floor covering them with lots of duct tape (preferably the yellow-and-black-striped safety kind) or better yet under a long rubber door mat duct-taped down. This not only protects the cables, but keeps gamers from tripping and possibly injuring themselves. It’s also a good idea to tape down the cables to the floor near the core switch to further prevent snags from potentially pulling the core switch into the floor causing serious damage to one of the most expensive switches you will own.
- Rolling and storing cables
When rolling up cables, be careful not to jerk them or put stress on either of the ends – especially if the ends are not booted and the clip can snag another cable or a table leg and break off. Broken tabs don’t properly secure the plug in the jack and can result in hard-to-find intermittent problems. Finally, it’s okay to use whatever shape you prefer to wrap the cable as long as you don’t bend the cable tightly into any sharp angle, like a 90-degree angle. This will break the conductors inside and unless you have x-ray vision, essentially ruin the entire cable!

Figure 9: Treat your cables right
Closing Thoughts
Even though I covered power in Part 1, there are a few things to keep in mind for powering your networking gear. While running power for your event, you should strongly consider running all of your networking equipment from dedicated power circuits.
Connecting floor switches to table power circuits provide all-too-vulnerable potential points of failure. Network switches generally take very little power, so you can run eight or so of them (at 2 amps each) off the same circuit. Go ahead and do it, it’ll save you lots of grief when / if power problems crop up! Note that depending on the size of your LAN Party, you may need more than one circuit to handle all your floor switches.
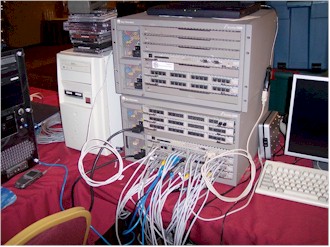
If you have just one or two server machines, you should be ok powering the servers and switches off the same circuit. But if your server row looks more like the one in Figure 10, you might also consider a separate circuit for your core and server row switch power!

Figure 10: Now THAT’s a server row!
So by now you know how to plan a LAN party, power it and install a LAN that will provide trouble-free gaming. In the next part of this series, I’ll show you how to proactively monitor and manage the live LAN and troubleshoot the problems that inevitably appear.
Christopher (AlexKidd) Dickens and his partner Dave Wilson own and operate LANrental.com, a LAN rental business serving the Kentucky, Indiana, Ohio, Southern Illinois, Eastern Missouri, Northern Alabama and Northern Georgia area.