Introduction
If you have an inexpensive IPsec VPN endpoint router and want to connect to the LAN behind it while you’re on the road, you’ll need to use a VPN client. Microsoft has included an IPsec client in Win 2000 and XP, but it is not the most intuitive thing to configure, and many have given up trying in frustration.
Contrary to what you may read in the forums and newsgroups, Microsoft’s IPsec client can be made to work! This article will show you how to get it up and running so you can be tunneling away in no time!
The Setup
Figure 1 shows the network configuration that I’ll be using as an example. It uses all private IP addresses, so you should be able to set it up and try it without having to be actually connected to the Internet.
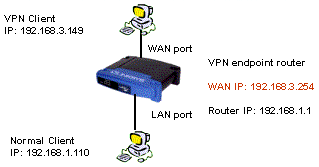
Figure 1: VPN Test setup
This procedure uses a Linksys BEFSX41 as the VPN endpoint router which handles two IPsec tunnels, but should also work with Linksys’ BEFVP41, which supports 70 IPsec tunnels. You don’t have to use these Linksys routers and could use any other router with built-in VPN endpoint. But many other inexpensive VPN endpoint routers have tunnel throughput in the 400 – 800kbps range vs. the SX41’s 2.5Mbps – a limitation you’d definitely notice.
Router Configuration
Figures 2 – 4 show the relevant SX41 admin screens with entries matching the network configuration in Figure 1. You, of course, are welcome to change IP addresses to match your existing LAN scheme, but unless you know what you’re doing, you may want to start with the scheme shown, get things working, then make your desired modifications.
There are some important setup points to note:
-
LAN clients should have static IPs assigned
As you’ll see later, you’ll need to access computers on the other end of the tunnel by IP address. So using static IPs on the LAN computers that you want to access will make sure that the shortcuts and mapped drives you set up will always work.
Remember that if you leave the DHCP server on the router active, be sure you assign your static IP addresses outside the range it uses!
-
The two ends of the VPN tunnel must use different subnets
In our example, the WAN-side client is in the 192.168.3.X subnet and the wired client in 192.168.1.X, which satisfies this requirement.
- Dynamic IPs won’t work
For reasons given in Microsoft Knowledge Base article 240262, the MS IPsec client supports tunnels between two static IP addresses only. If the mobile client is not located at a known IP address that can be entered into the SX41’s VPN setup, you won’t be able to use the MS client.
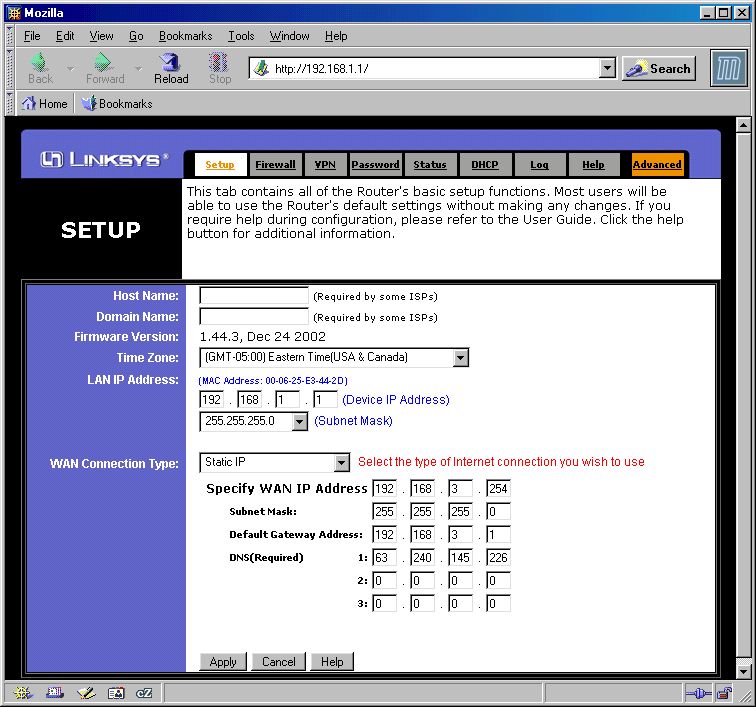
Figure 2: SX41 WAN / LAN Setup
(click on the image for a full-sized view)
Note that the Gateway and DNS information aren’t critical to getting the VPN tunnel to work. They can be whatever is required by your ISP. The WAN IP address can also be different, but its value is critical to getting the VPN connection to work and must be used in the IPsec client setup.
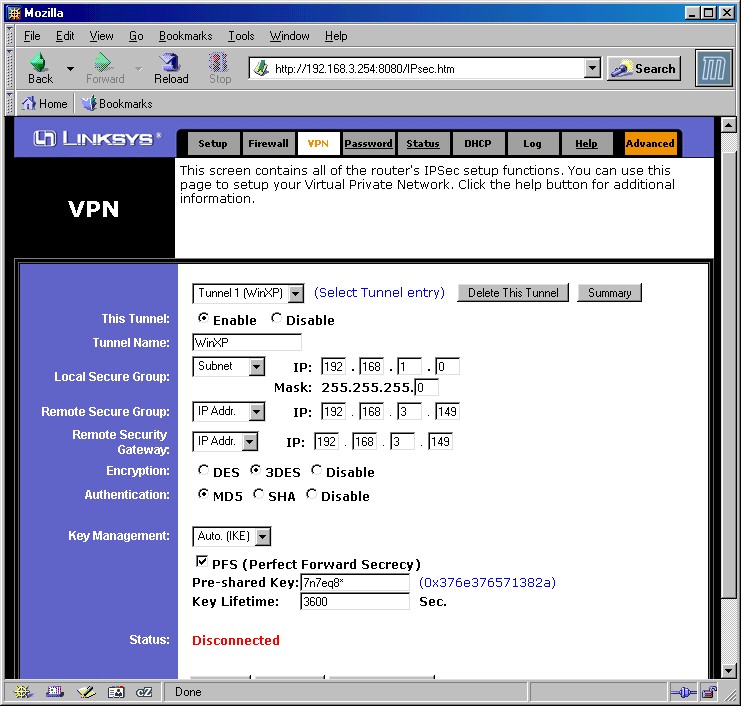
Figure 3: SX41 VPN Setup
(click on the image for a full-sized view)
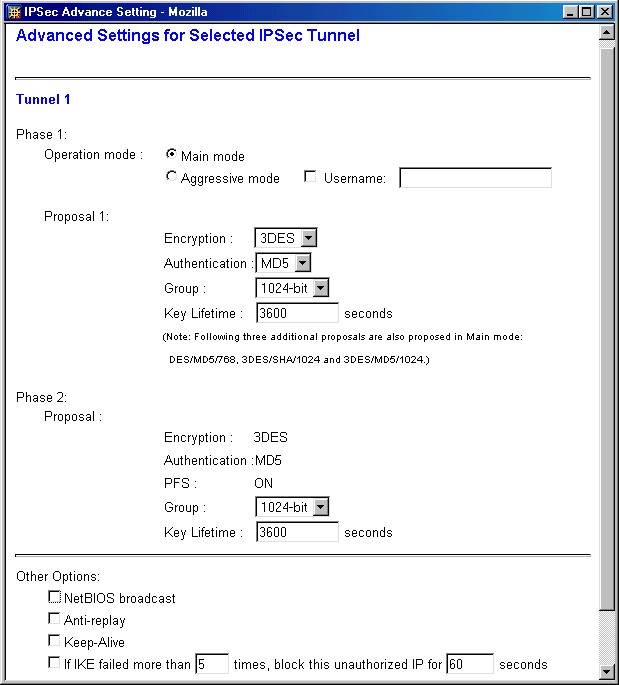
Figure 4: SX41 Advanced VPN Setup
(click on the image for a full-sized view)
Although other settings are possible for Encryption and Authentication, I suggest you use the ones shown, which use the best security that the Linksys router can provide. You can, of course, use a different Pre-Shared Key, but again, must substitute the value you choose at the appropriate points in the setup.
Finally, you can try enabling the NetBIOS broadcast option, but I couldn’t get network browsing to work (My Network Places), so left it disabled.
IPsec Client Configuration
Now for the hardest part – configuring the Windows IPsec client. These instructions are largely based on the app note on the Linksys website, but aren’t as much of a click-by-click procedure. They do contain some critical info that Linksys left out, however, and assume you’re running WinXP. You should be able to use the procedure for Win 2000, but some of the windows and default settings may look a little different.
|
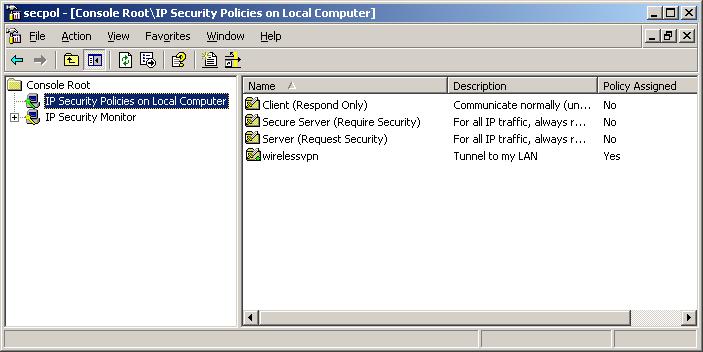
Step 1: Add a Security Policy Snap-In to the MMC
|
Figure 5: MMC Snap-In list
|
|
Step 2: Create an IPsec Policy
|
Figure 6: Security Policy Editor
|

IPsec Client Configuration, continued
|
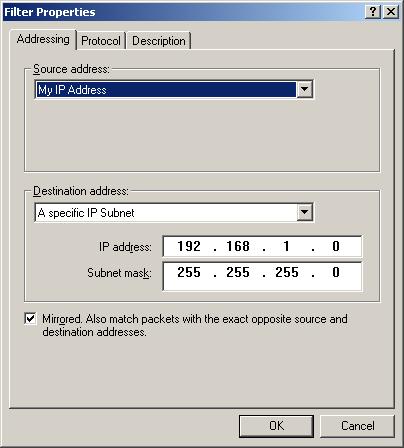
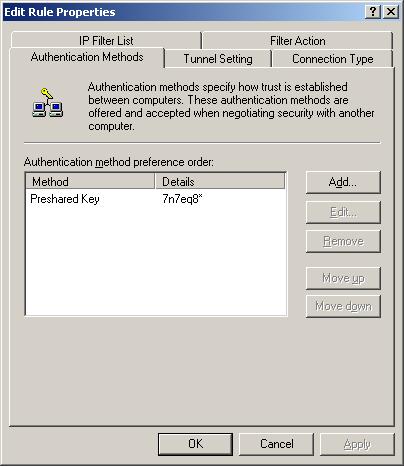
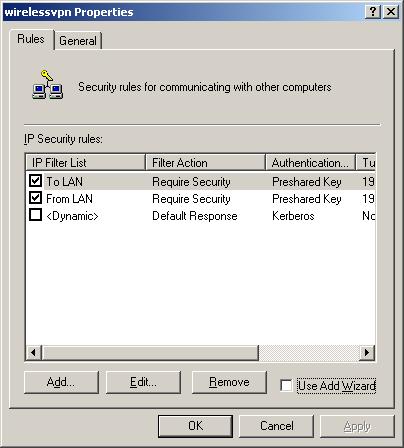
Step 3: Create the “To LAN” Security Rule
|
Figure 7: “To LAN” IP Filter Properties
|
|
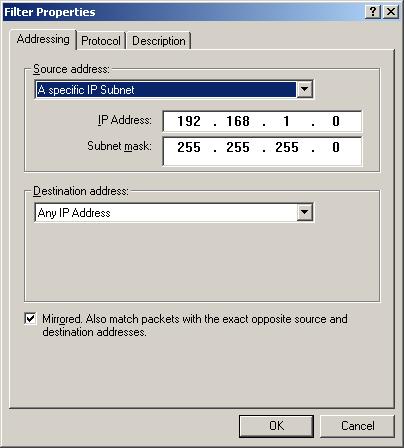
Step 4: Create the “From LAN” Security Rule
|
Figure 8: “From LAN” IP Filter Properties
|
IPsec Client Configuration, continued
|
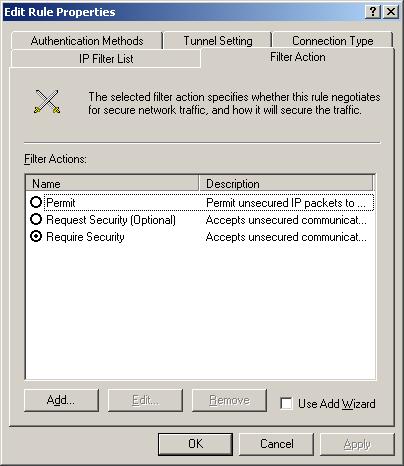
Step 5: Configure the “To LAN” Filter Action
|
Figure 9: “To LAN” Security Rule Properties
|
|
Figure 10: “To LAN” IP Filter Action
|
|
Figure 11: Require Security Filter Action Properties
|
|
Figure 12: Custom Security Method Settings
|

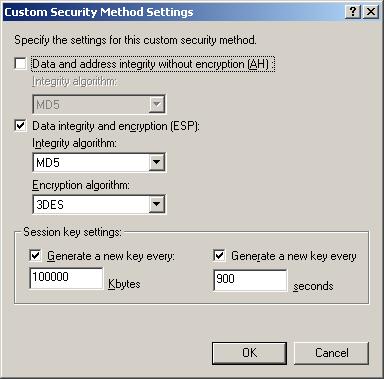
IPsec Client Configuration, continued
|
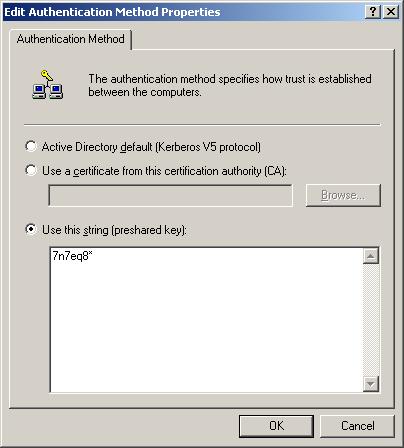
Step 6: Configure the “To LAN” Authentication Method
|
Figure 13: Authentication Method Properties
|
|
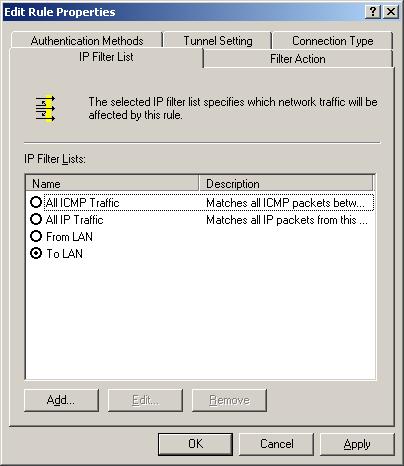
Step 7: Configure the “To LAN” Tunnel setting.
Step 8: Verify the “To LAN” Connection Type.
|
Figure 15: “To LAN” Tunnel Setting
|
|
Step 9: Save the “To LAN” rule.
|
Figure 16: IP Security Policy Properties
|

IPsec Client Configuration, continued
|
Step 10: Verify the “From LAN” Rule Properties
|
Figure 17: “From LAN” Security Rule Properties
|
|
Step 11: Configure the “From LAN” Tunnel setting.
Step 12: Verify the “From LAN” Connection Type.
|
Figure 18: “From LAN” Tunnel Setting
|
|
Step 13: Save the “From LAN” rule.
|
|
|
Step 14: Save and Assign the policy
This completes the IP policy configuration. You can either leave the Security Policy console open or close it. The assigned policy will be automatically started each time you boot your system. |
Figure 19: Security Policy Editor
|


Fix the IPsec client routing
Since a VPN tunnel is a routed connection, i.e. it connects different subnets, clients on each end of the VPN tunnel must send their packets to a router that knows where to send packets destined for clients at the opposite end. If your IPsec client and VPN router’s WAN side both have public, i.e. routable IP address, you’ll probably have no problem communicating once your IPsec tunnel is established.
If either or both of the IP addresses is private, however, you could be in for trouble if either the LAN or WAN-side clients have incorrect Gateways specified.
Clients on the LAN side of the VPN router will have the correct Gateway info as long as they use the router’s IP address as their IP address Gateway – 192.168.1.1 in the example setup – because the router handles both Internet and VPN tunnel routing.

Figure 20: VPN router LAN side client routing
Figure 20 shows the output of the route print command (entered in a Command prompt or MS-DOS window) for our example LAN client. You can see that the default route – where data is sent if it doesn’t match any other routes and indicated by 0.0.0.0 – is 192.168.1.1.
Gateway information for clients on the WAN side of the router may not be correct and need to be modified. In our example, the WAN-side client’s IP address is 192.168.3.149, so its expected that its Gateway IP would be something in the 192.168.3.X subnet. Figure 21 shows the output of the route print command for our example WAN client.
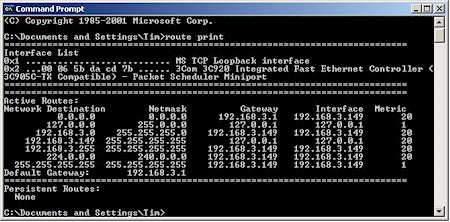
Figure 21: WAN-side VPN client routing
You can see that the default route is 192.168.3.1, which happens to be the IP address of my LAN’s main Internet-connected router. Although that router may know how to get our computer’s data to and from the Internet, it doesn’t know anything about the 192.168.1.X subnet at the other end of the test VPN tunnel. So if we fire up the tunnel that we just configured, we’ll connect, then be very frustrated when nothing on the other end of the tunnel responds to a ping!
Fix the IPsec client routing (cont’d)
More sophisticated VPN gateways and IPsec client applications handle this problem by assigning virtual IP addresses to VPN clients during the authentication process. These virtual IPs are in the same subnet as clients on the gateway’s LAN side, so for all intents and purposes, the client on the remote end of the tunnel looks like a full-fledged member of the local LAN.
Unfortunately, we’re running a low-budget operation and neither the SX41 nor Microsoft’s IPsec client can handle virtual IPs. So we have to solve the problem by fixing the Gateway IP address so that it properly points to the VPN router’s WAN side IP address, i.e. 192.168.3.254.
If for some reason we need to use one router to get to the Internet and another for our VPN tunnel, adding a static route on the WAN client will make everything work. To do this for our example, just open up a Command prompt (MS-DOS) window and type:
route add 192.168.1.0 mask 255.255.255.0 192.168.3.254
This says to your client, “take all the data intended for any IP address between 192.168.1.1 and 192.168.1.254 and send it to 192.168.3.254”.
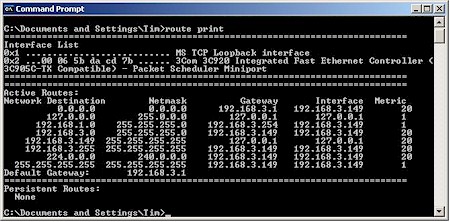
Figure 22: WAN LAN client routing with 192.168.1.0 static route added
Figure 22 shows the output of a route print run after the route is added. Since 192.168.3.254 is the WAN IP address of the SX41, and the remote end of our VPN tunnel, our data will now properly find its way and your ping (and everything else) should work. Note that the default gateway for all other traffic (including Internet) remains 192.168.3.1.
TIP: If you’re running Win2000 or XP, you can use the “-p” option of the router add command, i.e. route add -p 198.168.1.0… to create a persistent static route that will be there next time you boot.
If you’re running earlier Windows OSes, just open Notepad, type in the desired “route add…” command, save as routeadd.bat and put a copy in your Startup folder. This will run the batch command every time you boot and add the desired route.
Testing the Connection
We’re finally ready to test the connection. You can bring up the VPN tunnel either by clicking the Connect button on the SX41’s VPN page, or trying to make a connection to a computer on the SX41’s LAN side from the WAN-side client. Easiest way to do that is with a ping.
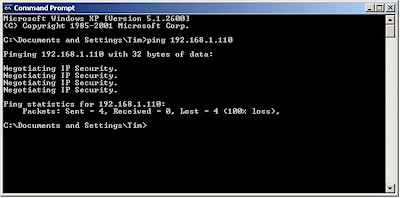
Figure 23: First ping from IPsec to LAN-side client
The Negotiating IP Security message in Figure 23 indicates that the IPsec policy is up and running and trying to establish a tunnel. But since it takes time to set things up, the ping completes before the tunnel is established, so we need to try a second ping.
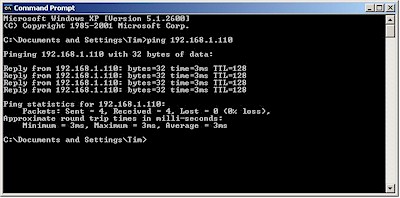
Figure 24: Second ping from IPsec to LAN-side client
The successful replies in Figure 24 show that the tunnel is up and running. Alternatively, we could use the “-n” option in the ping command to run a longer ping and see the setup in one try. Figure 25 shows what that looks like.
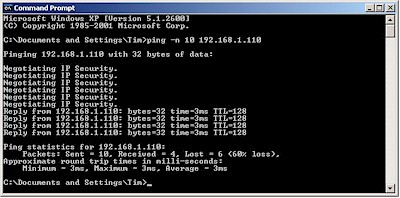
Figure 25: Long ping from IPsec to LAN-side client
At any rate, once you get a successful ping you should be up and running – at least when working from the WAN-side IPsec client. As I said earlier, I could not share files on the WAN-side IPsec client from the LAN-side computer, even though I could ping it and even access a test FTP server that I set up on it.
But File and Printer sharing worked fine when going from WAN to LAN, as long as I opened the connection by opening the Windows Run box and entering the desired folder in UNC format as shown in Figure 26.
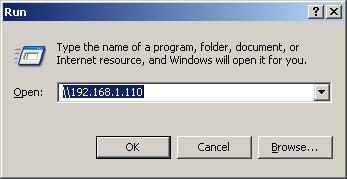
Figure 26: Accessing the LAN computer
Once you have confidence in the tunnel setup process, you can skip the ping and just go right to opening the desired share. Just be patient and allow time for the tunnel to be opened!
Troubleshooting
If you’re having trouble, try these troubleshooting tips:
-
Double check your settings
I wasted a good amount of time trying to get a connection running that had the wrong IP address or setting in the maze of configuration windows used by the Windows IPsec client. So check and double-check the settings carefully!
-
Try again
It sometimes takes two tries to get a successful tunnel setup. Don’t ask me why…
-
Reboot the client
I found that I had to sometimes reboot the IPsec client machine in order to get it to connect. First try unassigning and re-assigning the security policy via the secpol console, though.
- Re-apply the router settings or reboot
On the router side, I sometimes got a balky connection running by clicking the Apply buttons on the Main and Advanced VPN admin screens. Sometimes a reboot of the router did the trick.
Happy VPNing!