Increasing bandwidth and reliability on a network is important for core network
devices and servers. I recently covered Link Aggregation, which is the ability to combine two or more links between smart switches into a single trunk. Link Aggregation (IEEE 802.3ad) enables multiple links between devices to act as a single link at performance levels at or near the sum of the individual links with the additional benefit of greater network redundancy.
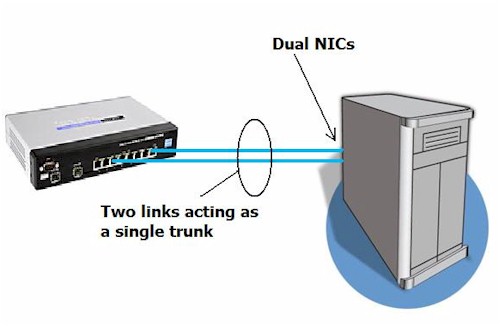
Link Aggregation isn’t limited to links between smart switches, though. Link Aggregation, NIC Teaming, or Ethernet Bonding can also be configured between a smart switch and a network server, and it is relatively easy.
In this article, I’m going to set up NIC Teaming between my Linux server and a Linksys SRW2008 switch. I’m just going to cover the steps on configuring my server. The steps for configuring the switch are exactly the same as I described in my previous article.

Figure 1: Yahoo TV
Not all Operating Systems support NIC Teaming. I’m not aware of Windows XP and Vista having support for NIC teaming, but Microsoft does support NIC Teaming in server operating systems, such as Windows Server 2003. Linux is the easy choice, as many distributions have support for this functionality.
The server I’m using has a motherboard with an on board Intel PCIe Gigabit NIC, as well as an add-on Intel PRO/1000 GT Desktop Gigabit PCI NIC. Both are pretty basic network cards. For an OS, I’m running the free Ubuntu 8.04 LTS Server Edition.
I have to admit, although the steps to complete this task were short, it took some trial and error to get the configuration to be stable and persist through a reboot of my machine. I read through multiple snippets on how to get this task done, with my end result a combination of several approaches.
First, to ensure the second NIC would function, I edited the /etc/network/interfaces file, adding added the following lines:
# The secondary network interface
auto eth1
iface eth1 inet dhcp
Second, I powered down my server and physically installed the second NIC. I disconnected the Ethernet cable from the on board NIC and connected it to the second NIC. I then powered up the machine and verified the second NIC was getting an IP address and I could ping and access the Internet. This ensured that I had two functional network cards. A nice Linux tool to verify an Ethernet card’s status is ethtool, which produces output as below.
dreid@ubuntusrvr:~$ sudo ethtool eth0
Settings for eth1:
Supported ports: [ TP ]
Supported link modes: 10baseT/Half 10baseT/Full
100baseT/Half 100baseT/Full
1000baseT/Full
Supports auto-negotiation: Yes
Advertised link modes: 10baseT/Half 10baseT/Full
100baseT/Half 100baseT/Full
1000baseT/Full
Advertised auto-negotiation: Yes
Speed: 1000Mb/s
Duplex: Full
Port: Twisted Pair
PHYAD: 1
Transceiver: internal
Auto-negotiation: on
Supports Wake-on: umbg
Wake-on: g
Current message level: 0x00000001 (1)
Link detected: yes
Third, I installed the Linux software that supports bonding, called ifenslave. Adding software and modules in Ubuntu is done with the aptget and modprobe commands. My exact commands are as follows:
sudo apt-get update && apt-get install ifenslave-2.6
modprobe bonding
Fourth, I re-configured the /etc/network/interfaces file to use the ifenslave software, and assigned a static IP address to the trunk formed by bonding the two interfaces. Below is the configuration that provided the most stable solution on my machine, which I’ll explain below.
auto eth0
#iface eth0 inet dhcp
auto eth1
#iface eth1 inet dhcp
auto bond0
iface bond0 inet static
address 192.168.3.201
gateway 192.168.3.1
netmask 255.255.255.0
dns-nameservers 192.168.3.1
pre-up modprobe bonding
up ifenslave bond0 eth0 eth1
In Linux configuration files, lines preceded by the # symbol are comments, or not used by the operating system. Notice the commented lines (iface eth_ inet dhcp) for both the eth0 and eth1 interfaces. Commenting those normal configurations disables the DHCP function so the physical interfaces don’t request an IP address. I was getting intermittent network failures on my server with NIC Teaming until I commented them out.
The section for auto bond0 is pretty intuitive. You can see that we’re telling the operating system that the bond0 interface has a static IP address, and then assigning the appropriate parameters. The last two lines are installing the bonding module and executing the software to create the NIC "Team" between the two physical interfaces, eth0 and eth1.
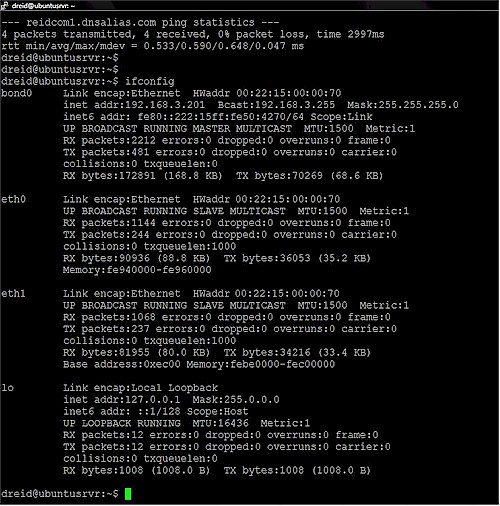
Rebooting the system resulted in a stable configuration with a single active interface called bond0 with an IP address of 192.168.3.201. As you can see from the ifconfig output in figure 2, I now have an active bond0 interface on my machine, which is my Ethernet trunk or NIC "Team."
Notice also that the MAC addresses (HWaddr) for bond0, eth0, and eth1 are the same. The ifenslave function takes the MAC of the first physical card and applies it to all the interfaces, with only an IP address assigned to the bond0 interface.
In my case, I used two Gigabit interfaces, effectively doubling the network capacity of my machine. Three or more physical interfaces could be "Teamed" in essentially the same manner with a longer command such as ifenslave bond0 eth0 eth1 eth2.
With the configuration up and stable, it was easy to validate the redundancy benefit. Pinging the 192.168.3.201 address from my laptop, I could disconnect one or the other of the two Ethernet cables without losing more than a single ping, proving the two NICs were acting as a single IP address on my network.
I hope this and my previous article were useful. Link Aggregation and NIC Teaming are an easy way to increase network performance, as well as provide a measure of redundancy. Further, since the technology is standardized, there are a lot of options in equipment and software to implement this technology in your small network.

