Introduction
We often hear from people who have two (or more!) routers in their LAN and are trying to get Microsoft File and Printer sharing running among all their computers. This ProblemSolver will explain why this doesn’t work by default and provide some suggestions for working around the problem.
Setting Up
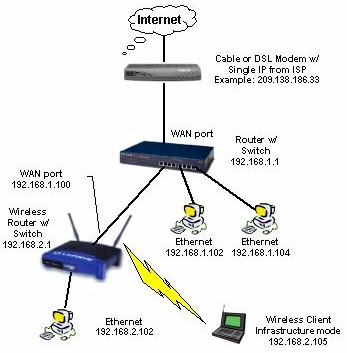
Figure 1 shows a two-router LAN configuration that I’ll use as an example. This isn’t the only configuration possible, but it will serve to illustrate the points I’ll be making.
Figure 1: Example of LAN with two routers
First, note that the two routers are set to different base addresses – the wired router to 192.168.1.1 and the wireless router to 192.168.2.1. This is essential for multi-router setups, since without the different address ranges, the routers wouldn’t be able to properly build their routing tables. These tables control the way that data is handled and ensure that it is sent to the correct router for delivery to its connected clients. The use of different base addresses puts each router’s attached clients into different Class C subnets.
TIP: Class C subnets have a maximum of 254 IP addresses, have the same first three “octets” in their addresses (ex. 192.168.3.X) and use a subnet mask of 255.255.255.0.
Next, note that the second router (the wireless) has its WAN port connected to one of the wired router’s LAN ports via a normal UTP patch cable, and that it has an IP address in the first router’s range. I’ve shown the wireless router’s WAN IP as 192.168.1.100, but it could be any IP address in the 192.168.1.X subnet.
TIP: You don’t have to use the 192.168.X subnets shown in the example. You can use any two private IP address ranges as long as they are different.
Note also that you can either assign the second router’s WAN IP statically, or just set it to be a DHCP client (obtain automatically). I suggest the latter option, since if you enter the IP address info manually, you’ll need to include the Gateway and DNS information, which you might have trouble figuring out.
Two Problems
Our two-router setup doesn’t cause problems with simple Internet use including email, web browsing, instant messaging, and most applications, i.e. anything where you initiate the request for data. But you’ll run into two problems when you try to get file and printer sharing going, which I’ll now explain.
Problem 1 is that the multiple subnets in our example LAN cause problems with network browsing. This means when you use My Network Places in Win2000 and XP or Network Neighborhood in earlier versions of Windows, the only computers you’ll see are those connected to the same router. This problem can be solved by using a WINS server, but there are simpler fixes that I’ll describe in the next section.
Problem 2 is caused by each router’s firewall. By default, consumer routers block all unrequested data that tries to travel from WAN port (the Internet) to LAN clients, and passes all outbound data from LAN clients to WAN. The blocking of inbound data requests provides the basic “firewalling” function of a NAT router and keeps computers connected to the router’s LAN ports inaccessible from the Internet. But this inbound filter gets in the way of Microsoft File and Printer sharing when routers are connected together.
Referring to our example LAN in Figure 1, this means wireless router clients will be able to file and printer share with clients of the wired router, but not vice-versa.
NOTE: This same “one-way” action will also complicate access to servers or server-type applications running on any computers connected to the second router. A simple fix for this problem is to connect those computers to the first router, but the file and printer sharing work-arounds shown later can also be used.
Solution 1 – Disable the second router
Updated September 28, 2005
The easiest way around this whole problem is to not use the second router as a router! After all, it’s the NAT firewall that’s causing these hassles, and if you don’t need it, don’t use it!
The only times you really need the second router to act as a router are:
- If you intentionally want to create a protected part of your LAN via the second router’s firewall
- You want to combine the firewall features of both routers, i.e. port filtering, content filtering, logging, etc.
If you’re not trying to accomplish either of the above, then you’re better off disabling the second router. Here’s how:
1) Choose a LAN computer on the second router and statically set its IP address information to their current values (use the Support tab of the Local area Connection Status window on WinXP and 2000, and Start > Run > winipcfg on Win95 and 98 systems to grab the current IP address info). This will keep the computer that you’ll be using for the next steps from losing its IP address info and the ability to connect to the routers.
NOTE: Ignore this step if the computer you choose already has static IP information, and remember to change back to “Obtain an IP address automatically” if you weren’t using a static IP setup.
2) Turn off the DHCP server in the second router. The first router also has a DHCP server, and you don’t want the two to conflict when you connect them.
3) Change the address of the second router so that it’s in the same subnet as the first router and doesn’t conflict with the first router’s base IP address or DHCP server range. This will ensure that you can reach the admin server of the second router from any LAN machine.
For our example setup, the first router base address is 192.168.1.1 with DHCP server range of 192.168.1.100 to 192.168.1.150. So set the second router base address to any IP address between 192.168.1.151 to 192.168.1.254
NOTE: Once you make this change, the computer you’re using will no longer be able to communicate with either router because it is set to an IP address in the subnet you just got rid of. So go back into the computer’s TCP/IP properties and change it back to “Obtain an IP address automatically” (and do a DHCP release / renew) or set its IP address info statically.
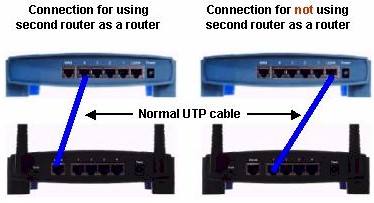
4) Once you take care of the items above, connect a LAN uplink port on one router and a LAN normal port on the other. It doesn’t matter which you use on which router, but don’t use the Uplink ports on both routers! If neither router has an uplink port, just use a crossover cable to connect any LAN port on one box to any LAN port on the other. Figure 2 shows an example of the two interconnection schemes when one router has an uplink port.

Figure 2: Router interconnection
Note that since you’re no longer using the routing part of the second router, none of the WAN (or Internet) setup parameters matter. You can just leave them as they are… they won’t affect anything.
Congratulations! You’ve just turned that second router into a dumb switch and/or access point, and your sharing troubles are over!
Solution 2 – Sharing via IP address
If you really do need two routers, you’re going to have to live with limitations on File and Printer sharing and Network Browsing. As mentioned previously, computers attached to each router will be able to browse and file and printer share with other clients attached to the same router. But only computers attached to the second router will be able to exchange files with computers attached to the first router, and the clients attached to the second router must initiate the file transfers.
If you can live with this limitation, here’s how to access a remote shared folder or drive:
1) Assign a static IP address to the computers that you want to have access to. This is important since you’ll be accessing them by IP address, not name, and if the remote computer(s) lease a different IP address at DHCP renewal time, you’ll have to track down and use their new address.
NOTE! Make sure you use static IP addresses outside the range of the router’s DHCP server. For our example setup, the first router has a DHCP server range of 192.168.1.100 to 192.168.1.150. So be sure to assign static IPs from 192.168.1.151 to 192.168.1.254.
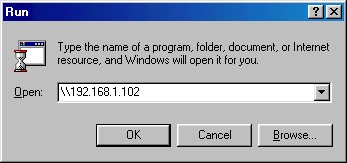
2) Open up a Run window (Start > Run) and type in followed by the IP address of the computer that you want to access. (I’m assuming that you’ve already shared the desired drive or folder on that computer). Figure 3 shows how it’s done for a computer with IP address 192.168.1.102.

Figure 3: Accessing a remote computer
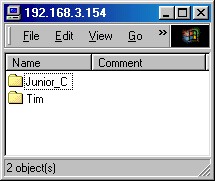
After a short wait, a window should open containing the shared drives and folders of the remote computer. Figure 4 shows the shared items on the computer I reached at 192.168.3.154.

Figure 4: Shared items on 192.168.3.154
TIP: You can also use Windows’ Find Computer function. Just omit the leading “” and type in only the IP address of the machine you’re looking for.
3) To avoid having to go through all these hoops the next time you want to access a remote shared file, just right-click on any of the items shown in the window opened in Step 2, choose Create Shortcut or Map Network Drive. (If you’re using WinXP, you can find Map Network Drive in My Computer > Tools). Then all you’ll need to do the next time you want to access the shared item is to double click on the shortcut or open the drive in My Computer.
It’s also possible to use computer names instead of IP addresses to find remote computers by editing the LMHOSTS file on specific computers. But since this doesn’t get network browsing working and can be difficult to maintain, I don’t recommend you mess with this.
TIP: If you want to know more about creating an LMHOSTS file, see the Microsoft article Windows NT Workstation Resource Kit – Using LMHOSTS Files
Going the other way
My earlier statement that clients connected to the first router won’t be able to access any clients attached to the second router for file and printer sharing actually isn’t entirely true. By using the second router’s DMZ (or exposed computer) function you can actually share in this direction, but for only one second router client at a time.
All you need to do is put the IP address of the computer you want to share in DMZ, then use the WAN IP address of the router when you go to access the computer. You don’t have to worry about weakening security for the computer that you put in DMZ, since it’s already protected by the first router’s firewall. But if you’re really paranoid, you can open just TCP and UDP ports 137, 138, and 139 to the IP address of the computer that you want to access instead of putting it in DMZ.

