Updated December 2006
Our setup for testing routers with built-in VPN endpoints is straightforward.
- We try to get two of whatever product we are testing so that we minimize setup hassles.
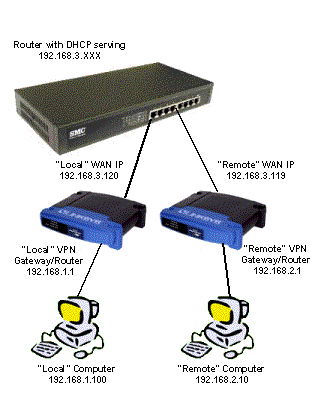
- We connect both routers’s WAN ports to each other by plugging them into our main router’s LAN ports.
- The test VPN routers’s WAN ports are set to be DHCP clients and get their TCP/IP information from the DHCP server in the main router.
 NOTE! Although the main router is connected to the Internet, all VPN traffic between the routers under test stays local behind the main router’s firewall.
The test setup is shown in the diagram below.

In most cases we will be testing IPsec routers and use the following settings:
- DES Encryption
- MD5 Authentication
- IKE Key management
After we successfully establish a VPN tunnel between the two routers, we use Ixia’s free Qcheck or IxChariot to check the performance of the VPN tunnel between the two test routers. We use the simple test setup pictured below to run three basic tests.
1) Transfer Rate – More commonly known as Throughput, this test is a measure of how fast data flows through the router. The test sends a file from computer to computer, measures how much time it takes, and calculates the result in Mbps (Megabits per second).
Our test sends one MegaByte of data (the most that Qcheck will do). Higher numbers are better, but any result over 1-2Mbps will be plenty fast for most broadband connections, which usually run at an average of 0.5 to 0.8Mbps (even though the speed is usually advertised as being 1Mbps or higher).
2) Response Time – This test measures the delay (also known as lag, or latency) that the router introduces into a data stream, and is essentially what you’d measure by using the ping command. This test sends a small packet of data from one computer to another and measures the time it takes to receive a reply.
Our test setup runs the test 10 times in a row and calculates the average and maximum times. Lower numbers are better, especially for gaming and any voice or video applications, but anything under 10ms (milliseconds) is fine, again, because the delay that your Internet connection introduces is probably greater.
3) UDP Stream – This test measures how well a router can keep up with a continuous stream of data. In addition to giving an indication of whether you’ll have trouble listening to Internet audio or watching video program streams, it tends to show flaws in the router’s routing “engine”. It uses the connectionless UDP protocol, which has less overhead and error recovery mechanisms than the TCP protocol (picture a fire hose being turned on vs. a water bucket brigade).
Our test setup pushes data at a 500kbps (0.5Mbps) rate for 10 seconds and results in two numbers. You want the Actual Throughput number to be as close to 500kbps as possible and the Lost Data to be ideally zero, which most routers will come pretty close to. Avoid products that can’t complete the test because they lock up or that have less than 400kbps throughput or error rates above 10%.
All three tests are run from Local to Remote, and repeated from Remote to Local. The “Local” router is the one connected to the computer that we run the Qcheck console on.
We tend to use the same computers to run the tests, with all running Win98SE or WinXP, and having 300MHz or better processor speeds and memory configurations in excess of 256MB. The test machines have no other applications running during testing.
