Using packet papture software like Wireshark is a useful troubleshooting technique that can be used to examine packets and gather details to help find the root of a problem. In my previous post, I talked a little bit about how to use Wireshark and walked through some steps to run a simple packet capture from a PC. This time, I’m going to go a bit deeper into the how to for doing packet captures.
A common use for packet capture is to monitor the packets going to and from a specific device. To be able to capture those packets, the packet capture tool has to be sharing the network segment being used by the specific device. Simply connecting a laptop running Wireshark to the same switch or switch embedded into a router as the target device will not allow a PC to monitor the packet flows of another device without some additional tools, features, or options.
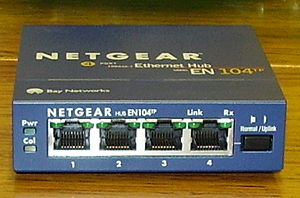
One simple tool that is useful to monitor another device’s packet flow is a hub. A hub, such as the simple 4 port Netgear model shown in Figure 1, looks and seems very similar to a Switch. There are some key differences, though.
Hubs are shared network devices that operate at the physical layer, or layer 1 of the OSI Network Model, with all devices using the same bandwidth and media. Subsequently, all packets sent and received on that hub can be monitored from any port on that hub. This shared aspect also makes Hubs a security risk, so replace that old hub with a switch if you still have one in production.
Figure 1: Typical hub
For troubleshooting, the Hub comes in handy. Connecting the target device and the PC with Wireshark to a hub connected to the rest of the network will enable the PC with Wireshark to run a packet capture on packets going to and from the target device, using the same techniques as described in my last blog.
Hubs have been pretty much replaced by switches. But managed or "smart" switches usually have a feature that allows you to monitor a specific port, known as port mirroring.
For example, the Linksys SRW2008 [reviewed] is a nice 8 port switch with various management features, including port mirroring. In Figure 2, I’ve enabled port forwarding on Port g1, with my laptop running Wireshark connected to Port g2, and selected a Type of Both to allow me to capture both Transmit and Receive traffic.
Figure 2: Wireshark Interfaces
Using this feature on my switch, I’ve essentially tied together ports 1 and 2, and now can run a packet capture from a laptop or PC on port 2 to troubleshoot packet flows coming and going from whatever device may be connected to port 1.
In addition to using a hub or port mirroring, many devices have packet capture options built in to their software. As I mentioned last week, the SonicWall TZ190W, D-Link DFLCPG310, and Netgear’s newly released FVX538 and FVS336G all have this option. Using the packet capture tool on a router combines the functionality of port mirroring and Wireshark capture, producing an output file of packet flows which can then be downloaded to a PC and opened within Wireshark for filtering and analysis.
Filter the Packets
Now that we’ve covered the software and hardware for packet captures, the next step is to filter the packets so we can limit the amount of data we are filtering. PCs can produce thousands of packets in a very short period of time, and if you’re looking for a specific problem, you don’t want to be sifting through all those lines of data to find it.
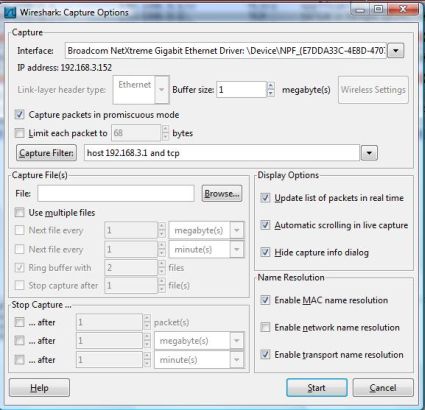
MAC addresses, IP addresses, traffic types, and just about any other data characteristic can be specified in a filter to isolate traffic. Let’s say I want to filter traffic between my PC and my gateway router, and I only want to look at TCP traffic. Clicking Capture -> Options opens the screen in Figure 3.
Figure 3: Host and TCP filter
As you can see, I’ve created a capture filter with the conditions host 192.168.3.1 and tcp. This simple filter will display TCP traffic that is coming from or going to my gateway router, which is host 192.168.3.1. I used the boolean key word and meaning both conditions have to be met in my filter, as opposed to using the boolean key word or which would have created a filter that would have captured all TCP traffic as well as all traffic to and from my gateway router.
Filters can get far more complex than this example, but this gives the general idea of using keywords and multiple conditions to narrow your search. All together, the combination of a hub or network device that supports port mirroring or packet captures, along with Wireshark, yields a very powerful tool for network troubleshooting.


