
| At a glance | |
|---|---|
| Product | MIKROTIK hEX 5-port Ethernet Gigabit Router (RB750GR3) [Website] |
| Summary | Small five port wired-only Gigabit Ethernet router. Similar to Ubiquti EdgeRouter. |
| Pros | • High throughput • Very low cost • Can be PoE powered • Simple secure remote admin via Winbox utility |
| Cons | • Too complex for average consumers • Possible intermittent packet loss • Could not get bandwidth management to work |
Typical Price: $58 Buy From Amazon
Introduction
Updated 9/26/17 – Storage sharing clarified
Many SmallNetBuilder readers have heard of Ubiquiti small but powerful EdgeRouter Lite, particularly since we’ve reviewed it a few times.
But the ERLite doesn’t have the inexpensive-but-powerful router market to itself. MikroTik was founded in 1996 and is located in Riga, Latvia. In 1997, MikroTik created RouterOS, the software that runs their routers today. You can try RouterOS today and turn a PC into a router if desired. In 2002, MikroTik decided to make their own hardware, creating the RouterBOARD brand.
The RouterBOARD product line includes an extensive list of network products as listed in their 73 page product manual and on their product page. MicroTik products include routers, switches, and wireless devices. In this review, I’m going to explore the MicroTik RB750GR3 hEX router.
The hEX is a 5 port router, enclosed in a white plastic case measuring 4.4″x3.5″x1.1″. On the front you’ll find (5) 10/100/1000 Ethernet ports (1 WAN, 4 LAN) and the power port as shown below.
The LEDs are on the top rear of the router, as shown in the product photo above, which defeats the value of having all ports on one router panel. There is a USB port on the right side of router for connecting a USB drive for copying files to and from RouterOS, or connecting an LTE dongle. The port doesn’t support storage or printer sharing.
Updated 9/26/17
SMB storage sharing is supported using the IP > SMB > Share menu and I was able to mount a USB drive. But our standard robocopy script threw a file attribute change error and we didn’t pursue further test. USB storage can also be used for web proxy cache, TFTP and FTP storage.
Inside
The main board of the MikroTik hEX, identified with product ID RB750Gr3, is a tiny board, not much bigger than a Raspberry Pi. It’s passively cooled so completely silent. As you can see below, there isn’t much to it.
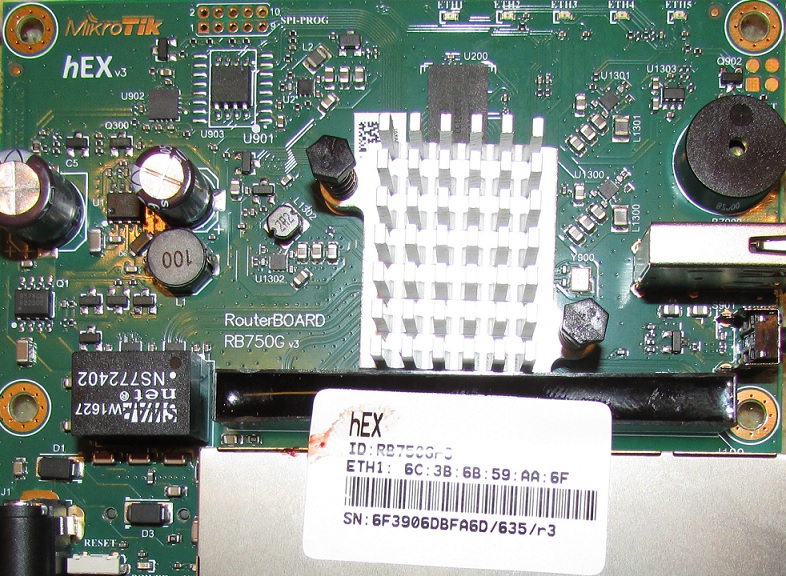
Mainboard RB750Gr3
Under the main heat sink is an 880MHz MediaTek MT7621A dual-core SoC. The board has 256 MB of RAM and 16 MB of flash memory. A power adapter is included, plus the device can be powered via "passive" Power over Ethernet (PoE) on the router’s WAN port. Buy an RBGPOE adapter if you want to do that.
RouterOS
RouterOS is the operating system for MikroTik routers, based on the Linux v3.3.5 kernel. My hEX came with firmware v6.39.2 which was easily updated to v6.40.3 by simply using the “Auto Upgrade” option in the GUI.
RouterOS supports Graphical User Interface (GUI), Console, and Command Line Interface (CLI) options for applying configurations, as well as a utility called Winbox that I’ll cover next. The list of configuration options presented when connecting to the hEX GUI for the first time illustrates the wide array of capabilities of RouterOS based routers. There are 14 main configuration options along the left side of the hEX GUI titled Interfaces, Bridge, Switch, PPP, Mesh, IP, MPLS, Routing, System, Queues, Files, Log, Radius, and Tools, as shown below.
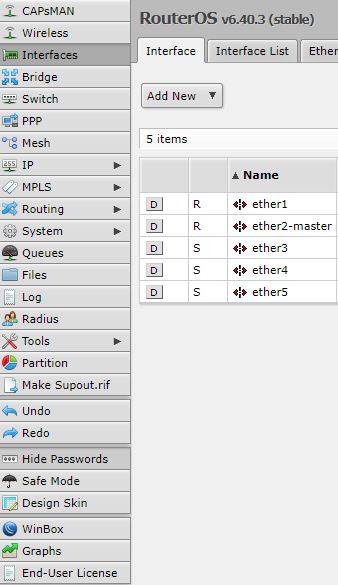
MikroTik RouterOS
Each of these options has multiple tabs and/or additional sub menus. For example, the IP menu has 24 submenus, as shown below.
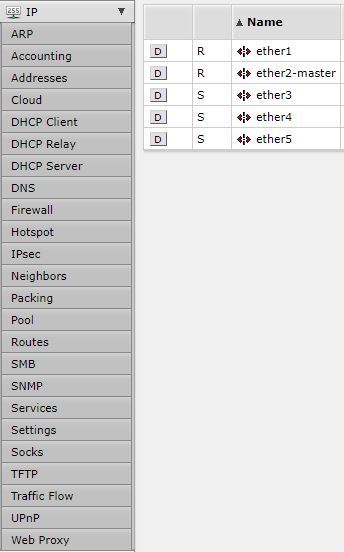
RouterOS IP Menu
To state the obvious, the feature set of this router is extensive! MikroTik provides a specification listing here, but the entire list of features would be too long to list. Clearly, this router is not intended as a basic consumer router. There is a simple “Quick Set” option in the GUI where you can set the WAN interface to DHCP and set the router password to quickly and easily get up and running with the default settings. But if your ISP requires another connection type such as PPPoE, L2TP, etc, you’ll need to hit the Wiki and go digging in the IP menus. The sheer number of configuration options indicate this is a router intended for those with networking knowledge. You have been warned!
I found the RouterOS GUI and CLI to be less intuitive than other router configuration interfaces I’ve used. The RouterOS GUI takes a bit of hunting around to find what you’re looking for. The RouterOS CLI is unique and is not similar to either Cisco or Juniper. Thus, from my perspective, there’s a bit of a learning curve to get comfortable with configuring a RouterOS device.
To MikroTik’s credit, their RouterOS Wiki is quite detailed and includes numerous detailed configuration examples. I found myself referring to the Wiki continuously as I tested various features on the hEX. Many of the Wiki’s examples provide the CLI commands for applying configurations. But with all the options in the GUI, it appears you should be able to apply most of the configurations in the GUI.
I found myself using both the GUI and CLI to complete several of my test configurations. An interesting surprise is that configurations applied via the GUI and CLI are automatically saved, no additional step has to be performed to ensure your changes will persist through a power cycle.
Winbox
I wanted to set up remote WAN access to the hEX for testing purposes and the MikroTik Wiki pointed me to using Winbox. Winbox is an interesting utility that allows you to manage the router from a small executable utility you download directly from the router. According to MikroTik, “Winbox is a small utility that allows administration of MikroTik RouterOS using a fast and simple GUI.”
Simply clicking on Winbox in the hEX GUI downloads its .exe file. You don’t install anything; you just run the file. I used Winbox on a Windows PC, but MikroTik says that Winbox can also run on MacOS and Linux using Wine.
I followed the RouterOS Wiki instructions to enable a firewall rule to accept remote Winbox access to the router. Once complete, I was able to access the router remotely. The Winbox utility looks and feels just like the GUI. A screenshot of Winbox remotely connected to the hEX is shown below.
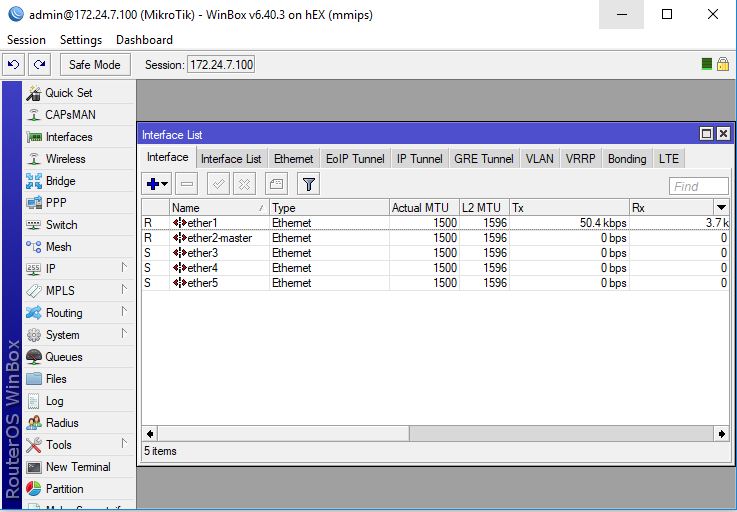
Winbox Utility
Winbox turns out to be a pretty useful RouterOS management utility. From Winbox, not only is remote access simplified, you can launch a terminal for CLI access and even access the full RouterOS manual which presents the same content as the Wiki, mentioned earlier.
Winbox will use TLS encryption to secure its connection, but only if you change to Advanced mode and check the Secure mode box.
VPN
I started my testing of the hEX features by diving into IPSec VPNs. In my experience, IPSec tunnels often require a bit of configuration tweaking to get them to work and I wanted to see how hard it was going to be to get one working on MikroTik’s RouterOS. As an added challenge, the Wiki’s example for IPSec Site-to-Site must have been out of date, as I had to modify it a bit to get it to work.
After resetting the router to defaults, I tried the CLI configurations provided in the Wiki, which says it uses a default of 3DES encryption and SHA-1 authentication. I attempted to set up a Site-to-Site tunnel to my Linksys LRT224 with these options, but couldn’t get the tunnel to connect. The GUI came in handy, since it showed that the IPSec defaults were actually using AES-128, 192, and 256 encryption. I changed the LRT224 to use AES-128 encryption and the tunnel from the hEX to the LRT224 came up, shown below. I tried to configure a tunnel from the LRT224 to use AES-256, but wasn’t able to get that option working.

S2S VPN Established
Once the tunnel was established, I had intermittent connectivity through the tunnel between the LRT224 and hEX. I discovered one of the CLI commands provided in the RouterOS Wiki had a value that wasn’t accepted by the router. I played around with a few other options until I found one that worked, which made the tunnel stable.
I measured throughput over the IPSec VPN tunnel between the hEX and LRT224, using TotuSoft’s LAN Speed Test client and server application and two PCs running 64-bit Windows with their software firewall disabled. With one PC on the hEX LAN and the other PC on the LRT224 LAN, I measured peak upload throughput from the hEX to LRT224 at 53.3 Mbps and peak download throughput to the hEX from the LRT224 at 85.2 Mbps, using a 100 MB file size. Although a bit unbalanced, this throughput level compares favorably with the recently reviewed Ubiquiti EdgeRouter Lite. In similar tests between the EdgeRouter Lite and LRT224, I measured peak throughput at 51.5 Mbps.
L2TP and PPTP VPNs are other options for remote client VPN access to the hEX router. You can even try OpenVPN if you’re adventurous. I successfully set up a PPTP connection from a Windows PC to the hEX. The PPTP instructions on the RouterOS fell woefully short, but I found a simple step by step here. Using these instructions, I was able to successfully set up a PPTP remote client VPN connection to the hEX. The screenshot below shows my established PPTP connection.

PPTP Established
LAN and VLANs
The hEX has four 10/100/1000 Ethernet ports. You can control MTU size, create IP and GRE tunnels, add VLANs, implement Virtual Router Redundancy Protocol (VRRP), channel bonding, and LTE interfaces for backup to your wired connections.
RouterOS supports port based and 802.1Q tagged VLANs. I was able to successfully test 802.1Q VLANs on the hEX router. Using the GUI, I added a test VLAN and attached it to the hEX’s LAN interface as shown below.
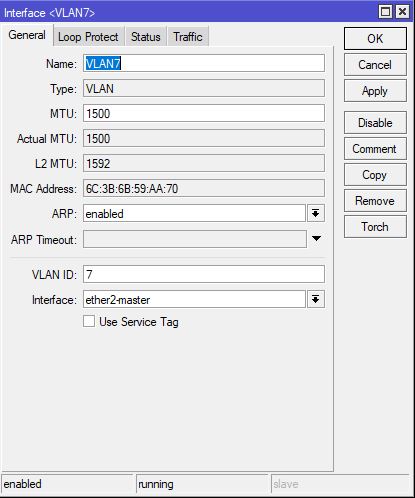
RouterOS VLANs
I then configured my test VLAN with an IP address and DHCP server. Using an 802.1Q capable access point connected to the hEX’s LAN with an SSID configured for both the default VLAN and my test VLAN, I was able to connect to both VLANs based on the SSID I attached to, validating the hEX’s VLAN tagging capability.
Firewall
The RouterOS firewall menu presents numerous firewall options for controlling traffic in and out of the hEX.
Filtering rules are added to an access control list and processed from top down. Traffic can be filtered by source and destination address, source and destination port, protocol, as well as inbound and outbound interfaces. NAT and VPN optimizations are also controlled via the firewall menu.
As mentioned previously, I created a firewall rule to allow Winbox access to the router’s WAN port to enable remote management access. The rule, shown below, involved accepting TCP traffic to port 8291, which appears to be the port Winbox uses to connect to the router.
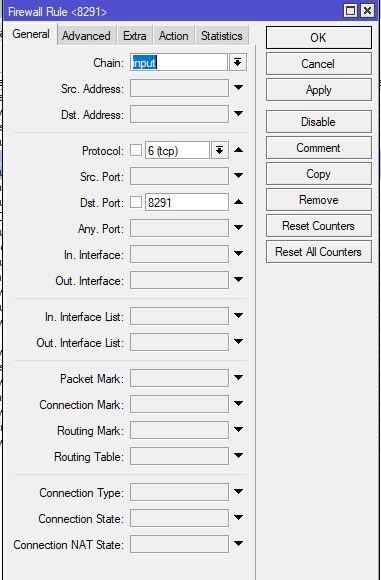
RouterOS Firewall Rule
I also created a firewall rule to enable PPTP connections. For both of my firewall rules, I had to make sure they were listed above the final drop rule. The GUI comes in handy for this step as you can simply drag your newly created rule up the list to ensure it is processed before the final drop rule.
There are no web filtering options available to those who don’t want to deal with the CLI. But entering block websites into MikroTik Wiki search box, which uses Google search, came up with this article on configuring a proxy to do domain filtering.
QoS options are similarly not for the networking novice. Searching for QoS brought up this page, which is enough to make it clear that anyone looking for a point-and-click QoS menu is out of luck.
Advanced Network Features
In addition to the above features, the hEX offers MPLS, Routing, and Queuing options. At a high level, RouterOS MPLS options include enabling MPLS switching, Routing options include BGP, OSPF, and RIP protocols. Queuing options include simple bandwidth management. Aside from Queuing, which I’ll get to shortly, these are not options home networkers would need.
I applied a simple bandwidth management rule following the example shown here and ran before and after tests using TotuSoft’s LAN Speed Test tool. Unfortunately, my tests showed that bandwidth remained unchanged. I tried multiple combinations of configurations, but was unable to affect my throughput with any of the simple rules I tried.
Last, RouterOS offers multiple views into the traffic flows and activity on the network. From the interface screen, you can see live traffic going in and out the active interfaces, as shown below.
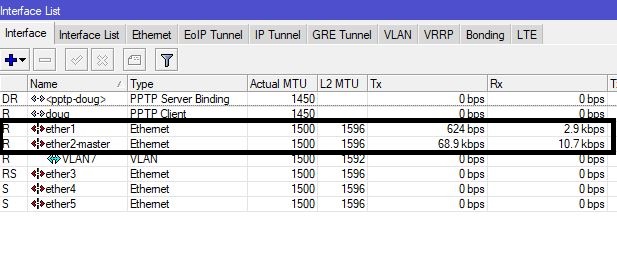
Interface Traffic
The System menu has multiple displays of the router’s health and performance. Below is a display of the System options.

System Menu
For example, a look at the Resources menu shows memory and CPU usage as shown below.
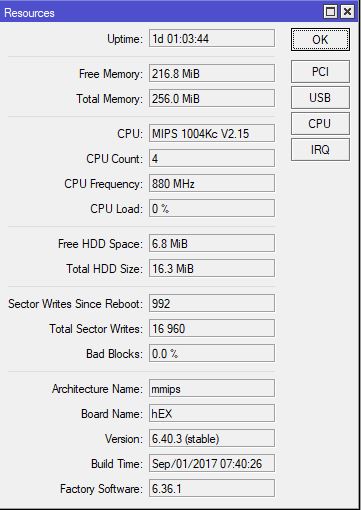
Resource Utilization
Performance
Testing by Tim Higgins
We ran the hEX through the Revision 10 performance test process with v6.39.2 firmware loaded, which was the most recent at time of test. As mentioned earlier, I later upgraded the firmware to v6.40.3 for my functional and feature review. The table summarizes router performance results.
| Test Description | MikroTik hEX |
|---|---|
| WAN – LAN Throughput (Mbps) | 939 |
| LAN – WAN Throughput (Mbps) | 939 |
| HTTP Score – WAN to LAN (%) | 65.8 |
| HTTP Score – LAN to WAN (%) | 57.9 |
| Bufferbloat Score- Down Avg. | 680 |
| Bufferbloat Score- Down Max. | 515 |
| Bufferbloat Score- Up Avg. | 559 |
| Bufferbloat Score- Up Max. | 437 |
| CTF Score (%) | 41.9 |
| Firmware Version | v6.39.2 |
The hEX maxed out the iperf-based WAN-LAN and LAN-WAN throughput tests, which don’t put much stress on the router. Bufferbloat scores were at the top of the Average and Maximum downlink charts, beating all other products, the EdgeRouter Lite included. But on uplink, the EdgeRouter Lite topped both average and maximum charts. For reference, all latency values, both average and maximum, ran between 1.5 and 2.3 ms.
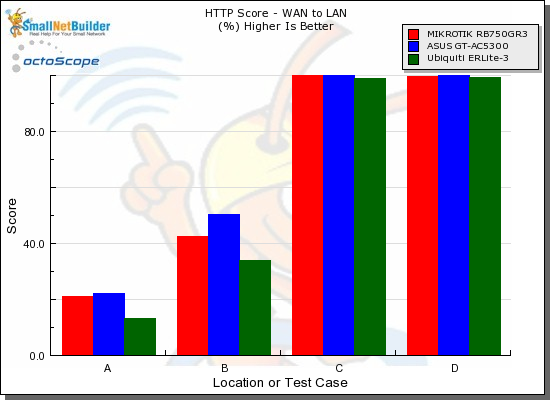
WAN2LAN Performance
I compared the hEX HTTP scores against the ASUS GT-AC5300 and the Ubiquiti EdgeMAX EdgeRouter Lite, the only two higher scoring routers for these benchmarks. The winner of the three remains the ASUS, but the hEX held its own against the ASUS and outperformed the EdgeRouter Lite in the smaller filesize tests running WAN to LAN.
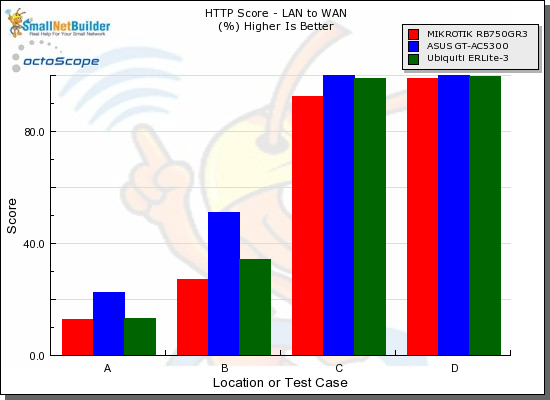
LAN2WAN Performance
The CTF score is a measure of the effect on throughput when various routing features are enabled. Or in the hEX’s case, with "FastTrack" disabled, which is their term for Cut Through Forwarding. The chart below shows hEX’s throughput was reduced to around 42% of the normal 939 Mbps measured with the default state of FastTrack enabled. Note the EdgeRouter Lite did worse, dropping to 12.9% of normal throughput (~940 Mbps) when CTF was disabled on it.
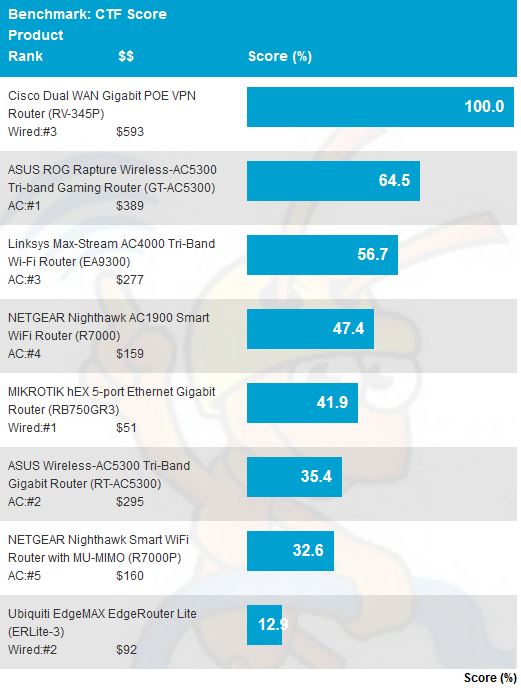
CTF score
On a practical performance level, I initially experienced packet loss during my testing, indicated by intermittent periods of network slowness. Continuous ping tests also showed dropped packets. I tried resetting the router multiple times, yet the packet loss continued.
I initially thought the packet loss might be due to using the GUI at the same time as my testing, but that theory didn’t prove out as the packet loss occurred even when I wasn’t logged in.
Through the course of this review, I reset the router numerous times. At the end of my testing, I couldn’t duplicate the packet loss, so I’m not sure of the cause. Perhaps the problem was user error, perhaps just an anomaly. Nevertheless, it is important to mention.
Closing Thoughts
Amazon’s prices for the routers I compared to the hEX paints an interesting story. The ASUS GT-AC5300 currently lists for $389, the EdgeRouter Lite lists for around $94, and the MikroTik hEX for $50. That’s an amazing difference in price for three devices with similar routing performance numbers! To be fair, the ASUS GT-AC5300 is also a highly capable Wi-Fi router, while the Ubiquiti and MikroTik are wired-only routers, without Wi-Fi radios. Still, the hEX’s bang-for-the-buck is obvious if all you want is a capable, high-throughput wired-only router.
At the end of the day, I came away impressed with the massive amount of features in RouterOS loaded into such a small and inexpensive package. I was also very aware that I had only scratched the surface of its capabilities. I had success in configuring most of the features I tried, but also had experienced a temporary issue with packet loss and an inability to apply working bandwidth management.
The bottom line is the hEX is an inexpensive but powerful router for network experts and those who aspire to be. This is not the inexpensive plug-and-play router you’re looking for.
