Introduction
| At a Glance | |
|---|---|
| Product | Corinex AV200 Powerline Ethernet and CableLAN Adapters |
| Summary | Ethernet to powerline and coax bridges targeted at household distribution of IPTV and other streaming media without running CAT 5 |
| Pros | • 2X – 3X better average throughput than HomePlug Turbo • Multicast binding and QoS and VLAN tagging |
| Cons | • Does not interoperate with HomePlug devices (and vice versa) • Severely interferes with HomePlug devices (and vice versa) • QoS features difficult to configure • Expensive (Powerline $139, CableLAN $149) |
My last look at powerline networking products was in the HomePlug Turbo Adapter Round Up, where I found that the “85 Mbps” advertised speed turned out to be typically 10 Mbps of real, usable bandwidth. Although this is twice the 5 Mbps delivered by non-turbo HomePlug 1.0 products, it’s still borderline for IPTV service providers, which is the target customer. The real HomePlug solution for video streaming lies in HomePlug AV, which, unfortunately seems to remain six to nine months away – as it has for the past year or so.
This delay has opened a market window that Madrid-based DS2 (Design of Systems on Silicon) has attacked with a vengeance using its high speed “200 Mbps” powerline technology. DS2’s success to date has been mostly in markets outside the U.S., since that’s mainly where the action is in IPTV right now. The company claims an installed base of around 600,000 units with 30,000 in Spanish telecommunications company Telefonica alone. DS2’s success seems likely to continue, given that Netgear recently announced that it will be shipping products aimed at the IPTV market, based on DS2’s technology.
But we don’t need to wait to see what “200 Mbps” powerline networking technology is like, because Vancouver-based Corinex is shipping its AV200 Powerline products today. This review will take an in-depth look at Corinex’ powerline product and a shorter one at a version of the product for use with coax-based TV distribution systems.
Product Features
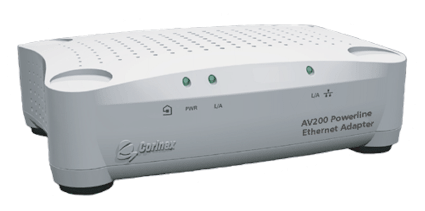
The AV200 Powerline adapter doesn’t opt for “wall-wart” form factor now common in powerline adapters, but is instead packaged in an off-white plastic enclosure about 6″ X 4″ X 2″ (148 mm X 106 mm X 47 mm). Power, Powerline Link/Activity and Ethernet Link/Activity LEDs are arrayed across the front of the product and the rear panel (Figure 1) contains only an AC line cord receptacle and 10/100 Ethernet RJ45 jack.
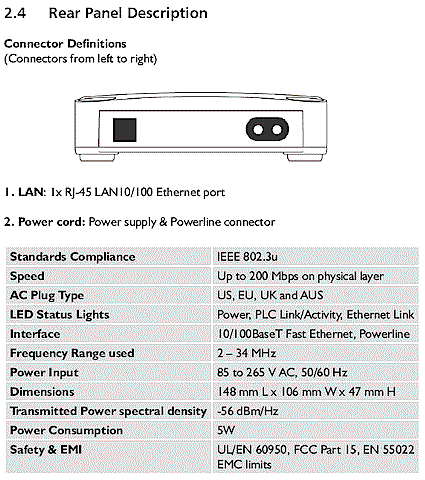
Figure 1: AV200 Powerline rear panel and specifications
Figure 2 shows the back panel of the AV200 Coax version, which differs only in the addition of a coax “F” type connector.
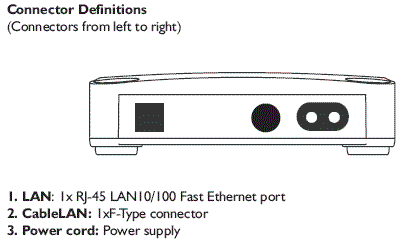
Figure 2: AV200 Coax rear panel
With the proper line cord, you can connect either product to an AC supply from 85 to 265 V AC and 50 or 60 Hz. Contrary to the instructions in the Installation Guide, I found that the Ethernet port has auto MDI / MDI-X capability built in, so you can connect any Ethernet device you like without having to find a crossover cable.
Note that the AV200 adapters are designed as bridges and support connection of up to 64 devices, 32 of which can be AV200 Powerline or Coax adapters.
Inside Details – Powerline
The powerline and coax AV200’s have very similar designs, differing only by a small amount of circuitry that couples the DS2 guts to either the AC mains or a single “F” type coax connector. Figure 2 is an photo of the inside of the AV200 Powerline version that shows that most of the interesting circuitry is hidden by a thick aluminum heatsink.

Figure 2: AV200 Powerline Internal view w/heatsink
(click image to enlarge)
Figure 3 shows the heatsink removed so that you can see the DS2 DS9001A processor and DSS7700S analog front end devices (the DS9001A has white heatsink compound on it). The other ICs used in the design are RAM, flash (on the underside of the board) and a Realtek RTL8201CL Single-Port 10/100M Fast Ethernet PHYceiver.

Figure 3: AV200 Powerline Internal view w/o heatsink
(click image to enlarge)
The component grouping at the top of Figure 3 is the power supply. You can also see the coupling transformer and associated components clustered near the power receptacle, which connect the AC line and DS2 circuitry. You can also see empty mounting pads for the coax connector and its coupling transformer, which are not loaded in the powerline version at the bottom center of the photo.
Inside Details – Coax
Figure 4’s photo shows the AV200 Coax inside view, which as noted above, is very similar to the powerline version. You can see that the AC line coupling components in the lower right-hand corner are not loaded in this version, but you’ll have to refer to Figure 5 to see the coax connector coupling components.

Figure 4: AV200 Coax Internal view w/heatsink
(click image to enlarge)
If you carefully compare the larger versions of Figures 3 and 5, you can see that the coax version board is slightly different, with a cluster of passive components that have no blank mounting pads in the powerline version of the board.

Figure 5: AV200 Coax Internal view w/o heatsink
(click image to enlarge)
Figure 6 provides a view of the underside of the coax version board, which has a string of passive surface-mount components running in a line up from the left side of the coax connector. The mounting pads for these components are also not present on the powerline version of the board. You can also see the single flash memory device with its firmware revision label toward the right side of the board.
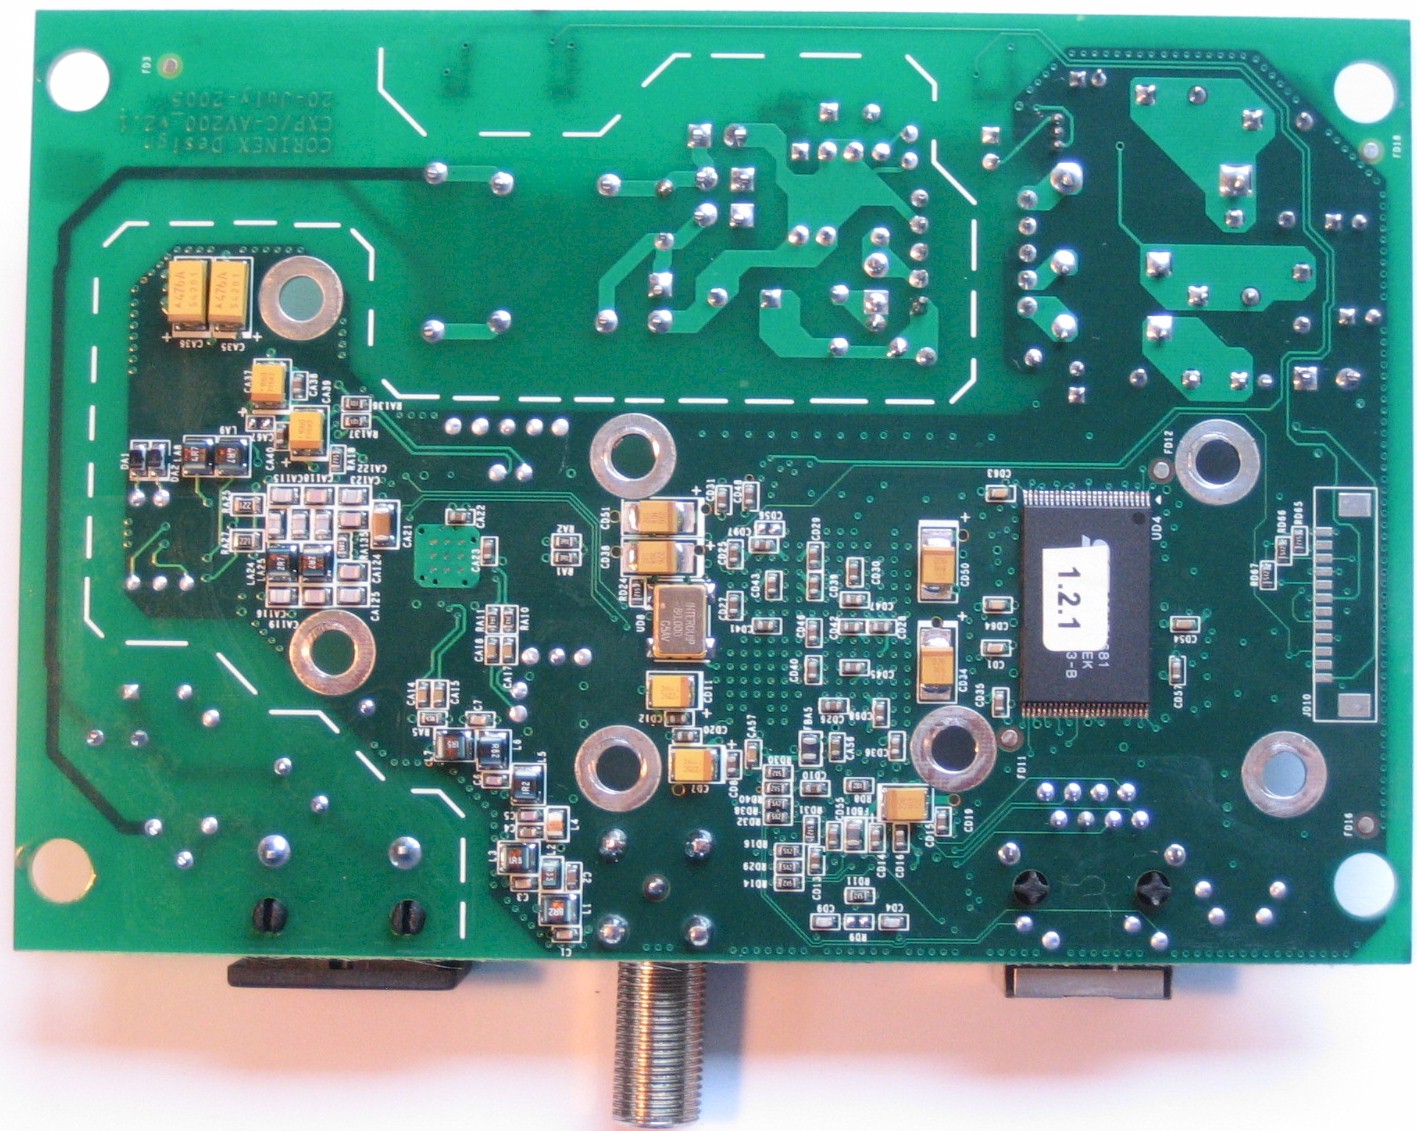
Figure 6: AV200 Coax Internal view board bottom
(click image to enlarge)
Setup And Administration
Both the AV200 adapters come set so that they will just plug and play if you don’t feel the need to mess with their settings. Like HomePlug adapters, they use a Network Identifier to let you keep your network separated from your neighbor’s. It ships with a blank setting, which is essentially as good as the default “HomePlug” that the other guys use. This Network Identifier also serves as the key for the combination of DES and 3DES encryption used to secure data between AV200 adapters.
Both AV200 adapters are a bit unusual for these types of devices in that the adapters have IP addresses and built in web-based administration. I’ll touch on both as I describe the devices’ settings. The AV200 comes with its IP address set to 10.10.1.69, so Corinex’ Quick Start Guide advises changing the computer you use to set up the adapter to an IP of 10.10.1.1. Of course, since all adapters come set to the same IP address, you should power up only one device at a time if you want to access its web-based admin features. Figure 7 shows the main page of the web admin that you are presented with upon login.
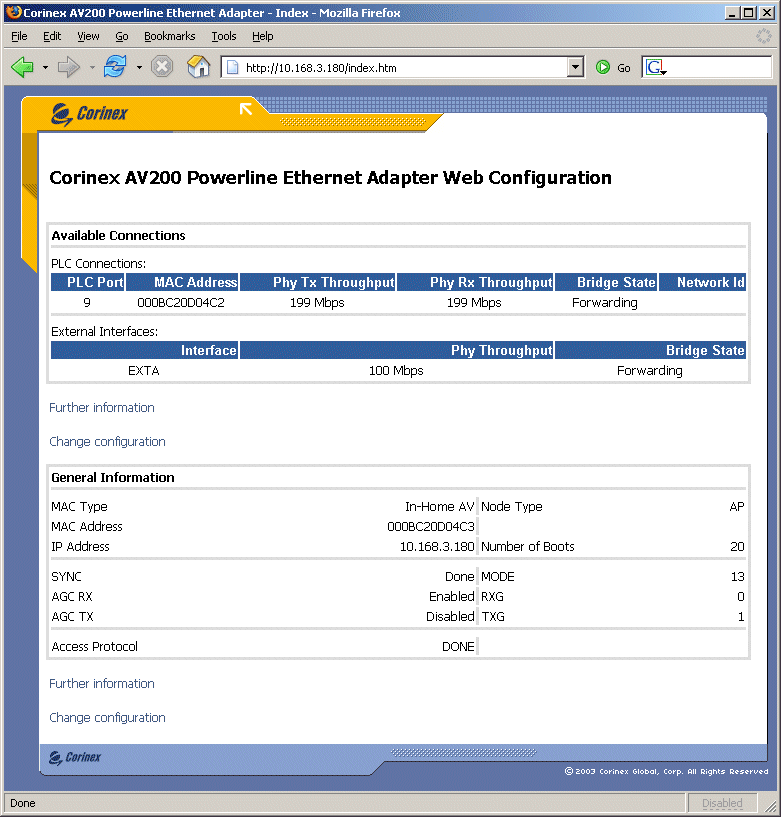
Figure 7: Web-based admin main page
(click image to enlarge)
The interface departs from the design found in most networking devices in that it doesn’t have a navigation bar to direct you to its various sections. Instead, there are only the subtle “Further information” and “Change configuration” links that aren’t even underlined to help announce their existence. The PLC Connections section shows information about other connected AV200 powerline devices, including the Phy receive and transmit throughput. The “Phy” rate is that of the physical interface, i.e. the best-case “raw” bit rate. Of course, you’ll never get this throughput in your actual network connection, but it’s the same game played by every other networking product manufacturer.
If you are running Windows, you can opt to install the AV200 Configuration Utility, which has its settings organized into separate pages, instead of the single long page used by the web interface. The other plus the Utility provides is that you don’t need to futz with your computer’s IP address settings, since the utility can find and connect to AV200 adapters with any LAN IP address scheme. Note that this utility is relatively new and didn’t come on the CD included with the product. Corinex said the utility has since been added to the CD, but it would be nice if it were also posted for download.
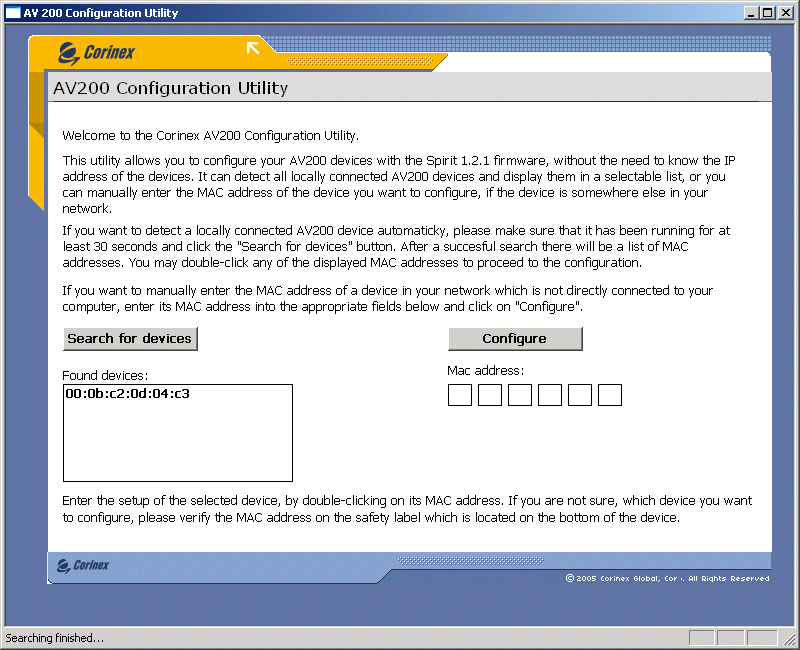
Figure 7: Corinex Setup Tool Search screen
(click image to enlarge)
Figure 7 shows the Windows-based Configuration Utility‘s opening screen. The Search for devices button will find only “locally connected” AV200 devices, which means that they need to plugged into the same Ethernet LAN that the computer running the Utility is on. Once you find a device, you just double click on it to proceed into the admin and status pages of the Utility.
Alternatively, if you have copied down the MAC address from the label on the bottom of each of your AV200 devices, you can enter it into the MAC address field at the right of the page and click the Configure button. I think I prefer the utilities that came with the HomePlug Turbo devices I recently reviewed, an example of which is shown in Figure 8.
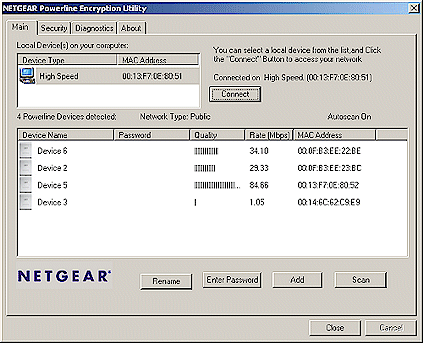
Figure 8: NETGEAR Utility Main screen
Both the Windows application and the web-based admin provide access to the same status information and configuration options, so I’ll mostly show the Windows app, since its screens are better organized. Many of the controls (Multicast, VLAN, QoS) appear to be intended for use by the AV200’s primary target market, IPTV service providers, with settings that are fairly cryptic. The User Guide at least explains what each setting is intended to do, but falls a bit short on providing consumer-level guidance on the how, when and why.
The MAC page lets you force an AV200 to End Point (EP) or Access Point (AP) mode – the latter only if you’ve entered a Network Identifier, however. Each AV200 network has a single AP and up to 31 EPs, with APs in charge of sharing channel access within the nodes of each network. If two or more networks share the same power lines, one of the access points becomes a “QoS Controller” (QC), which is responsible for controlling how the multiple networks share the OFDM spectrum to avoid collisions and interference. This determination is normally made automatically, and these settings are mainly needed in situations such as apartment buildings or hotels, where multiple networks might need to share the same power grid.
![]() NOTE: Both HomePlug and DS2 200 Mbps based devices use OFDM as part of their base technologies. OFDM is a modulation technique also used by ADSL modems and 802.11a and g wireless networking products.
NOTE: Both HomePlug and DS2 200 Mbps based devices use OFDM as part of their base technologies. OFDM is a modulation technique also used by ADSL modems and 802.11a and g wireless networking products.
The Network Settings page contains the IP address controls for the device, letting you set static IP information or change to having the AV200 pick up the info via DHCP.
Figure 9 shows the PHY settings page, which I’ve included because I thought its function was interesting, if not a bit cryptic. All you get is Enable / Disable, so enable at your own risk.
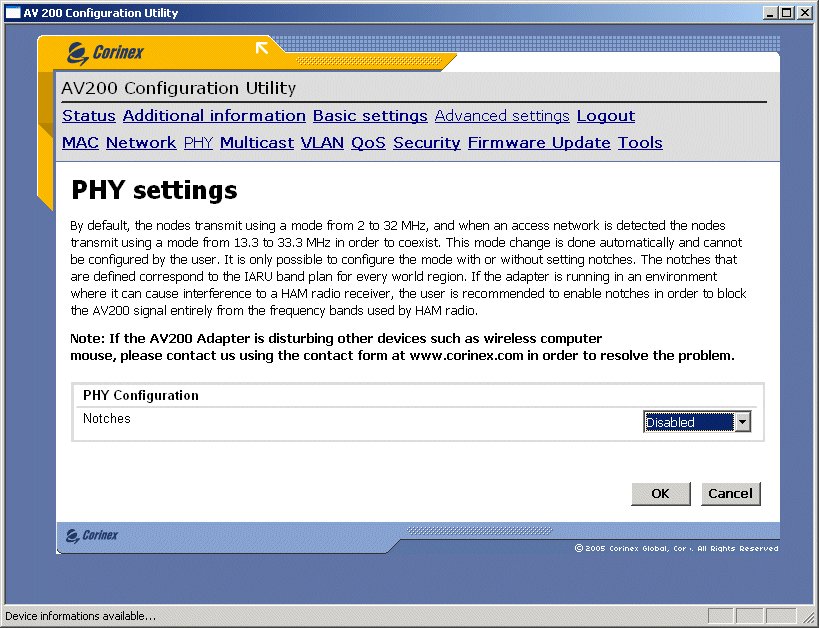
Figure 9: PHY settings
(click image to enlarge)
Multimedia content is often distributed using IP multicasting, which allows the same content to be more efficiently delivered to multiple recipients. Figure 10 shows the AV200’s Multicast settings, which allow bindings between adapter MAC addresses and multicast IP addresses. No bindings are set by default, and the results are saved in the adapter’s non-volatile RAM (NVRAM).
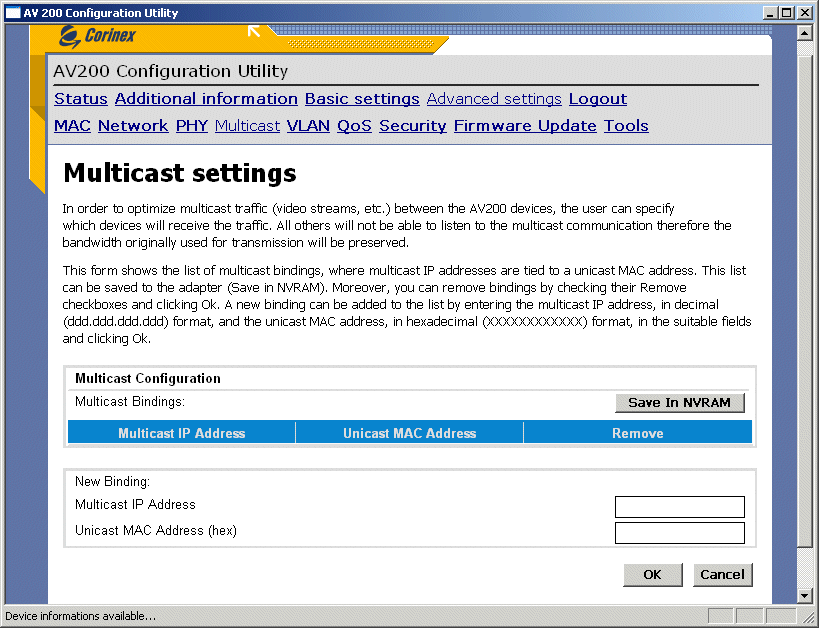
Figure 10: Multicast settings
(click image to enlarge)
The VLAN page allows you to enable (default is disabled) 802.1q VLAN tagging for data entering an adapter’s Ethernet port. This is another feature for network operators, since no VLAN filtering is done in the AV200 itself. Controls are provided to set the VLAN Tag (or ID) and set the priority from 0 to 7.
QoS controls (called Priority Configuration in the User Guide and web interface) come set to a default priority of 2 and Criterion 1 and 2 set to “none”. Priority can be set from 0 to 7 and the Criterion settings changed as shown in Figure 11 to support 802.1p or ToS (Type of Service) tagging.
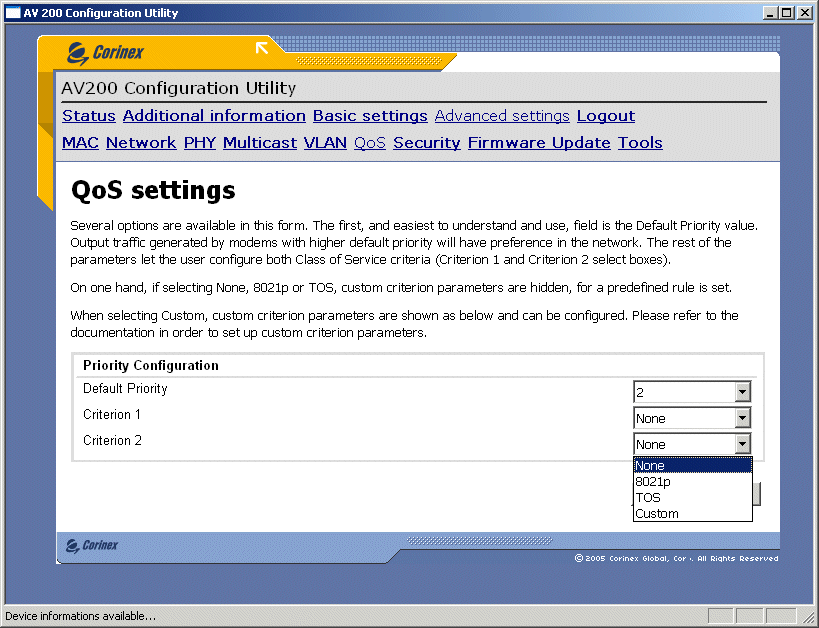
Figure 11: QoS settings
(click image to enlarge)
Figure 12 shows what you get into when selecting “Custom” Criterion setting. This is a fairly low-level interface for a traffic classifier, again, not intended for general consumer use. The User Guide provides a little insight into the Custom controls via a video streaming example, but not enough that I’d feel comfortable messing with the settings. Figure 12 is a shot of a portion of the web admin interface, but the same controls appear when selecting the Custom Criterion in the Utility application.
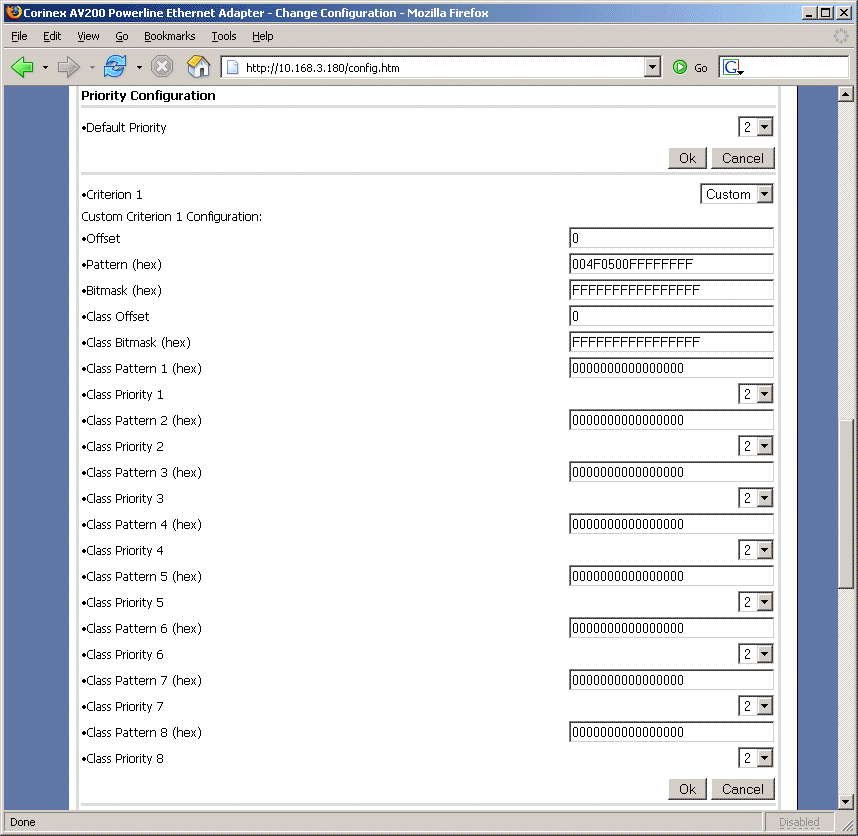
Figure 12: QoS Custom Priority settings
(click image to enlarge)
The remaining settings include Security to set the admin login password, Firmware Update to control interaction with a TFTP application used for firmware upgrading and Tools, which provides soft reset and reset-to-factory defaults controls.
Performance – Powerline
For the AV200 powerline’s performance testing, I used the same five test locations around my home that I used for the HomePlug Turbo Roundup testing. Go here if you want the details on the locations and distances.
I used Ixia’s IxChariot and set up two copies of the standard throughput.scr script to run simultaneously, one from the IxChariot console to a remote endpoint (for transmit), and the second with endpoints swapped (for receive). I used TCP/IP, changed the file size to 300,000 Bytes from the 100,000 Byte default, and set the scripts to loop for one minute.
![]() NOTE: I did not follow Corinex’s recommendation to change the TCP window size to 512 kBytes to accommodate the “higher latency” of a powerline network, since I don’t like messing with my TCP/IP settings. But if you have no such qualms, you can run the scripts Corinex supplies to execute the tweak for Win 98, XP or Linux kernel 2.4 or higher.
NOTE: I did not follow Corinex’s recommendation to change the TCP window size to 512 kBytes to accommodate the “higher latency” of a powerline network, since I don’t like messing with my TCP/IP settings. But if you have no such qualms, you can run the scripts Corinex supplies to execute the tweak for Win 98, XP or Linux kernel 2.4 or higher.
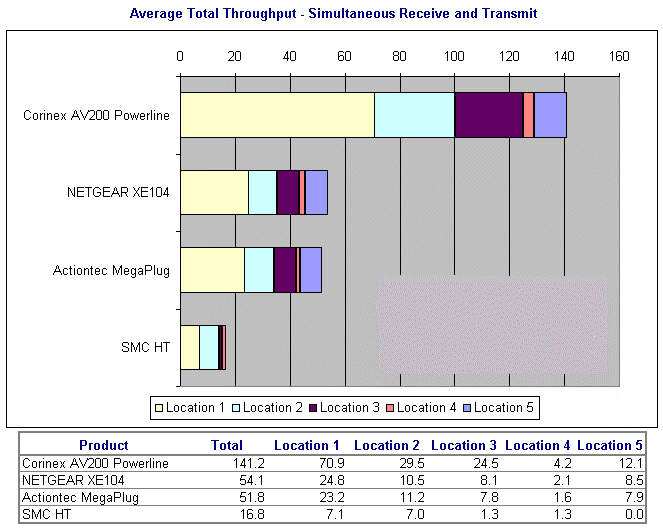
Figure 13: AV200 powerline throughput comparison with HomePlug Turbo
(click image to enlarge)
Figure 13 shows the results for the AV200 along with the results from the HomePlug Turbo roundup testing. I guess I can see why networking product manufacturers are willing to give up HomePlug interoperability to use DS2’s technology! The AV200 beat the best case HomePlug Turbo results (Netgear XE104) in all test locations and had a best case (Location 1) throughput of almost three times that of HomePlug Turbo (70.9 vs. 24.8 Mbps)
Figure 14 shows an IxChariot plot of the simultaneous receive and transmit runs in Location 1 so that you can see the throughput variation.
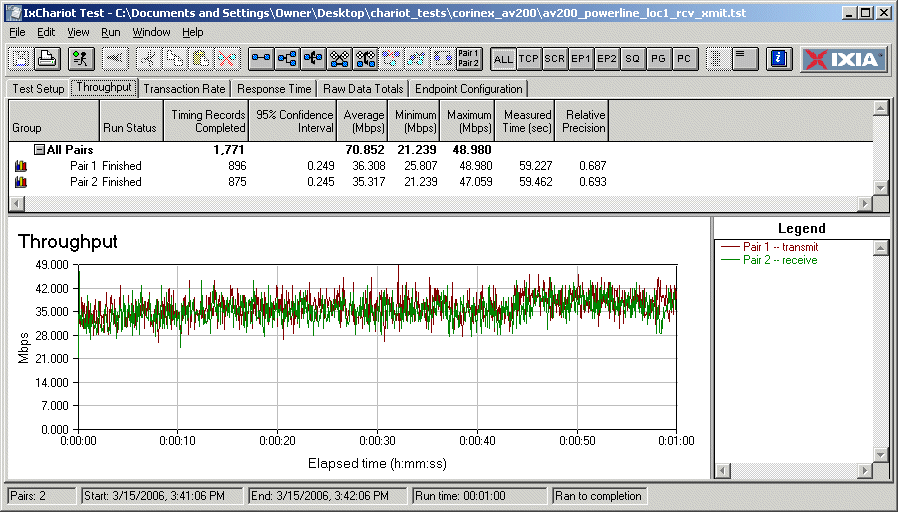
Figure 14: Location 1 AV200 throughput
(click image to enlarge)
Figure 15 shows the plot for my infamous Location 4, which seems to defy all attempts at networking to it other than with good old Ethernet! I know why this location is tough for wireless, but have yet to figure out why it’s also bad news for powerline networking.
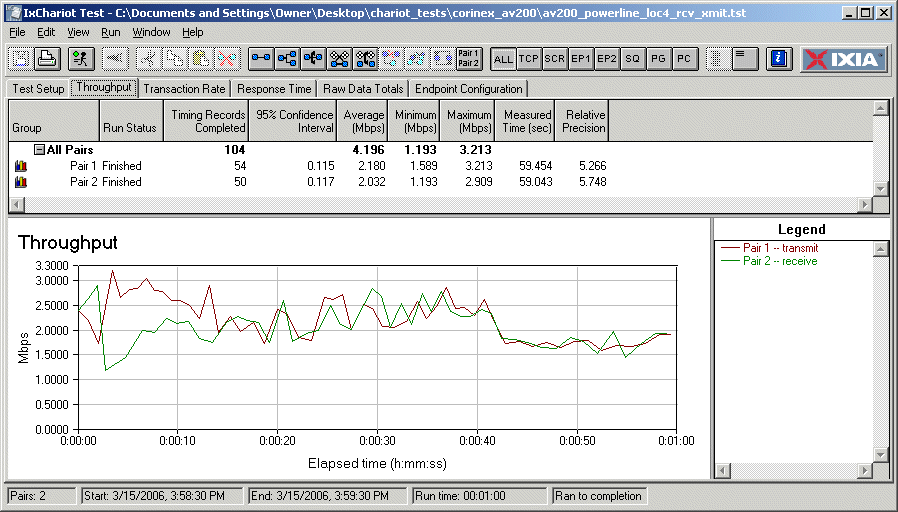
Figure 15: Location 4 AV200 throughput
(click image to enlarge)
Performance – Coax
I was only able to give the AV200 Coax adapter a few cursory throughput checks since my in-home test setup still needs more development. My original plan was actually to test the Corinex AV200 Coax product against MoCA-compliant (Multimedia over Coaxial Alliance) adapters. I’ve been after MoCA to supply product for review since CES 2005 and thought I was finally going to succeed after an encouraging meeting at this January’s CES. But after a number of emails with a MoCA rep after the show, I finally got the word that no MoCA product would be forthcoming since member companies weren’t able to part with product due to “certification” and “standards-ratification” activities.
So I had to settle for two relatively unstressful tests. The first test just connected two AV200 Coax adapters via a 6′ piece of RG 6 coax with an IxChariot test pair plugged into the adapters’ Ethernet ports. I ran the same script that I used for the AV200 powerline tests, with the results shown in Figure 16.

Figure 16: AV200 coax direct back-to-back throughput
(click image to enlarge)
I suppose I shouldn’t have been surprised by these results, which were essentially the same as those I got in the Location 1 powerline test. But I had thought (hoped?) that given the superior electrical environment of coaxial cable over power wiring, that DS2 could have tuned its OFDM signal processing magic to eke out higher throughput.
But I suspect that the coax product’s real advantage comes from less throughput degradation over distance, even though I couldn’t effectively test that…yet! Instead I had to settle for simple tests using the two-way splitters that came packaged with each AV200 Coax adapter. For one test, I cabled the IN connectors of the two splitters together with a short piece of RG 6, then connected each AV200 Coax adapter to one of each splitter’s OUT connectors in a back-to-back splitter configuration.

Figure 17: AV200 coax throughput through two back-to-back splitters
(click image to enlarge)
The results are shown in Figure 17, which are essentially the same as Figure 16. I also connected the splitters in a cascade configuration, i.e. an OUT of one splitter to the IN of the other, but the results were again essentially the same as with the direct cable connection.
Interoperability And Coexistence
Although I knew that HomePlug and DS2-based devices would not communicate (interoperate) with one another, I at least hoped that they would somehow cooperate so that they could coexist when plugged into the same electrical grid. So I threw together the testbed shown in Figure 18 to find out.
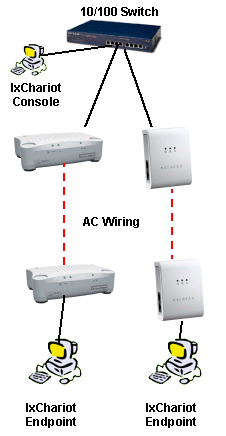
Figure 18: DS2 and HomePlug Turbo coexistence testbed
The three computers in Figure 16 were all set to different static IP addresses in the 10.168.3.X subnet and all adapters were plugged directly into outlets in my office lab. The two Netgear XE104 HomePlug Turbo adapters had their Network ID set to the default “HomePlug” and the two AV200 powerline adapters had their blank default Network IDs.
I modified the IxChariot script used for the throughput testing so that in one case I gave the AV200 test pair a 10 second head start in one case and the HomePlug Turbo the head start in the other. I also had both scripts send data from the IxChariot console to the remote endpoints instead of one receive and one transmit used in the performance tests.

Figure 19: HomePlug and DS2 competing for bandwidth
(click image to enlarge)
Figure 19 shows that the two powerline networking technologies battle each other so that only one can operate at a time. The results I got over repeated runs were highly variable and would also depend on the distance between the various adapters. The bottom line is that the two technologies neither interoperate nor coexist without severly interfering with each other. This behavior was confirmed as expected by both Intellon and DS2.
Wrapup
I dinged the HomePlug Turbo folks for advertising 85 Mbps and delivering an average of 10, so let’s see if DS2 does any better. Table 1 compares the % reduction from the advertised maximum throughput for the Corinex AV200 powerline and Netgear XE104 “85 Mbps” (HomePlug Turbo) for each of my five test locations.
Although the Corinex’ best-case throughput of 65% is better than the Netgear’s 71%, the other values are similar enough that DS2 deserves as much of a “shame on you” as I awarded to Intellon for selling high and delivering (relatively) low on throughput.
That having been said, however, it’s clear that DS2’s technology delivered consistently better performance than HomePlug turbo in my test environment.
| Location 1 | Location 2 | Location 3 | Location 4 | Location 5 |
|---|---|---|---|---|
| Corinex AV200 Powerline (DS2) | ||||
|
|
||||
| 70.9 | 29.5 | 24.5 | 4.2 | 12.1 |
|
|
||||
| 65% | 85% | 88% | 98% | 94% |
| Netgear XE104 (HomePlug Turbo) | ||||
|
|
||||
| 24.8 | 10.5 | 8.1 | 2.1 | 8.5 |
|
|
||||
| 71% | 88% | 90% | 98% | 90% |
Table 1: Actual Throughput Reduction
from Advertised Maximum
The big question is why did DS2 design its technology so that it doesn’t nicely coexist with HomePlug? It’s not as if DS2 doesn’t know what it takes to have its 200 Mbps technology coexist with both the installed base of HomePlug 1.0 and 1.0 plus Turbo products. After all, DS2 joined the HomePlug board at the beginning of 2004 (but at some point left both the board and HomePlug entirely).
What we have here is yet another case of a grab for marketshare using incompatibility with a competitive technology as a weapon. And, as usual, the consumer is once again thrown into the middle. Granted, that AV200 products aren’t intended to be a big retail item. But consumers could be put into the position of having to throw out any HomePlug products they have when they sign up for an IPTV service that uses DS2-based powerline technology to distribute the service throughout a home.
As much as DS2 and HomePlug wish the other would go away, both are probably going to be around for the foreseeable future. HomePlug AV – which incidentally doesn’t interoperate with HomePlug 1.0 and Turbo, but cooperates with them to share bandwidth – will eventually make it out of the labs and into consumer homes. Indications are that the HomePlug AV and DS2 technologies will battle each other for powerline bandwidth even more severely than has been shown for HomePlug 1.0 / Turbo and DS2. So all companies involved are going to need to confront this issue in a more constructive way or face consumer (and hopefully service provider) resistance.
Fortunately, the new leadership in the HomePlug Alliance seems to understand what’s at stake and recently announced a new “compliance, interoperability and coexistence program”. This initiative includes working with the IEEE P1901 Work Group and European Telecommunications Standards Institute (ETSI) Powerline Coexistence Work Group – the same groups that DS2 has been working with on the same issues.
The good news from all of this is that there is a powerline-based networking alternative that appears to be capable of supporting a few video streams and even some simultaneous good old data traffic to boot. Now if everyone would please just get along, maybe there will be room for everyone in the shiny, happy powerline-networked streaming video future, eh?