Introduction
| Linksys Instant PowerLine EtherFast 10/100 Bridge (PLEBR10) | |
|---|---|
| Summary | HomePlug compatible power line to Ethernet Bridge |
| Update | None |
| Pros | • No-brainer installation • Comparable in price to HPNA 2.0 products |
| Cons | • 5Mbps throughput best case • Expensive relative to alternative products • Need Windows machine to set security code |
Although some companies who announced HomePlug power line networking products back in January are having second thoughts, Linksys is forging ahead with at least two of their Instant PowerLine products. This review will take a look at the Instant PowerLine EtherFast 10/100 Bridge (Model PLEBR10) and see how it stacks up against other networking methods.
Basic Features
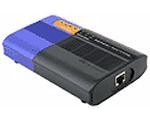
The PLEBR10 comes in an attractive enclosure that’s about the size of a thick paperback book (6.5 in. X 3.8 in. X 1.24 in. if you want to be exact) and sports the familiar Linksys purple, orange, and charcoal grey color scheme. There’s a 10/100 BaseT RJ45 jack on one end of the box, and a power receptacle for the supplied power cord on the other. All indicator lights are on the top of the box and include Power, Link, Activity, and Collision LEDs for the power line side and Link, 100, and Activity LEDs for the Ethernet portion of the bridge.
Since the BR10 is a bridge and not a client adapter, it will connect not just one, but multiple devices connected to its Ethernet side to clients on the HomePlug part of your network (Linksys says you can have up to 16 HomePlug devices in your LAN). The Ethernet jack is wired so that you can use a normal UTP cable to connect the bridge to most Ethernet devices. But if you want to connect the bridge to your router so that your HomePlug-connected computers can share your broadband connection, you’ll need to either use your router’s uplink port, or use a crossover cable plugged into any of the normal router ports.
The BR10 uses the 5130 chipset from Intellon, who won the nod from the HomePlug Powerline Alliance as the baseline standard for HomePlug technology. This means that all the first generation HomePlug products will use this chipset, just as all HPNA 2.0 phone line networking equipment uses Broadcom’s HPNA chipset. This doesn’t necessarily mean all designs will be the same, however, since manufacturers still need to add the Ethernet and bridging chips or USB interface chips to complete their designs.
That wraps up the general description. Let’s see what installation and configuration are like…
Setup and Administration
Setting up the BR10 is pretty much plug-and-go. The printed Quick Installation poster tells you everything you need to know and the most difficult part of the process will be adding the TCP/IP protocol to your computer’s network configuration if it’s not already installed. Although the CD that comes with the bridge has an installer program that can help networking novices through the setup process, it’s possible to just connect up the adapters and have a working network without installing or using the program. But this is not recommended for security reasons!
NOTE! It’s possible for HomePlug signals to travel relatively long distances and be picked up by adjacent homes or apartments. This means that your next-door neighbor could connect to your HomePlug LAN if they had a HomePlug compatible network adapter. The good news is that HomePlug products protect all data with 56 bit DES encryption. The bad news is that the encryption doesn’t do you any good if you don’t change the default password or network ID that the products come set to.
All you need to do to keep your data safe is to pick a strong password and enter it as the Network Password on each of your HomePlug adapters. Check this article, or this one for more on strong passwords and how to generate them.
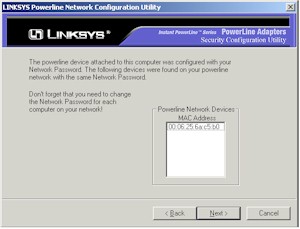
If you’re running the right version of Windows, you can run the installer, which will install the Security Configuration Utility (see screen shots below), and check to see if it can see a connected bridge.

The utility is pretty simple, allowing you to enter a case-sensitive 4 to 24 character “Network Password”, and see the MAC addresses of the other HomePlug devices that have the same password. The MAC address of each box is printed on a label on the bottom of the box, along with a sixteen character “password” code, that isn’t mentioned anywhere in the Linksys documentation and that doesn’t appear to be used.
I installed the bridge using both WinXP Home and Win98SE systems, and didn’t see any problems with either install. Once I entered the Network Passwords, I was up and running and ready to see what a HomePlug network had in the performance department!
Performance
The numbers above show best case performance about equal to HomePNA (phoneline) 2.0 products. Considering that I’ve only tested HPNA products with a stand-alone 50 foot phone extension cable and not with actual home wiring, these results are pretty impressive! (Remember that the first generation powerline networking products were lucky to run at about 100 kbps… if they ran at all!)
Since this was my first crack at looking at HomePlug networking, I thought I’d run some longer tests with NetIQ’s Chariot, and generate some comparative plots. The results are shown in the plot (click on it for a full-sized view) and table below.
![]()
(Test conditions are plotted in order, starting with Condition 1.)
| Test Condition | Average (Mbps) | Minimum (Mbps) | Maximum (Mbps) | Throughput 95% Confidence Interval |
Measured Time (secs) | Relative Precision (smaller number is better) |
|---|---|---|---|---|---|---|
|
Condition 1
|
5.814
|
1.240
|
6.299
|
0.099
|
59.723
|
1.710
|
|
Condition 2
|
5.225
|
0.954
|
5.797
|
0.173
|
59.710
|
3.312
|
|
Condition 3
|
5.245
|
1.060
|
5.839
|
0.140
|
59.637
|
2.661
|
|
Condition 4
|
2.933
|
2.564
|
3.089
|
0.010
|
59.743
|
0.329
|
The results show that the throughput is pretty consistent over the one minute test period, even with the large negative “spikes” that you see on the plots. I’m not sure what the “spikes” are caused by, but I’m pretty sure that they’re not due to any electrical interference on the line… at least not any that I was generating! Condition 2 and 3’s measurements show about a 10% throughput loss, and Condition 4 had a drop of just about 50% exactly. I can’t explain the difference between the Condition 3 and 4 results, since both were on the other phase of my home’s electric service and roughly equal in distance from the reference bridge in my office. I ran the tests a few times, and although the exact numbers varied, the relative throughput reductions in each of the test Conditions were consistent.
Ok, time for the torture test! I tried running both a hair dryer, then a small hand-held jigsaw while running a Condition 1 test to see if there was a throughput hit or a loss of connectivity. Both noise generators were plugged into the same outlet strip (not filtered) as both bridges, and I ran at least two tests with each appliance. The resulting plots didn’t show any appreciable change in the throughput while the motors were running. Basically, the motor noise didn’t make any difference in the network’s operation… another impressive performance!
Wrap Up
If you set out to design the worst possible electrical environment for high speed data networking, you’d be hard pressed to come up with something worse than your home or office’s electrical wiring. It’s noisy, has no dependable impedance (important for designing high-speed circuits), and is otherwise a just plain nasty place to use for anything other than supplying power. But through the wonders of HomePlug’s digital signal processing, OFDM modulation, and, in my opinion, just plain magic, Linksys’ PLEBR10 looks like it can provide yet another alternative to folks who can’t or don’t want to run CAT5 cables through their home of office.
With its major competitors holding back or canceling HomePlug product plans, Linksys has the market virtually to itself. Although average street pricing is around $125, you can (at review time) find the PLEBR10 for as little as $80, which about half the price of their HPB200 HPNA bridge!
As with other “alternative networking” products such as HomePNA and wireless, the old “your mileage may vary” warning certainly applies to HomePlug products, and I’m not saying that it absolutely will work under all conditions. But from what I can see, it’s certainly robust enough, and priced low enough, as an alternative for floor-to-floor and (closely spaced) building-to-building connections, or for connecting a few computers in that how-am-I-gonna-run-cable-to-there!? location.