Introduction
There has been much talk recently of NAS devices which I have followed with interest. The idea of a small low-power fileserver and BitTorrent client appeals to me as it uses less electricity and also can be shut in a cupboard where noise is not an issue. The Kurobox [reviewed here] seems ideal for the job, however its high price and lack of availability in the UK means that, for me at least, it is not an option.
A Mac mini could also work, but again it is too expensive, and can only handle 2.5″ hard drives. Linksys’ NSLU2 [reviewed here] might be a reasonable choice, but is lacking in both RAM and processing power.

Which brings us to Microsoft’s Xbox. The Xbox is basically a PC with 64MB RAM, a Celeron 733Mhz CPU, 100Mb Ethernet, a 10Gb Hard drive and DVD Drive. What’s more, they are dirt cheap (mine cost €75, about $88 USD) and soon to be two-a-penny with the release of the Xbox 360. There is also active development on Xbox-Linux, so it is easy to install and configure like any other Linux device.
So the aim of this project is to turn an Xbox into a dedicated fileserver / NAS by replacing the DVD drive with a large hard drive, installing Linux, and setting up Samba and BitTorrent. The resulting box will no longer be able to be used for gaming, but makes a full-featured and relatively inexpensive NAS.
|
Adding a modchip
First, I bought a faulty Xbox on eBay for €75 (about $88 USD) including postage. The description said that it wouldn’t boot, however I knew that this wouldn’t be a problem as I would be installing Linux. When I received the box and powered it up, the Xbox logo would display for some time and then it would come up with an Error Code 09 and would FRAG (the LED on the front Flashes Red And Green).
The Xbox has a BIOS just like a PC, however it is write protected. So in order to install Linux you must use a special BIOS – we will be using Cromwell. There is a way to overwrite the MS BIOS using a hack known as a ‘soft mod’, however I decided to buy a modchip and install the BIOS instead.
I purchased the Duox-2 modchip (Figure 1) for about €15 / $18 USD mainly because it was cheap, but also because it has two BIOSes on it. So if you ruin one of them you can use the other to repair the faulty one.

Figure 1: DuoX 2 Xbox Modchip
It also works with all versions of the Xbox (1.0, 1.1, 1.2, 1.3, 1.4 & 1.6, mine is a 1.1). Note that the ‘DuoX-2 Cromwell Edition’ comes with the Cromwell BIOS pre-flashed on one of the chips.
With the modchip in hand, the first thing we need to do is take the top of the Xbox. This page has an excellent description.
Once the top is off, remove the motherboard, then install the chip as per the instructions here (make sure you get the correct version for your box). Note that I found it easier to install the D0 cable to the alternative solder point on the back of the motherboard. Once the modchip is installed correctly, it should look something like the photo in Figure 2:

Figure 2: The DuoX 2 installed
(click image to enlarge)
Make sure that you put the switch on the modchip to position 0 so that it boots from the Cromwell BIOS. When you now apply power to the Xbox you should be now be presented with this screen:
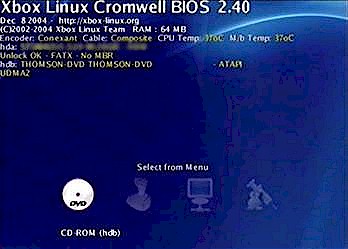
Figure 3: Cromwell boot screen
If the Xbox tries to boot normally, or the LED doesn’t blink, then you have not soldered the pin header properly. It took me 4 or 5 attempts before I eventually got it to work, so don’t be too disheartened if it doesn’t work straight away!
There are some optional tasks you might want to consider while you have top off:
- Replace the thermal compound between the CPU and its heat sink. The regular stuff is like chewing gum and is terrible.
- If you will be wall mounting your Xbox, now is the time to drill a couple of holes in the bottom.
Adding USB ports
The four game-pad ports on the front are, in fact, regular USB 1.1 but with a proprietary connector. We will need to use these later, so we have two choices – create or buy an adapter cable, or cut off the existing game-pad ports and solder on some proper USB sockets. I chose the latter as it is neater.
I had an old USB header bracket that fit into a PCI socket on my PC, but if you do not have one you can pick them up on eBay, Radio Shack, your local computer store, CompUSA, etc. for a few bucks. This page of the Xbox Linux wiki contains a good overview of performing this mod, so I won’t repeat those details here.
Basically, you take the plug that connects to the motherboard, and solder each wire to its corresponding color wire on the USB sockets salvaged from the USB bracket. Ignore the yellow cable, as it is not used. Figure 4 shows what my completed cable looks like.

Figure 4: My hacked USB cable
(click image to enlarge)
I also found that if you remove a couple of the Xbox’ game ports, then the USB sockets can just about be squeezed into the space they occupied. You might have to cut away the USB sockets (or the Xbox case) slightly to squeeze them in. Once done, hopefully they will look something like this:

Figure 5: USB ports fitted into the Xbox front panel
(click image to enlarge)
And here’s the inside view of the USB sockets cabled to the Xbox motherboard:

Figure 6: USB ports internal view
(click image to enlarge)
Flashing the BIOS
Version 2.40 is the latest Cromwell BIOS, but my DuoX 2 came with 2.32. So the first thing I wanted to do was flash it to the latest version using HTTP. I first plugged the Xbox into my LAN and then connected it up to my television.
I next downloaded the latest version of the Cromwell BIOS from SourceForge. The download includes two versions – 256 kB and 1024 kB. But unfortunately, the DUOX-2 mod chip has 512 kB banks, so the 256 kB version needs to be padded out to 512 kB before it can be loaded.
To do this, download the excellent EVTool and the 256 kB version of the latest Cromwell BIOS. Then, extract cromwell.bin from the downloaded tarball, which should be roughly 256 kB. Next, launch EVTool and make sure the 512 kB radio button is selected. Then click on the Size… button, select the cromwell.bin file that you just extracted and then save it to cromwell512.bin.

Figure 7: EVTool
(click image to enlarge)
In order to flash the DuoX with this new firmware, you’ll need to boot from the other BIOS (called FlashBios). So turn off the Xbox, switch the modchip to bank 1 and turn the Xbox back on. If all goes well, you should boot to a screen like the one shown in Figure 8.

Figure 8: FlashBIOS boot screen
Now, leaving the Xbox powered, switch the mod chip switch back to bank 0 so that the Cromwell BIOS is selected for flashing. At this point, you will need to navigate through the menus. The game pad that came with my machine was no help for navigation and I have read that only official MS gamepads work to move around the menu. Fortunately, I plugged in a USB keyboard into the nice new USB sockets that I added earlier and it worked fine the first time.
Now flash the BIOS as per these instructions. Once finished, assuming everything was successful, turn off your Xbox. Now with your new Cromwell BIOS still selected (bank 0) turn the Xbox back on. If all went well, you will be greated with the Cromwell BIOS screen that should show your new firmware version number.
Replacing the OS drive
The Xbox comes with either an 8 or 10GB hard drive. Although it is perfectly reasonable to install Linux on this hard drive, I chose instead to replace it with a 2.5″ 6GB laptop drive since they are quieter and less power hungry. Note that you could also use a large Compact Flash card if you wished.
Replacing the hard drive is just like with a PC and to use a 2.5″ drive you will need to buy an adapter cable and bracket. In the photo you can see the metal bracket that I used to put the 2.5″ drive into the 3.5″ drive bracket and the cable adapter that I used to convert the drive’s 42 pin connector into the 40 pin connector required for regular IDE.

Figure 9: 2.5″ replacement drive mounted in the Xbox HDD tray
(click image to enlarge)
Installing Linux
Now that our hardware is pretty much in order, the next step will be to load Linux onto the Xbox. Xbox-linux.org is an excellent page about installing Linux on the Xbox and I suggest you read it all thoroughly before starting this next step. I chose to install Debian, or rather its Xbox-specific version: Xebian. There was no particular reason for this other than it seems to be popular on the Internet.
Have a good read of the install pages here to familiarize yourself with the procedure. I will be following that procedure, but with a few differences and am going to assume that you are using a Windows PC to create the CD.
Step 1: Preparing to install Xebian
First, you need to download the archive, expand it, and burn the installation CD image (the big one) to a CD-R, CD-RW or DVD-R. The Xbox can be funny about the media it reads, but my Samsung DVD drive was fine with CD-R, CD-RW and DVD-R.
Step 2: Installation
Follow the Xbox-Linux instructions (Step 2) but with the following notes:
-
I was using version 1.1.4 so the password was ‘xebian’
-
In point 4 you will want to chose a native install by using the entire drive (don’t install it on E: or F:)
-
In point 6 choose to make the root partition as large as possible. Once you have chosen this, the entire drive will be formatted although there is no “busy” indicator shown and the system just looks like it has hung. Be patient and wait for the format to complete
-
You can ignore points 9 and 10 as we have a native install
-
Once you have done up to the end of point 10, if all went well, you have installed Linux correctly. Take your boot CD/DVD out of the drive, reboot and you should see the Cromwell BIOS for a few seconds and then it should automatically boot into the installation you just made
-
Log in using the user ‘root’ and the password ‘xebian’
Step 3: Xebian post-install configuration
Continue to follow the Xbox-Linux instructions (you are now at Step 3).
-
Create a user for yourself using
useradd myname -
Follow the section titled ‘Changing from Static IP to DHCP’ if you have a DHCP server such as a router. If you do change this, then typing in ‘ifconfig’ will show you the IP address that has been allocated to you, which we will use later to log in
-
You can ignore all of the sections after this (3.3 and up) as they don’t apply to us
Now, go to your PC and using PuTTY, connect to your Xbox’s IP address that you found earlier using ifconfig. Log in using the user ‘root’ and the password you changed it to during your install. If it works, then well done – you have the difficult bit out of the way! If not, go back and carefully repeat the process.
Installing a second hard drive
OK, so now we have a working Linux box, it’s time to dump the DVD drive and stick something more useful in there – a big hard drive that is going to store all of our shared files.
Whip out the DVD drive (and the yellow cable that attaches it to the motherboard) and put it in a safe place so that when you break your kernel later, you still have something to boot with. If you need help with the DVD drive removal, see this part of the Xbox-Scene tutorial.
Warning: We will be formatting the big hard drive with a Linux file system (ext3) so it should be fairly obvious that anything you have on the disk will be lost!
There is only one molex connector coming from the power supply, so you will need to buy or make a ‘Y’ splitter cable to enable you to run two devices from the one molex.
Unfortunately, the DVD drive is 5.25″ and a 3.5 ” hard drive won’t fit in there nicely, so you need some way of stopping it rattling around inside the Xbox. I ended up drilling a couple of holes in the side of the black plastic DVD drive frame and screwing the hard drive in – not great, but it will do. As you can see from Figure 10, it took me a couple of attempts to get the position of the holes correct.

Figure 10: DVD drive frame modified with holes
(click image to enlarge)
Now you can mount the drive to the modified frame (Figure 11), making sure your hard drive is set as slave.

Figure 11: 3.5″ drive mounted to DVD drive frame
(click image to enlarge)
Finally, pop the drive in its frame into the Xbox, attach the IDE ribbon cable and molex power connector and you should be good to go. Hopefully, your Xbox should now look something like Figure 12.
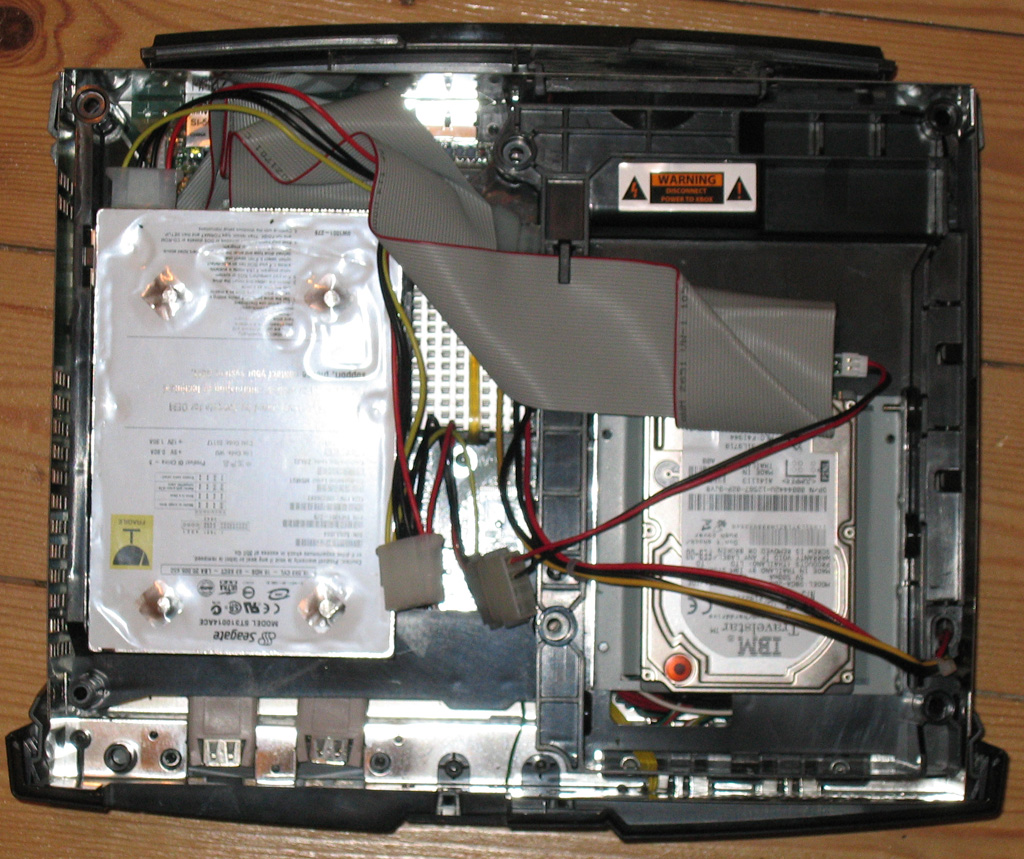
Figure 12: The new drives in place and ready to go
(click image to enlarge)
That wraps it up for Part 1. Next time, we’ll get the second hard drive prepared for use and install all the software bits that will complete the Xbox’s transformation into a feature-rich NAS.