Introduction
In Part 1, I described using rsync to back up files from a NETGEAR ReadyNAS NV+ to a Synology DS109+. In Part 2, I showed how to set up rsync between the DS109+ and a QNAP TS-109 Pro. In Part 3, we covered using a Western Digital My Book World Edition II (white bar) as an rsync target. This time, I’ll describe how to use a Buffalo and Seagate BlackArmor NASes as rsync targets.
Buffalo
Buffalo has had the ability to back up to other Buffalo NASes for some time. But it turns out, like most other NAS manufacturers, the feature uses rsync with customized rsync target discovery routines layered on top of it.
Unfortunately, Buffalo allows the use of only pre-populated pick lists (Figure 1) for setting the backup source and destination. So, since you can’t enter anything that the Buffalo doesn’t discover, it’s impossible to enter non-Buffalo rsync targets.
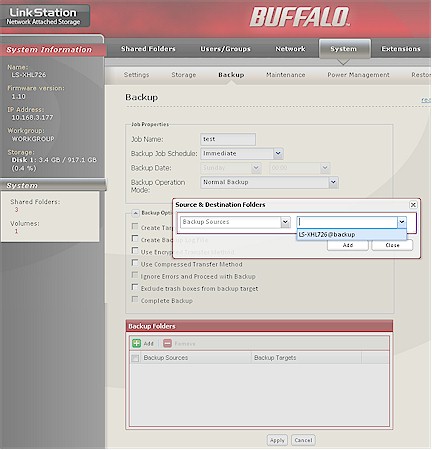
Figure 1: Buffalo Backup Folder selection
Fortunately, you can use a Buffalo NAS as an rsync target. You just need to know the trick for specifying its rsync module name. Figure 2 shows how to set up a backup folder that can be used for rsync (and attached) backup. You must check the Disk Backup box to enable access by the rsync service. If you don’t, your rsync server won’t be able to connect to the Buffalo rsync target.
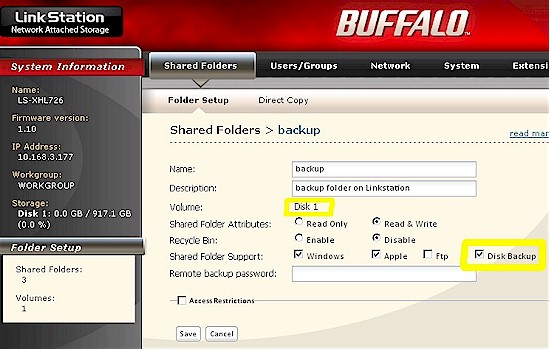
Figure 2: Creating a Buffalo backup target folder
Note that I also highlighted the Volume name, which you’ll need, since Buffalo uses a combination of the volume and backup folder name to create the rsync module name. The form volumename_foldername is used.
Note that volumename differs across Buffalo NASes. Figure 2 shows a LinkStation LS-XHL, which uses "Disk 1". A Buffalo TeraStation Duo, on the other hand, uses a volume name of "Array 1", which you would enter as array1 when creating the rsync module name.
In this example, the rsync target name you must use is disk1_backup. Note that no space is used in the volumename, even though it appears in the Volume name displayed.
Figure 3 shows the Synology DS109+ backup settings for a test to the Buffalo rsync target module just created. Even though I didn’t password-protect the Buffalo folder, the Synology requires a username and password be entered. So I just used the default Buffalo admin login: admin / password. Once I had everything entered, the backup ran with no problems.
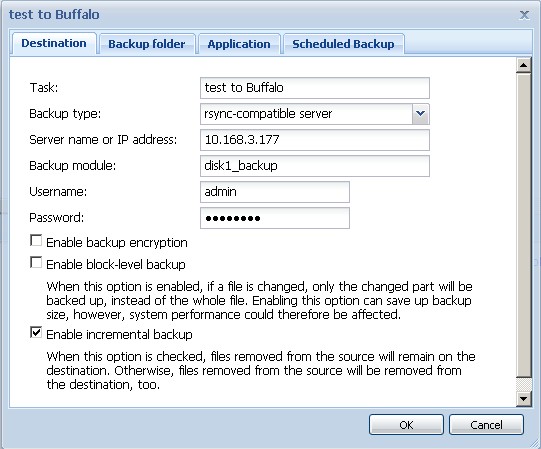
Figure 3: Synology DS109+ backup job to Buffalo rsync target
Seagate BlackArmor
In the BlackArmor NAS 220 review, I briefly showed how to set up an rsync-based backup from the NAS 220, to a Synology DS109+. The screenshot from the review is shown in Figure 4. Since the NAS 220 (and its bigger NAS 440 sibling) allows freeform entry of the rsync target module name (Seagate refers to it as Alias name—just to keep us confused), you aren’t restricted as you are with the Buffalo NASes.
Figure 4: Seagate BlackArmor NAS to Synology DS109+ rsync settings
But what about using BlackArmor NASes as rsync targets? It turns out that it’s possible, but there is a catch. You first have to enable the Backup Server Service, found under the Storage menu. Figure 5 shows a completed setup.
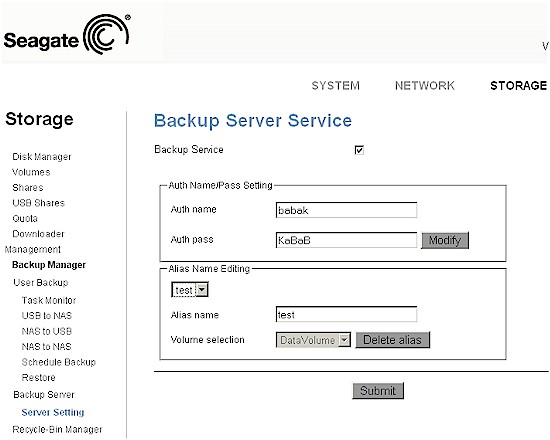
Figure 5: Enabling the BA NAS 220 Backup service
I checked the Backup Service box, accepted the defaults shown for rsync authentication name and password (babak and KaBaB, respectively) and created an Alias name (again, Seagate’s term for rsync module) of test and clicked the Submit button.
The catch here is that you can create only one Alias / rsync module and it is an invisible folder. That means that you can’t see it when you browse network shares. The only way you know that it’s there is when you successfully connect to it when setting up the rsync job on another system.
Once again, I did that on the Synology DS109+, as shown in Figure 6. I entered the NAS 220 Alias name test in the Backup module box and the default Auth Name / Auth pass (babak / KaBaB) from the NAS 220 in the Synology’s Username and Password boxes. When I completed the Synology backup wizard, it successfully connected and I was able to run a backup job.
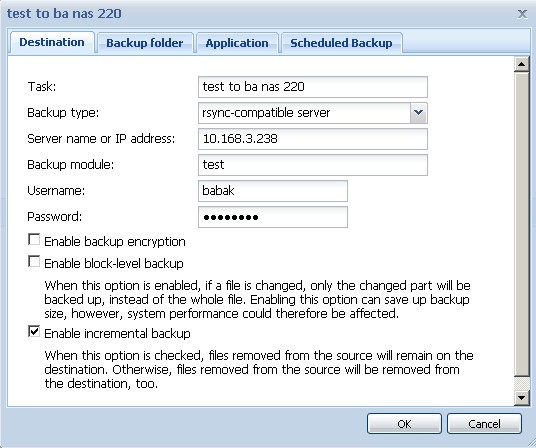
Figure 6: Synology DS109+ backup job to Seagate BlackArmor NAS target
Since the NAS 220 doesn’t allow root login, the only way that I could retrieve the data was via an rsync restore. I also did that on the DS109+ using the Backup Restore wizard. I entered the server info for the NAS 220 (Figure 7).
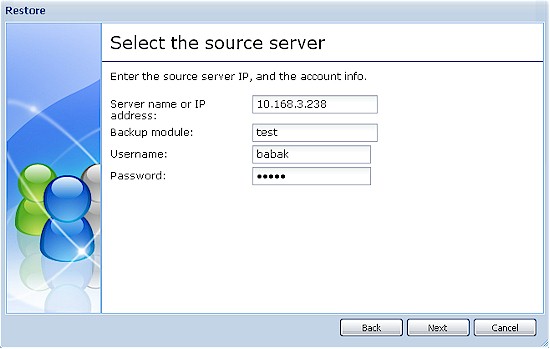
Figure 7: Synology rsync restore server select
And was presented with a folder selection pick list when I successfully connected (Figure 8).
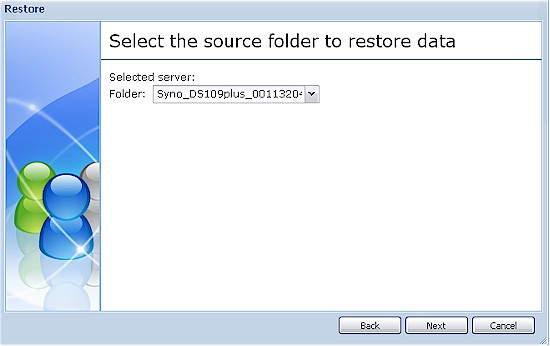
Figure 8: Synology rsync restore folder select
Unfortunately, the only option that the Synology provides is to restore the data to the exact folder that it was backed up from and to overwrite existing files. So this makes Seagate’s BlackArmor NASes suitable as rsync targets only for restoring entire directories.

