Introduction
If I build the cheapest non-RAID NAS I can, how well will it perform? The purpose of this article is to build a cheap NAS (i.e., using low-cost and “locally available” parts) and test it with using the iozone benchmark to see how well it compares with commercial solutions. This article differs from my first article that showed how to build your own RAID 5 NAS. This time, the idea is to take the same hardware, the same software and see how it performs using a single hard drive.
The Hardware
The hardware for this do-it-yourself project is displayed in Table 1. To keep this project simple, I intended to use a single hardware configuration with a single gigabit Ethernet adapter (the Initial Hardware Components columns in Table 1). I was able to complete two of the three operating system evaluations with this setup (which was the same as my previous DIY RAID5 NAS article). But before I could evaluate Windows XP Pro, something began to go wrong and the hardware died. So, I switched to an even slower set of hardware (the Final Hardware Components columns) that I bought three years ago from Walmart. I call this hardware the “Walmart Wonder” box even though it was manufactured by Microtel.
| Initial Hardware Components | Cost | Final Hardware Components | Cost | |
|---|---|---|---|---|
| CPU | Sempron 2200+ | $59 (for 2600+ 2200+ no longer available) | Duron 1.6 GHz | Included |
| CD ROM | ASUS 52x | $10.00 | ASUS 52x | Included |
| Power Supply | CoolerMaster RS-450-ACLX 450W | $80.00 | Codegen 300W | Included |
| Case | Cheapest @ CompUSA | $29.90 | “Walmart Wonder” Microtel | $199.00 |
| RAM | 512 MB DDR 400 SDRAM Running at 266 mHz |
$40.00 | 512 MB DDR 400 SDRAM Running @ 266 mHz |
$40.00 |
| Hard Drives | 300 Gigabyte 7200 ATA IDE | $105.00 | 300 GB 7200 ATA IDE | $105.00 |
| Operating System | – ClarkConnect 3.2 Home – Ubuntu 6.06 Desktop |
$0.00 $0.00 |
– ClarkConnect 3.2 Home – Ubuntu 6.06 Desktop – Windows XP Pro |
$0.00
$0.00 $140 |
| Total System Cost | $407.84 or $547.84 | $362.99 or $502.99 |
Table 1: System Costs
I found this hardware after becoming tired of searching for the cheapest components one-by-one. So, I asked myself: “Who in the world has the greatest incentive to ruin the PCmarket with low prices?” I thought for minute and said “Oh! Walmart!” Until then, I had never looked on Walmart’s web site for computers.
When I looked, there it was, CD ROM, motherboard, case, 250 W power supply, 128 MB ram, case, 40 GB hard drive, and crappy speakers, all for $199. If you look today, the system has been changed and the price point is higher – $258 – but this is where the original system came from. I’ve tried several times to beat the price of the Walmart Wonder and even though I threw out the RAM and hard drive, it was still cheaper to buy the system.
In Table 1, I’ve put the word “Included” in each row of the Final Hardware Cost column to indicate what came with the original Walmart Wonder system for $199.00.
Operating Systems
Originally, I was going to compare FreeNAS to ClarkConnect in this article. However, I could not get FreeNAS running within my article deadline. In my last article, I was able to install FreeNAS and to compare it to Ubuntu 6.06 Desktop. However, even though the change in hardware for this review was simple (removing the LSI Logic MegaRaid i4controller and three hard drives, attaching one hard drive as an IDE), I was not able to get FreeNAS to boot.
Searching the FreeNas help site revealed many other users with the same problem. The fixes, “set BIOS to default,” “turn off serial ports,” “nuke the master boot record,” did not work on either the initial or final hardware for this article. So, if you can provide help in getting FreeNAS up and running, please drop me a line at [email protected].
I will keep working on the installation and hope to add FreeNAS benchmarks to the other results reported in this article at a later time. In no way do I mean to gloss over or not give FreeNAS its due. In the future I’d love not only to add FreeNAS but also NASLite benchmarks to the data collected.
I ended up building and benchmarking NAS configurations using ClarkConnect, Ubuntu 6.06 Desktop and Windows XP Pro. I’ll provide a fair amount of detail for installing and configuring Samba on ClarkConnect, a little less on Ubuntu and none for Win XP Pro. These tips are not bullet-proof instructions, but mainly the most important do’s and don’ts that I’m aware of. If you have problems, please let us know in the Forumz.
To get Samba up and running we use the simplest installations possible. Before you start, you need a basic desktop computer configuration like the one in Table1. You would be smart to only have one Ethernet port active in this configuration. I used a PCI gigabit Ethernet adapter to maximize throughput and disabled the internal 100 Mbps adapter in the BIOS of both motherboards used before I began installing ClarkConnect. I did this because a second Ethernet port has the potential to confuse ClarkConnect during installation.
Installing ClarkConnect
ClarkConnect (CC) is a system of products that allow non-gurus to capture a lot of the value of Linux. See our earlier review for more info.
To a lay person, ClarkConnect is a web interface that is wrapped around many Linux command-line programs, all organized into a tabbed graphical menu system. The graphical interface allows you to use Linux to set up Ethernet cards, a Samba share or a porn filter, without the requirement of knowing 700 Linux commands and worse, the correct sequence in which the commands must be typed to get your system working.
Peter Baldwin, the president of CC is astonishingly sympathetic to the frustrations of non-Linux-gurus in getting infrastructure computer systems up and running. You can ask ClarkConnect for help, and they are in my experience, very generous about providing it before asking for money. At least they’ve never asked me for money in my three years of working with ClarkConnect. But, I was once so moved by how great ClarkConnect’s support is, to send the programming team cookies via a Toronto-based bakery. RULE: Feed a programmer, starve a fever.
Before you boot your ISO CD we need to do the first step in installing ClarkConnect. Go to https://secure.clarkconnect.com/webapp/ and create an account (second option on menu at left). You don’t have to pay to use ClarkConnect 3.2 home, but you do need to register to get all the benefits of free upgrades. Installation is easier if you register before you install the software. When you register, write down your user name and password on a note and stick it next to the desktop computer.
Follow these steps to install ClarkConnect
Step 1: Download the ISO image at http://www.clarkconnect.com/downloads/
Step 2: After the ISO image is completely downloaded, burn the ISO image to CDR. [See these instructions if you need help.]
Step 3: Boot the desktop PC you are making into a NAS from the Clarkconnect ISO image.
Step 4: Follow the instructions to install Linux and ClarkConnect 3.2.
TIPS:
• Use a fixed IP address so that you know where to find your server on your network.
• When you set your password, write “username = root” and then the password on the same piece of paper you used in Step 0. You will then have a username and password for logging in to ClarkConnect’s website. And another user name (root) for logging in to your CC NAS.
• If you have trouble installing or bringing up the server on your hardware, use the ClarkConnect Forums at http://www.clarkconnect.com/forums/ubbthreads.php. Do not post to these forums. Treat them as read only. One downside to ClarkConnect is that the forums are policed by unforgiving silver-back gorillas that pretty much flame all newbies. Remember that CC is built on RedHat, so you can also search for RedHat information to solve any problems that crop up.
Step 5: After ClarkConnect 3.2 Home has finished installing and your desktop has rebooted from its hard drive, give yourself a high five. Stand up. And then walk to another PC connected to the same network.
Configuring ClarkConnect
You’ll now need to log into the ClarkConnect web configuration system. ClarkConnect uses a console + surf-in user model (FreeNAS does too). What I mean by this is that when you boot up ClarkConnect from an ISO CD you need a monitor and a keyboard attached to your desktop computer. The console allows you to configure the Ethernet card for this project. Then to configure the Samba share, you need to go to another PC, and surf-in to the ClarkConnect box.
This can be disorienting if you have not built servers before. I know it was a struggle for me. I had to invoke the, “I don’t get it. I’d better leave this until tomorrow” rule before I understood there were two places to configure ClarkConnect. Server folk are used to remote administration, they use KVM switches to control machines remotely. As a home user building a first server, the console+surf-in model was confusing. So again, to sum up:
• To set up the CC NAS network: Use the Anaconda installer and the character based console.
• To set up Samba share after you’ve installed the software and gotten the CC NAS on your network: Surf-in via another computer.
The default surf-in address for ClarkConnect is https://192.168.2.36:81. Note that the above address uses secure http. If you don’t put “s” on the end of your http you won’t get in. If you don’t put an :81 on the end of your web address, you won’t get in.
If you have the address right and you don’t get in, check the console of the CC box and make sure you have a static IP address. If the IP address is correct and you still can’t get in, then check how many Ethernet cards are listed in the CC console. If you have two Ethernet cards, you most likely are suffering from Ethernet card jumping.
When you have two Ethernet cards in a ClarkConnect server, the Ethernet ports “jump” between IP addresses. Even though you configure each network card with an IP address in the RedHat Anaconda set-up program, the cards still have a 50% chance of having the wrong configuration.
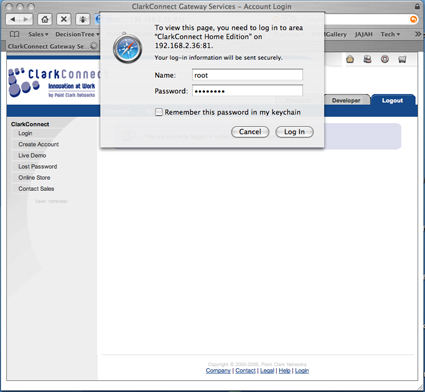
Ok, you are in. What do you see? Figure 1 shows the first ClarkConnect screen you will see. Login as root and use the password you set during the Anaconda installation process. If you took the time to write down your user names and passwords, this should be the bottom password on your note.
Figure 1: Initial ClarkConnect screen (click to enlarge)
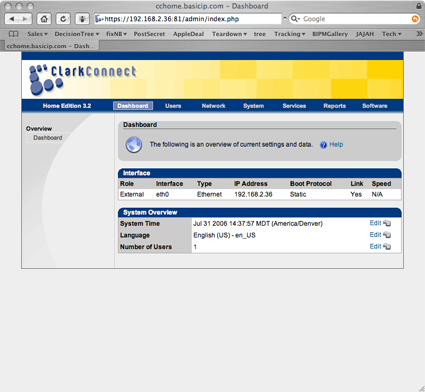
After you log in, ClarkConnect shows you the networking setup by default. Figure 2 shows the default networking setup on my machine. This screen will match the data values you see on the ClarkConnect Console. You can see the IP address of the gigabit Ethernet adapter is 192.168.2.36. You can also see all the menus available in the second blue row from the top. The control menus extend to the right of Home Edition 3.2.
Figure 2: ClarkConnect Dashboard screen (click to enlarge)
Configuring ClarkConnect – more
For this project, we will only need to use two ClarkConnect menus: Services and Software.
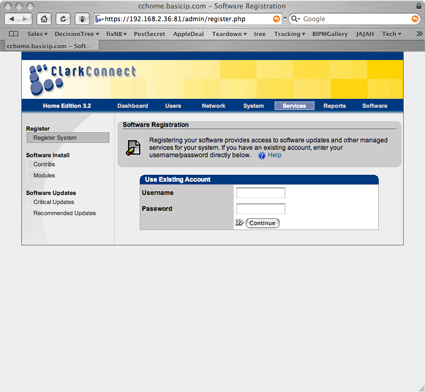
The first thing to do after getting into theClarkConnect GUI is to go to the services menu to register your server with ClarkConnect. Figure 3 shows you the services menu.
Figure 3: ClarkConnect Services screen (click to enlarge)
You need to log into this page with the username and password that you created in Step 0 above. Remain calm. Think back. Remember when you went to https://secure.clarkconnect.com/webapp/ and registered? The user name you created for that registration is what you want to enter here. Look at the note where you wrote down the username and password.
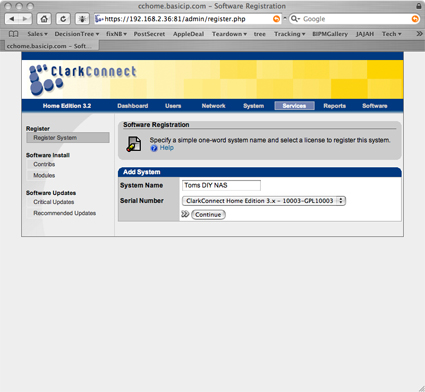
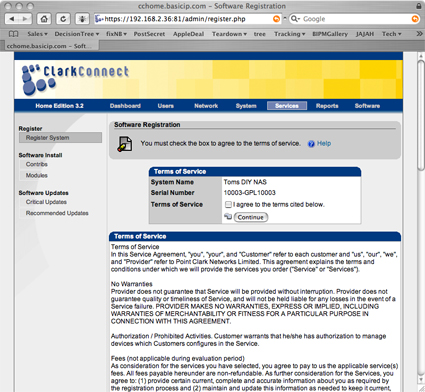
Enter any name that you want for the System name (Figure 4). I entered Toms DIY NAS. The serial number for your machine will be created by ClarkConnect’s back-end system. Click Continue.
Figure 4: Registering your system (click to enlarge)
Next, you will see the ClarkConnect terms and conditions (Figure 5). Click I agree and then click continue.
Figure 5: ClarkConnect Terms and Conditions (click to enlarge)
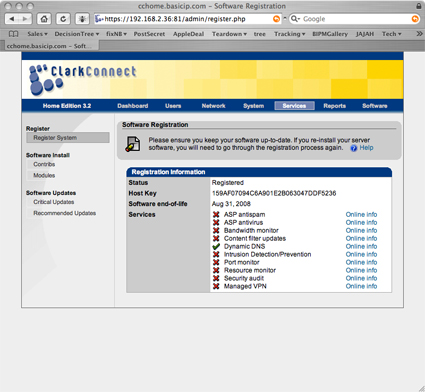
It will take anywhere from 30 seconds to a minute before your system is registered with the ClarkConnect back end. ClarkConnect has back end servers to support for-pay services which include updating proxy filters, detecting intrusions, filtering SPAM, as well as virus protection. This registration with ClarkConnect’s back-end systems will put your NAS on the map to receive updates from ClarkConnect.
Once your system is registered, the services page will come back up as in Figure 6, showing your system’s registration information.
Figure 6: Registration completed (click to enlarge)
Configuring ClarkConnect – Samba
Once your system is registered, we can set up the Samba share. To do this click on the Software tab and you should see Figure 7. If you installed more services than just Samba, you will have a list of those services along the left side of this web page. Click on Windows File Sharing to bring up the Samba configuration controls.
Figure 7: CC Windows File Sharing screen (click to enlarge)
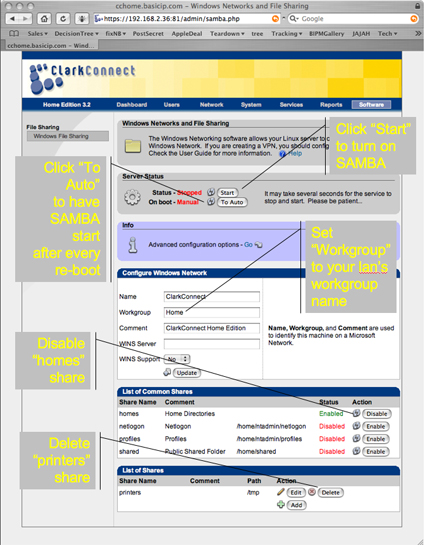
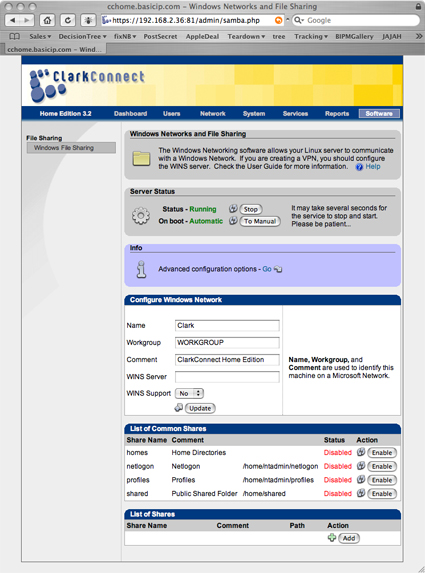
To get your server up and running you need to make five changes on this screen:
One: Click Start to turn on the CC NAS Samba server.
Two: Click To Auto to set Samba to start every time your CC NAS boots up.
Three: Set Workgroup to whatever your home LAN workgroup is. For example, this will be “WORKGROUP” if you have Windows XP and a default XP LAN setup. If you change the Workgroup name, click the Update button four lines below the workgroup name immediately. These Update buttons are frustratingly easy to miss in ClarkConnect. Whenever you change something with an Update button, hit Update ASAP.
Four: Disable the homes share. I assume you are not going to create users (for user authenticated log in) or use a domain in this project. We will be setting Samba for unrestricted log ins. So, homes shares for users are not needed because we are going to create a few 100% shared network drives.
Five: Delete the printers share.
Figure 8 illustrates each of these changes and where you click or type to make them.
Figure 8: CC Samba settings (click to enlarge)
Configuring ClarkConnect – Samba , more
After you have made these changes, your Samba setup screen will look like Figure 9. Check to make sure that your Status and On boot are set to I and Automatic and that your workgroup is the value you want.
Figure 9: CC Samba settings completed (click to enlarge)
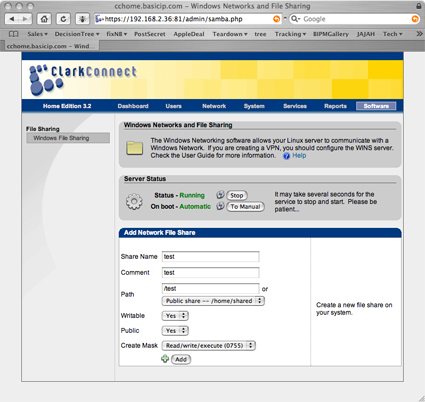
Now we are ready to create your Samba share in the CC NAS. Click on the +Add in the lower right-hand corner of your screen (Figure 9). Figure 10 will open for you. You need to fill in the “Share Name” and “Comment” (Confession: I’m superstitious about Samba and put values in comment even when I don’t use the information.) and “Path” for your share. Make sure Writeable and Public are set to Yes. Then click on Create Mask and set it to 0755 to allow your share to be written to. Finally, click on +Add to add your share.
Figure 10: CC Add Share screen (click to enlarge)
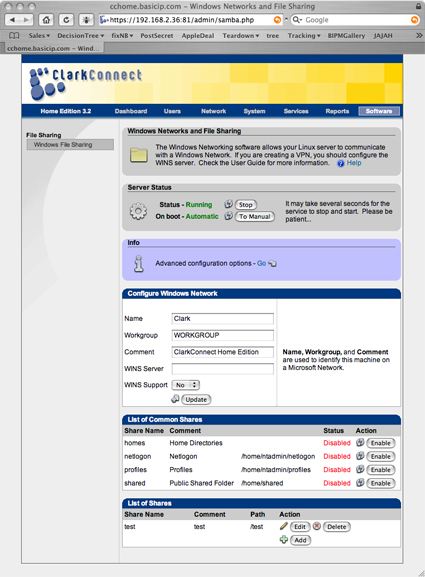
If everything works, you will see a screen like Figure 11. The only thing that has changed from Figure 9 is that at the very bottom of the screen is your network share.
Figure 11: CC Share added (click to enlarge)
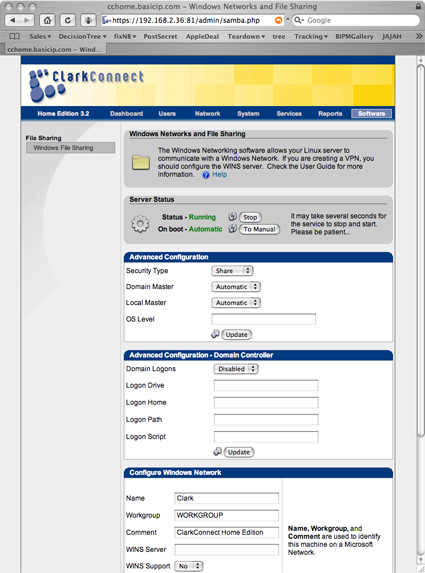
Until now, we’ve ignored the purple rounded rectangle one third of the way from the top of the screen. Now we are going to look for Advanced Configuration Options and click Go. A screen that is almost exactly the same as Figure 12 will open. The top blue and white region is the Advanced Configuration area. In the Advanced Configuration you want to change Security Type to Share. Then look four lines below Security Type and click the Update button.
Figure 12: CC Windows File Sharing Advanced Configuration screen (click to enlarge)
The change from User to Share may not seem like much, but that one little click saves hours. It saves hours because this is the first build of Linux that I’ve been able to create a Samba share on without opening a console, editing files, using chmod 0777, restarting the service via whatever the local dialect of Linux is, etc. Oops, don’t forget to click on Update four lines below Share to tell Samba to make the change.
Finally, click Stop next to Status – Running and wait for the Samba server to report Status – Stopped. Then, click Start to restart the Samba server with all the changes you’ve made. At this point you should be done setting up Samba on your CC NAS box!
Configuring ClarkConnect – Connecting Shares
To connect to the Samba network drive from Windows, move to your windows computer, and then start file manager (right mouse button click on Start, click on Explore and click on Tools >Map Network Drive menu (Figure 13)
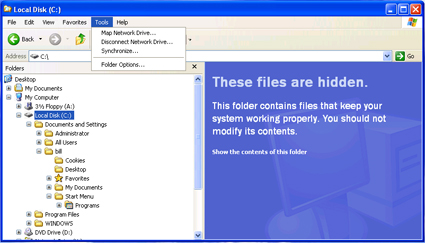
Figure 13: Windows Explorer
When you click on Map Network Drive a dialog will open that looks like Figure 14.
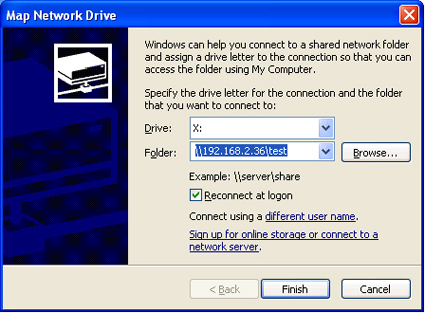
Figure 14: Map Network Drive
Your server address will be clarktest or 192.168.2.36test or clarkwhatever for the share you created. And it will not matter what the user name is to log in. The acid test of setting up a Samba share is not whether you can map to the network drive, but whether you can write to the network drive. Figure 15 shows that I was successfully able to write to the share by copying a shortcut.
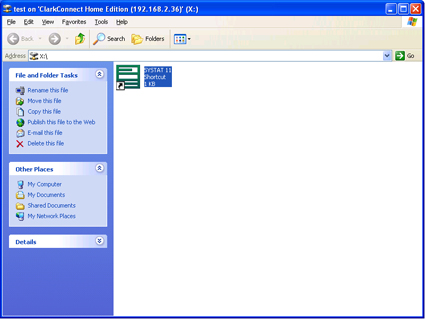
Figure 15: Successful Mapped Share Write
This is the end of the tutorial on setting up ClarkConnect. When you are learning a new distribution, the last step – becoming able to write to the share – can often take as long as all the other installation steps combined. As I said, ClarkConnect is the first Linux Samba distributon that I’ve been able to set up a share 100% from within the web user interface (i.e., without ssh and a terminal window). Hats off to ClarkConnect for making this possible. Linux wimps of the world unite!!!
Ubuntu 6.06 Desktop
I don’t know much about Ubuntu 6.06, just that it is great! I’ve been most impressed by its ease of installation and updaing. For the constellation of hardware that I work with, Ubuntu beats Suse, Gentoo, ClarkConnect, and Linspire 5. Ubuntu has been able to install flawlessly on esoteric laptops (Averatec 1050EB1), rare-in-the-x86-world-monitors (Apple 23″ Cinema Display), as well as all the video cards, motherboards, and Ethernet adapters in my inventory. Having worked at a large electronics company on installers, I take my hat off to the Ubuntu installer team (wiki, launchpad page). These three (!) people have obviously spared no trouble to try their product on every piece of hardware available.
The more I use Ubuntu, the more I find myself gossiping about it as a great operating system. (Francis Crick in his book What Mad Pursuit used the idea of listening to yourself gossiping as a way to determine what you want to do with your life.) I’d better be careful, because I find myself fantasizing about getting rid of all my Windows computers and jumping to something like Ubuntu. Well, maybe someday.
Because the Ubuntu installer does such a great job, the “tips” are going to be much shorter. To install and configure Ubuntu Desktop:
Step 1: Point your web browser to http://www.ubuntu.com then click on desktop Download, click on your country, then click on the version of Ubuntu 6.06 for your platform.
Step 2: After the ISO image is completely downloaded, burn the ISO image to CDR (see the instructions on burning ISO CDs if you need to).
Step 3: Boot your desktop PC from Ubuntu 6.06 ISO image.
Step 4: When your machine finishes loading the graphical user interface, look in the upper left hand corner for the disk icon with an orange triangle (Ubuntu logo) and an arrow that says Install. Double click on that icon and follow the screen prompts to install Ubuntu 6.06. You have to specify Language (English for me), Location(Boise, ID), Keyboard Layout (American English), Full Name, Log-In Name, Password, veto or don’t the Name of Computer computed for you. Next erase entire disk or partition. Confirm installation settings before the installer starts. Get back to work while the Ubuntu installer completes.
Write down your user name and password on a note. You will need them to get back into the system at the end of the install. I’m not doing screen shots or step-by-step instructions for this part of the installation. It is smooth. You will be fine. Trust me. 31 minutes end-to-end. Or, if you have a problem, complain on the Forumz and I’ll see what I can do to step you through any roadblocks that pop up.
Step 5: Once you’ve got Ubuntu 6.06 Desktop installed, reboot, then log in. Now you are at the desktop, we can install Samba and get your share up. Warning, for the Linux queasy, we’ll have to use the terminal window to do this. Not pretty, but it won’t last too long.
Step 6: Click on the “Applications” menu in the upper left hand corner, then hold the mouse over “Accessories” so that the sub-menu pops up. Then, move your mouse over “Terminal” and hold down the left mouse button. Keep your finger on the left mouse button and then drag the terminal icon to the top menu bar of the screen. It may take you a couple tries, but once you’ve got the terminal at the top of the screen, you can easly jump back and forth between the graphical user interface and the Linux Ferrari under the hood.
Step 7: Open the terminal window. Type sudoapt-get install samba and Ubuntu will prompt you for password. Give it your default password. Next the terminal will prompt you to ask permission to copy the Samba files to your hard drive. Type Y and then hit the Enter key. After the action stops you should see * Starting Samba Demons on its own line. Then type sudoapt-get install smbfs. This should get Samba installed on your UNAS (Ubutnu Network Attached Storage).&
Step 8: Next we need to create the first share. To do this, we will use the Ubuntu GUI and the mouse. Click on the minimize button (left side of the upper right corner) of the Terminal window.
- Click on the System menu at the top of the screen to the left of the globe icon.
- Select Administration which is second from the top.
- Click on Shared Folders which is about half the way down the menu.
- First you will be asked for your administrative password. Enter it. The Shared Folders Settings dialog will open up
Now click the +Add button on the Shared Folders Settings dialog. - A Share folder dialog pops up. Type the name of the share you want to create next to the “Name”field. I named mine sharetest. Check Allow browsing folder. Then, click on the General Windows Sharing button.
- A dialog named Windows sharing settings will open. In this window set your domain/workgroup (the default is MSHOME) to whatever your workgroup is. I set my workgroup to WORKGROUP. Then click OK.
What these steps have done is to create a network share in my /home/bill Linux directory. The network name for the share is test in Samba (or MS Windows Networking).
Step 9: Open the terminal window (click on it on the bottom task bar) and go to your home directory by typing cd /home. Next type chmod 0777 bill where bill = your login name in Ubuntu.
Ubuntu 6.06 Desktop – more
Step 10: Now we need to tweak the Samba configuration file that is in /etc/samba. While you are still in the terminal window, type:
cd /etc/samba
sudo nano smb.conf
The first line will move you into the Samba folder and the second line will allow you to edit the Samba configuration file (smb.conf) and allow you to save your changes. The computer will ask you for your password. Type it in and hit return. Once you are in the Nano editor, type <Ctrl><w> to search for a text string and type in security = and then hit enter to start Nano searching for security =.
The search will stop at lines in smb.conf that look like this:
#######Authentication #######
#”security = user” is always a good idea. This will require a Unix account
# in this server for every user accessing the server. See
# /usr/share/doc/samba-doc/htmldocs/Samba-HOWTO-Collection/ServerType.html
# in the samba-doc package for details.
; security = user
Take out the ; at the beginning of the 2nd security = user line and then change user to share. When you’re done, this section of smb.conf should look like this:
#######Authentication #######
#”security = user” is always a good idea. This will require a Unix account
# in this server for every user accessing the server. See
#/usr/share/doc/samba-doc/htmldocs/Samba-HOWTO-Collection/ServerType.html
# in the samba-doc package for details.
security = share
Then, scroll down to the very bottom of your smb.conf file where you should find:
[test]
path =/home/bill
available= yes
browseable= yes
public =yes
writable= yes
and add these lines:
createmask = 0777
directorymask = 0777
forceuser = nobody
forcegroup = nogroup
so the final product looks like this:
[test]
path =/home/bill
available= yes
browseable= yes
public =yes
writable= yes
createmask = 0777
directorymask = 0777
forceuser = nobody
forcegroup = nogroup
Type <Ctrl><x> to exit the Nano editor. Type Y to save the changes. Finally, restart Samba by typing sudo/etc/init.d/samba restart.
The reason we restart Samba is that we want the changes we just made in the smb.conf file to be loaded into Samba. Until Samba restarts, it will be using the old settings. These last settings changes tell Samba that it is OK to allow us to write to the test share.
The very last thing we need to do is to see what the IP address is on our UNAS. To do this type ifconfig in the Ubuntu terminal window. At the left side of the screen you’ll see eth0. On the line below eth0 and at the left end you’ll see inet addr:192.168.x.xxx. That is your UNAS’s IP address. In my case that is 192.168.2.36.
Connecting to the UNAS is the same as connecting to the ClarkConnect NAS. So you can just follow the instructions that I gave earlier.
This completes the installation step-by-step for Ubuntu. Any problems, let us hear about them in the Forumz.
Performance – Read
I ran the iozone test on multiple configurations, so you’ll need to use the info in Tables 2 and 3 to decipher the abbreviations used in the plots below.
| Abbreviation | Translation |
|---|---|
| 1G | Gigabit Ethernet Adapter |
| Ubuntu | Ubuntu 6.06 Desktop |
| CC | ClarkConnect 3.2 Home Operating System |
| FreeNAS | FreeNAS.671 used |
| XPP | Windows XP Pro Operating System Used |
| S22 | Sempron 2200+ CPU on ECS Motherboard |
| D16 | Duron 1.6 GHz Processor on ASRock Motherboard |
| RAID5 | LSI Logic Megaraid i4 Card Used |
| NoRAID | A single 300 Gigabyte Maxtor ATA drive Used. |
Table 2: Performance Chart Legend Abbreviations
| Abbreviation | Translation |
|---|---|
| Terastation noraid 1G | The Terastation NAS System with Gigabit Ethernet Adapter |
| 100M Ethernet | This line shows the theoretical throughput of 100 Megabit Ethernet |
| Ubuntu_1G_RAID5_S22 | Ubuntu 6.06 DT on RAID5 Hardware with GB Ethernet 2200+ Sempron |
| FreeNAS_1G_RAID5_S22 | FreeNAS on RAID5 Hardware with GB Ethernet and 2200+ Sempron |
| Ubuntu_1G_NoRAID S22 | Ubuntu 6.06 DT with GB Ethernet and 2200+ Sempron |
| CC_1G_NoRAID_S22 | ClarkConnect 3.2 Home on GB Ethernet and 2200+ Sempron |
| XPP_1G_NoRAID_D16 | Windows XP Pro with GB Ethernet on a Duron 1.6 GHz |
| Ubuntu_1G_NoRAID_D16 | Ubuntu 6.06 DT with GB Ethernet on a Duron 1.6 GHz |
| CC_1G_NoRAID_D16 | ClarkConnect with GB Ethernet on Duron 1.6 GHz |
Table 3: Performance Chart Legend
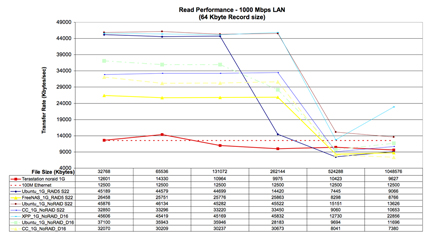
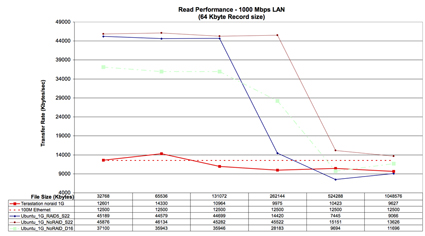
If you are interested in whether the DIY NAS is as fast as entry-level commercial systems, Figures 16 (for Read performance) and 19 (for Write performance) pool the data from my last review and this one. From the graphs and tables the following seems fair to conclude:
• Eliminating RAID5 hardware on a given computer system speeds up your read performance dramatically. At least with the old LSI MegaRAID i4 card, hardware is not an equalizer.
• Eliminating RAID5 hardware will allow you to double file size one more time before poor read performance sets in. The dark blue line that drops between 131072 and 262144 file sizes (128MB and 256MB) represents a drop in performance for the Ubuntu.
• Windows XP Pro’s read performance is not significantly different than Ubuntu 6.06 Desktop’s peformance with a partial exception of very large data files (1 GB).
Figure 16: All System Read Performance Comparison (click image to enlarge)
Figure 16 is a lot of information to digest, so I’ve dropped all but the Ubuntu and TeraStation lines in Figure 17. In this figure we have displayed three conditions under which we tested Ubuntu 6.06 Desktop:
- With a Sempron 2200+ and Hardware RAID (blue line)
- With Sempron 2200+ and without RAID(top red line)
- With Duron 1.6 GHz and without RAID (green/blue dashed line)
Figure 17: Ubuntu Read Performance Comparison (click image to enlarge)
The Megaraid i4 card seemed to help the system perform very well at 128 MB file size and below. But, on larger file sizes, the non-RAID configurations were better. The difference between the Sempron 2200+ and the Duron 1.6 GHz can be seen by looking at the difference between the red and green/blue dashed lines. On the faster CPU, hardware RAID was never faster or as fast as not using RAID. I found this to be surprising. I’ve always thought (hoped) that the hardware cards for RAID were equalizers for the RAID overhead. Not so, particularly for large (i.e., 500 MB and larger) file sizes.
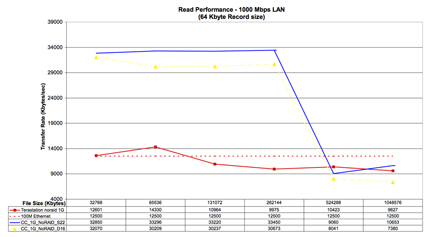
Figure 18 displays the ClarkConnect read performance using AMD Sempron and Duron processors and shows that neither of the ClarkConnect configurations were as fast as the slowest Ubuntu configuration. But surprisingly, the CPU speed difference was much less pronounced in ClarkConnect (difference in blue and yellow lines in Figure 18) than in Ubuntu (difference in top red and green/blue lines in Figure 17).
Figure 18: Clark Connect Sempron vs. Duron Read Performance (click image to enlarge)
Performance – Write
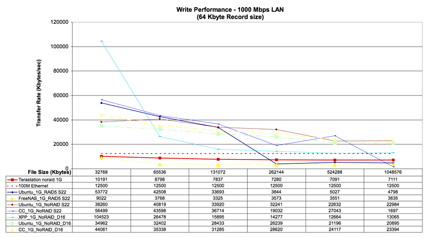
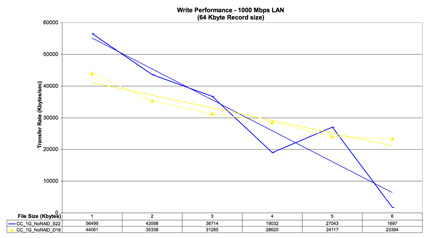
Figure 19 looks at write performance across all the systems evaluated to date. The light blue line is Windows XP Pro that we decided to test when FreeNAS would not boot on the test system. The key qualitative conclusions of this chart are:
- XP Pro has a bigger write cache than the Linuxes. I would guess bigger than 32 MB because that is the one database file size at which XP Pro dominated the Linux operating systems.
- The variation in write performance across competitors is just as big as the variation in read performance. Look at the scale of the graph in Figure 19 (0 to 120,000) and compare it to Figure 16 (4,000 to 49,000). The astronomical score of XP Pro on 32 MB file sizes has the effect of visually distorting the performance of the other operating systems, making them look slower than they are. To make it easier to see the relationships in the data, Figure 20 breaks out just the Ubuntu results
Figure 19: All System Write Performance (click image to enlarge)
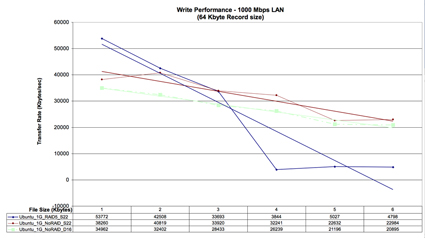
In Figure 20, by dropping XP Pro we can more easily compare the three implementations of Ubuntu. The red line is no-RAID on Sempron 2200+, the green/blue line is no-RAID on the Duron 1.6 GHz and the blue line is hardware RAID in the Sempron 2200+. By adding linear trend lines, the relationships on Figure 24 show how each of these implementations behaves as the database size doubles.
Figure 20: Ubuntu Write Performance (click image to enlarge)
One practical implication of this analysis is that if you collected data on file sizes of the files you will use on your NAS, you can select a summary statistic, say the median file size, and then you can use the trend lines on this chart to tell you which implementation of Ubuntu would give you the best speed.
For example, if you knew that the median file size is 32 MB, you could use either XP Pro with no RAID, or Ubuntu with a hardware RAID card to get very good performance. If your median file size is larger than a gigabyte, then you would be smart to go with the red line in Figure 24 (no-RAID on Ubuntu with as fast a processor as you can get). You tell me how big the most common file is, I’m beginning to be able to tell you which RAID implementation will provide the best speed.
Figure 21 shows the strangest relationship uncovered in this analysis. As files get bigger, the faster Sempron’s performance crosses the line of the slower Duron’s performance. This means for very big files, the Duron’s write performance is better! Go figure. Ifyou know why this is the case, please post in the Forumz and share your experiences with the rest of the RAID geek community.
Figure 21: Ubuntu Sempron vs. Duron Write Performance (click image to enlarge)
Closing Thoughts
I’d like to close this review with what I wish I’d done. I wish that:
- I had found a way to test software RAID to compare to hardware RAID and no RAID. I’m still worried about the step-by-step of repairing a software-managed RAID array. But, it would be interesting to see the speed hit. Especially across processors (Pentium, Centrino, x64…).
- I wish I’d tested XP Pro with the RAID5 hardware. I have done some informal testing, and it seemed like XP Pro did not have the large file performance hit that Linux has. It is time to go back and get the micrometer out an actually measure.
- I wish I’d known to test file system against write and read speeds on large files. That and, I wish I knew how to test file systems!
- I wish that I could get all the people posting to the Forumz from the first article to run iozone on their equipment and send me the equipment specifications (NAS and XP test system) and the.wks file that iozone creates.
Hope you enjoyed reading this as much as I enjoyed writing it!
Addendum: Making ISO CDs
ClarkConnect and Ubuntu 6.06 Desktop require you to download and then burn ISO CDs. Making an ISO CD is not hard. Here’s how:
If you are on a Mac:
- Download the ISO image to your desktop.
- Open Disk Utility (/applications/utilities folder) then you can drag the ISO image from your desktop, and drop it on Disk Utility.
- Next, click on the ISO image in Disk Utility, and then click BURN on the Disk Utility toolbar.
- Follow the prompts, you are done. This ISO CD can be used to boot your x86 desktop computer and install Ubuntu and ClarkConnect software.
If you are using Windows XP:
- You can’t burn an ISO CD with the stock software in XP. I’m sure there are other ways to do this, but I’ve always used Alex Feinman’s excellent ISO Recorder to burn ISO CDs from Windows. Go to http://isorecorder.alexfeinman.com/isorecorder.htm and download the appropriate version of the software for your XP installation.
- Install the iso recorder software.
- Download the ISO images for ClarkConnect or Ubuntu to your desktop.
- After the ISO image finishes downloading, put a blank CDR in your optical disk drive.
- Finally, right-click the ISO image and then select burn from the popup menu. When the ISO is burned, you can use the CD to boot your computer and install software.

