Introduction
Updated 9/27/2007. Major changes to use OpenSSHD instead of freeSSHd.

Let’s face it, backing up data is boring. No one gets excited about it, and so I’ll bet there many of you who still, in spite of your ever-increasing personal digital data stores, don’t have a robust solution in place. You see that external hard drive next to your PC with all your backups on it? That doesn’t count if it’s not offsite. Ask yourself this: If your house burned down tomorrow, how much data would you lose? I’ll bet there aren’t many of you who could say “nothing”.
So what are your choices for that offsite backup? Well, you could let Google look after your data. However, I find their costs a little steep. There are plenty of other online data storage providers too, but they all cost money. You could copy it all on to a USB hard drive and leave it at your parents’ or a friend’s house. But what about the photos from your holiday last month? When will they get copied onto it? And that album you bought on iTunes awhile ago? You can’t quite remember if you bought that before or after your last backup, can you?
So you need a backup solution. At least for me, here are the requirements:
- It has to be free.
- It has to be easy as pushing a button.
- It has to be offsite from your primary data storage.
- It has to be secure.
- It must be able to run on any PC without admin rights.
This How To will describe my solution for automatically backing up critical files offsite without using an online service. I use this solution to back up my home Linux box to the Windows machine I use at work all day. I have plenty of free space on my PC at work and no one minds if I use a little of my hard disk and bandwidth to back up some personal files.
Your company, however, may have different ideas, and you should check your workplace’s computing policies before using company resources. But my technique can be used with any remote PC. For example, you could come to an agreement with a friend to back each other’s files up. And my method works for either "push" or "pull" backups.
This article is going to assume that you have two Windows machines and you want to back one of them to the other over
the Internet. We will call the machine that is being backed up ‘server’ and the other ‘client’. It is also assumed that the reader is familiar with the free SSH client PuTTY, and that the account you log in to Windows with has a password attached.
I’ll also use the word ‘User’ to describe the user you will be, erm, using. Sometimes you will see ‘Kevin’ instead and these are interchangeable. You shouldn’t use Kevin as that’s my name and not yours. Unless your name is Kevin too, then you should just go ahead and use it. Confused? Good….. let’s start.
Installing SSH & rsync on the Server
rsync is a brilliant little program that is fairly common in Linux. It is basically used to synchronize two folders or file systems and consists of a daemon/service running on the server machine and a small application running on the client machine.
The great thing about rsync is that it splits the file up into chunks and
then copies over only the chunks that have changed. So let’s say you changed the artist in the tag
of an MP3, it will copy only the chunk that contains the change over. This makes it fast, efficient and very suited to backing up over the Internet.
So the first thing we need to do is install SSH and rsync on your server machine
The best version of rsync for Windows is called
cwRsync. The server package can be downloaded from SourceForge
here. Install it normally and ensure that you check the option to install OpenSSH server.
You will need to do this as an administrator, since it will install two services—one for rsync and the other for OpenSSH.
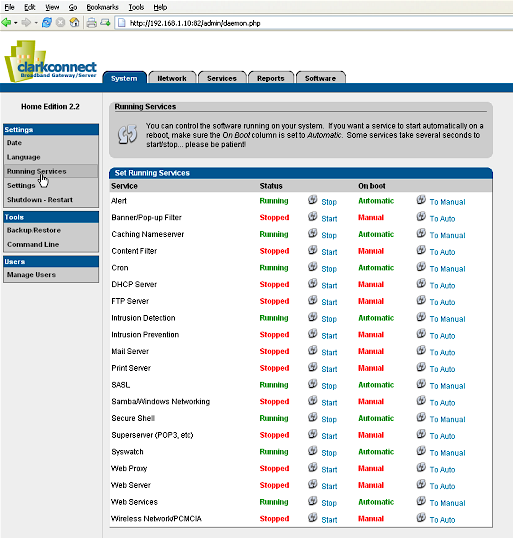
These are not started by default, so go to Start->Run and type in services.msc to bring up the services screen (Figure 1). Locate the
services called Openssh SSHD and RsyncServer, start them and set the Startup Type for each one to be Automatic.
Figure 1: Service console showing OpenSSHD and rsync server
Next, we need to activate a user so that we can use it to log in. cwRsync should have installed a menu item in your Start Menu. Locate it and click on 05. Start a UNIX BASH Shell. Which will bring up a command line. Then type in activate-user.sh and you’ll see the following response:
$ activate-user.sh
?###############################
Activate a user for copssh
###############################
Do you want to activate a (l)ocal or a (d)omain user [l/d] ?
Enter ‘l’ for local and the system will respond with a list of local users:
User accounts for \\WIGGUM
-----------------------------------------------------------------------
Administrator ASPNET Guest
HelpAssistant kevin sshd
SUPPORT_388945a0 SvcwRsync Enter a user account for activation :
Now enter the user you wish to activate. In my case, I entered "Kevin" and pressed the Enter key. The user activation process will then prompt to enter a passphrase to use with key generation. But since we’ll be using our own keys, as you’ll see later, just hit the Enter key to let the user activation process finish up:
Generate a 2048-bit RSA key pair for public key authentication:
A passphrase is similar to a password and is used to protect
the private key. Good passphrases are 10-30 characters long,
are not simple sentences or otherwise easily guessable
(English prose has only 1-2 bits of entropy per character, and
provides very bad passphrases), and contain a mix of upper and
lowercase letters, numbers, and non-alphanumeric characters.
NB! There is no way to recover a lost passphrase. If the passphrase
is lost or forgotten, a new key pair must be generated
Enter passphrase (empty for no passphrase):
Enter same passphrase again:
Private key is /home/kevin/.ssh/kevin
/bin/activate-user.sh: line 110: ln: command not found
A shortcut/symbolic link to your windows home directory is created (myh
processed file: C:\Program Files\cwRsyncServer\home\kevin\.ssh\kevin
processed file: C:\Program Files\cwRsyncServer\home\kevin\.ssh\kevin
Activation process for kevin is completed.
You may establish an ssh connection to this machine now.
Press a key to continue...
kevin@wiggum /
$
Note that the program also creates
a ‘home’ directory for the user in C:\Program Files\cwRsyncServer\home\. This directory will be the
same as your user name and will contain a subdirectory called .ssh, which will contain your keys we will
generate later. The username should be the one that you normally log into Windows with, that has a strong password. This machine will be accessible to everyone from the Internet unless you set up good security!
Now we need to change the port number that SSH is listening on from 22 to 443. Leaving it on 22 is not generally a good idea because you will be subject to frequent hacking attempts, and 443 can be useful to us as you will find out later.
Browse to the file C:\Program Files\cwRsyncServer\etc\sshd_config. Open it with WordPad and near the top you should see a line that says Port 22. Change this to Port 443. Next, stop and restart the SSH service in the services console.
Now let’s test the server. Load up PuTTY (still on the server machine) and connect to localhost, being sure to change the port to 443. You should now be presented with a warning about accepting the key into the cache. Accept this and you will be presented with the login prompt. Enter the name of the user you set up before and then type in your Windows password. If all is well, you will now see a DOS-style command prompt. Since this was just a test, you can close PuTTY for now.
Adding Public / Private Key Authentication
Now we are going to change the server login process so that it can be run automatically for use in scripts and scheduled tasks.
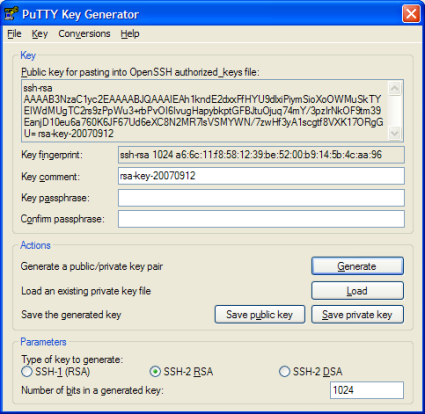
Download PuTTYgen, which we will use to generate our keys. Load it up, click on Generate and then wiggle the cursor over the blank area until the progress bar finishes. This will generate two keys (Figure 2). The Public one is put onto the server and it doesn’t really matter who sees it. The Private one should be kept secure because whoever has the Private key can use it to log into your server without using a password!

Figure 2: Using PuTTYgen to generate Public and Private keys
Add a comment to the key if you wish, and then click Save private key. Answer Yes to saving the key without a passphrase and save it somewhere safe with a meaningful name. Also, as I first didn’t realize and took a good deal of
hair-pulling to find out, PuTTY and OpenSSH have different format private keys. Since we will be using the OpenSSH client
with rsync, click Conversions-> Export OpenSSH Key and save that too. Don’t worry about saving the Public key in a different format.
Now in the .ssh directory that was created above (in C:\Program Files\cwRsyncServer\home\kevin), there should be a file called authorized_keys. Open this in WordPad and paste the contents of the big text-box at the top of PuTTYgen into the file. It should paste onto a single line. Save and close the file, and close PuTTYgen.
Now in PuTTY, we will now try to connect using the key instead of the password. Enter localhost and 443 as before, but now add two more options. Click Connection and change the Auto-login username to be the one you created previously. (Figure 3)

Figure 3: Entering the Auto-login username in PuTTY
Then expand the SSH branch and click Auth. In the Private key file for authentication enter the location of the file you saved in the previous step (Figure 4).

Figure 4: Entering the Private key file location in PuTTY
Now when you click Connect, PuTTY should connect without asking for a username or password. Neat eh? As you now see, anyone with your private key can log into the server, so keep it very safe.
We now have a automatic secure connection to a remote server. Now, it’s time to do something with that connection!
Install rsync on the Client
Now you need to install the client application on the Windows client machine. The client can be downloaded from Sourceforge here.
Once you have installed, you need to add some environment variables. Right-click on My Computer and select Properties. Click the Advanced tab and then the Environment Variables button. Under the User Variables, create a new variable called PATH and set it to be the install location of cwRsync:
c:\Progra~1\cwRsync\bin;%PATH%
Add another user environment variable called RSYNC_RSH with a value of ssh.exe.
Now bring up a command window on the client, type in rsync and if the install is correct, you should get help relating to the various options on screen.
Now is a good time to copy the private key file you created earlier to the client machine.
I recommend creating a .ssh directory in your Documents And Settings, and putting it in there.
Tunneling
If your client machine (the one that is storing the backup) can connect to the Internet freely, then you can skip this section. But if your client computer is somewhere that is restricted from Internet access, you may need to go through some extra steps to connect to your server.
In my case, my machine at work is locked down so that access to only certain Internet ports are allowed, and all traffic must go via a proxy server. However, one outgoing port that is nearly always available is port 443 which is normally used for SSL (encrypted HTTP) traffic. Another advantage of using this port is that to any sysadmin, it just looks like we are visiting a lot of secure web pages!
So how do we do this? First up you need to open up the firewall that your server sits behind to allow traffic on port 443, which is why early we changed freeSSHd to listen on port 443. This is left as an exercise to the reader and should be able to be accomplished by opening port 443 in your router to the server machine’s IP address.
Now you must set up the client machine to use the tunnel. We will use PuTTY again, since we already are using it on the server. I actually use a free program at work called Bitwise Tunnelier, since it is a bit more user friendly. But it requires a tricky installation that some people might not be able to do.
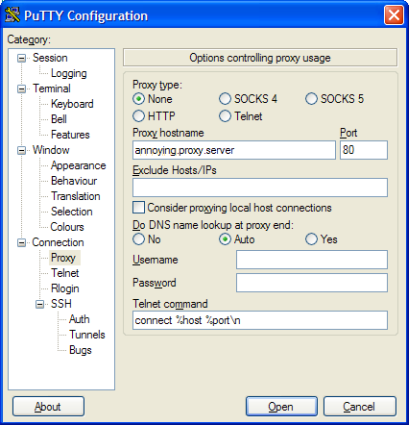
So load up PuTTY on the client machine and enter your hostname (the public IP of the router behind which the server sits) as usual, being sure to set Port 443. Next enter your Proxy settings by expanding the Connection category and clicking on Proxy. (Figure 5)

Figure 5: Entering the Client proxy settings
If you don’t know what your proxy server is, you should be able to pick it up from Windows. Go to Tools->Internet Options->Connections >LAN Settings and it should be there.
Tunneling – more
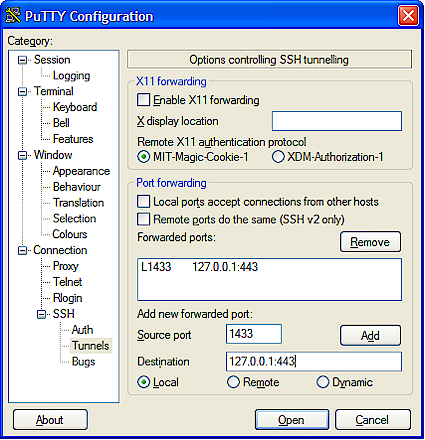
Now we need to tell PuTTY the ports we want to forward. Back in PuTTY expand Connection->SSH->Tunnels. Enter 1443 (or anything you want above 1024) in Source Port and 127.0.0.1:443 in Destination (Figure 6).

Figure 6: Entering the Tunnel settings
Now save your session, connect and then log in using your preferred method. Your PC should now be listening on port 1443 (or whatever port you entered). Anything that PuTTY receives will be forwarded to Port 443 on your client machine.
You can test this by creating another PuTTY session and connecting to 127.0.0.1 port 1443. Hopefully it will now just
connect to your server, but this time you didn’t enter a proxy or anything. You are in fact creating an SSH connection over a SSH tunnel. Doubly secure!
Tunnelling works with pretty much anything, not just SSH. For example, it is commonly used to secure VNC connections. Note that you don’t have to set the destination IP address to be 127.0.0.1. It can be anything that the server machine can see, such as other machines on the local network or Internet.
Using this approach, I have one gateway machine (my Linux box) which I SSH to, and then use tunneling to access other services such as VNC, SCP, Remote Desktop and POP mail on other machines in my home network. That way I only have to have a single port open on my firewall, so the chances of being compromised are minimized.
Note: It is easy to tell SSH (and thus rsync) to connect via a proxy without going through the trouble of setting up a
tunnel using PuTTY. You need a tiny little C program called Connect for this.Unfortunately, the people that bundle rsync into
cwRsync don’t include a rather important file (sh.exe), which is needed to run the Connect executable. I have emailed them asking them to add it. But in the meantime if you want to use Connect, you will have to go with a full Cygwin install, which is beyond the scope of this article.
Running rsync
Now it’s finally time to do the backup. Bring up a command prompt on the client machine. The command I run to back up all my music (which should be all on one line) is:
rsync -avzr -e "ssh -i /cygdrive/c/Documents and Settings/Kevin/.ssh/open_ssh_key -p 1433" kevin@localhost:"/cygdrive/c/My Music/" "/cygdrive/c/My Music/"
So what do all the options mean?
– avrz means: Archive, Verbose, (Z)compressed, and Recursive.
– The -e flag specifies the shell to use, in this case we are telling SSH to use the OpenSSH private key (not the PuTTY
.ppk one) we exported from PuTTYgen earlier.
– kevin@localhost:”/cygdrive/c/My Music/” is the source. Since I am tunneling, I use localhost as discussed earlier. If you don’t have
restrictions on your outgoing firewall, you can just put the hostname here.
– “/cygdrive/c/My Music/” is the destination. Because the Windows implementation of rsync is derived from Cygwin, you need to add
/cygdrive/ to your path.
rsync should then start listing all your music as it synchronizes it to your client machine. The first time will obviously be quite slow, but after that it will only sync the files (and parts of them) that have changed.
Scheduling It
I run the above script every time I aquire a new album or a similar script after I have taken some new photos. But you might well want to schedule it to run daily. It does no harm, as it will download virtually nothing if nothing has changed.
If you aren’t using tunneling, then really all you need to do is create a batch file and paste your version of the rsync command above, and then schedule it using Windows Scheduled Tasks which can be found in the Control Panel.
If you are using a tunnel, then things get much more complicated. You will need to load up PuTTY, wait for it to connect, run your rsync command(s), and then close PuTTY. I have created the following VBScript file to help you do this:
Option Explicit
Const PUTTY = "C:\Progra~1\PuTTY\putty.exe -load saved_session"
Const RSYNC = "rsync -avzr -e ""ssh -i """"/cygdrive/c/Documents And Settings/kevin/openSSH"""" -p443"" "
Const RSYNC2 = "--chmod=a+rwx kevin@localhost:""/cygdrive/c/My\ Music/"" ""/cygdrive/c/My Music/"" "
Const PAUSE = "ping 127.0.0.1 -n 5 -w 1000"
Dim objWMIService, objWMIProcess, WshShell
Dim intPID
' Start PuTTY
Set objWMIService = GetObject("winmgmts://./root/cimv2:Win32_Process")
objWMIService.Create PUTTY, null, null, intPID
' Wait for PuTTY to load
Set WshShell = WScript.CreateObject("WScript.Shell")
WshShell.Run PAUSE, 1, true
' Start Rsync
Set WshShell = WScript.CreateObject("WScript.Shell")
WshShell.Run RSYNC & RSYNC2, 1, true
'Stop PuTTY
Set objWMIProcess = GetObject("winmgmts://./root/cimv2:Win32_Process.Handle='" & intPID & "'")
objWMIProcess.Terminate()
Save this to a file called rsync.vbs, or anything ending in.vbs, and then schedule it to run as before.
Closing Thoughts
The script isn’t great, so if you really want to automate the rsync using tunneling, I suggest you do a full Cygwin install, and use the Connect program I mentioned above.
If you are using the script, then there are three constant (Const) strings at the top of the script that you will need to edit. The first one is the location of PuTTY and the name of the session to load. The second is your rsync command. Note how the quotes in the original command have now become double quotes. The third statement is the pause to wait for PuTTY to connect. This uses ping, which in this case, will ping the localhost 5 times, waiting no more than a second for each one. You probably won’t need to change this.
So there we have it, free offsite backup, what more could you ask for?
Using this method and the uplink rate of 45KB/sec from my home ADSL line, I can back up just over a gigabyte each day, should I need it. This should be enough to keep most people up-to-date.
So the next time someone asks you how much data you would lose if your house burned down, you can say “Nothing!”.

