Introduction
| At a Glance | |
|---|---|
| Product | Thecus YES Box (N2100) |
| Summary | “Bring Your Own Disk” (BYOD) RAID dual-drive NAS with Gigabit Ethernet and media serving |
| Pros | • RAID 0,1 and JBOD support • Up to two SATA drives • Gigabit Ethernet with 4K and 8K Jumbo frames supported • Many Features |
| Cons | • A bit on the pricey side for a box without drives • No backup features |
I recently had a disk drive go bad on me. The first signs of trouble were some ominous I/O errors in my system log file; then, while I was trying to do a final backup of data, the drive just stopped responding – it was dead. I had long ago learned the lesson about the importance of backups, so all of my critical files were safe, but I still lost a bit of minor data such as some email history, browser bookmarks, application configuration settings, and so on.
It’s a fact of computing-life that disk drives will eventually die. This drive was only a year and a half old and still under warranty, but that’s not much comfort when you lose your data. And even when you have your data backed up to another hard drive, there’s a danger that the backup drive will go bad as well. What’s a person to do?
I’ve been using some custom rsync-based scripts to mirror copies of my data to two different Network Attached Storage (NAS) devices on my LAN. That way, if one drive dies, I’ll still have my data on the other. This works fine, but it’s not as transparent or real-time as it could be. There should be a better way, and there is. In this review, I’ll take a look at an NAS device that, among other things, will automatically do my mirroring for me: the RAID-equipped, Gigabit-enabled Thecus N2100.
Basic Features
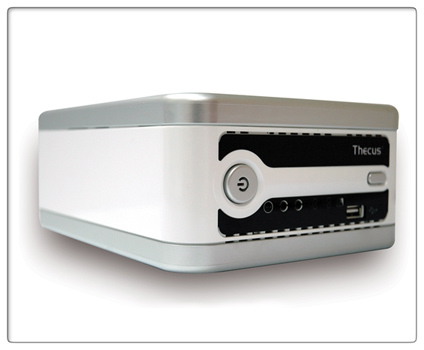
The N2100 is a bit bigger then the standard NAS devices I’ve been testing. The size is understandable, since it is designed to hold up to two user-supplied drives in its internal cage, unlike most others of this type that only hold one. Along with its RAID support, another interesting feature of this box is the fact that it uses Serial ATA (SATA). SATA is the successor to the old ATA standard and should provide better performance; this is the first consumer-level NAS device I’ve worked with that uses it. As I took the device apart to install two drives, I found it to be well constructed and simple to work with. The drives installed easily and securely.
Figure 1 shows the back of the N2100. Along with the fan vent and power connector, you can see two USB 2.0 ports and two 10/100/1000 Ethernet ports. On the left is a security slot so you can attach a locking cable to keep someone from picking up the box and walking away. The two Ethernet ports allow the box to act as a mini-switch, and the two USB ports on the back, along with the single USB port on the front, can be used either for a printer or for external storage. Thecus specifies that with the use of a USB hub, up to six external drives can be added.

Figure 1: Back Panel
Setting Up
Once I had the box assembled with my drives, I hooked up an Ethernet cable and powered it on. Initially the fan in the box spun up fast and loud, but as the unit booted, the noise subsided and the fan slowed. This told me that it had a variable speed capability, which is fairly uncommon in NAS boxes. In its stable state, the fan was loud enough to hear, but not as noisy as some boxes I’ve had on my network.
Thecus advertises support for Windows, Apple OSX and Linux, so I started the configuration process by inserting the supplied CD into my Apple iBook. Unfortunately, browsing the CD showed only Windows executables, so it was time to check out the manual. It stated that unlike most NAS boxes that default to DHCP for address assignment, the N2100 would come up hard-coded with an IP address of 192.168.1.100. For me, this address was in my subnet and currently unused, but if your network is configured differently, you’ll have to adjust accordingly.
Like almost all of these boxes, configuration is accomplished through a Web browser, so I pointed my browser to the correct IP address and found a login screen as shown in Figure 2.
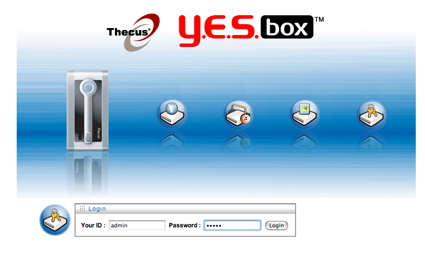
Figure 2: Main Login Screen
As I browsed through the available administration menus, I found a large number of features. These included standard setup screens for password settings, time setup (see Figure 3), user and group creation, firmware upgrade and more. Along with the standard capabilities, there were a number of screens I found interesting.

Figure 3: Time Setup
Figure 4 shows a status screen that geeks (like me) will find informative. You can see the CPU load, temperature settings, fan speed and other statistics. This type of information was rarely, if ever, available on other NAS devices that I’ve worked with.
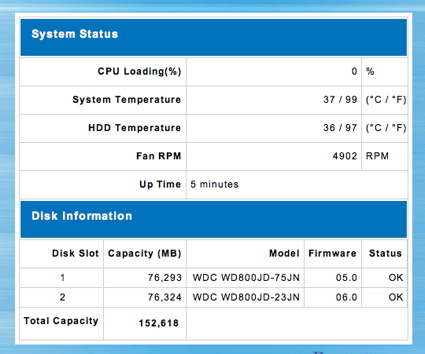
Figure 4: Information Screen
Serving Options
I was also pleased to see support for iTunes; turn on this feature and your N200 will serve music to all iTunes clients on your network. Figure 5 shows the iTunes setup, and Figure 6 shows how it appears on iTunes running on my iBook. In my tests, this appeared to work fine – the basic idea is that you mount the N200 iTunes network share from one of your computers on the LAN and then deposit your music onto it. The iTunes server will catalog your music and feed it back to all iTunes clients on your network.
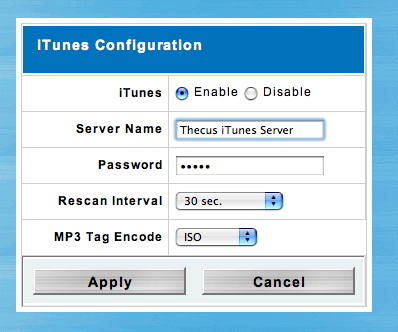
Figure 5: iTunes Setup
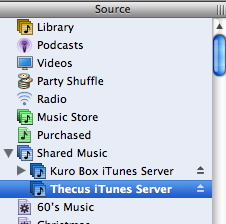
Figure 6: iTunes Client
The N2100 also supported a number of other services. The box could operate as an FTP server for file access, and it supported file access through the built-in HTTP server. Figure 6 shows access to the filesystem using a Web browser. Note that both HTTP and secure HTTPS access are supported for file browsing and administration.

Figure 6: Browser Interface to Filesystem
Notification And Logging
I found a couple of nice features under the system administration screen. The first was notification; using this screen, I could set up the device to email me when problems occurred (see Figure 7). But the one thing I found missed from this screen was a “test” button. There was no way to verify that email had been properly set up.
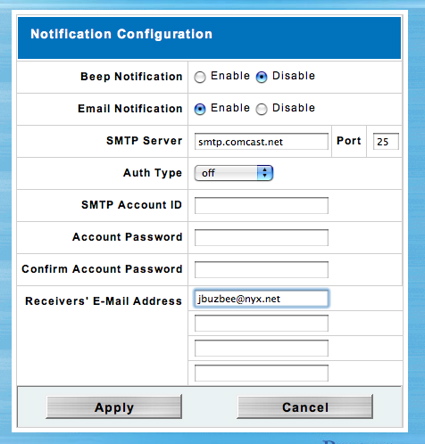
Figure 7: Notification Setup
The other nice feature in this area was logging. Figure 8 shows the logging capabilities of the device. Logs can help diagnose problems that can occur; messages can also be filtered based upon their severity.
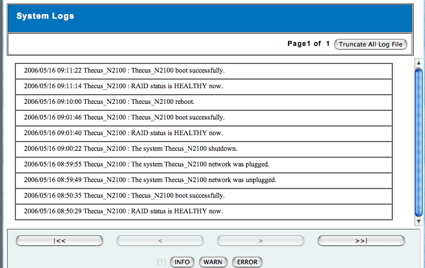
Figure 8: Log Display
RAID
One of the main features that attracted me to this box was its support for RAID. Three different modes are supported: Just a Bunch Of Disks (JBOD), RAID level 0, and RAID level 1. JBOD allows you to treat the two internal drives as a single larger unit, but offers no additional data security or performance. RAID level 0 increases performance by splitting data storage and I/O across the two drives, but provides no increased security. RAID level 1 increases data security by mirroring data on the two internal drives, and also increases read performance since the two drives can be read independently. The main drawback is that the total disk capacity is cut in half (since each drive contains a copy of the same data). I was interested in data security, so I went with level 1. Figure 9 shows the RAID configuration screen.
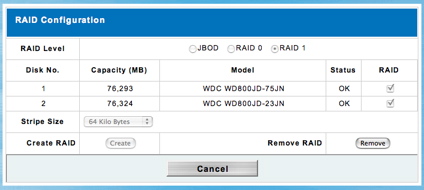
Figure 9: RAID Configuration Screen
One of the things I wanted to check in the device was its RAID failover capability. To test this, I simulated a drive failure by shutting the system down, unplugging one of the two internal drives and booting it back up. When the box was coming up, I expected to see some sort of flashing error indicator, but if there was one, I missed it. When the system was back up, I was able to mount the shares I had defined previously, and everything appeared to be in place. A check of the status log gave me a single message:
RAID status is DEGRADED now
I also had hoped to get an email indicator of the issue, but I never received any. This is why it would have been nice to have a test button for setting up email notices. I couldn’t tell if the email was never sent, or if email notification just wasn’t working.
To see if I could recover from the problem, I shut down, replaced the drive and powered back up. When the system booted, however, it was still running in a “degraded” mode. Not until I went into the RAID configuration page and manually recreated the RAID mirror did it start to recover. During the recovery phase, the system was still usable and my data was available. The status page showed the N2100 CPU usage jump to as high as 75%, but it was more commonly under 15%; the system would probably be a bit sluggish during this phase. Total recovery time for my 80 GB drive was just over an hour.
Print Serving And Backup
As stated earlier, the N2100 also has the ability to act as a print server for the network. Each computer on the network that needs to use the printer has to have a driver installed that is specific to the printer plugged into the N2100, which is then configured as a network printer. Figure 10 shows the printer status window after I plugged a printer into one of the USB ports.
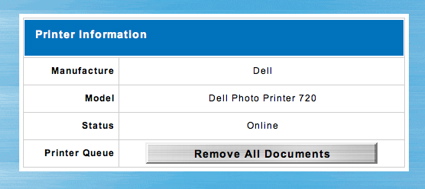
Figure 10: Printer Information
One last feature I checked out was “one button copy”, which is designed to give you a quick way to back up a USB device. For my test, I plugged a FAT32-formatted USB drive into the front USB port and then pressed the copy button just above it. After a beep and a short wait, my data was available in a time-stamped subdirectory of a “usbcopy” directory. This seemed to work well and would be a handy way to move data around.
I should also note that the box has the ability to create “photo albums” from your photographs, but it didn’t seem to work for me. I placed a number of JPEG and PNG files in the top-level Album directory, but when I brought up the Gallery Web page, none of my pictures were present.
Many NAS devices include backup software, but Thecus instead gave directions on how to use a standard Windows backup utility, and directed Apple users to several on-line packages that are compatible with the N2100. The lack of either a bundled software backup application or built-in backup capabilities is an important omission that I hope Thecus corrects at some point.
Performance
100 Mbps Ethernet
Many readers find our 3D iozone plots confusing and uninformative, since caching effects from the computer doing the reading and writing tend to dominate the plot. After some experimentation and consultation with iozone’s creator, Don Capps, we’ve decided to continue using iozone, but change the way we present the data.
According to Don, there are only a few record sizes that are of interest to most Windows applications: 4 K, 8 K and 64 K. 4 K is the memory page size, 8 K is one value that Windows appears to use for network transfers, and 64 K is the typical record size that Windows uses when applications try to transfer blocks of data that are bigger than 64 K.
So, starting now, we’re going to show read and write performance plots using a record size of 64 kbytes, and transferred file sizes of 32, 64, 128, 512 and 1024 Mbytes. We think this will provide performance information that is easier to understand and more helpful for product comparison. We’re also going to include a line on the plots that indicates the theoretical 12,500 kbytes/sec transfer rate of 100 Mbps Ethernet. If any product with a Gigabit Ethernet interface ever starts to approach Gigabit Ethernet speeds, we’ll also include that line on the applicable plots.
So without further ado, here are the 100 Mbps performance results for both JBOD and RAID 1 modes. Thecus supplied the drives used in the 2100, which were Western Digital WD800JD Caviar SEs. These are 7200 RPM 300 Mbit/s SATA drives with 8 MB of cache.

Figure 11: 100 Mbps Ethernet read performance (click to enlarge)
JBOD and RAID1 read and write speeds show very little difference, and the slight speed advantage that read has disappears for file sizes 256 MB and above.
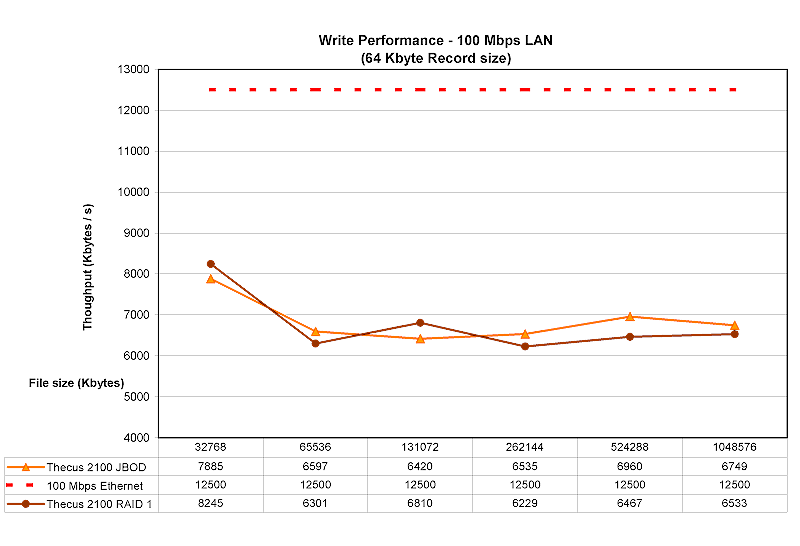
Figure 12: 100 Mbps Ethernet write performance (click to enlarge)
Gigabit Ethernet
The 2100 supports 4 K and 8 K jumbo frame sizes, but only 4 K frames were tested in both JBOD and RAID1 modes. Figure 13 shows that jumbo frames help read performance approach the 100 Mbps Ethernet performance line, even though a Gigabit connection was in use.

Figure 13: Gigabit Ethernet Read performance (click to enlarge)
Figure 14 shows write caching effects with 32 and 64 MB file sizes and also, once again, that jumbo frames provide a definite performance boost.
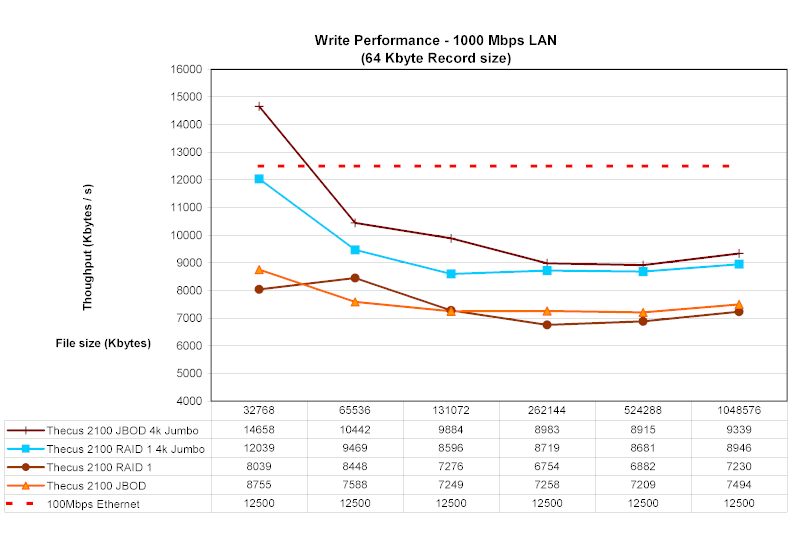
Figure 14: Gigabit Ethernet write performance (click to enlarge)
Competitive Comparison
To put the 2100’s performance into perspective, here are the previous results plotted along with those of the Buffalo Gigabit Linkstation (non-RAID) and TeraStation.
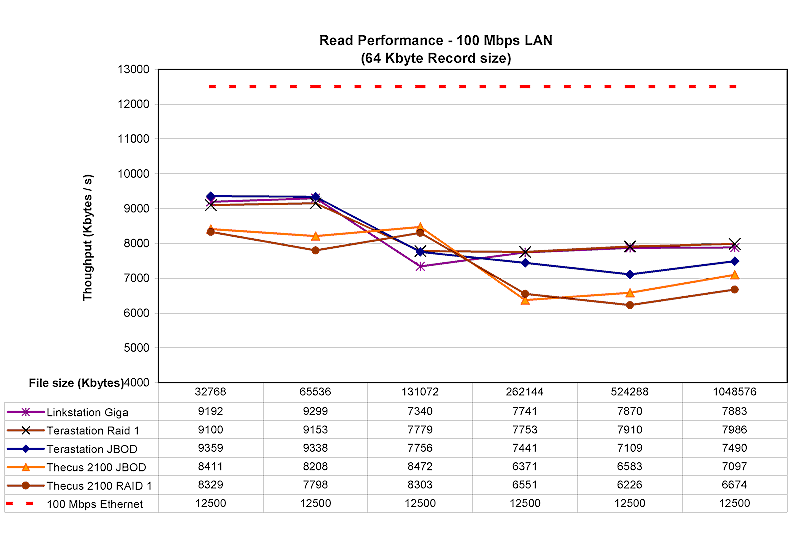
Figure 15: 100 Mbps Ethernet read performance competitive comparison (click to enlarge)
The 2100’s read performance is lower than both of the Buffalo products, except at the 128 MB file size. But the Buffalo products’ write speeds drop off at larger file sizes, giving the 2100 the upper hand.
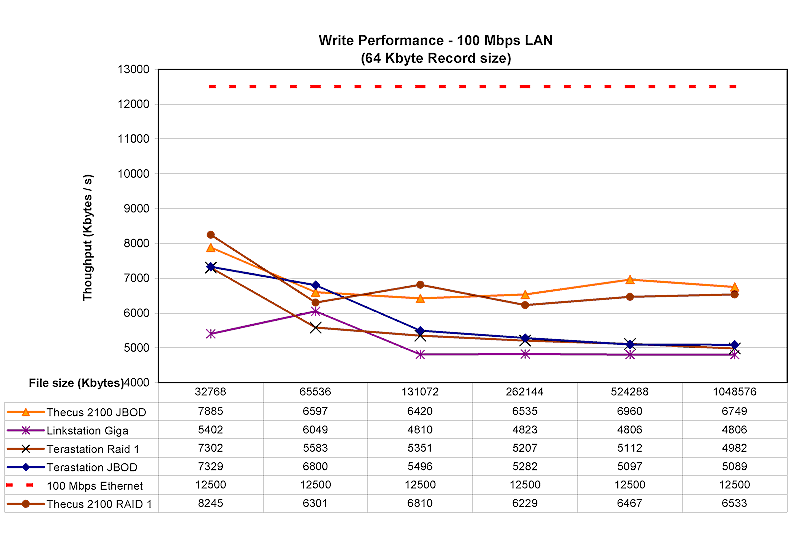
Figure 16: 100 Mbps Ethernet write performance competitive comparison (click to enlarge)
Read performance with a Gigabit Ethernet connection shows that the Buffalo Gigabit LinkStation and TeraStation in RAID 1 mode generally turn in superior performance except for the 128 MB file size runs. Keep in mind that the Buffalo results are produced without the benefit of jumbo frames. Also of note is the large drop in performance for the TeraStation when run in JBOD mode.
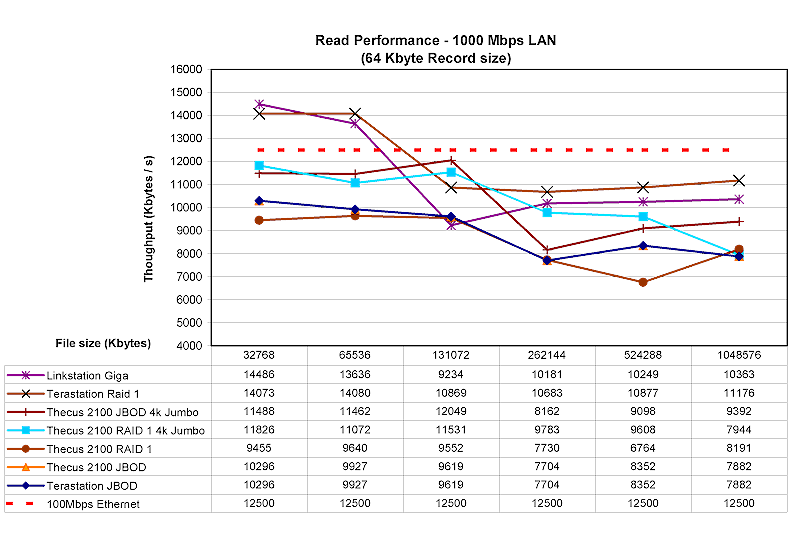
Figure 17: Gigabit Ethernet Read performance competitive comparison (click to enlarge)
There is little difference among the products when it comes to write performance, except for the Thecus when run with 4K jumbo frames. Once again, the downward performance trend below 128 MB file size is due to decreasing caching effects.
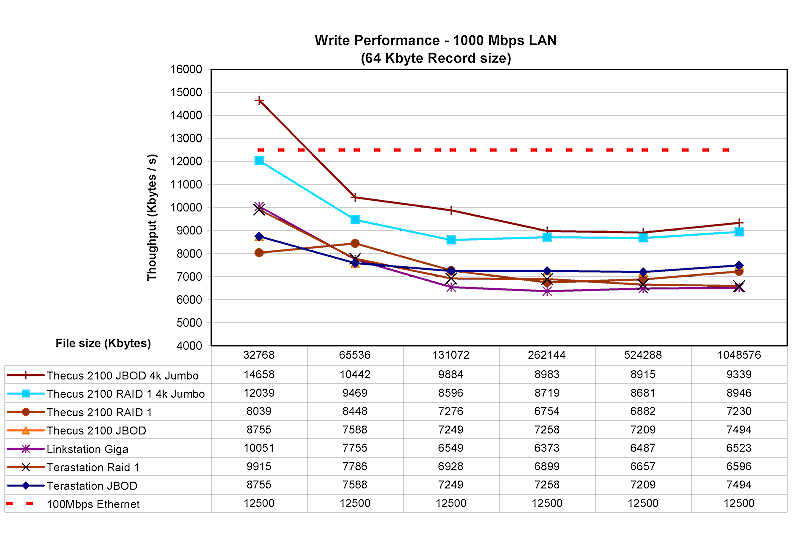
Figure 18: Gigabit Ethernet Write performance competitive comparison (click to enlarge)
File Copy
I also ran a couple of drag-and-drop file copy tests to provide a different perspective on performance. These were done with a different computer than the iozone tests – Dell Inspiron 1000, 2.2 MHz Mobile Intel Celeron, 320 MB RAM, Win XP Home SP2 – with the 2100 in RAID 1 mode. The results below are averages of multiple runs of moving a directory tree containing just over a gigabyte.
100 Mbit Ethernet
From Thecus to Laptop: around 3:00
From Laptop to Thecus: around 4:451000 Mbit Ethernet (no Jumbo Frames)
From Thecus to Laptop: around 2:20
From Laptop to Thecus: around 2:30
I also read and wrote a file sized at over 1 GB to the Thecus to check for the large file problem that exists with some Linux-based drives. Both read and write completed in under three minutes with a Gigabit Ethernet connection.
Under The Covers
Figure 19 shows the main board of the N2100 after the disk cage has been taken out. It’s a bit hard to see, but the CPU in the box is a 600 MHz Intel 80219 Xscale processor. The Ethernet controllers are provided by Realtek, and the SATA controller is from the Silicon Image SataLink family.
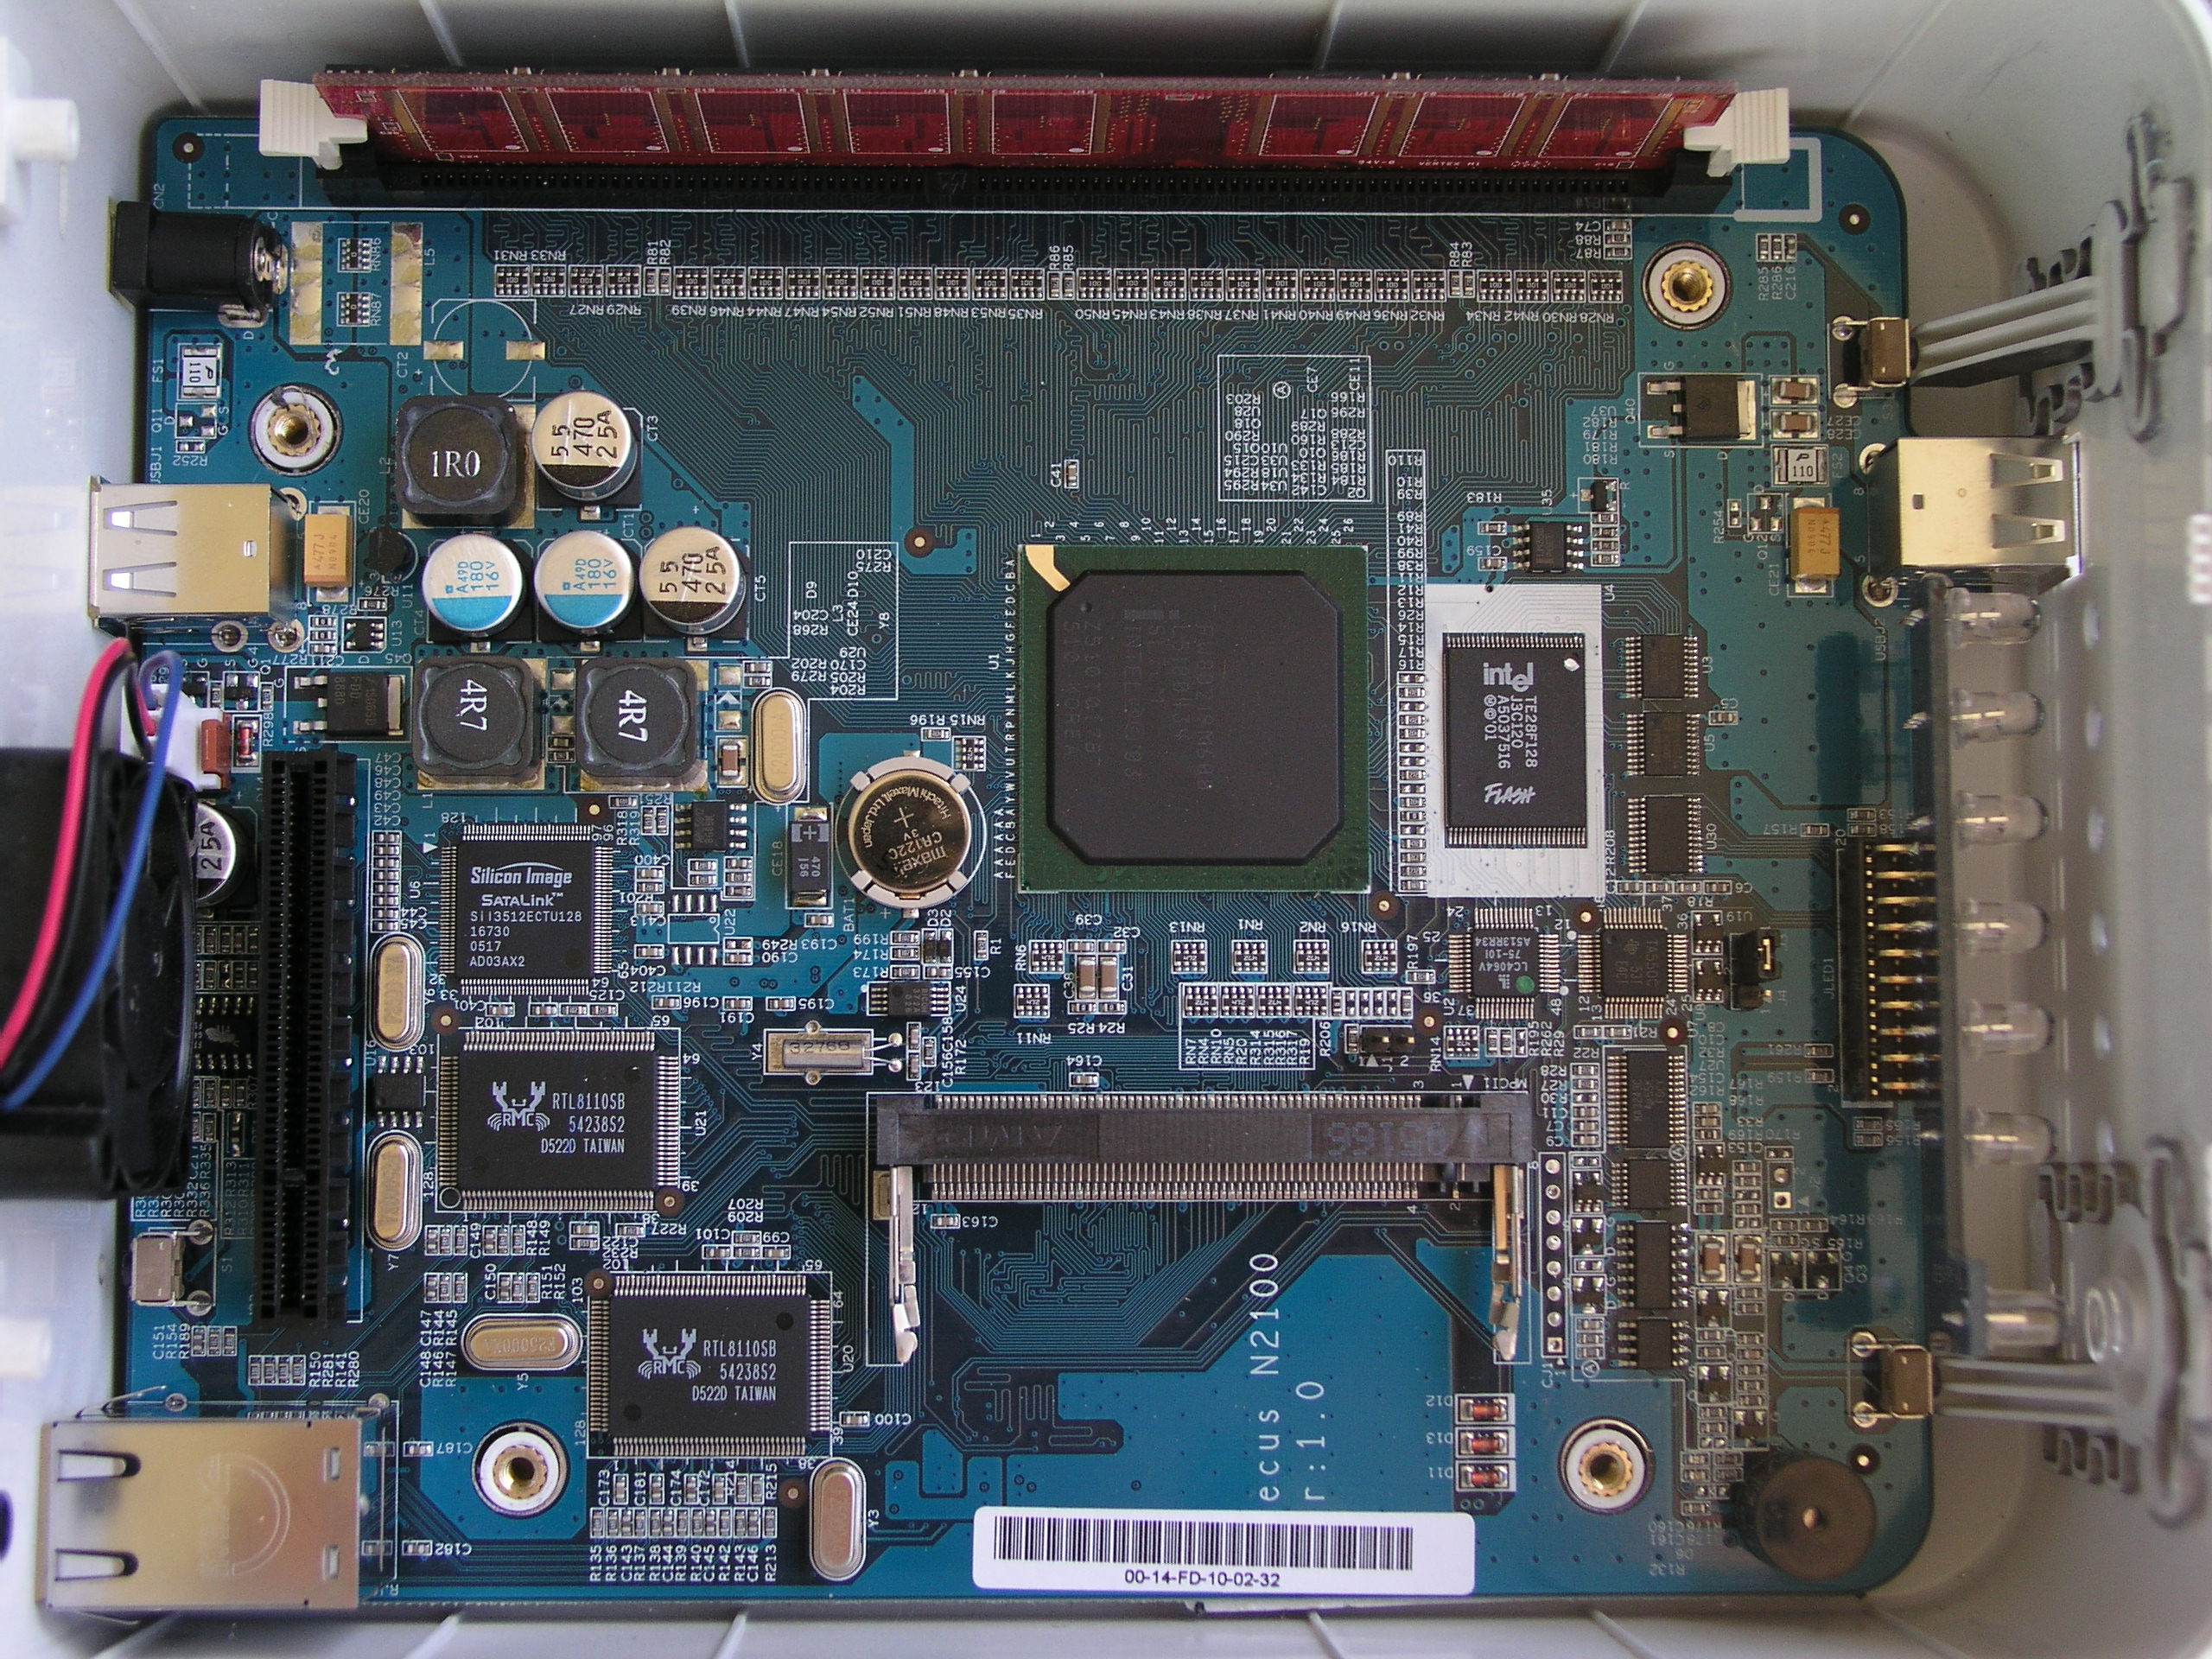
Figure 19: Main Board – Click to Zoom in (click to enlarge)
Note the empty mini-PCI slot on the board, which is designed to be consumer-populated by wireless cards based on the Ralink RT2561 chipset. Wireless USB dongles based on the ZyDAS ZD1211chipset are also supported. Near the top of the image, you can see a 128 MB memory module in the single slot.
I was fairly certain that this box was running Linux internally, but I wanted to poke around a bit to be sure. A port scan of the device turned up nothing interesting, but a fingerprint scan identified the OS as being based on a Linux kernel. The documentation included copyright notices for several GPL components, but not for Linux. Time to dig deeper.
I’ve had a bit of success lately finding and using NAS CGI security holes to poke around the operating system. It turns out that like the other boxes I’ve played with, the N2100 has at least one such error as well. When you use the Web interface to browse the file system, you are supposed to be restricted to the shared directories, but it was fairly straightforward to break out of the standard structure. I noticed that when I fetched a file, the relative path of the file appeared in the browser URL.
After a bit of trial and error, I found that as a non-admin user, I could view almost any file I wanted to by first going up two directories and then back down. For example, using the following URL, I could fetch the password file: http://192.168.1.100/cgi-bin/download.cgi?album%2F/../../etc/passwd
Rummaging around like this told me that the box was indeed running Linux. I couldn’t get a directory listing, but knowing the typical structure of a Linux system, it was fairly easy to make my way around. I started with the first startup file, inittab, and then worked my way, script-by-script, through the entire boot sequence, finding some interesting things along the way. An ssh daemon was present on the box, and it appeared to be started up at boot time. Unfortunately, I could find no evidence of it when the box was fully booted.
I found that the iTunes server used was mt-daapd. Viewing the proc filesystem gave me info about disk mount points, memory usage, kernel version (2.6.9), and so on. One interesting feature I noticed was a script that, with a bit of effort, could give a user the ability to completely control the box.
A “module-boot” script loads modules and executes scripts from a designated directory on the hard drive. To access this, you’d probably need to mount the drives on a standard Linux box, properly populate the “module” directory with your customizations, and then replace the drive. This way you could add your own Telnet server, ssh server, device drivers, etc. There are lots of possibilities.
Conclusion
I found the Thecus N2100 to be a full-featured box that provides data security, flexibility and expandability with performance comparable to other products with Gigabit LAN interfaces. The box had a few rough edges, but overall, the software was well written. As far as cost, a street price of around $320 seems a bit high for a BYOD, two-drive product.
That said, it was a bit hard to find a device that directly compares to this device, since few have built-in RAID capabilities. For example, the Kurobox HG is a bring-your-own-disk, Gigabit-enabled NAS box going for $149, but it’s a single drive unit, doesn’t directly support RAID, and doesn’t have a polished software baseline. The Buffalo Technology HD-HG250LAN is a Gigabit NAS device that can be found for under $200 including a 250 GB hard drive, but once again, it’s a single-drive product and doesn’t have RAID support.
For multi-drive products, the $549 500 GB Yellow Machine supports RAID all the way up to Level 5, but I found its performance to be sub-par and it lacks Gigabit LAN support. Finally, the four-drive Buffalo TeraStation isn’t available in a BYOD model, and the least expensive of the Infrant ReadyNAS BYOD versions costs a little less than twice as much as the Thecus.
So you’ll have to judge for yourself whether the benefits that the Thecus N2100 provides justify its price. As for me, the RAID capabilities of the unit provide peace of mind for data security, and its expandability means that it can keep up with my ever-growing data needs. It’s definitely worth checking out if you’d like to step up to a more secure NAS, but your budget isn’t quite ready yet for RAID 5!