Introduction
| At a Glance | |
|---|---|
| Product | LaCie Ethernet Disk RAID (301160U) |
| Summary | Four SATA drive NAS with two Gigabit Ethernet ports |
| Pros | • Supports RAID 0, 1, 5, 5+ spare and 10 • USB print server • Two Gigabit Ethernet ports with jumbo frame support • Hot-swappable drives • Active Directory support |
| Cons | • Lower performance than other RAID 5 NASes • No FTP server logging, no syslog support • Email Alerts didn’t work in our tests • No link aggregation |
Networked Storage products come in a variety of configurations, storage capacities and features. They range from the simple single-drive devices such as Buffalo’s LinkStation Live and LinksStation Pro, to multi-drive BYOD products like the DLink DNS-323, up to the rack-mountable business class Linksys NSS4000.
Consumer-based products tend to focus on features such as media servers, web servers, and in the case of the Synology DS-207, download clients for Bit torrent, HTTP and FTP. NASes targeted at businesses tend to have fewer of the consumer features, but instead focus on data availability and fault tolerance.
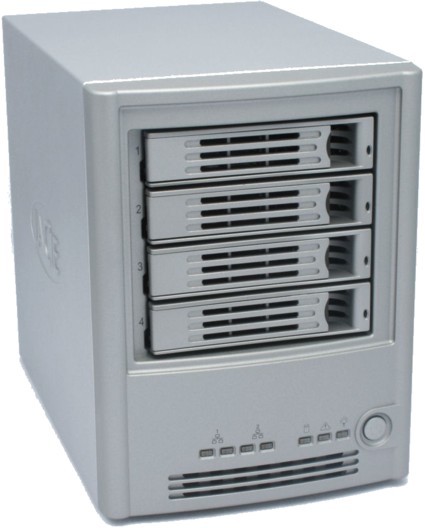
The LaCie Ethernet Disk RAID (EDR), available in both 1TB and 2TB configurations, is a four drive NAS that has many features that are likely to appeal to business users. In addition to RAID 0, RAID 1 and RAID 5 found on many NASes, the EDR also supports RAID 5 + Spare as well as RAID 10.
For those not familiar with RAID 10, it’s similar to RAID 1. In a four-drive RAID 10 configuration, two disks mirror the other two disks. In either configuration, as with the RAID 5 + Spare configuration, the available space on the RAID is 50% of the total “raw” storage capacity. In this four drive configuration, the RAID 5 configuration yields 75% usable space while still providing fault tolerance.
Rather than a rack mount form factor, the EDR is designed to be a desktop NAS. It measures 6.3 X 8.42 X 9.6 inches and weighs in at 12 lbs. Four SATA drives are mounted horizontally above the circuit board and power supply. On the front panel, there’s a power switch and seven LED indicators. There’s an LED for power, system status and disk status as well as a link and activity indicator for each of the EDR’s two gigabit Ethernet ports. In addition, each SATA drive, mounted in a hot-swappable tray, has an activity indicator.
The Ethernet Disk RAID is not a BYOD device—it arrives fully populated with disks. Our 1TB test unit had four 250GB Hitachi Deskstar drives (HDT 725025VLA380). Tray-mounted 250 and 500 GB spare drives (Figure 1) are available from LaCie. These drives must be used to replace failed drives or your warranty will be voided.
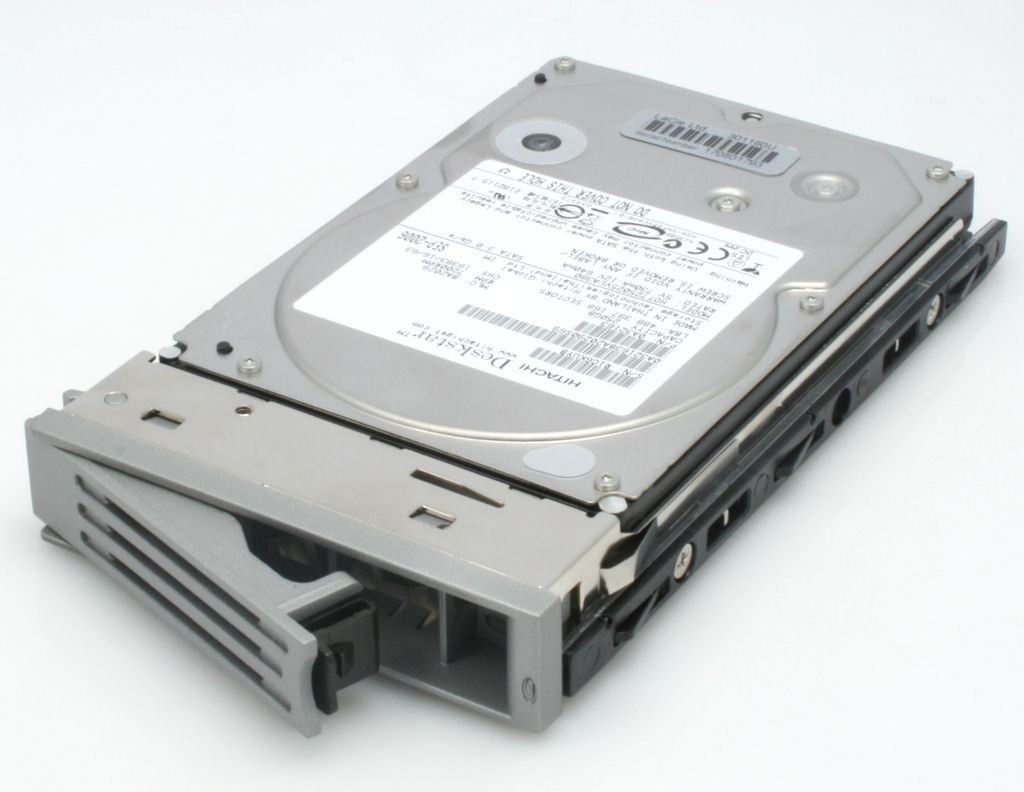
Figure 1: Spare drive for Lacie Ethernet Disk RAID
The rear panel of the EDR (Figure 2) has two gigabit Ethernet ports and two USB 2.0 ports for adding external drives or printers. The NAS has two separate fans—one for power supply and one for cooling the drives/CPU. The larger fan, approximately 3.5” (diameter), is temperature-controlled.
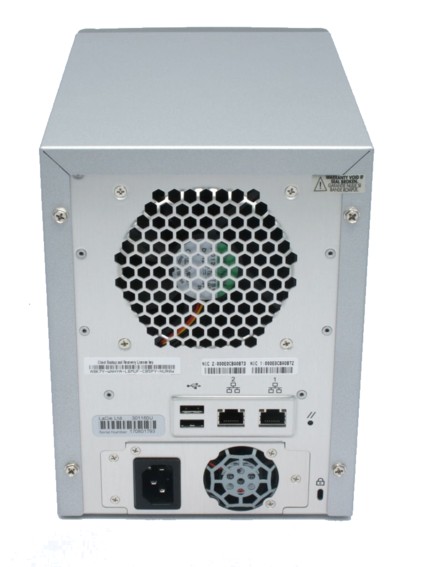
Figure 2: LaCie Ethernet Disk RAID rear view
The EDR has over-temperature protection and will shut down if the CPU reaches or exceeds 85 C (185 F) or if any of the disks reach or exceed 55 C (131 F). There’s also a reset button as well as security slot for securing the NAS with anotebook cable lock.
Internal Details
![]()
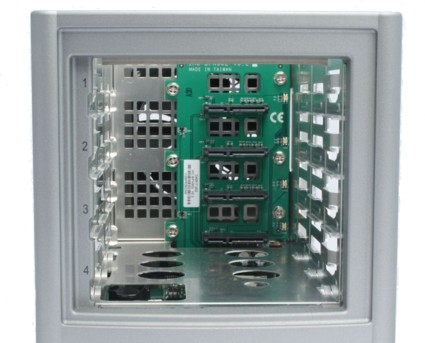
Figure 3: LaCie Ethernet Disk RAID drive cage
The tray-mounted SATA drives slide easily into the drive cage (Figure 3). A lever with a locking mechanism secures the drives in the bay.
![]()
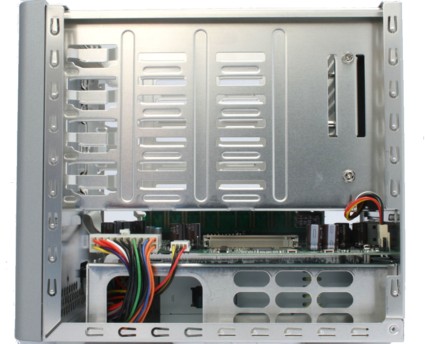
Figure 4: LaCie Ethernet Disk RAID side view
You can access the interior of the EDR (Figure 4) by removing the four case screws on the rear. Once inside, however, you’ll find that further disassembly is difficult as the well-built chassis is put together with a number of rivets.
The drive cage and the cage surrounding the 200 watt power supply are each riveted to the case. We were able to determine that an Intel XScale PR80219M400 400 MHz processor and 256 MB of DDR memory power the EDR. The underlying operating system is a Linux 2.6 core.
Power draw was measured at 65 W, which is in line with other quad-drive NASes we’ve seen. Note that there are no power save features on the EDR.
Setup and Configuration
Setup of the Ethernet Disk RAID involves several steps in addition to plugging it in and connecting it to your network. LaCie provides a simple Windows-only discovery utility (Figure 5) that discovers your EDR on the local network and provides you with a link to the web-based management console.
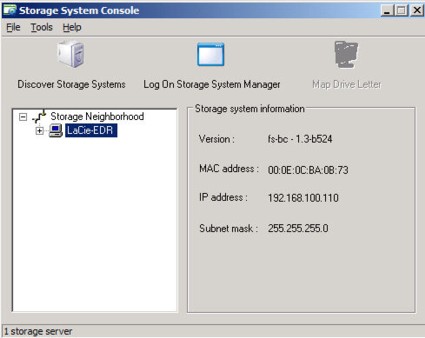
Figure 5: Storage System Console discovers the EDR on your network
When you log onto the Storage System Manager, your connection is via HTTPS. You’ll receive an invalid certificate warning from your browser as the certificate is issued by “storage server”. I didn’t find a way to update the certificate on the EDR, so you’ll either have to accept the certificate or live with the warning each time you log on.
Upon first log on, there’s a first run wizard. This wizard prompts you to initialize the disks into one of the RAID configurations. Next, you’re prompted to decide how much space on the RAID to commit to shared folders. The default is 200MB.
The LaCie Ethernet Disk RAID is supplied with backup software for backing up local computers to the NAS. Only one license is supplied, but you can purchase additional licenses to back up more than one local computer. If you plan on backing up computers to your NAS, the instructions recommend you only allocate the minimum amount to shared folders because backups are stored separately from shared folder.
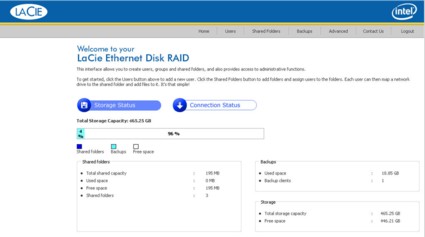
You can always allocate additional space to shared folders, but you can’t de-allocate space. If you allocate all of the space to shared folders and then later decide that you want to also use the NAS for local backups, you’ll have to re-initialize the drives (all data will be lost). After the initial setup, the home page of the browser console looks like this:
![]()
Figure 6: Home page of the Ethernet Disk RAID management console
The menu interface is simple. Across the top of the screen you’ll find the main menu items. As you click on each menu item, the sub-menu options appear in a vertical menu on the left of the screen. The EDR supports both CIFS (windows/Mac OSX) and NFS clients, though you have to choose which type of client when you create the user.
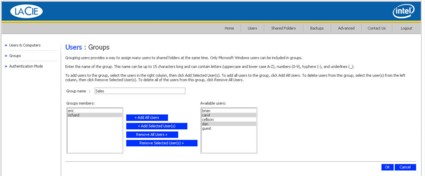
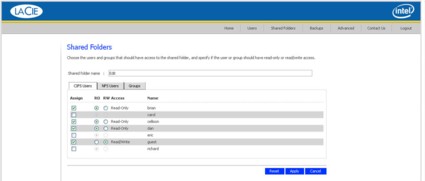
You can also create groups of users (Figure 7) to facilitate assigning rights to shares (Figure 8). As you create users, the EDR automatically creates “private” directories. Unfortunately, there’s no option for setting disk quotas on users. The EDR supports either local user authentication, or can integrate into an Active Directory environment.
![]()
Figure 7: Assigning users to groups
![]()
Figure 8: Assigning rights to users for a shared folder
Setup and Configuration – more
Most of the non-user/share related options are located under the Advanced menu. Here you can configure alerts, update firmware, scan for USB drives, configure the network interfaces, reconfigure disks, view system status and check the system log.
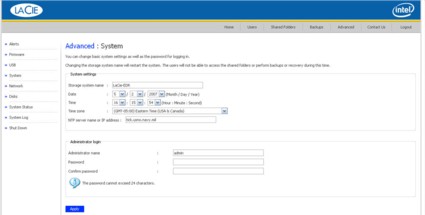
The Advanced System sub-menu (Figure 9) lets you configure system time/date and change the administrator’s password. Interestingly, it doesn’t support daylight savings time.
![]()
Figure 9: The Advanced System sub-menu
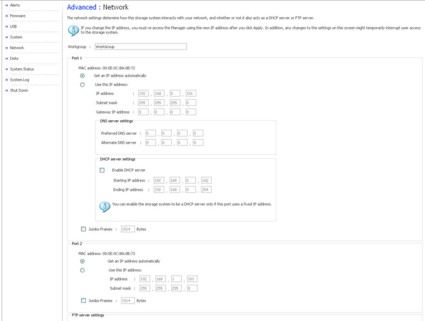
The Network option of the advanced menu (Figure 10) lets you name your workgroup and configure the two gigabit Ethernet ports. By default, each of the interfaces has its DHCP client enabled and supports jumbo frames. However, only port one has a gateway out to the Internet.
You can also enable a DHCP server on port one, but the second interface lacks a DHCP server. Note that there is no link aggregation of the two ports, nor does the EDR provide any routing. The second interface is intended to provide access from a second subnet.
You can also enable the built-in FTP server on this page. FTP provides access to your personal folders as well as the global public folder, but not other shares to which you have rights. Anonymous FTP is not supported, nor are FTP sessions logged.
![]()
Figure 10: Network configuration
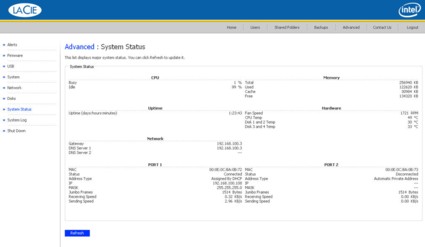
The System Status page (Figure 11) shows you a snapshot of your system including CPU and disk temperatures, fan speed and network settings. I would have preferred to have one status page, showing storage status, disk status and system status, rather than having the information spread through three pages.
![]()
Figure 11: System status page
The EDR has an alerts page that allows you to configure email alerts. It supports authenticated SMTP and you can email alerts to up to three addressees. However, in my tests, I was unable to receive alerts. I attempted to use two different SMTP servers, neither of which required authentication and sending to three different email addresses.
You can view the log file which logs major events such as disk configuration changes, NTP time synchronization and creating users and shares. Each alert is tagged either informational, warning, error or critical error. I was surprised to see that the EDR didn’t support Syslog – a feature we’ve seen on significantly less expensive NASes.
Hands On
Once the EDR was configured, I had no problems finding it on my Windows network. I was surprised, however, that with only the default “guest” user defined, when mapping a drive, I had to click to open the device and use the guest/guest login credentials. Most of the other NASes I’ve reviewed allow a guest connection to the public share without authentication. Of course, if your user account on the NAS matches your windows name and password, you won’t have any problems.
I tried accessing the EDR via FTP. The EDR allows up to eight connections, but doesn’t support anonymous FTP. FTP clients such as WS-FTP won’t have any problems, but for browser-based access, you’ll need to use the following format: ftp://username:password@IP_Address.
I plugged in several USB drives, which the EDR immediately recognized and had no problem mapping drives to them. By default, no users are assigned to USB shares—you have to add users to the USB shares before they can be used on the network.
![]()
Figure 12: USB Drives are recognized immediately when plugged in
The real measure of a NAS that supports RAID is how well it handles a disk failure. Do you lose your data? What happens if a drive goes bad? What happens depends on how you’ve configured the RAID. To demonstrate this, I created a test scenario which I’ve documented in a separate slideshow.
Initially, the EDR was configured for RAID 10 and 100% of the space was allocated for shared folders. I set up users, groups and shares and copied data. I also tried to use the backup software to protect a partition on one of my systems, but the backup failed because there was no unallocated space on the RAID.
I then decided to reconfigure the RAID for RAID 5 + Spare. In this configuration, data and parity are striped across three drives, and the fourth drive is online as a spare, should any of the three drives fail. As warned, I lost all data when I reconfigured to RAID 5 + Spare.
The RAID array reconfigured fairly quickly, and I had access within minutes, albeit at reduced performance. However, the EDR took more than 14 hours to fully synchronize the new array and restore full performance! Note that if another drive failure occurs while an array is being resynced, you lose all data.
Once the RAID 5 + spare configuration had synchronized, I copied additional data to the drive and successfully backed up a notebook partition to the EDR. I then intentionally failed the drive in bay one by pulling it out. I still had access to my data, and was able to continue to back up my notebook partition.
Immediately after pulling the bay one drive, the spare drive in bay four started rebuilding. 13 hours and 23 minutes later, the new drive had synchronized and the RAID was again fault-tolerant. I then re-inserted the original “failed” spare back into slot one. Immediately the EDR recognized the drive and designated it as the spare.
Under the Advanced menu, the Disk sub-menu shows the model, serial numbers, size disk status and a “hot plug” indicator for each drive. A green hot plug indicator means that removing the drive will have no impact on the RAID. Yellow indicates that removing the drive (or if it fails) will cause the RAID to operate in a degraded state. Red means that the RAID will fail and data loss will occur if the drive fails.
![]() Look for the hot plug indicators in the slideshow.
Look for the hot plug indicators in the slideshow.
Performance
We generated a few sample performance charts using our interactive NAS charts. All data was taken with our standard iozone-based test procedure that is described here.
TEST NOTES:
- Firmware version tested was fs-bc-1.3-b524
- The full testing setup and methodology are described on this page
- To ensure connection at the intended speeds, the iozone test machine and NAS under test were manually moved between a NETGEAR GS108 10/100/1000Mbps switch for gigabit-speed testing and a 10/100 switch for 100 Mbps testing.
While you can create your own charts and select which products to compare, we chose to include read and write performance charts for RAID 5 using small file sizes with a 1000 Mbps connection and both standard and 4k jumbo frame sizes.
We used the chart small filesize mode instead of the usual large filesize mode because many readers have expressed interest in seeing performance for small file transfers. Note that small file size performance is highly influenced by OS cache effects
For comparison, we included a few comparable desktop RAID 5 NASes: the Freedom9 freeStor 4020 (a veritable clone of the EDR), and Infrant NV+. The 100 Mbps Ethernet reference line is also included to provide a consistent point of reference. 100 Mbps was used instead of 1000 Mbps because the 1000 Mbps line would have compressed the data too much.
The EDR had an average throughput for small file size writes of 9.5 MB/s for 1000 Mbps RAID 5 and 17.3 MB/s for 1000 Mbps 4k jumbo frame RAID 5. Average small file size read speeds were better at 18.8 and 22.4 MB/s for 1000 Mbps RAID 5 and 1000 Mbps 4k jumbo frame RAID 5 respectively. Details behind these averages are shown in the throughput vs. file size plots in Figures 13 – 16.
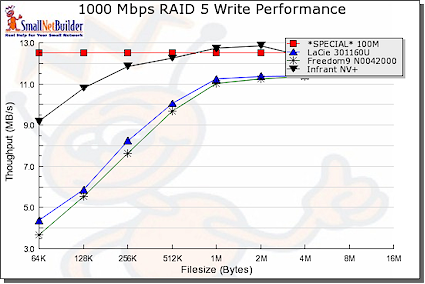
Figure 13: Write performance
You can see that the Freedom9 freeStor results track the EDR’s pretty well in Figure 13. Figure 14 shows that both products take better advantage of 4k jumbo frames than the Infrant NV+.
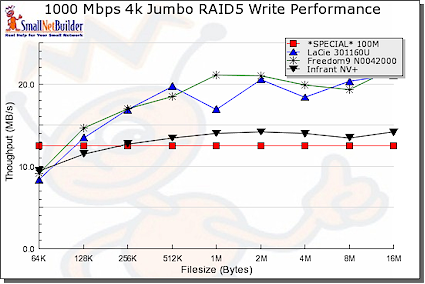
Figure 14: Jumbo frame write performance
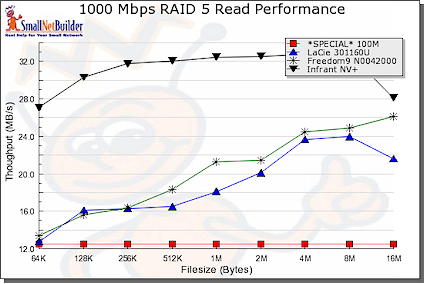
Figure 15: Read performance
On read tests, the NV+ again doesn’t get much of a boost from jumbo frames. But it still stays ahead of both the EDR and freeStor.
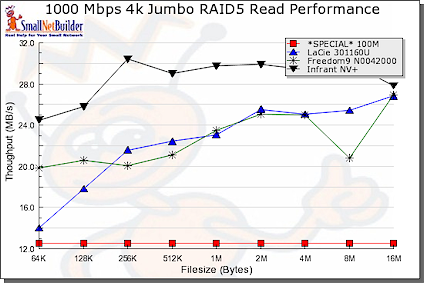
Figure 16: Jumbo frame read performance
While the EDR does pretty well with small filesizes, it ranks near the bottom of tested NASes for large file size writes with an average throughput of 5.6 MB/s for 1000 Mbps RAID 5 and 7.9 MB/s for 1000 Mbps 4k jumbo frame RAID 5.
For other comparisons and tests, check out the NAS charts.
Final Thoughts
For a “1TB” NAS, a typical RAID 1, RAID 5 + Spare or RAID 10 configuration is going to yield only somewhat less than 500MB of usable storage. Given its high price, the Ethernet Disk RAID probably isn’t targeted at the home market. So I didn’t find the lack of web and UPnP AV servers and download clients particularly disturbing. That’s a lot of money for the number of usable gigabytes, but fault tolerance comes at a (high) price. And in a small business environment, data availability is a key consideration.
I was disappointed by some of the small issues encountered, such as email notification not working properly, lack of FTP session logging, the inability to update the SSL security certificate, and lack of administrator session timeout. But those shortcomings wouldn’t be enough to keep me from considering the Ethernet Disk RAID for an SMB environment.

