Introduction
| At a Glance | |
|---|---|
| Product | Qnap Turbo Station 9-in-1 NAS server |
| Summary | BYOD single drive SATA NAS with Gigabit Ethernet and many serving options, and decent Gigabit performance |
| Pros | • Web server with PHP support • Gigabit Ethernet with Jumbo Frame support • RAID 1 support using external drive • Windows and MacOS support |
| Cons | • Backup application provided only for Windows • BitTorrent feature is Windows only • Limited U.S. availability |
Earlier this year I reviewed a full-featured Network Attached Storage (NAS) box from Synology that packed a lot of capabilities into a small footprint. Along with the normal features you’d find in a consumer-level NAS device, it also supported Gigabit Ethernet, external USB and SATA disks, had an impressive software feature set and clocked in with top-of-the-line performance.
In this review, I’ll take a look at a similar NAS box from Qnap that aims at the same power-user and small office market. The company’s TS-101 is billed as a 9-in-1 server that also supports Gigabit Ethernet and SATA drives, and comes loaded with an extensive software baseline.
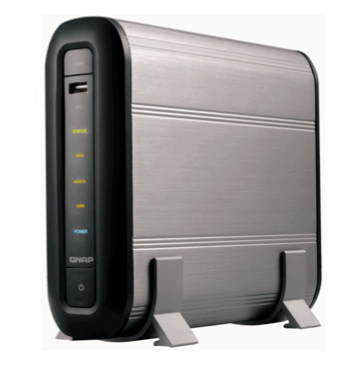
As I unpacked the box, I noticed that the styling of the TS-101 was a bit different from that of most boxes I’ve worked with in the past. The device had a more rounded look, it was slightly larger, and it was constructed of a heavy-duty aluminum, which gave it some nice heft. Along with a power cord and an Ethernet cable, two solid aluminum stands were included for support. The front panel sported a row of LEDs along with a power button, a “copy” button, and a single USB port. The back panel (see Figure 1) included two USB 2.0 ports, a 10/100/1000 Ethernet port, an eSATA port, a locking slot and a power connector.

Figure 1: TS-101 Back Panel
I noticed one thing missing: a fan vent. This box was designed to run without a fan, instead using the aluminum case for heat dissipation. The TS-101 is a bring-your-own-disk box, so setting it up involves installing a SATA drive. Qnap was kind enough to send me a unit with the drive already installed, but the included drive-installation instructions were complete and well written. Note that Qnap has a compatibility list (PDF link) of supported SATA drives; so check it before purchasing a drive.
Setting Up
Completing the hardware setup was just a matter of plugging in the power and network cables and powering the unit up. When the TS-101 booted, it was silent except for the noise of the drive spinning. Nice. Qnap supports installation from both Windows and Macintosh systems, so I first turned to my MacBook Pro. The instructions documented a couple of ways for an Apple user to initially connect to the device, but I found both methods a bit confusing.
The instructions were trying to get across the point that you needed to bring up your browser and connect to the box on port 6000. The hard part was figuring out the IP address. I just did a broadcast-ping for my network: “ping 192.168.1.255”. When I saw an unfamiliar IP address respond, I connected to it on the documented port of 6000 with my browser. Figure 2 shows the initial web page from the device.
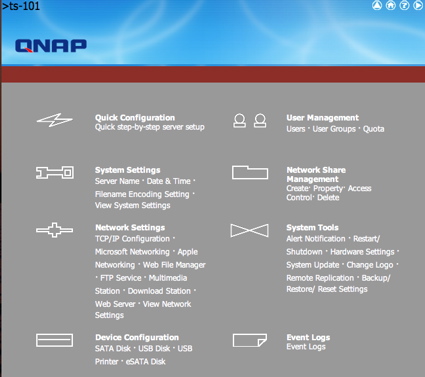
Figure 2: TS-101 Main Menu
I’m using a package from Parallels that allows me to run Windows XP simultaneously with Mac OS X, so I later tried out installing the TS-101 from Windows. In this case, Qnap provided a little utility that automatically found the device and walked through the initial setup, making the process a bit easier. Setting the box up with my browser under OS X stepped me through some standard initialization steps. Menus were presented for defining the name of the box, setting the administrator password, setting the network parameters, and so on.
When setting the time on the TS-101, I was pleased to see NTP support, as shown in Figure 3. There was also an option for selecting one of ten different languages for filename encoding.

Figure 3: Time setup screen
Features
Once the box was fully configured, I started exploring the advanced options. Like the Synology NAS, this device has too many options to fully explore in this review, but I’ll cover some of the more important ones.
The TS-101 has full support for defining users and groups of users, and restricting particular users both with read/write privileges and quotas. Figure 4 shows the basic user management screen. Qnap also provides full support for the creation and management of network shares.
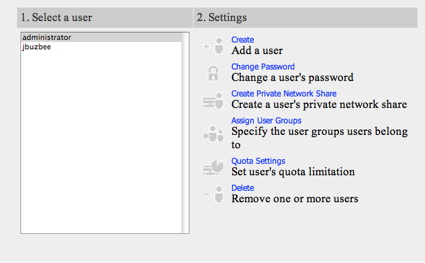
Figure 4: User Management
Figure 5 shows the basic screen, which allows the creation, deletion and access control of network shares. As shown in the figure, a number of shares are pre-defined.
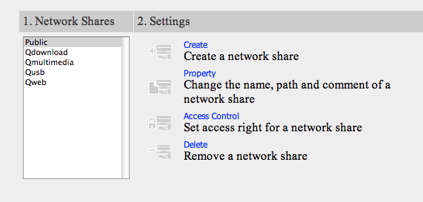
Figure 5: Share Management
One important feature I like to see on these boxes is logging. Figure 6 shows the basic log screen, where events can be filtered based on their severity.
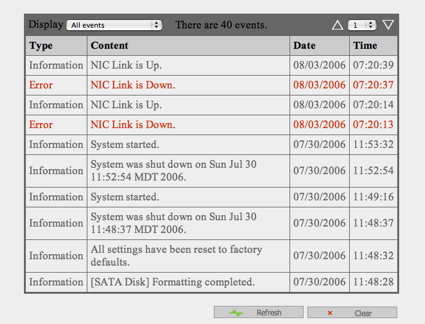
Figure 6: TS-101 Logging
In this case, the log is showing that my network connection quickly bounced up and down a few days ago. Odd. Along these same lines, the TS-101 also supports email notification of errors, as shown in Figure 7. During my review of the unit, the only non-test notifications I received were a couple of cryptic warnings: “Re-launch process [ImRd]” and “Re-launch process [btd]”.
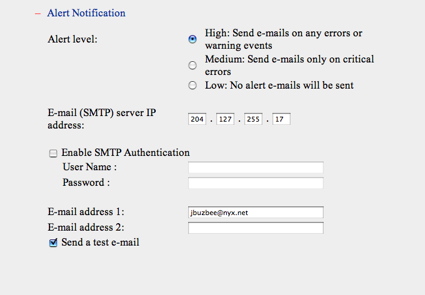
Figure 7: Alert Setup Menu
Features, Continued
Figure 8 shows the “Hardware Settings” page, where I was able to set up some interesting features, including the ability to auto power-on after a power loss. This is a feature I like to see, because it means the system will come right back up after a power blip. This menu also gave me the ability to set the spin-down time for the drive, which means that when the drive is idle, it will shut down to reduce both noise and power consumption.
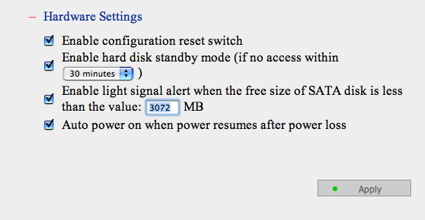
Figure 8: Hardware Settings Menu
The next option I explored was the “Remote Replication” feature. I assumed that this was a way to back the device up to another network disk, but I soon found otherwise. From the main menu, I entered the info for another NAS on my network, but no matter what I did, I’d get an error, as shown in Figure 9 “(Status: Remote destination path does not exist)”.
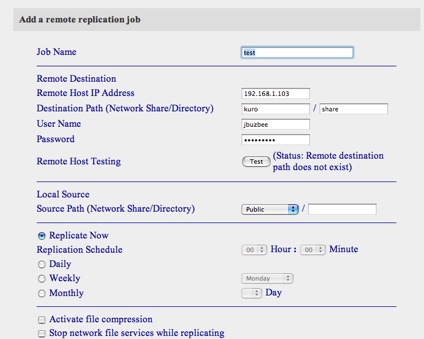
Figure 9: Replication Menu with Remote Host Test Failure
Turning to the manual, I found that this feature was really designed to back up one TS-101 to another. Since I only had a single TS-101 on my LAN, I moved on.
The TS-101 also has a built-in FTP server. Figure 10 shows the configuration page, where the server can be disabled or set to a non-standard port.
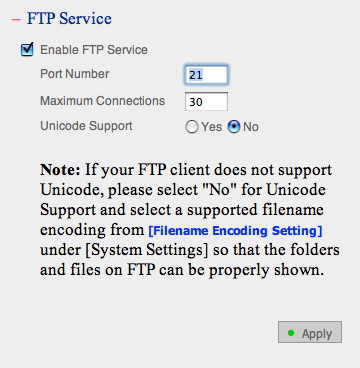
Figure 10: FTP setup menu
The TS-101 provides a web interface that allows you to access your files remotely using a web browser (see Figure 11).

Figure 11: Web Interface to file system
The next couple of features I’ll touch on are network backup and USB backup. For network backup, Qnap provides a Windows-only backup utility that allows you to copy data from your Windows system to a share on the TS-101. Figure 12 shows the main interface of the utility.
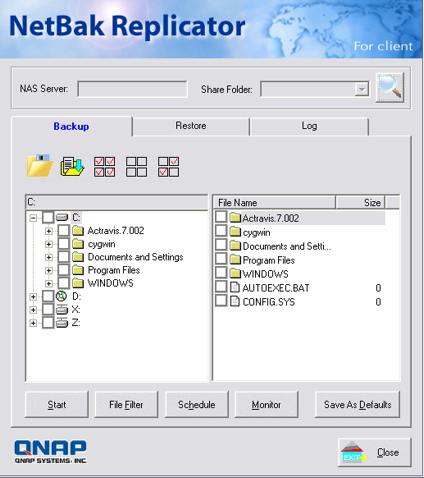
Figure 12: Backup Utility
Unfortunately, despite a number of attempts, the utility was never able to log into my TS-101 – even though I could interactively access the TS-101 myself under Windows using the same parameters.
The other backup utility that the TS-101 provides is “USB Copy”. The idea here is that you plug a USB disk device such as a thumb drive or an external disk into the front panel USB port, and then press the “Copy” button. My test of this worked well, with the exception that there was no visible indication that the copy was finished, so I didn’t know when I could remove my USB thumb-drive. Once the operation was complete, I found my copy in a new dated directory underneath the shared “USB” folder.
Features – BitTorrent, Multimedia, PHP Webserver
Finally, I wanted to explore some of the “9 in 1” server features that the TS-101 provided; one uncommon feature in the TS-101 is something that Qnap bills as a “Download Station”. This, it turns out, refers to the ability of the device to do automated BitTorrent downloads. Unfortunately, I couldn’t test this feature under OS X, because it is only supported using Internet Explorer. Instead I turned to my XP installation and brought it up.
Figure 13 shows a Linux Ubuntu download in progress. This feature seemed to work well – configuration settings were available for limiting bandwidth, limiting simultaneous downloads, changing ports, and so forth.
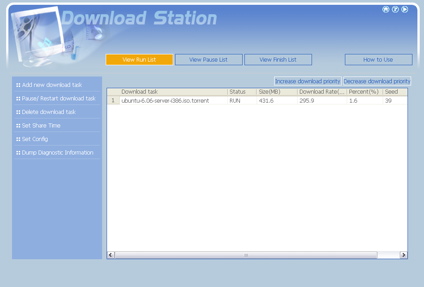
Figure 13: Download Station
When I saw that Qnap advertised the TS-101 as a “Multimedia Station,” I assumed that it would run a UPnP server like a number of other NAS are starting to do, but that’s not what Qnap had in mind. Instead, the multimedia capabilities referred to a built-in photo album application. When you deposit your digital photographs in the multimedia folder, they are automatically indexed, thumbnails are created, and a web page is generated. Figure 14 shows a page that was generated based on some of my photos, music and movies.
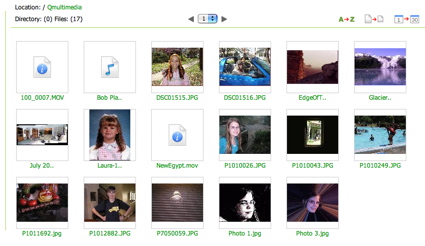
Figure 14: TS-101 Photo Album application
From this page I could view my pictures, cycle through a “slide-show”, zoom in, get info, and so on. The movies and music could be selected for playback in my web browser using standard browser plug-ins. The feature worked fairly well, but I guess I expected a bit more from a “Multimedia Station”.
The TS-101 also has the capability to act as a general-purpose web server with both PHP and database support. This combo gives the product the ability to be a powerful little LAMP-like server in a footprint the size of a toaster. Figure 15 shows the only configuration setting for this server. As noted in the figure, the database support is provided by SQLite.
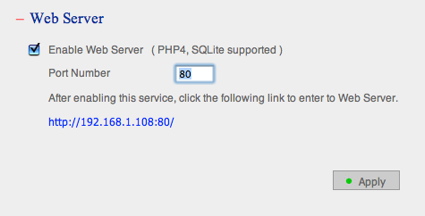
Figure 15: Web Server Setup
The default web page for this server gave a little information on how to upload files, but there was nothing on how to create and/or use the embedded database server, so if you are interested in this feature, you’re on your own.
The final interesting feature I’ll touch on is what Qnap bills as “Q-Raid”. This feature allows an external USB or eSATA drive to be used in a RAID 1 (mirroring) mode. This gives you extra data protection in case of disk failure. I wasn’t able to test this feature since I didn’t have a spare empty disk on-hand, but Qnap’s documentation makes it look fairly easy to set up and use.
Under The Covers
Figure 16 shows the main board of the TS-101. It’s hard to make out the identity of a couple of the chips, due to them being covered with thermal paste that created a seal between the chips and a bracket connected to the aluminum chassis. The CPU is from the Freescale PowerQUICC family. SATA support is provided by a Silicon Image 3512 chip; the USB controller from NEC is from the µPD720101 family; and the Ethernet controller is an Intel 82540EM.
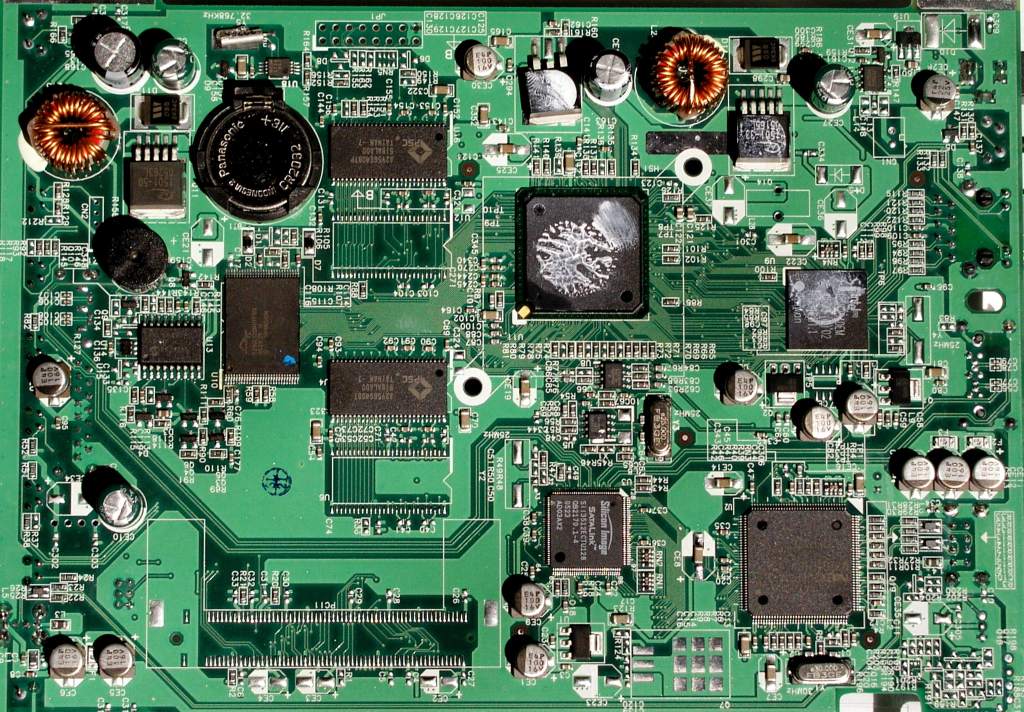
Figure 16: TS-101 Motherboard (click to enlarge)
When possible, I like to see what is going on inside a NAS under review. To this end, I started looking for a way to get command-line access so I could poke around. A network port-scan turned up nothing promising, so I turned to the web interface. The web file manager allows access to files and directories in the data partition, so I tried a trick I’ve had success with before. By tacking on a “/../” to the top-level directory URL, I’ve often been able to pop up into the operating system directories. Not this time – Qnap properly rejected my attempt to break out, so I kept looking.
Since the web server supports PHP, an obvious place to get access was with a PHP script. To try this out, I wrote a simple PHP script that took input from a form, passed the input on to an operating system shell, and printed the output. Success. Using this technique, I could execute arbitrary commands to see all sorts of details (see Figure 17).
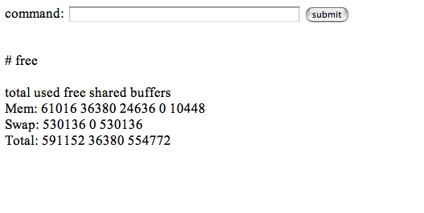
Figure 17: Custom PHP shell
Like nearly all consumer-level NAS devices, Busybox was heavily used, and the operating system was based on a Linux 2.6.12.3 kernel. Both Apache and thttpd webservers were in use, Samba and aftpd were employed for network file serving, and rsync was running for backups. The boot messages told me that 64 MB was installed, and the filesystem on the disk was ext3.
When I examined the set of running processes I noticed that the Apache web server, running under the “guest” account, was serving up user pages. According to the password file, which I could view (but not modify), this was an unprivileged account, so any command I executed through my PHP script would be executed as an unprivileged user. Surely I could do better than that! The thttpd web server, on the other hand, ran under the “administrator” user, which was a root (system level) account, giving it full access to the operating system. This server had no PHP support, so it was time to get a bit more creative.
Maybe I could give the guest account some more privileges. Turning to the account maintenance pages, which ran under thttpd, I noticed that I could assign users to the administrator group, but the “guest” user was not listed as a choice. I know that web designers often take a short-cut and do their user-input validation using Javascript inside the browser. This is a very bad idea, since there is nothing that says a user has to execute the validation scripts. By examining the source to the page I saw that I could manually set the required parameters, change one of the normal usernames to “guest,” and build up the CGI execution URL by hand.
Using this technique, and after a few false starts, I succeeded in adding the guest account to the administrator group. This meant that commands I ran from my PHP script would have administrator group privileges. This was an escalation of privileges, but I still didn’t have full access, so I needed to keep looking. Poking around some more with my PHP script, I noticed that the password file was writable by the users in the administrator group – this was an easy path to root using one more level of privilege escalation. Using a command executed from my PHP script, I copied the password file to one of my network shares, edited it so that the guest account had a user-id of 0 (root) and then copied it back. Now the guest user was the same as the root user.
Any command I now executed from my script would have the privilege to do whatever I wanted. I could install new software, modify the configuration of existing software, load new drivers, and more. Note that these steps required administrator access to start with, so this hack didn’t expose a vulnerability to standard users.
My success was a bit short-lived, however. I found that the next time I rebooted, the Apache web server failed to start. It evidently wasn’t happy starting up under a root-level account. Completing this little hack would have required additional investigation, and more time than I had at the moment, so I reinitialized the TS-101 back to its normal state and moved on.
Performance
To test performance, several tests were run using our standard NAS test procedure. Tests were run with 100 Mbps, 1000 Mbps, and 1000 Mbps with 4K jumbo frame network connections, using the version 1.2.0 Build 0626T firmware that came installed on the product. Figures 18 through 21 show the TS-101’s performance using a 64 kByte record size and file sizes from 32 MB to 1 GB, plotted along with comparable previously-reviewed products.
The TS-101’s read performance with a 100 Mbps network is at the bottom of the pack for smaller file sizes, but stays pretty even and moves to the middle for 256 MB and larger files.
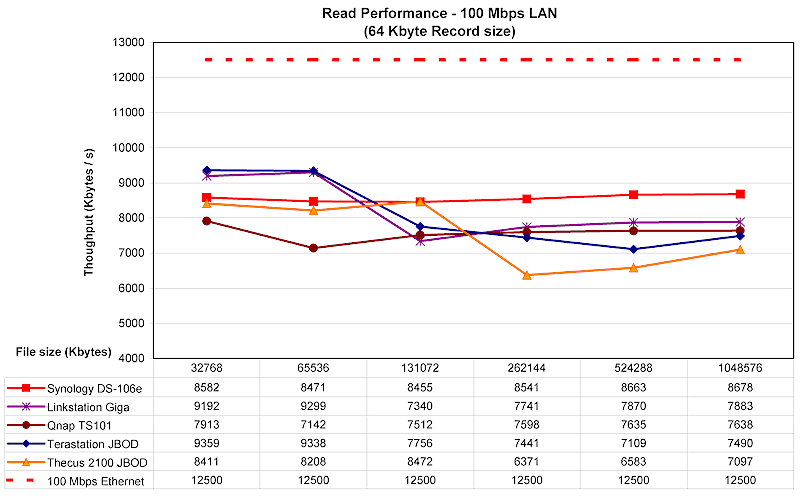
Figure 18: 100 Mbps Ethernet read performance (click to enlarge)
Middle of the pack is again the watchword for 100 Mbps write, which doesn’t experience the speed fall-off of the Buffalo Tera and Link Stations.
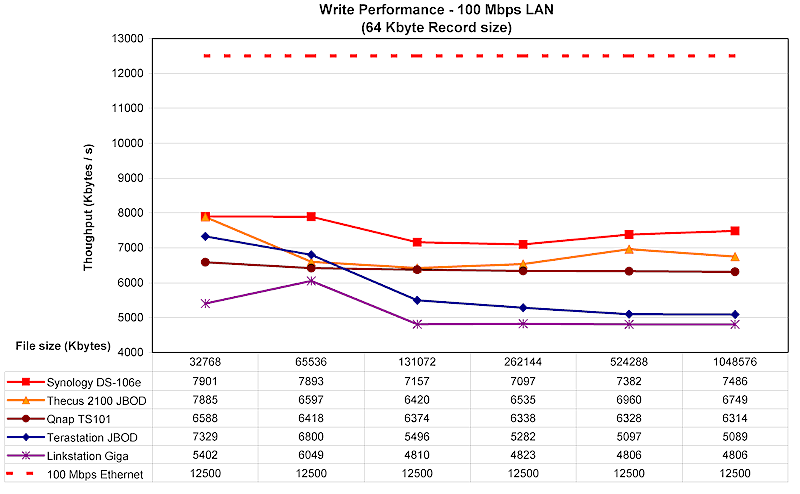
Figure 19: 100 Mbps Ethernet write performance (click to enlarge)
Performance with a Gigabit connection is more interesting. Figures 20 and 21 show three lines for the TS-101 representing normal frame Gigabit, 4K jumbo frame, and the “V0713” line. This last line represents the currently-released “20060713-1.2.0” firmware that Qnap released as testing was being wrapped up.

Figure 20: 1000 Mbps Ethernet read performance (click to enlarge)
Figure 20 shows that the current firmware really improved Gigabit read performance even without the boost that jumbo frames usually provide. Figure 21, however, shows that write performance doesn’t benefit at all from the latest firmware, and lets the Synology DS-106e claim top honors, at least among this group. For a more complete comparison of the various NAS devices we tested in the last couple of years, check out the charts located here.
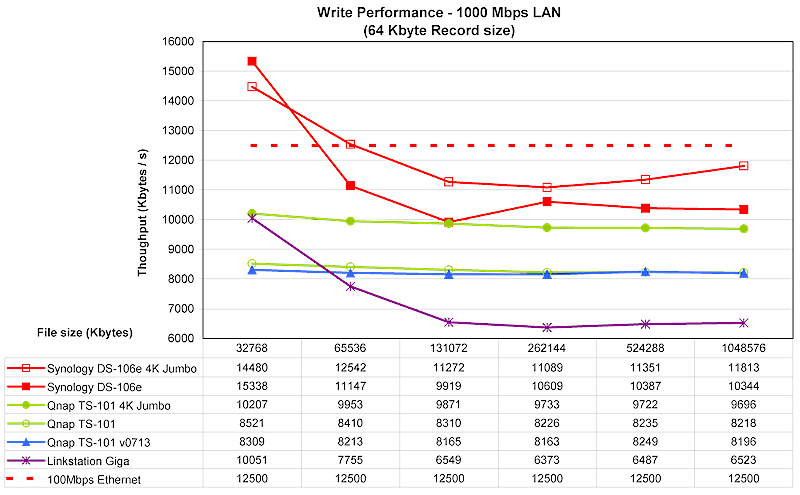
Figure 21: 1000 Mbps Ethernet write performance (click to enlarge)
Performance, Continued
To get a different perspective on performance, I tried an interactive file-copy test to see how the TS-101 might perform in real-world use. These tests were done with a different computer than the iozone tests. I used my old Dell Inspiron 1000, a 2.2 GHz Mobile Celeron with 320 MB RAM, running Win XP Home SP2. The results in Table 1 below are averages of multiple runs of moving a directory tree containing just over a gigabyte.
| 100 Mbps LAN | 1000 Mbps LAN | % change 100 to 1000 Mbps |
|
|---|---|---|---|
| Write to TS-101 | ~ 200 sec | ~ 148 sec | – 26% |
| Read from TS-101 | ~ 140 sec | ~ 86 sec | – 43% |
Table 1: File copy test results
These results show that reading benefits more than writing from using a Gigabit Ethernet connection.
Conclusion
I found the TS-101 to be a nice product to work with. Its performance was solid, it had a extensive feature set, and it was generally a well thought out product. The TS-101 was also the first NAS I’ve worked with that had support for using an external drive in RAID mode. This was a nice feature that gives users an additional level of data security. I also appreciated the fact that the TS-101 had a sturdy aluminum case and didn’t require a fan to operate. My attraction to NASes is largely based on low noise and power usage, so the quieter the better.
On the other hand, the product did have a few rough edges. While the documentation was well written overall, there were sections that could have been better. And while I appreciated the basic support for Apple systems, I was a bit disappointed to find that both the “Download Station” and the backup utility were Windows-only.
Since their basic features sets and prices are almost identical, I thought it would be interesting to compare the Qnap TS-101 to the previously reviewed Synology DS-106e.
The DS-106e had a number of advantages over the TS-101, the first being performance. Our performance tests aren’t 100% comparable since the disk drives used were not identical, but the fact that the DS-106e bested the TS-101 in most tests is a pretty good indicator that the DS-106e is a better performer. The only tests where the TS-101 beat the DS-106e were in the gigabit read measurements, which could be due to the TS-101 having twice the RAM of the DS-106e.
Multimedia-wise, the DS-106e also bested the TS-101. Both had a nice photo-album feature, but the DS-106e supported the UPnP protocol as well. As far as database support, the DS-106e used the full-featured MySql while the TS-101 used a less powerful Sqlite – however, depending on your needs, the reduced memory requirements of Sqlite may be a benefit. As mentioned just above, the TS-101 had 64 MB while the DS-106e only had 32, which should benefit performance in certain areas.
As far as the TS-101’s advantages, its RAID 1 support was not matched by the DS-106e, and its fanless design is definitely a plus.
In general, both products were powerful, full-featured NAS devices that would be nice additions to any home or small-office network. But the Synology DS-106e’s advantages mean that Qnap still has some work left to do on the TS-101.