Introduction
Sony Ericsson M600i
In the electronic world these days, the emphasis is on convergence, but placing all your functionality into a single device isn’t always a good thing. A pet peeve of mine has been the addition of cameras and music-playing capability in phones. My old Nokia 6230 had a camera that I used only twice in a little over two years, and although it seemed great at first, its music feature was also used only a couple of times.
When I looked for a replacement phone, camera and music features were at the bottom of my "must-have’s" list. The staff at the various shops thought I was a bit odd after I told them! Am I the only person who thought this way? I hope not! When I wanted to listen to music, I used my iPod; when I wanted to take a picture, I used my Canon Ixus; when I wanted Sat Nav (satellite navigation) during a drive, I used my TomTom.
Still, convergence is not all bad. I think Media Centers are brilliant, and nowadays, I couldnÂ’t live without my Windows Media Center Edition (MCE). Also, the ever-growing PDA-functionality of phones isn’t being utilized enough by us.
Considering that you always carry your phone with you, wouldn’t it make sense to have all your contacts, your calendar, and maybe even your email with you as well? It’s true that phones have had such features for some time now, but they have only recently become an integral part of the phone rather than an afterthought.
But how to keep contacts, calendar, and emails all in sync? When I purchased my new Sony Ericsson M600i, its software for drivers and synchronization weighed in at a whopping 120 MB! Adding insult to injury, the software slowed my entire computer down and recognized only about half the time when my phone was plugged into the USB port. In addition, every time I got home or back in the office, I also had to remember to plug in the phone or turn on Bluetooth.
To simplify my life, I set out to find a way to keep my information and devices synchronized with the following requirements in mind:
- The solution must be free. You canÂ’t beat the value for the money.
- The solution must enable me to sync anywhere and at any time.
- The solution must use a minimal amount of data, since I’m charged at the slightly exorbitant rate of around $4.50/Mb for any amount over my monthly 3 Mb GPRS allowance.
Fortunately for us, a few years ago some forward-thinking people formed the Open Mobile Alliance, an organization that set out to create a set of open standards to facilitate the synchronization and management of mobile devices in all their forms.
Originally called SyncML, the standard had its name changed recently to the slightly less catchy "Open Mobile Alliance Data Synchronization and Device Management" (OMA DS and DM).
Like all good open standards, numerous implementations exist, but the project called "Funambol" (formally known as "Sync4j") caught my eye. A mature, powerful, Italian and American project, it comes highly recommended and offers commercial and open source editions of the product.
Excellent documentation, covering both Windows and Linux installations, exists for the Funambol project. There are also client plug-ins for many devices (including the iPod!) that come with excellent documentation. The important ones to note are the server and Outlook instructions.
In this article, I will introduce Funambol, some of its features, and details to get you up and running. My assumption is that you’re an individual who has an Internet-facing server and wants your schedule to stay up-to-date or you’re a small company that wants to keep the field staff in sync with the office.
I’m also making the assumption that your phone has SyncML (since nearly all mobile phones manufactured in the past three years have the functionality), and that you use Windows clients with Microsoft Office Outlook. Note that the device management side of things will not be addressed in this article.
One last note before we begin: although free services are available that can perform these tasks—one of these services being Mobical, which worked well when I played with it briefly—the article is for people who like to get their hands a little dirtier!
Funambol DS Server Installation and Setup
The Funambol DS Server installation was surprisingly easy. I installed it on a headless Debian server with a 2.6.17 kernel. Although, I had set aside the whole day to get the product working, I was up and running within an hour, since the required packages and relevant documentation were kindly bundled into the download.
First, browse Funambol’s Download page for the latest version of the installation bundle to download. In my case, after checking the page, I downloaded the PIM & Email Bundle v3.0 for Linux by issuing the following command from the command line on the server:
wget http://download.forge.objectweb.org/sync4j/funambol-3.0a.bin
Since the instructions Funambol provided with the bundle are excellent, I do not want to repeat too much of the information in this section. Essentially, at this point, run the install script that you have downloaded earlier. For example, I ran the script by issuing the following command:
sh funambol-3.0a.bin
Then, follow the screen instructions. During the installation, you will be asked to specify the directory in which to place the software. You may want to place the software in a directory such as /opt/ instead of the default location. If you accept the default location, the software will be installed in the current directory.
Now, start the server. For example, my software is installed in the /opt/ directory, so I would start the server by issuing the following command:
/opt/Funambol/tools/bin/funambol.sh start
By default, the Funambol DS Server doesn’t automatically start when you start your server. You must perform several steps to make the Funambol DS Server start every time your server is powered up or rebooted.
First, copy the startup script into the /etc/init.d directory using the following command:
cp /opt/Funambol/tools/bin/funambol.sh /etc/init.d/funambol
Next, change the file so that it points to the absolute location of your installation. Using your favorite text editor, change line 4 in your new file from
BUNDLE_HOME=`(cd../.. ; pwd)`
to
BUNDLE_HOME=`(cd /opt/Funambol ; pwd)`
Then, create a symbolic link to your rc3.d directory by issuing the command:
ln -s /etc/init.d/funambol /etc/rc3.d/S30funambol
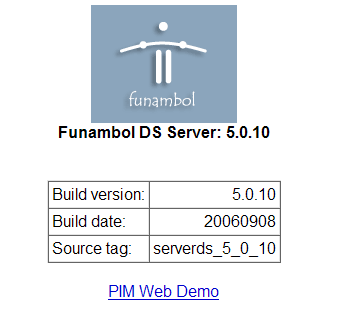
Afterwards, you can verify that the Funambol DS Server is running by directing a web browser to http://<servername>:8080/funambol. The page shown in Figure 2 should display with the Funambol DS Server version number when you successfully connect.
NOTE: Make sure you open port 8080 on your router/firewall to the IP address of the funambol server if you want to access the server from the Internet. Also note that by exposing this commonly-used port that your IP address will be constantly probed and the target of continuous exploit attempts. So be sure that your server is tightly locked down with no unnecessary services running.
Figure 2: Funambol DS Server Information screen (click image to enlarge)
Funambol Administration Tool Installation and Setup
After installing and setting up the Funambol DS Server, we need to install and start the administration tool, an interface which will allow us to manage the server.
I got the Funambol Admin Tool for Windows, which was listed under the USEFUL INDIVIDUAL PACKAGES section of Funambol’s Download page. After the download, I basically followed the instructions given by its Windows installation.
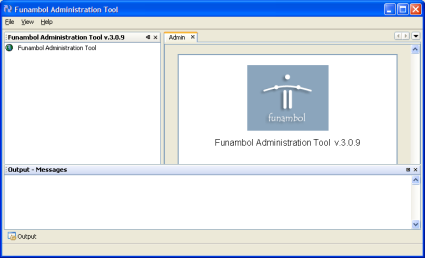
After loading the program, the main Funambol Administration Tool panel will appear. Figure 3 shows the panel with its three panes.
Figure 3: Funambol Administration Tool panel (click image to enlarge)
Before you can perform administrative tasks, you must first login to the server. Double-click the only node that appears in the left pane. Figure 4 shows the Login screen which will display.
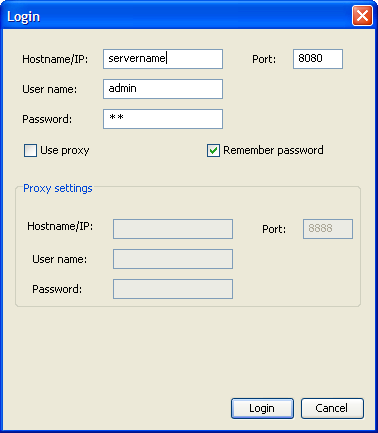
Figure 4: Login screen
Enter your server name. The default password is "sa".
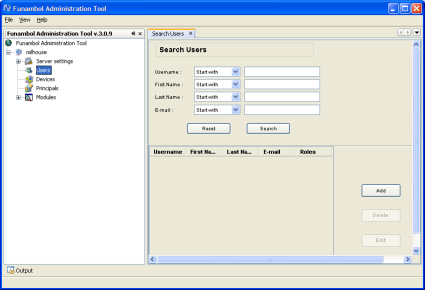
Assuming that you manage to connect, you will now be able to explore your server. Figure 5 shows the Search Users panel that is displayed when the Users node is selected in the navigation tree.
Figure 5: Funambol Administration Tool’s Search Users panel (click image to enlarge)
For basic use, there isnÂ’t really much you need to do at the moment. The application instructions cover it in more detail, but basically the three nodes you need to be familiar with are Users, Devices and Principals.
The first two are straightforward, but Principals is the link between Devices and Users since you can have multiple devices to a user and vice versa.
At this point, I found the easiest thing to do was to choose a username and password; then, connect to the server with my two clients. After this completed, the principal was automatically created to link them.
Funambol Outlook Plug-In Installation and Setup
The Funambol Outlook Plug-In allows us to synchronize Microsoft Outlook with various data. Get the Funambol Outlook Client Plug-in that is listed under the CLIENT PLUG-INS section of Funambol’s Download page.
After the download, follow the instructions given by its Window installation, but be warned that you must be logged in as an Administrator. Also, the software does not yet support multiple-user machines (this is scheduled to be fixed soon).
After completing the installation, you will see a new icon in your Outlook toolbar and a new icon in your Start menu. Load the client from the Start directory and you will see the Outlook Plug-in screen. Figure 6 shows the Main menu and the Synchronize button available on the Outlook Plug-in screen.
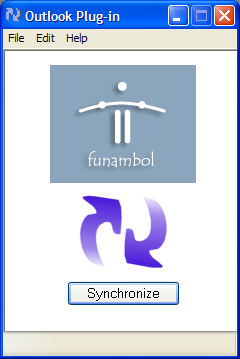
Figure 6: Funambol Outlook Plug-in screen
From the Main menu, select Edit-> Communications Settings. Figure 7 shows the Communications Setting screen.
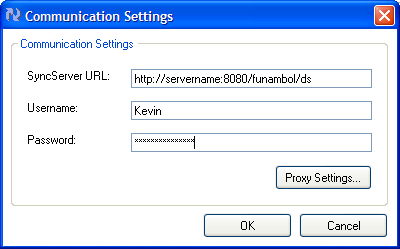
Figure 7: Communication Setting screen
Type in the server name, username, and password you would like to use. These will be stored on the server on the first connect; therefore, make sure you make a note of what they are, and remember the username is case-sensitive!
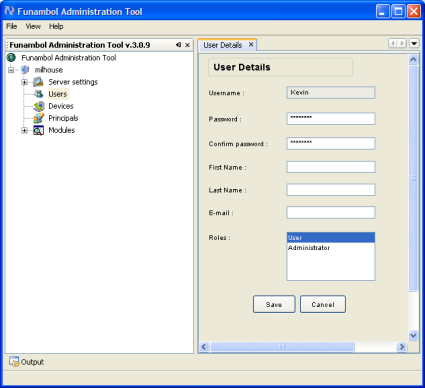
Click OK and then press the Synchronize button. Once synchronization has finished, go back to the Funambol Administration Tool and refresh the users. You should see the user you just created, and also the devices, which should also show Outlook. Double-clicking your Users node will bring up a User Details panel, as shown in Figure 8, with some more options that you can fill in if you want.
Figure 8: Funambol Administration Tool’s Search User Details panel (click image to enlarge)
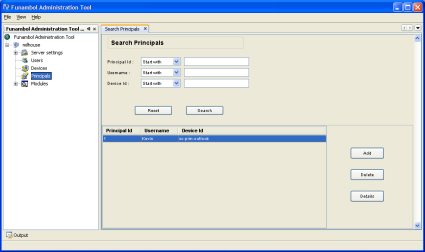
The process should have also created a Principal to link your Outlook account and your user. Figure 9 shows a Search Principals panel.
Figure 9: Funambol Administration Tool’s Search Principals panel (click image to enlarge)
Once this all works successfully, you will probably want to schedule Outlook to synchronize every few minutes. To access Scheduler Settings, select Edit->Scheduler Settings.
Device Synchronization With SyncML
Now you are ready to synchronize with your mobile device. IÂ’m not going to go into very specific details here because devices vary a lot; however, I will be using my Sony Ericsson as a template.
First, ensure that you can connect to the Internet. Load up your browser and go to Google or a Web page you know works that isnÂ’t part of your service provider’s "walled garden."
Next, you need to find some kind of menu option that covers SyncML. On my M600i, it was under Tools->Remote Sync. On my Nokia 6230, it is in Organizer->Sync. An example of a SyncML menu is shown in Figure 10.
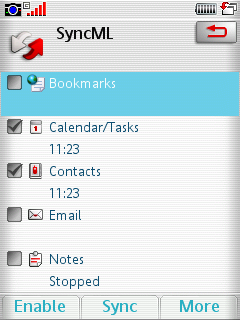
Figure 10: SyncML menu on the M600i
First, I created a profile called "SyncML" as you can see from Figure 10. Then, I had to decide what I wanted to sync, and I chose Calendar/Tasks and Contacts. I could also choose Bookmarks, Email and Notes, but none of these were of interest to me.
Next, you have to create a profile. Pertinent bits of information you will need are:
- Server name: http://servername:8080/funambol/ds
- User name & password: the one you chose during setup (donÂ’t forget the username is case-sensitive)
- Transport protocol: HTTP.
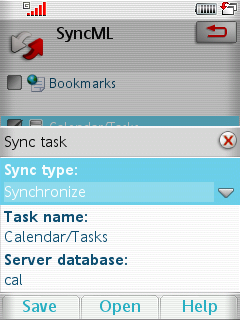
Figure 11: SyncML Profile Creation
Now for each of the items you would like to sync, you must specify the name of the database that they are stored on in the server. I had to select each item and choose the Edit Sync task. The sync type should be set to Synchronize and the following database names should be entered:
- Contacts: card
- Calendar/tasks: cal
- Notes (should you want them): note
Again, remember these are case-sensitive. Once you have completed the steps, save your settings and attempt your first synchronization. Your phone should connect to the Internet and then sync with the database. This may take some time on the first attempt as it will have a lot of data to receive. After this initial time, it should be much quicker as it will only send and receive the differences.
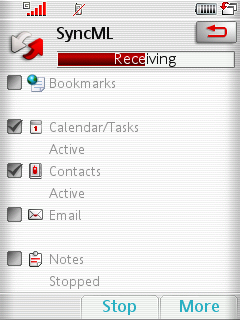
Figure 12: Sync Progress
Once this has completed, go back to the Funambol Administration Tool . Upon refreshing the devices, you will see that you have a new phone device that will have an ID of your phone’s IMEI (International Mobile Equipment Identity) number.
TIP: If you would like to check what your phone’s IMEI is, type *#06# into it, and it will be displayed.
Now, try adding an appointment on your phone, and then sync it with the database. After a couple of minutes and your appointment will "auto-magically" appear in Outlook.
And that is essentially it! We have now covered the basics of synching your devices, which should be enough to get you started with slightly more advanced things. You can even create your own connectors which enable you to sync any information source if you wish; the world is your oyster!
Push Email
I was also interested in playing with my new phone’s push email feature. Although I donÂ’t really have the kind of job where it is essential, I thought that it would be nice to see if I could get it working without paying my service provider for the privilege. I was also intrigued as to how it actually worked. Unfortunately, I was not entirely successful in getting it to work, but I will walk you through the theory as you may have more success.
If you have ever used pull email on your phone, you will probably be aware of the IMAP (Internet Message Access Protocol) protocol, which basically synchronizes the headers of emails so it generally doesnÂ’t store much locally. Using the IMAP protocol means that the client must poll the server every few minutes and "pull" the email down.
If you think about what is happening behind the scenes, you can see that there is a reasonable amount of traffic involved: open a connection, find the server, attempt to log in, send the username, send the password, ask if there are any new messages, and finally, close the connection. If you were to set up your phone to perform these tasks every few minutes, over the course of the month, you will have a pretty hefty data bill!
The IDLE command in IMAP essentially reduces drastically the amount of data that is required to check email. Some people say that this isnÂ’t strictly push email, but I will leave this up to you.
This is how it works: the client opens up a connection to the server in the usual way, but then instead of closing the connection, it leaves it open and tries to keep the connection open. Now the server essentially has an "always on" connection to the client, so when an email arrives, it can push it down to the client immediately.
But because connections generally have a time-out associated with them, the client must keep the connection alive using a "heartbeat" or keep-alive method. All it has to do is send a couple of bytes a little more often than the connection time-out, and presto, push email! Neat huh?
If you would like to find out whether your email server supports IDLE, telnet to it. Here’s a sample telnet session:
telnet mail.myisp.com 143
Trying mail.myisp.com…
Connected to example.com.
Escape character is ‘^]’.
* OK [CAPABILITY IMAP4rev1 UIDPLUS CHILDREN NAMESPACE THREAD=ORDEREDSUBJECT
THREAD=REFERENCES SORT QUOTA IDLE ACL ACL2=UNION STARTTLS] Courier-IMAP ready.
Copyright 1998-2005 Double Precision, Inc. See COPYING for distribution information.
From the example, you can see that this server supports IDLE (sixth line in the example).
In my client software on my phone, I had an option for IDLE (Figure 13), so I checked it. I set up my server information and my phone connected to the Internet, and then downloaded my email and remained connected to the Internet. If I sent an email then to my phone, it would appeare instantly! Brilliant!
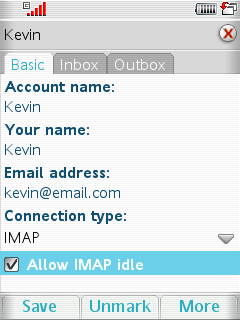
Figure 13: SyncML Option’s Basic Tab
So why didnÂ’t it work properly? Well, the main problem was that my service provider doesnÂ’t much like permanent Internet connections to their network, so they have a time-out as you would expect. This shouldnÂ’t be a problem as the heartbeat from the IDLE protocol should keep the connection open; however, as I found out, there was no way of setting how often the heartbeat should be sent on my phone.
Unfortunately it would appear that the default is longer than the time-out on my network! So essentially once the time-out "kicked in," my email stopped appearing. Despite lengthy phone calls to Vodafone and Sony Ericsson, nobody seemed to know what they were talking about, and their conclusion was that if I wanted push email, I was going to have to pay for it.
So a slightly disappointing end to the exercise, but one that proved very insightful. Perhaps you, the reader, can give this a "go," and discuss your successes (or otherwise) in the Comments. Unfortunately, I could find very little information about it on the Internet that would help, but by all means give it a try!
So there we have it, two free solutions to a potentially expensive problem; one definitely successful, the other slightly less so. But who knows? Perhaps it will work for you!

