Introduction
A mobile user relying on public Internet access has to accept certain inherent risks. Unscrupulous individuals can intercept and record your traffic, or even interpose themselves into the session, taking the place of any party. Your traffic can also be blocked or filtered at will, with little notice.
While these risks can never truly be mitigated, measures can be taken that reduce the potential for harm. This article will show you how to use two applications, Hamachi and Squid, to set up a secure connection to a web proxy that can be used for secure web browsing no matter where you are.
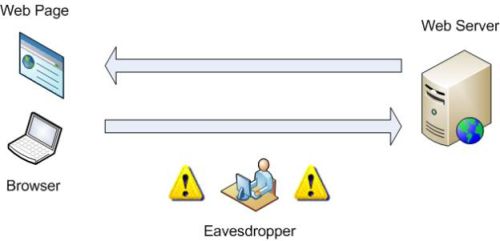
Figure 1: In-the-clear browsing can be monitored
Figure 1 is a simplified diagram of
normal Internet traffic, in this case HTTP. A user’s Internet browser sends a
request for data to a web server, which then replies with the data
requested. The Eavesdropper, an individual who gains access to the session traffic, is able to obtain passwords transmitted in plaintext, all without the knowledge or consent of the user.
If a wired connection is used, the Eavesdropper must have physical access to the network being used. A wireless network, however, such as a public Wi-Fi Hotspot can be monitored from afar with no physical connection.
Today, most e-commerce sites rely on SSL to encrypt passwords. But there are still many sites in use (forums and blogs being the most prevalent) that provide easy pickings for anyone with basic competency in packet sniffing. Although it would be ideal to have every site engage in secure communications with its users, the reality is that the responsibility of safeguarding credentials is too often placed squarely on the user.
If a secure session cannot be established between a site and user, the next best solution is to secure at least part of the connection. This is illustrated in Figure 2.
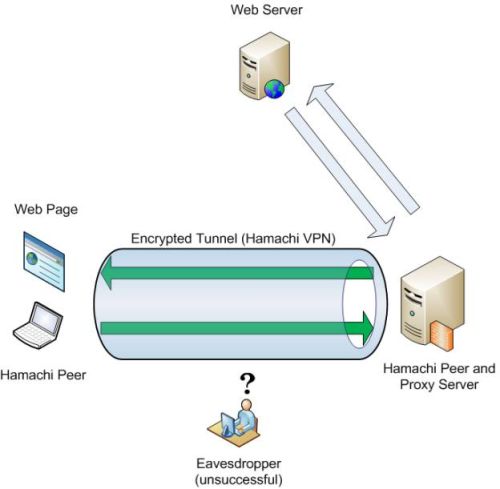
Figure 2: Secure connection to a Proxy server
Figure 2 illustrates the data flow of a user relying on VPN to traverse an untrusted network. Instead of querying the web server directly (as in Figure 1), the Internet browser forwards the request to a proxy server, which then conducts a session with the web server on the client’s behalf.
Communication between the client and proxy (which should be all the HTTP traffic) is routed through the tunnel established by VPN software (Hamachi). Since this tunnel encrypts traffic passing through it, Eavesdropper is unable to obtain any plaintext data. Without the ability to read traffic, the risk of someone hijacking the session is sharply reduced, resulting in an overall improvement in security.
Install & Configure Hamachi
There are numerous VPN solutions
available, both free and commercial. For this project, we will be using the
free version of Hamachi. Hamachi,
a product of LogMeIn, Inc., is a peer-based VPN
implementation. Clients are grouped into “networks”, in which each member of a
network establishes a connection with its peers. This differs from the standard
client-server model, where if the server goes offline, clients are unable to communicate with each other.
There are benefits (and drawbacks) to each design. But for this task, Hamachi will be more than sufficient. You will, however, need at least a working Internet connection and two computers. Hamachi supports Windows, Linux, and Mac OS X , but I’ll provide instructions for Windows clients only.
To establish a Hamachi network, you’ll need to first download and install the Hamachi software on what I’ll refer to as the "Primary Client". This must always be running in order for you to log into your secure network. You can use the supplied nickname (derived from the hostname) without issues, since Hamachi relies on IP for uniqueness. Changing it (now or later) won’t disrupt anything, so feel free to do so if you are inclined.
You next need to create a network and specify a password. Basic network tasks are located in the appropriately titled “Networking Menu”, which is accessed by the three node button located at the bottom right of the Hamachi window (Figure 3).
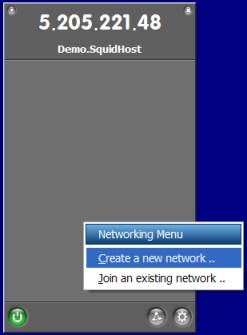
Figure 3: Main Hamachi window
You should be greeted by the configuration screen shown in Figure 4.
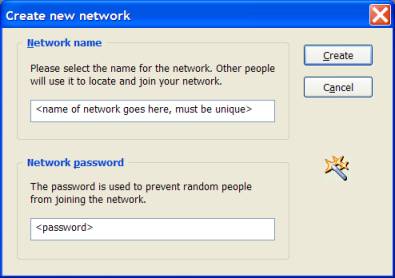
Figure 4: Creating a new Hamaci network
This is where you create the
unique network that your peers will be grouped together in. Peers can be
members of more than one network, but only members of the same network can communicate with each other.
You’ll then need to install Hamachi on the machine(s) that you’ll be using to browse the web and join the network (option also found in the Networking menu) started by the Primary Client (Figure 5). The network name and password were specified on the Primary Client during the network creation process.
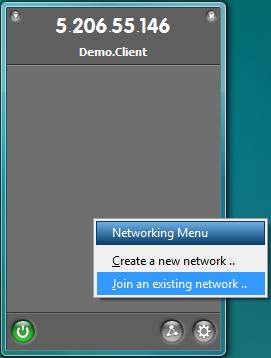
Figure 5: Joining an existing Hamachi network
Once this is done, your Hamachi window should look something like Figure 6, with online peers displaying a green circle or star (more on that later) next to their Hamachi-provided IP.
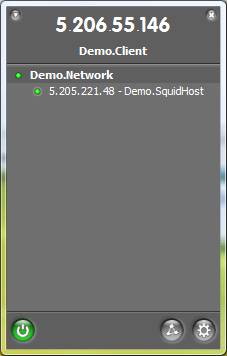
Figure 6: Hamachi network join complete
The next phase is to configure a proxy on one of the clients.
Install & Configure Squid
Hamachi can provide a secure path to a trusted network, but as shown in Figure 2, it is only part of the safe browsing solution. Squid is a free, widely-used web cache/proxy server. Although very configurable (almost to the point of intimidation), Squid can be up and running with only a few minutes of tweaking. Follow these steps:
1) Download Squid (the Windows binaries can be found here). There is no installer, only a zip file, so Squid requires manual extraction. I recommend (and will make the assumption) that Squid be copied to C:\squid.
2) Rename the three configuration files, located in C:\squid\etc\, removing the .default extension.
3) The squid.conf file will have to be customized for your needs. This can be done inserting the following lines (line placement specified in the squid.conf comments):
acl Hamachi src 5.0.0.0/255.0.0.0 (adds a Hamachi group, defined by the
5.x.x.x network)
http_access allow Hamachi (gives the Hamachi group permission to use the proxy)
visible_hostname any_hostname_you_specify (gives the proxy a name to report errors with)
Alternately, you can use the squid.conf I’ve tailored for Hamachi usage, available for download here.
4) To verify that everything works, open command prompt as an Administrator and type the following:
cd\squid\sbin
squid -z
If everything works, it should say Creating Swap Directories, pause for a moment, then terminate. Now run squid again, this time without the -z parameter (Figure 7). Leave the command prompt window open and begin the next step, client configuration.
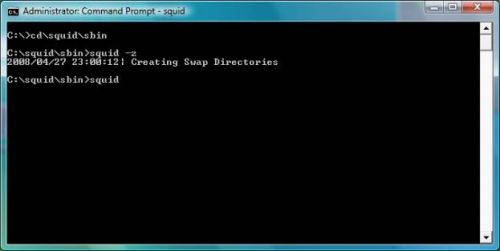
Figure 7: Starting squid
NOTE: Since Squid doesn’t use the command prompt to notify you of successful operation, at first glance it appears the Squid process has stalled. Don’t worry, it’s still running.
Client Configuration
After the previous installs, this section should seem like a cakewalk. Now that we have a connection established between two peers in Hamachi, and a proxy server operational, the non-proxy system (the one we’ll use to actually browse the web) must be configured to forward HTTP requests to the proxy.
All web browsers can be configured to use a proxy. I’ll show you how to configure Internet Explorer 7 as an example.
First, navigate to Tools, Internet Options, select the Connections Tab, and click the Lan Settings button.
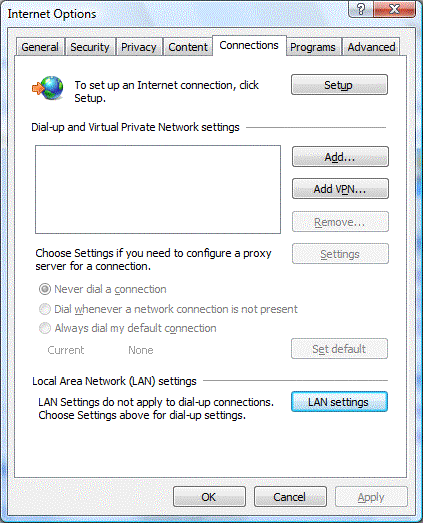
Figure 8: Windows Internet Options Connections properties
The window shown in Figure 9 should be displayed:
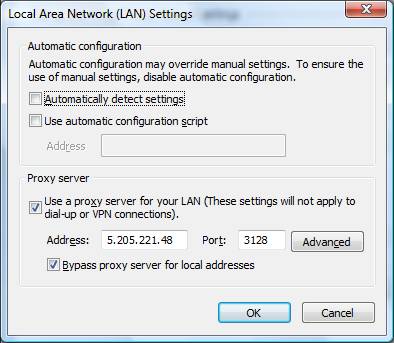
Figure 9: Setting the proxy
Make sure the bottom two boxes are checked. The Hamachi IP of the system running Squid goes in the Address box, and the port should be 3128 (Squid’s port by default, provided it hasn’t been modified in squid.conf) Hit OK and close the Internet Options window.
Now test your configuration by visiting www.google.com. More than likely, there will be a long delay as Squid fetches the page. Wait times will decrease for repeated viewings (as early as the second visit) as Squid builds up its cache.
To verify that the proxy isn’t being bypassed, go to www.dnsstuff.com. If your proxy is operational, the “Your IP field” (top left of page, Figure 10) should list the IP of the proxy server (or your WAN IP if you rely on NAT) followed by the Hamachi IP of the client in brackets.
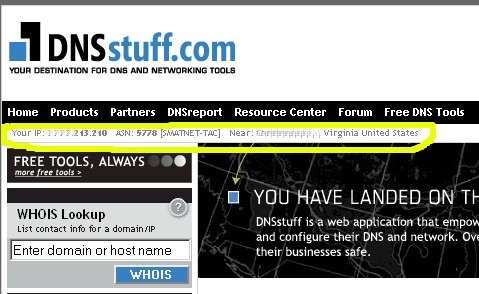
Figure 10: Finding your WAN IP
If everything works, that’s all you need to do to use the proxy. There are measures that can additionally be taken to improve the resiliency of the network, which are covered in the “Improvements & Conclusion” section.
Troubleshooting
If you are having problems getting clients to communicate with Squid, the likely culprit is a overzealous firewall. Due to the myriad firewall/client combinations out there, it’s impossible to create a workaround for them all, but basic troubleshooting can pinpoint the issue.
The first step would be to disable the firewall on both peers and retry the proxy. If the proxy works, turn the firewalls back on and begin modifying the rules to allow Squid to function.
The problems I’ve encountered to date are due either to 1) the firewall on the peer running Squid refusing incoming connections from any host, or 2) the host’s firewall running Squid does not allow the application to access the Internet. The former can be resolved by adding a port exception for TCP 3128 (default Squid port) and the latter by adding an exception for the Squid proxy application.
The Hamachi application is very NAT-friendly. In the vast majority of cases, creating a network is accomplished without any snags. However, there is a possibility that, upon startup, Hamachi will choose to use the browser proxy (instead of the Internet) to establish the initial connection with the Hamachi authentication servers. Since a connection must already be established to use the proxy, this results in failure.
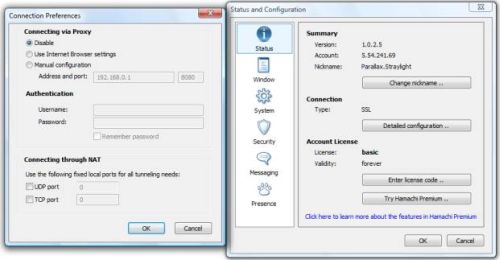
The solution is to configure Hamachi to not use the browser’s proxy to connect to the Internet. Click on the System Menu (the “gear” button located at the bottom right of the Hamachi window. Choose Preferences, then in the Status Tab click on Detailed Configuration.
Once there, choose “Disable” in the Connecting via Proxy list, then click OK and close the Status and Configuration window (Figure 11). This will force Hamachi to access the Internet directly when communicating with the Hamachi servers.
Figure 11: Setting Hamachi to not use the proxy connection
If NAT issues prevent peers from connecting, the Detailed Configuration/Connection Preferences window also allows you to specify static ports for incoming connections, which should then be used to configure the NAT device.
Even if Squid and Hamachi are
configured properly, there are situations in which a proxy may not function
properly, and even stop you from using the Internet. Some schools and hotels
rely on a device called a transparent proxy. This type of proxy is used to intercept
all HTTP traffic and redirect the user to a page of the owner’s choosing. This is usually done to force the user to
acknowledge and accept the owner’s Acceptable Use Policy (AUP) before accessing the provided resources.
Since our solution relies on encrypted traffic, the
transparent proxy is unable to function, which often results in a denial of all
traffic. The workaround for this is to configure the browser to bypass the
proxy, then allow the initial request to be redirected. Once access to the Internet has been granted, the proxy can be reactivated.
Improvements & Conclusion
If you followed the instructions to the letter, you should have a Hamachi network with at least two peers, one of which is running Squid. This is sufficient for temporary operations, but there is potential for disruption. If someone were to close the command prompt window running Squid, the proxy would be knocked offline, leaving remote users without safe HTTP access. If, on the Squid system, the user is logged off or the system rebooted, Hamachi will not be online until the user logs on again.
This may not be an issue for an afternoon trip. But if the user is overseas, it may be days until connectivity is restored. The easiest way to mitigate these issues is through the use of services. Services are programs that run without requiring user intervention, usually in the background. By eliminating the need for user intervention, the system needs merely be turned on and connected to the Internet to work.
Hamachi Premium (the pay version, clients of which are marked with a star) grants you the option of running Hamachi as a service, and provides a trial period for basic (free) clients to upgrade. If you are traveling and predict a system reboot during your absence (Microsoft’s Patch Tuesday is an almost guaranteed reboot), it may be worthwhile to upgrade to Premium. If you choose to upgrade, the option to run as a service is found in the Preferences\Status and Configuration window, under the System tab.
Squid also has the ability to run as a service. The service is installed by running squid with the -i parameter, i.e. squid -i. After the service is installed, it can be configured for future usage by running services.msc, locating the Squid service, and choosing to start the process.
With these two measures combined, a proxy can be maintained with little intervention. Should further maintenance be necessary, I recommend allowing remote access on the peer running Squid. Remote Desktop Protocol (RDP) may come in handy should problems occur.
Hamachi is a flexible, easy-to-use VPN package. And combined with Squid, it presents a solution to a problem many users face. An operational Hamachi network can serve as a platform for the use of other services (like RDP), so if you have any ideas for a follow up article, just post them in the Comments below.

