Introduction

OpenVPN is a open-source SSL VPN client/server that allows you to set up your very own encrypted VPN. VPN’s are great for securely sharing and accessing resources regardless of geological separation, all you need is an internet connection and you can feel right at home no matter where you are. And what better way to feel secure on the road than with the winner of the 2007 Bossie Award for Best Open-Source VPN.
A Virtual Private Network (VPN) can be thought of as a secure tunnel which connects two nodes through an insecure connection (although it has other uses not related to security). This can be as simple as securely connecting a road warrior and his/her laptop back to the home office’s network or as complex as linking multiple entire networks together. In this How-To we’ll show you how to configure OpenVPN for the latter, linking up remote sites through a secure, encrypted tunnel.
Network Topology
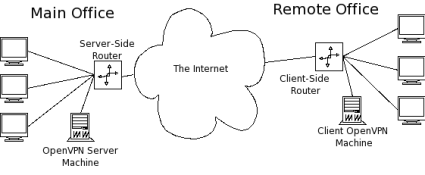
Let’s assume that we have the network topology shown below in Figure 1. There are a handful of computers on a remote network that we would like to connect securely to the main office.

Figure 1: Network Topology
To accomplish this, we can employ one of OpenVPN’s two different modes: routed or bridged. Bridging, as the name implies, simply extends the server’s network (via the OpenVPN machine) to the client that’s connecting. It’s quick and easy to set up, but has limited scalability as the network grows.
Bridging also expands the broadcast domain as broadcasts are sent through the tunnel since connected clients are assigned IP addresses in the same subnet as the server’s network. This is great for services and protocols that rely on it like SMB (Windows file-sharing) or IPX. But in a broadcast-heavy environment, that extra traffic over an encrypted tunnel can take its toll on performance.
Routing, on the other hand, is a bit trickier to set up, requiring access to both the client and server side routers. But it scales well and separates both the client network and the server network in to separate broadcast domains. This requires a WINS server to route Windows fileshare info between the two (or more) subnets.
In the topology in Figure 1, the remote office will end up being the OpenVPN client, so I’ll refer to the remote office as the "client" network, server, etc. Similarly, I’ll refer to the main office as the "server" side.
For this How-To, we’ll tackle the routed configuration and set up a WINS server to allow SMB file sharing over the tunnel. When we’re talking encryption and security, the obvious choice is Linux, which is what I’ll be using for this How To.
OpenVPN has great support for Windows too. So setting up a routed tunnel is very similar in both OSes and most of the configurations and settings that apply to Linux are fairly straightforward to apply in Windows as well. Table 1 lists the hardware I’ll use for this set up.
| Hardware | |
|---|---|
| Server Side Router | D-Link DGL-4300 |
| Client Side Router | Linksys WRT54G |
| Server Side OpenVPN Machine | •CPU: AMD Athlon 1600+ •RAM: 768 Mb •OS: Slackware 10.2 |
| Client Side OpenVPN Machine | •CPU: AMD Athlon X2 3800+ •RAM: 2 Gb •OS: Slackware 12 |
Table 1: Hardware Specs
There are some other neat options that a you can use with OpenVPN, so I’ll point those out in "Notes" as we go.
 Note: The router and OpenVPN can be on the same machine on either or both networks.
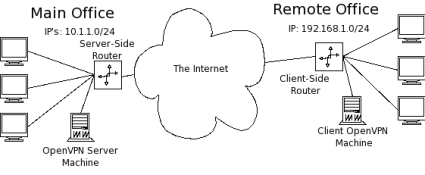
In a routed setup, each client network must be on a separate separate subnet from the server’s network to avoid address conflicts. For the setup I’ll be describing, the network subnets are shown below in Figure 2. (I’ve used the CIDR notation for netmasks below. For those unfamiliar with it, essentially 10.1.1.0/24 means the network 10.1.1.0 with a subnetmask of 255.255.255.0. The "/24" part indicates the number of bits in the prefix address.)

Figure 2: Network Addresses
Installing OpenVPN
First, we need OpenVPN. Grab the latest stable release from here and compile it on both the server side OpenVPN machine and the client side OpenVPN machine. Download, unpack, configure, compile and install OpenVPN with the following:
~ $ wget http://openvpn.net/release/openvpn-2.0.9.tar.gz
~ $ tar xvzf openvpn-2.0.9.tar.gz
~ $ cd openvpn-2.0.9
~/openvpn-2.0.9 $ ./configure
~/openvpn-2.0.9 $ make
~/openvpn-2.0.9 $ su -c 'make install'
– OpenVPN requires OpenSSL which is included in most Linux distros. If you don’t have it, you’ll need to install it first.
– OpenVPN also requires the TUN kernel module. This is usually compiled as a module on most vanilla kernels but didn’t want to autoload for me. You can manually load it using modprobe tun.
– I used the latest stable release: 2.0.9
Public Key Infrastructure Review
Like WPA-Enterprise, OpenVPN relies on a Public Key Infrastructure (PKI). Remember all the trouble we had to go through to get a PKI set up for FreeRADIUS? Turns out that the folks behind OpenVPN found setting up a PKI a bit cumbersome too and wrote a few wrapper scripts to make it incredibly simple to get your own PKI up and running.
OpenVPN’s easy-rsa scripts make this a snap. This process is explained well in OpenVPN’s documentation so I’ll just give a brief overview here.
Change in to the easy-rsa directory under the unpacked OpenVPN directory (~/openvpn-2.0.9/easy-rsa) and edit the vars file to suit your needs. I usually increase the key size to 2048 bit (line 40):
export KEY_SIZE=2048
Then change the key fields on lines 45-49 to suit your application:
export KEY_COUNTRY=US
export KEY_PROVINCE=NY
export KEY_CITY="New York"
export KEY_ORG="SmallNetBuilder"
export KEY_EMAIL="[email protected]"
Next, initialize the vars file with:
~/openvpn-2.0.9/easy-rsa $ ../vars
Finally, initialize the work environment and build the Certificate Authority (CA):
~/openvpn-2.0.9/easy-rsa $ ./clean-all
~/openvpn-2.0.9/easy-rsa $ ./build-ca
OpenSSL will ask for values for the fields we defined in the vars file; just hit enter to accept the defaults. When you get to the Common Name field, enter whatever you want for the CA (I use the very creative name, "CA").
Common Name (eg, your name or your server's hostname) []:CA
Next, build the server’s key (in the command below, server will be the key’s filename):
~/openvpn-2.0.9/easy-rsa $ ./build-key-server server
Enter a meaningful Common Name, sign the key and commit it to the database. Similarly, build the client key:
~/openvpn-2.0.9/easy-rsa $ ./build-key remote_office
Configuring the Server Side OpenVPN Machine
The server side OpenVPN machine is the heart of the VPN. In routed mode, all clients will connect to the OpenVPN server and all communication between clients (if the "client-to-client" option is enabled) is routed by the OpenVPN server, so it’s best to have a dedicated, always-up machine to run it on.
Clients need the server side IP address hardcoded in their config files, so it’s usually best and easiest to set up a domain name to point to your server side network. (There are many free services out there for free domain names. You’ll also need a dynamic DNS service, such as TZO or DynDNS, if the IP address of your server’s WAN connection changes frequently.)
First, we need to create a configuration directory for OpenVPN. Elevate yourself to root and create the directory /etc/openvpn with subdirectories /etc/openvpn/certs and /etc/openvpn/keys.
~ # mkdir /etc/openvpn
~ # mkdir /etc/openvpn/certs /etc/openvpn/keys
Next, copy the server’s certificate (server.crt) and the CA’s certificate (ca.crt) we created earlier with OpenVPN’s easy-rsa into /etc/openvpn/certs. Likewise, copy the server’s key (server.key) into /etc/openvpn/keys. The server’s key should be kept secret, lock down the permissions on the key with:
~ # chmod -R 600 /etc/openvpn/keys/
Next, we need to create the Diffie-Hellman parameters for symmetric key agreement and exchange. After creation, copy the DH parameters (dh2048.pem) to /etc/openvpn.
~ $ openssl dhparam -out dh2048.pem 2048
One of the great features of OpenVPN is the ability to "push" specific configurations to individual clients. This allows you to set up a very powerful and flexable VPN network with multiple types of clients all connecting back to one central server.
This is accomplished by setting up a client configuration directory on the OpenVPN server that contains short configuration files for each client that connects to the server. When a client connects, the server looks for the configuration file with the same common name as the client’s certificate and executes any configuration parameters in that file.
Create the directory /etc/openvpn/client-configs and in it, create a file with the same common name as the client network (remote_office in this example).
~ # mkdir /etc/openvpn/client-configs
~ # touch /etc/openvpn/client-configs/remote_office
Open up remote_office with your favorite text editor and enter the following configuration:
iroute 192.168.1.0 255.255.255.0
push "route 10.1.1.0 255.255.255.0 vpn_gateway"
The iroute directive sets an internal route on the OpenVPN server, so it knows to route all traffic bound for the network 192.168.1.0/24 through the remote_office client. Pushing the route 10.1.1.0/24 allows the client advertises the server’s network to the client.
Finally, we need to edit the OpenVPN config file. OpenVPN ships with a collection of good example config files (found in ~/openvpn-2.0.9/sample-config-files) that are very well documented starting points. The man page is also very well written and contains loads of useful information.
For this example, the OpenVPN server’s config file (server.conf) looks like this.
Configuring the Server Side Router
In order to route traffic from the server-side network through OpenVPN to the client, the machines on the server’s network need to know how to reach the client. So we need to add a route to the server-side router to route all traffic bound for the client subnet (192.168.1.0/24) to the OpenVPN machine (10.1.1.2).
On the DGL-4300, this is found under Advanced > Routing (Figure 3).
Figure 3: Adding a Route to the Server-side Router
Now we can start up the OpenVPN server:
~ # openvpn --config /etc/openvpn/server.conf
Configuring the Client Side OpenVPN Machine
Setting up the client OpenVPN machine is Just like the server: create the directories for the certificates and keys; copy them over; and secure them appropriately. The client side OpenVPN configuration is a bit more sparse than the server’s, since the server will be responsible for "pushing" the proper configuration settings to the client after connection.
#
# SmallNetBuilder OpenVPN Client Configuration
#
# Instructs OpenVPN to run in client mode, requests IP address and
# special instructions (like routes) from the server. client
# Interface for tunnel
dev tun0
# Remote server to connect to. Can be domain name or IP address.
remote smallnetbuilder.com
# Certificates and keys required for connection
ca /etc/openvpn/certs/ca.crt
cert /etc/openvpn/certs/remote_office.crt
key /etc/openvpn/keys/remote_office.key
# Symmetric cipher - Must be the same as the server's
cipher BF-CBC
# Protocol and Port - Must be the same on both server and client.
proto udp
port 1194
# Log to file instead of syslog
log-append /var/log/openvpn.log
verb 4
# Since the OpenVPN client is acting as a gateway for other machines
# on the client-side network, run as a daemon and downgrade user
# priviledges.
user nobody
group nobody
daemon
# Use a persistent key and tunnel interface.
persist-tun
persist-key
Configuring the Client Side Router
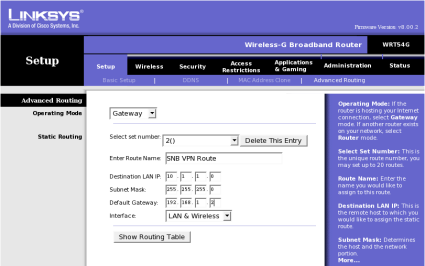
Just like the server-side setup, all the machines on the OpenVPN client’s network also need to know how to reach the server’s network (10.1.1.0/24). Add a route that directs all traffic destined for the server’s network to the OpenVPN client machine (192.168.1.2). On the WRT54G it’s under Setup > Advanced Routing (Figure 4).
Figure 4: Adding a Route to the Client-side Router
Finally, connect the client up to the OpenVPN server with:
~ # openvpn --config /etc/openvpn/client.conf
Samba WINS Support
In order to use Windows filesharing across different subnets, you need a WINS server to allow resolution of computers’ NetBIOS names across subnets. Luckily, Samba has that capability built in and enabling it is as easy as adding:
wins support = yes
To Samba’s configuration file, smb.conf, and restarting the Samba server. In Windows networks, all the computers participate in an election process to determine the computer that will be the local Browse Master. The Browse Master is responsible for collecting and distributing all the information regarding Windows shares within its subnet.
That information is then transmitted to the domain Browse Master to distribute across subnets. Generally, we’d like the WINS server to be the domain master, so we set this by "rigging" the election with the following:
local master = yes
os level = 35
domain master = yes preferred master = yes
You need only one SMB server running the WINS service for all your subnets. For simplicity’s sake, I like to put it on the same machine that is acting as the OpenVPN server. You can also enable a Windows-based WINS server instead of using Samba.
Performance
As you might expect, encryption takes its toll on network performance. But, in practice, network throughput will be limited more by the Internet connections of both the OpenVPN server and client, than by OpenVPN itself. For my setup, I get speeds of around 35 kbps, but the client side of my network uses a wireless point-to-point Internet provider that sounds good on paper, but in reality, is horribly unreliable.
To get a better look at OpenVPN’s true performance, I set up both the server and client locally connected through a gigabit switch and transfered some files through them over SMB. Direct transfer (without OpenVPN) clocked in at around 38 Mbps. The same transfer over an encrypted tunnel was barely able to top 4 Mbps. But again, unless you have top-tier fiber-based connections on both ends of your encrypted tunnel, you’re unlikely to be limited by OpenVPN itself.
So you definitely pay the price on the performance side, but you gain the ability to securely transfer data over insecure connections.
If you don’t want to dedicate a computer at each end of an OpenVPN tunnel, there are implementations of OpenVPN that run on the limited hardware of consumer grade routers (like the Linksys WRT54G) through DD-WRT or OpenWrt. So don’t worry about old hardware slowing you down!
Troubleshooting
There are quite a few pieces that have to play nicely together to get OpenVPN working correctly. Here are a few tools that come in handy if things don’t work smoothly right out of the gates.
- Check the OpenVPN logs There is lots of good information in there that can point you right to the problem. This is especially handy when tweaking the config files.
- Increase the verbosity This will show you more of what OpenVPN is thinking. A verbosity level of 5 or 6 is pretty handy for high level checking, anything higher is great for really tracking where packets are going.
- Use "tcpdump" tcpdump is a great network troubleshooting tool, especially since both OpenVPN machines are acting as routers. Check the tcpdump man page for more details.
- Take baby steps! Build up the VPN incrementally and test the connection along the way. (i.e. bring up the tunnel, make sure your can ping through the tunnel, then try with other machines on the network)
Conclusion
VPN’s can be handy for a myriad of setups, connecting remote laptops back to a main office’s servers or even connecting whole networks together securely over the Internet. OpenVPN offers an "industrial-strength" VPN suite that’s both versatile and powerful. It has a great reputation and is a snap to set up.


