Introduction
| Axis Network Camera | |
|---|---|
| Summary | The Axis 205 is small and compact and those features alone draw most of the attention. However, the lack of pan, tilt and zoom features as well as a merely average image quality might deter some buyers. |
| Update | None |
| Pros | • Compact size |
| Cons | • Lacks pan, tilt and zoom • Poor image quality |
As we have seen in previous reviews, network based camera products continue to gain traction in many markets. While the applications can vary substantially from person to person, the ability to peek remotely at a net cam from anyplace, at any time, is what many users want.While most of the uses of network based camera products involve some sort of security purpose, there are many other uses for products like this, as well.
As long as you have a broadband Internet connection that is always on, with or without a static IP, it is possible to access these devices across the Internet.
However, since most users use a gateway or firewall of some type, this can present potential configuration issues that might make the installation of a network camera more of a challenge.
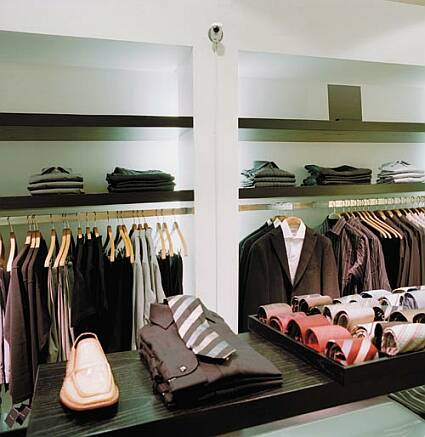
Security applications is one of the target markets where Axis sees the 205 fitting into their product line up.
Still, the ability to check in on your cat after she has kittens, keep an eye on your baby/baby sitter and to see what is happening in your house when you are not there is certainly appealing. The applications for this technology continue to grow, and based on the reaction we have received from past Network Camera reviews, we know that many readers seek smaller and more flexible models.
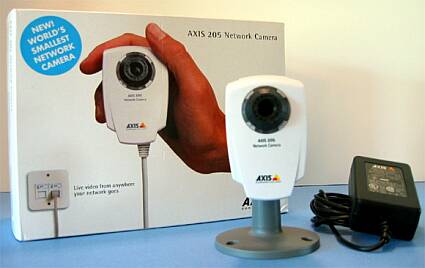
To this point, flexibility and price have been obstacles for many consumers, but now Axis has addressed these issues in its new model 205 Network Camera. The 205 Network Camera is small enough to fit in the palm of your hand and checks in with a MSRP at only $199 US. What has Axis done to achieve this? Read on and see what the pluses and trade offs are in the Axis Model 205.
Small Enough To Fit In The Palm Of Your Hand
The Axis 205 Network Camera (or 205, for short) is small, measuring in at 2.17″ x 1.34″ x 3.35″. As you can see in the picture below this is quite an innovative form factor for a network camera; however, the camera still requires both a network (LAN) connection as well as a connection to the external power brick.
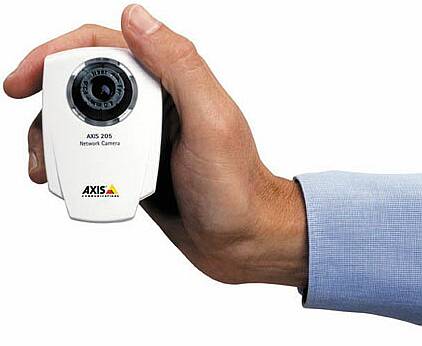
The big sales pitch of this camera is of course the form factor. It is small, but once you add the base back to the camera, the size does increase quite a bit.
<banner2>
Once these connections are inserted into the camera this does tend to make things a bit messy, as there really is no clear way to route these cables away from the 205. Most users will most likely use some sort of a hanger close to the mounting base to give the camera a clean and uncluttered look. Keep in mind that these connections are required, so during the installation process you will have to factor this into the placement of the camera.
Let’s take a quick look at the specifications of the 205 supplied to us by Axis.
| Axis 205 Specifications | |
| Device Type | Motion-JPEG Network Camera with built-in web server |
| Connection Type | RJ45: 10Base-T/100Base-TX Ethernet networks |
| Resolutions Supported & FPS | 640×480, 320×240 and 160×120 – Delivers Up To 30 frames per second |
| Lens Type | 4 mm, F2.0, Fixed Iris |
| Illumination | 10-10.000 LUX |
| Number Of simultaneous users | 20 |
| Operating System | Linux |
| Size | 55 mm x 34 mm x 85 mm (2.17″ x 1.34″ x 3.35″) |
| Weight | 177 g (6.24 oz) – Includes Camera Mounting Bracket |
| Operating environment | Indoor Use Only – 5°- 40° C (41°-104° F) |
| Power Requirements | 5.1 VDC/2A – Power Supply Brick Included |
| System Requirements To View Video Sent From Axis 205 Network Camera | Most Windows versions (such as Win98, Win2000 and XP), Linux, UNIX, Mac OS, Mac OS X – Web Browser Required – Browsers: Most versions of Internet Explorer, Netscape, Mozilla, Opera – Limitations in functionality may occur when not using a Windows based system! |
| Prerequisites to monitor images via the Internet using the Axis 205 | Broadband connection, such as cable or DSL – Static IP Recommended / An ISP providing outbound traffic / A router supporting port forwarding / When using multiple cameras, it is beneficial to have a router providing port mapping |
| Warranty | One Year |
| Suggested Retail Price | $199 US |
After taking a look at the specifications, a few things really stick out. First, the lens type is 4 mm with F2.0 support and is a fixed iris type, which means that the lens is fixed focus and the camera offers no pan, tilt, or zoom options. Of course, at a low MSRP of only $199US, we would expect the camera to be rated for indoor use only; and it is.
Perhaps more exciting is that the 205 is able to deliver Motion-JPEG video in three resolutions (640×480, 320×240 and 160×120) at up to 30 frames per second. This is good news because more frames per second equal a much smoother and a more fluid picture. To be able to deliver 30 frames per second of video over your Internet connection, you will have to have a good deal of up stream bandwidth, which not all broadband connections provide. Since most broadband connections offer less upload bandwidth than download bandwidth, this could mean that your broadband Internet connection might not offer enough bandwidth to deliver a resolution of 640×480 at 30 frames per second.
Similar to past Axis models before it, the 205 offers Axis’s embedded built-in Linux OS that sports an integrated Web server, one of the most attractive features of the Axis products we have reviewed. This trend continues with the 205, as it offers nearly the same built-in features as previous Axis models with a few new features, as well. Now in firmware version 4.02, Axis continues to add features and fix bugs with each firmware release.
Inside The Box & Setting Up
Upon opening the packaging of the 205 you will find the following: Axis 205 Network Camera, Power Adaptor Brick, Stand, 3 Mounting Screws and Installation Guide. As you can see, there is not a lot of stuff included within the box. Maybe we have become too accustomed to the junk and “shovelware” that is included inside the typical retail box of today, but you will not find it here.
The Installation Guide is of particular interest, as whether you are an experienced user or not, you will need this guide to help you set up and install your Axis 205 Network Camera. This manual is only eight pages, and at first glance we feared that it might be a little on the skimpy side. Once you spend some time looking at this manual, however, it is clear that our skepticism was correct. This manual is quite compact and fairly well written but it is obvious that the intended target audience of the manual is a user with some computer experience and knowledge of how IP addressing works. This could present more than a little frustration for those who don’t have the required background knowledge.
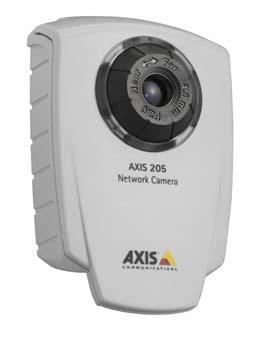
A close up of the Axis 205.
As part of the Axis firmware, Axis registers the camera with the Axis Internet Dynamic DNS Service. This Dynamic DNS Service run by Axis tracks the current IP of the camera to make the camera accessible via the World Wide Web when the user types in http://axis123456.axiscam.net. The 123456 numbers correspond to the last six digits in the serial number of the 205 Network Camera. While use of this service is optional and can be disabled, it does provide a very useful feature.
For most users who are able to place the 205 outside their router/firewall or in a DMZ, getting the camera to work will not likely be a problem. Those who wish to be able to access the camera placed behind their own router or firewall will have to become masters of using the port mapping functions of their router/firewall to be able to get 205 working, however. There is no explanation or help on configuring this within the included 205 Installation Guide.
After looking at the Axis Web site and downloading the Quick Installation Guide, we found a small section covering the configuration of a router to accept incoming data traffic, but it just refers to the documentation of your router/firewall for additional details. There is no mention of ports or suggestions on how to configure your router/firewall to get it to work. After additional exploration on the Axis web site, we found several FAQs that address this issue, but no step by step suggestions on how to reconfigure your router/firewall. This is a glaring omission and by our own experience we had some problems getting the camera to work from behind the two models of Netgear router/firewall products that we tested it with. We suggest that Axis spend additional time preparing some documentation on how to configure this, and perhaps even go as far as show how it is configured with a few different router/firewall products. Many users are going to have plenty of problems getting the 205 working from behind a router/firewall unless Axis provides more help in the form of documentation. The suggestion in the documentation that the user have an IP just for the net camera is not something that most DSL/Cable Modem users will routinely have.
The installation of the 205 is quite easy. The 205 is designed to be mounted in place using the three screws that are supplied in the product package. The 205 can be mounted on either a horizontal or vertical surface. Once you have mounted the unit, then you need to connect both the power and the RJ45 network connection. Prior to making your installation, it might be best to connect to the 205 and make your basic configuration changes. We found that this method seemed to work best, as this way you don’t have to de-install the camera in the event you are unable to connect to it.

A look at the back of the Axis 205 Network Camera. Notice that you have to still plug the camera into the power brick as well as the network connection. Maybe if they could make the unit plug directly into the outlet and make it wireless that would eliminate some of the mess.
There are three different ways to connect to the 205 in order to configure it. All of these involve getting the IP address of the camera set. You can use the manual IP configuration application which is available for download on Axis’s Web site; you can use the “arp” command; or you can simply connect the camera to your NIC card in your computer and reconfigure your NIC card network settings to be on the same subnet as the 205’s default IP address of 192.168.0.90.
We found that the camera’s configuration worked best when connecting it directly to the network card using a crossover cable to reconfigure the network IP settings, and then pointing the Web browser to 192.168.0.90. This method isn’t documented in either the Installation Guide or the Quick Installation Guide that we downloaded from Axis. We did find a FAQ on the Axis Web site that documented this process, and we found it worked better than the two other processes suggested in the manual. This method does require a crossover Ethernet cable that the purchaser may or may not have, but it still was the fastest way to configure the 205.
Once connection has been established to the camera you are able to change the configuration of the 205 to meet the configuration needs of your specific network. We find the menu driven Web-based configuration system to be quite useful and complete. You are able to control every feature and function of the camera from this interface. The interface offers password protection, but it would be nice if you were able to lock the administration of the 205 to a specific IP address to enhance the security even a little more.
The outside of the camera itself offers a lighted status indicator around the outside of the focus ring of the camera. The 205 also offers an adjustable ring around the camera that can be used to manual fine tune and adjust the focus. Beyond that, the other things you will find are the network connection indicators that are located above the RJ45 network jack and the control button on the back that is used to reset or restore the factory configuration of the camera, if necessary.
Now that we have connected to the camera, let’s configure it.
Configuration Of The 205
Flexibility is perhaps the most important feature needed for any network based camera. Since the applications for which these devices are used are different, it is important that any network camera that you choose offers the maximum flexibility in its configuration.
Axis, like earlier products, uses a built-in Web-based management approach to the configuration and set up of the 205. After resetting the master configuration (root) password, you are presented with four major menu options with a few sub options under them. The major four menus are Basic Configuration, Video & Image, Layout and System Options.
For most users, the Basic Configuration options menu (which offers four sub menus of Users, TCP/IP, Date & Time and Video & Image) will be the suggested path that most users should follow. Axis does offer a built-in help file that can be accessed that covers most of the basics, but again, we didn’t find it any better or worse than what is covered in the manual that shipped with the product; it does offer some additional specifics on the individual menu options, but it is somewhat limited.
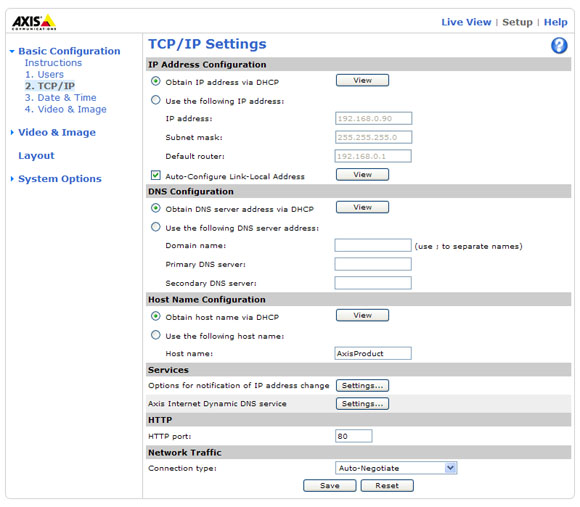
The Axis 205 IP configuration screen offers a flexible feature set.
The 205 offers the ability to set up three types of access levels. The Administrator level allows access to both view and configure the 205. The Viewer level allows the created account to view only the images on the camera, without the ability to configure the settings of the camera. Also provided is an “Enable Anonymous Viewer Login” mode. With this option enabled, no user name or password is required to view the live images from the camera. While only three modes might seem somewhat limited, this covers the major ways in which the camera is used and configured.
Configuration Of The 205, Continued
As you can now surmise, the 205 relies on password security to restrict access to the 205. If you have the camera configured to be accessible from the Internet, you will want to keep this fact in mind, as your security will only be as strong as the password that you select and the frequency in which you change the password. Depending on your application, this may or may not be important to you, as in many situations users will elect to configure the camera for Anonymous Viewer Mode and this will require no login or password.
The IP settings for the 205 are very flexible and provide settings for just about every option that we could think of. The user is able to change the HTTP port that the 205 listens on, as well the type of network connection used to serve up the images. You can lock the camera down to as little as 10mbit half duplex, if you so desire, to use less bandwidth; most users will just elect to leave the camera in Auto Negotiate Mode.
The IP settings do not support packet priority, so if you wish to control the bandwidth even more by packet priority, you will need to plug the 205 into a switch that supports the configuration of packet priority on a per port basis. Depending on your application and the way that you have the camera configured, during our testing we found that it is possible to saturate your Internet connection using the 205 if you have a lot of users at once and don’t have a lot of bandwidth on your broadband connection, or your network for that matter. While we don’t expect the 205 to offer packet priority configuration for a home user, it could prove useful to a business that wishes to use this product in that type of environment.
The 205 offers the ability to time stamp the video that you are receiving from the camera. The camera is able to sync with an NTP server that you can specify by IP address. Time keeping is pretty important for security applications and we found the 205 was able to keep accurate time with no problems that we encountered during our testing.
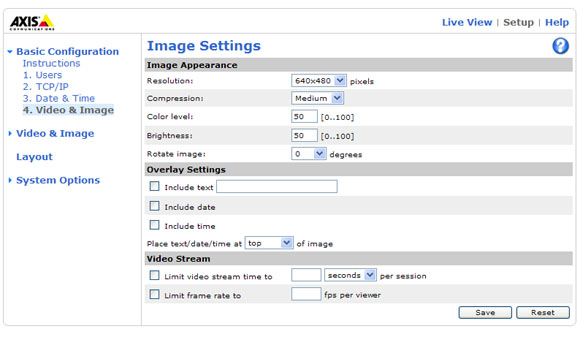
The 205 Image Settings Menu offers a lot settings to tweak and reaching an acceptable performance level will depending on your ability to tweak these settings. Don’t look for the manual to provide you with any help.
The Image Settings Menu allows you to adjust the resolution, compression level, color level, brightness level and rotate the image. Rotation of the image is important, as depending on how you mount the camera, you might need this option to get the image back to the proper orientation. This is a nice feature that is often overlooked in other models. Compression of the video stream does result in smaller sizes, which are distributed more quickly, thus you have to sacrifice some of the quality. We did notice a difference when we played with this setting. Depending on the resolution and application and the amount of movement, this will dictate one of the four levels that you will select. We found in most of our testing that the medium setting seemed to provide the best balance of compression and performance for our purposes. We were never happy with the image quality of the High setting, but medium was acceptable.
The 205 allows you to add an overlay to the image. This can include the text, date, time, or a combination of all three if you like. The 205 allows you to configure the placement of overlay fields on either the top or the bottom the image. No additional option for the placement of the overlay fields within the image is possible, however.
Another interesting configuration option is the ability to limit how the video stream is accessed. The 205 allows you to limit access to the video access session for a specific numbers of hours, minutes, or seconds per access. This is handy if you are using this in an environment where you want to give everyone a chance to look. In addition, you can cap the frame rate, as well. We experimented with this option with mixed results. While it did work fine, it sill didn’t provide the level of restriction that we might have liked for managing the level of bandwidth that the camera consumes. Let’s face it: it is an intensive high bandwidth device, but Axis does make a good effort and allows better control and management of the bandwidth, which the 205 consumes.
The 205 is able to E-mail “snap shot” images to you. This can be configured in several ways, based on time of day and the number of pictures you want to send. We did encounter some problems getting this to work correctly, as our mail server required authorization prior to sending. This can be an issue, so unless you are running your own mail server or mail forwarding server, you may or may not have to jump through more than a few hoops to configure this and get it to work. It should be made clear that this is no fault of the 205, but getting it to work is contingent on the configuration of your mail server. Still, Axis might want to consider a few revisions to widen the range of the 205’s out of the box compatibility. Axis does offer a test button for the E-mail configuration so it is easy to see if you have it working or not.
Lights, Camera, Axis 205…
Now with the configuration out of the way, it is time to talk about the camera in action. As we explained above, the 205 uses a fixed lens. (4 mm with F2.0) The lack of pan, tilt, and zoom options means that you will have to use a little more planning in the installation of the 205. While you can tune the focus using the outer focus ring found outside the camera housing, no other adjustments are possible. This presents a problem if you change the view from your 205. While it is possible to physically move the camera in the base to make minor adjustments, major changes will require you to move the entire camera. For most applications which are security type applications, the lens in the 205 provides more than enough view for you to see quite a bit, but it does pale in comparison to other models that we have reviewed that are close in price to the 205 and provide at least zoom support.
The quality of the video received in the browser was good, but not stellar. Depending on the amount of motion and the type of video that you are capturing, you will likely want to work on the configuration of the settings to tweak the performance of the video that is being sent from the 205 to better fit your application. Once tweaked, the video quality delivered by the camera was acceptable; but there are trade offs, depending on the resolution and quality settings selected. Depending on your application you should be able to find a balance that is acceptable for your needs. We did notice that the low light performance of the camera is average, at best, which is in line with most other network cameras in this price range.
The Web interface for viewing the video is good and similar in function to similar Axis products before the 205. The viewing interface offers the option to provide snapshot to the viewer, in addition to the live video, which is a nice option.
No discussion of the 205 would be complete without mentioning the status light located on the front of the camera. The light can be configured in one of three modes: “light off”, “blink during access”, or “always on.” Depending on your application, you can configure the light accordingly.
Axis does not offer the ability to directly capture video streams from the 205. However Axis does offer the “Axis Camera Recorder” application, which allows you to capture and save video. This is professional security level software and, according to what we were able to find out, it is not currently compatible with the 205. Since the software is expensive and the 205 is an entry level product, don’t expect support for this feature anytime soon.
Conclusion
The Axis 205 Network Camera is quite an innovative product from its form factor standpoint. It is very small and compact. This provides you the ability to put this camera in places where it might not be as noticeable for stealthy surveillance.
The integrated Web-based management and delivery software functions well and performed as expected. The level of features supplied is quite good and Axis does provide a mix of options to support a variety of situations and uses that purchasers may want to use the 205 in. Axis does an excellent job with the firmware that is loaded in the 205, and this indicates their depth of experience in this market space, providing Axis leap over its competition. Still, we found the documentation for the 205 somewhat lacking and we did encounter some difficulty getting the camera to work with our router/firewall configuration. Many buyers may likely encounter problems similar to ours; it is clear that Axis needs to address this deficiency by providing better documentation to address this issue.
The video quality from the 205 was good, but not the jaw dropping quality that we have experienced from other products from Axis, which was a disappointment; but at the price point of only $199 US, you can expect to make some trade offs.
Overall, the 205 packs a lot of punch into a small package. There are many applications where the 205 will find a nice home, but the lack of at least zoom support will cause some users to look at other options. The 205 Network Camera is a nice addition to the Axis family. One can only wonder how much smaller and how much more performance these products can be made capable of delivering.