Introduction

| At a Glance | |
|---|---|
| Product | NETGEAR NTV300SL NeoTV MAX Streaming Player [website] |
| Summary | Media player primarily focused on Internet streaming services with support for Intel Wireless Display (WiDi) |
| Pros | • “N300” wireless • Easy setup • QWERTY keyboard on back of remote • Supports Intel WiDi • Large number of Internet content providers |
| Cons | • Remote lacks page up/down navigation buttons • WiDi can be difficult to set up • DLNA only; no share browsing to access local content • Very limited video format support • No user manual • 2.4 GHz only |
If your TV doesn’t have access to streaming content from the Internet, you’re behind the times. Many current HDTVs have Internet applications built in that provide access to a wide range of Internet content. With these sets, all you need is an Internet connection (wired or wireless) to your home network and you’re in business.
But many legacy TVs, as well as new TVs with smaller screens, lack”Smart TV” features. But you don’t have to toss out the old TV and buy a new one (though if you still have a tube TV, it’s probably time to upgrade). You have choices. You can either buy a Blu-ray player that has built-in Internet capabilities or you can purchase a “streamer”.
A streamer is a small box that connects to your Internet-connected home network and to your TV through one of the TV’s inputs. We have reviewed many of these streamers, including a head-to-head comparison between Western Digital’s WDTV Live and the Roku 2XS about a year ago.In this review, I’ll be looking at NETGEAR’s NeoTV MAX. Since I currently have a WDTV Live connected to my TV, I’ll also be making comparisons between it and the NeoTV MAX.
As the name might suggest, the NeoTV MAX sits at the top-of-the line of NETGEAR’s media players. The the two streamers below the MAX have a reduced feature set and a lower price. The figure below, courtesy of NETGEAR, shows the feature comparison between the three models, which have a fairly compressed price range.
The entry level NTV300 has a list price of $49.99; the NeoTV PRO lists for $59.99; the MAX lists for $69.99. As compared to the entry level, the Pro adds dual stream “N” (N300), support for WiDi and an analog output to support legacy TVs with only a composite input. With the MAX, you pick up player support for DLNA/USB files, a QWERTY remote, a MicroSD memory slot and support for VUDU 3D.

NeoTV product line comparison
Product Tour
Like all media streamers, the NeoTV Max is a fairly simple device. The NeoTV MAX is contained in a small plastic "hockey puck" case measuring 3.62″ X 3.62″ X 0.98″. It has a highly polished glossy surface which really is a fingerprint magnet. I prefer the matte finish on the WDTV Live, as it doesn’t show fingerprints at all.
The figure below shows both the front and rear panels. The front panel only has as a power LED and the NeoTV logo. The rear panel has a power connector, 10/100Mbps Ethernet port, HDMI port, a composite video/stereo port, a pin reset hole and a slot for a micro SD card. The right side of the box (not shown) has a single USB 2.0 port. There are no mounting screw slots on the bottom.

NeoTV MAX front and rear panels
There are no indicator lights on the Ethernet port, so you don’t really know if you have link status. In contrast, the WDTV Live’s Ethernet port has two LEDs to indicate link/activity. The WD also has a second USB port on its rear panel and another on its front, an arrangement I prefer over the MAX’ side-mounted port.
The MAX comes with an IR remote control, power supply and an analog cable that you can use to connect to a composite video input on your TV. Neither it, nor the WD ships with an Ethernet or HDMI cable, however.
One of my pet peeves are products that ship without everything needed to connect and use them. Both of these streamers barely meet that threshold; you could connect to your network via wireless and you could connect to your TV using the composite cable. But frankly, I’m not buying a media streamer to connect to a 480i display. When I bought my first flatscreen TV, I ordered several HDMI cables online. It’s a lot cheaper to by them online than at a retail store.
The NeoTV MAX has an edge over other streamer remotes by virtue of its QWERTY keyboard. The keyboard speeds entry of your Internet credentials when you first configure the device for your subscribed Internet services. The figure below shows both the front and back of the MAX’s remote. Like all inexpensive remotes bundled with streamers, neither the front nor back of the MAX’ remote is backlit.
I also like the instant access buttons on the front of the control for the most popular Internet services. It saves you from having to navigate through the menus to select a service. The unlock key is a nice touch, too, preventing unintended keypresses when using the top side of the remote.

NeoTV MAX features a dual sided remote with a QWERTY keyboard
However, the NeoTV MAX remote is lacking a couple of buttons that I use frequently on my WDTV Live’s remote: a mute button – useful for when you get a phone call; a subtitle key for enabling subtitles (if the content supports it); and a direct access button for the setup menu. The remote on the WDTV Live also has buttons labeled for Previous Page and Next Page. I discovered that you get the same functionality by using the Next and Previous keys on the NeoTV Max’s remote.
For some applications, the NeoTV MAX obscures the each character as you type it so you can’t visually verify your input when entering passwords. WD does a better job with this, leaving each character on the screen until you press the next key and then obscuring it.This gives you a chance to visually confirm your input – very useful if you have long and complex password.
I also noticed that you need to be fairly accurate when you press the arrow keys. They are very close to the four colored menu navigation keys in the corners. For example, it’s easy to hit the “green” key in the upper right when you are attempting to use the up or right arrow without looking at the remote.
There are also NeoTV remote control applications for both Android and iOS devices. In order for these to work, your mobile device has to be connected to the same subnet as the media player. This wireless remote would be very useful if you mount the MAX behind your TV and not in direct line of site for the standard IR-based controller. I installed the Android app on my Droid Razr, and it seemed very responsive. There are a few shots of the app in the screenshot composite below.

Mobile app for iOS or Android
Inside
The figure below shows the top of the NeoTV MAX’s circuit board. The device is powered by a Mediatek MT8653 Main processor with 512 MB of RAM and 256 MB of flash.

NeoTV MAX PCB top showing processor and memory
The PCB bottom shows the Ralink RT5372L single band 802.11bgn Wireless SoC. Although only single band, at least the MAX and PRO versions both support potentially higher wireless bandwidth via dual stream “N” ("N300") vs. the single-stream (N150) wireless found in other products. Note the two antennas on the left side of the PCB.

NeoTV MAX PCB bottom showing Wi-Fi SOC
Setup
Setup is really simple. You should be up and running in less than 10 minutes. Just connect the NeoTV MAX to your TV, select the appropriate TV input, connect to your network and plug it in. On first run, the setup wizard checks for and allows you to download and install a firmware update, if available. My MAX installed version 1.00.48NA update dated 10/17/2102.
After the device reboots from the firmware update, you select your desired resolution – Auto is the default choice. Next, you select the standby settings from choices of off, 30, 45 or 60 minutes. The next screen shows an image of the front and back of the remote with descriptions of the buttons.
When you finish setup, you land at a screen similar to the one below. There’s a menu along the left side of the screen. At the bottom of the list you can go into the setup menu to check the settings for your MAX, confirm your Internet connectivity and test your connection speed.

Most popular sites from the NeoTV MAX menu page
Hands On
After completing the setup, I went to the Settings > Network > Test Connection Status page to test the connection speed. I ran several tests using both a wired and a wireless connection, and the setup connection test reported 1.9 – 2.1 Mbps. This sounded way too low. I immediately ran speedtest.net on my computer and speedtest.net reported 30+ Mbps down and 6+ Mbps up. I also ran the Internet speed test function within Vudu to see if my connection would support Vudu HD Movies. Their connection test reported >9 Mbps – more than enough for HD. Clearly there must be something wrong with the NeoTV’s connection test.
It won’t take you long to realize that NeoTVs are focused on Internet streaming, similar to Roku’s players. NETGEAR claims "hundreds of channels and tons to choose from", but I counted 108 different apps or "channels" as NETGEAR prefers to say. The list includes a real smörgåsbord, some of which you’ll actually use regularly (Netflix, Hulu Plus, Pandora, Vudu, YouTube, Ted) and others you may never click on unless you are really, really bored or curious (London landscapes.tv, iVid, Fred).
Channels are organized into groups with some channels appearing in more than one group. The My Channels group is initially populated to get you started. But you can add or remove any channel there, or rearrange them as you wish. The Most Popular group looks more like a listing of all the available channels, so is the place to go if you want to browse. If you’ve added a channel to My Channels, a little green plus icon is superimposed on the channel icon when you see it in the other groups.
The other groups, Movies & TV, News & Education, Web TV, Music & Photos and Lifestyle are conveniences to help you more quickly locate channels. Unlike the WDTV, is also a Games group with a small assortment of popular games as Blackjack, Texas Hold ’em, Memory and Kaboom.
Each product has some content not available on the other. For example, the WDTV Live has better music offerings including Live 365, Shoutcast Radio, Spotify and TuneIn, in addition to Pandora and Rhapsody found on both products. But the sheer numerical superiority of the NeoTV offerings means that in some categories, it has a significant edge over the WDTV Live.
Comparing social sites, the NeoTV supports both Facebook and Twitter, while the WDTV Live has only Facebook. The News and Education category is also a clear win for the NeoTV, with providers including TED, TMX, NASA 360, The Whitehouse, CNN, CNBC Podcasts, PBS Podcasts, Fox News Podcasts and the Discovery Channel. However, the WD TV Live holds an edge with a unique sports category that features MLB.TV, RedBull TV, SEC Digital Network and XO College sports.
Of course, this is just a snapshot in time. The firmware in both media players can be upgraded and additional providers could be added (and deleted). If there are "must have" content providers, you should check the manufacturers’ sites to see if there’s a full listing before you buy.
I tested streaming video from Hulu Plus, Netflix and streaming audio from Pandora using a wired connection on both the NeoTV MAX and the WDTV Live devices. I found that the user interface for Netflix and Hulu Plus were virtually identical. Both devices streamed video content from both sources without any interruptions or dropouts. Video and audio appeared to be in sync.
I watched quite a bit of Video during the course of testing. I never saw any dropouts or frame freezes during any of my viewing. The video was as good as I get from my HD cable box on my big screen. I also tried some Vudu HDX content and the video quality was surprisingly good.
I also listened to a lot of music – both from DLNA media servers as well as locally-attached storage. There were no audio problems, but then again, I really didn’t expect any. Audio doesn’t really take much bandwidth at all. However, I saw a significant difference when using Pandora. The Pandora client in the NeoTV MAX has a different user interface that provides a better experience by allowing channel changes from the playback screen (screenshot below). There’s also a history of tracks that you’ve played.

NeoTV MAX Pandora interface
By comparison, the user interface for Pandora on the WDTV Live looks dated, and requires menu navigation to change channels.

WDTV Live Pandora interface
Local Playback
Both the NeoTV MAX and the WDTV Live devices include a USB port (the WD has two) so you can plug in storage devices. The NeoTV MAX also has a microSD card slot on the rear panel directly above the HDMI port. In fact, it’s close enough to the HDMI port that unless you’re pretty dexterous, you’ll need to unplug the HDMI cable to insert/remove the microSD card.
You access local content via the My Media channel. This is not located on the default My Channels screen. You’ll have to hunt it down in the Most Popular section and add it yourself to your My Channels screen for easy access. You can browse both USB and SD card storage and view individual photos, play slide shows of a selected folder, play music from a selected folder or play videos. Both devices let you browse by folders for playable media content.
The WDTV Live lets you do all the above. But it also lets you view media on the local storage device in the same way that you view it from a DLNA server. Music, for example, can be viewed by Artist, Albums, Genre, All tracks, Folders, plays lists, favorites, etc.
Speaking of DLNA, both devices can play back media from local DLNA servers. To test this, I set up three DLNA servers on my network: a Seagate GoFlex Home NAS, Synology DS107+ NAS and an external USB drive attached to the USB port on my NETGEAR WNDR3800 router. All devices had their DLNA servers enabled with the device’s default settings.
The NeoTV MAX discovered only two of the three DLNA servers. Interestingly, the one that it didn’t discover was the DLNA server built into the NETGEAR router! The WDTV Live detected all three of the DLNA servers and I could easily switch between DLNA servers and locally attached storage.
Both devices played the media content properly on the DLNA servers that they found. I tested photos, videos and music on each of the devices, and neither had a problem with any of the content (in the supported formats, of course).
Some folks don’t have a DLNA server or prefer to not have to deposit content in the folders required by a DLNA server. If that’s your case, the NeoTV MAX won’t be able to find your content, because it can’t browse network (SMB) shares. The WD has an edge here, supporting browsing of SMB shares to find and playback content.
When it comes to supported file formats, the WDTV Live holds an big edge over the NeoTV MAX. I checked both manufacturers’ web sites and here’s what I found:

File format support
The NeoTV’s short list of supported formats, especially video, belies its internet streaming focus. I tried an assortment of local content and here is what I found:
Video
- .3gp – played sound only (video shot on DroidX)
- .avi – did not play
- .wmv – played OK
- .mp4 – played OK
- .mov – did not play correctly – played back very fast – seemed to jump to key frames. I used.mov files shot on my Canon SX210IS
- Photo
- .png – OK
- .bmp – NO– directories showed as empty
- .tif – NO– directories showed empty
- .jpg – OK
Audio
- .mp3 – OK
- .m4a – OK
- .mp4 – directory showed as empty
These results reinforce the point that if you are looking for a player that can handle a video collection amassed over time, the NeoTV is not the product for you.
WiDi
Section by Tim Higgins
Craig didn’t have a computer that supports WiDi, so I jumped in to write this section. One of the unique features of the MAX and PRO flavors of the NeoTV is integrated support for Intel’s Wireless Display (WiDi) technology. WiDi is Intel’s pre-standard implementation of the Wi-Fi Alliance’s Wi-Fi Direct spec rolled out almost three years ago. Wi-Fi Direct begat Wi-Fi Display, which has since been rebranded as Miracast.
Miracast has slowly made its way to market and Intel says that it will eventually merge/support Miracast and WiDi. But in the meantime, NETGEAR has decided to integrate WiDi support into the new NeoTVs. As noted in our announcement article, the PRO and MAX boxes are supposed to get upgrades to add Miracast support sometime late this year. Owners of older NeoTV models are out of luck. NETGEAR says you won’t be getting any WiDi upgrades.
WiDi works only with computers built with Intel Core i3, i5 and i7 processors, Intel HD graphics and Centrino wireless. This Intel page has the exact list of requirements.
It took me an hour or so to get WiDi running. I first tried downloading and installing the Wireless Display software, but got an error message. I tried Googling the message, which led me to some old Intel support forum posts that were not particularly helpful. In the end, I discovered that my error was in not enabling the installation of Intel My WiFi Technology when I ran the Intel installer for my Intel Centrino Ultimate-N 6300 wireless adapter.
Your wireless adapter has to be running both Intel My WiFi Technology and Wireless Display software for WiDi to work. The My WiFi piece adds Wi-Fi Direct support and Wireless Display enables, uh, that. As noted above, My WiFi Technology is an option in the Intel wireless software installer. There is a screenshot in the gallery below that shows what the wireless installer should look like if you are set up to install My WiFi.
Wireless Display then has to be downloaded and installed separately. Things will go more smoothly if you make sure that My WiFi is installed and enabled (screenshot in gallery) before you install Wireless Display. The gallery below walks you through the process of getting WiDi up and running.
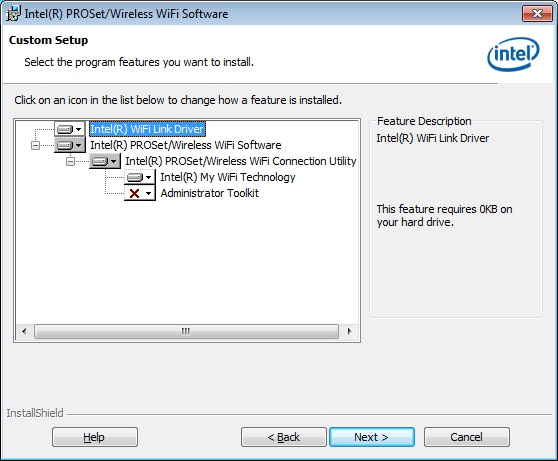
Make sure you install Intel My WiFi Technology when running the Intel wireless adapter software installer.
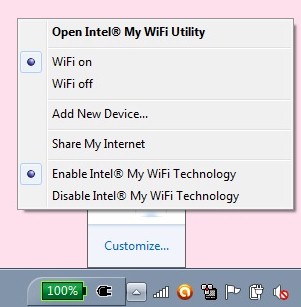
Make sure you enable My WiFi Technology after you install it and before you run the Wireless Display software installer.
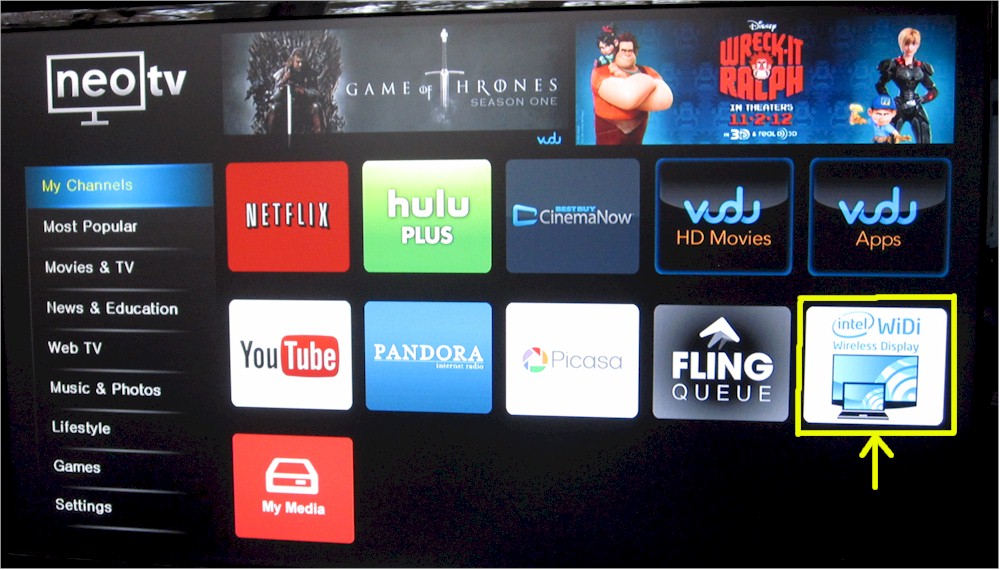
You first locate and launch the WiDi app on the NeoTV.
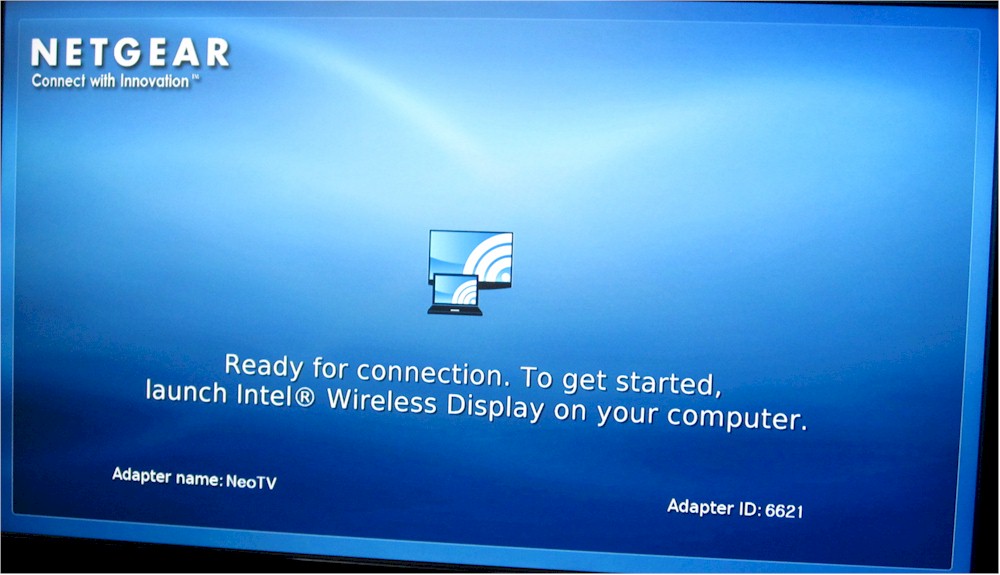
When the app is launched, you will get this screen.

The WiDi app running on a notebook has detected the NeoTV
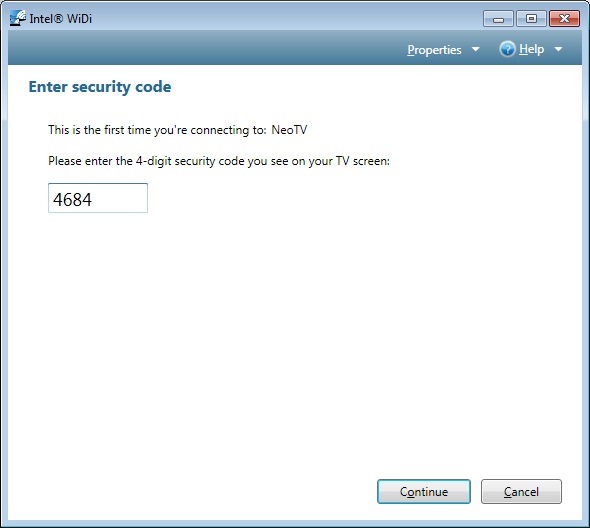
Before you can connect you need to enter a security code. This is only done once.

When the notebook and NeoTV connect, the TV display changes to this
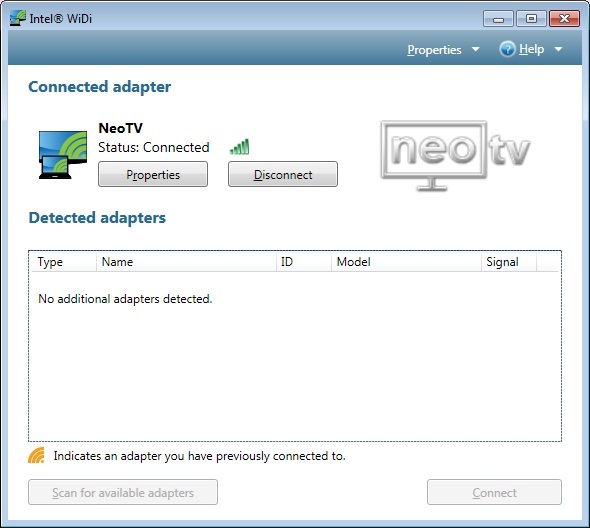
When the notebook is connected, the WiDi app window will change to show it. Note the name of the adapter (NeoTV) is now shown in the upper Connected Adapter section of the window.
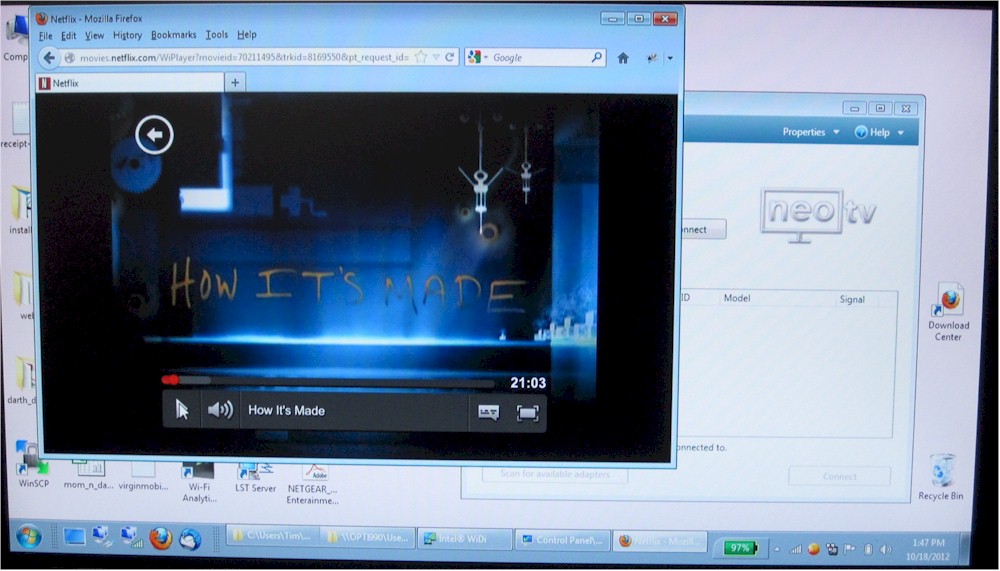
When the connection is complete, your notebook is now mirrored to the TV
Once everything is installed, operation isn’t hard to figure out. Everything on your notebook’s screen gets mirrored to the connected display. But be warned that your notebook’s resolution will be changed automatically when WiDi connects. Since my notebook is 1366×768, all my desktop icons got scrambled when WiDi lowered resolution to 1280×720. (Hate when that happens…)
You even get a pointer that mirrors the one on your desktop. The pointer is set to be an arrow by default. But you can check a box on the WiDi app Properties screen that allows the pointer to change. The change is a bit funky, however. When I moved the pointer to the lower corner of a browser window to resize it, I got both the arrow and the resize pointers.
The screenshot below is a (crappy) photo of my TV screen showing multiple windows open.
WiDi in use
The projected image is a bit soft. But (internet) video I tried was surprisingly watchable on a 23" TV in my office. Not crisp and clear 1080p HD, but not soft and fuzzy SD, either. Had I been watching on my 50" plasma upstairs, however, I might feel differently about image quality.
There is, of course a bit of a lag between the laptop screen and projection. So when moving the pointer around, keep you eyes on one screen or the other.
Closing Thoughts
If you’re considering purchasing a media player and your primary interest is streaming Internet content, the NeoTV MAX is a good choice. It ships with dozens of Internet services including Netflix, Hulu, Pandora and Vudu. And if NETGEAR is correct about its HTML5 underpinnings, adding new apps/channels should be easy.
If, however, you’re more interested in playing your own content from local media stores, the WDTV Live is a much better choice. In addition to playing media from an attached USB storage device, it can also play media from SMB shares. So whether your content sits on Macs, PCs, Linux boxes or NASes, the WDTV Live will be able to find it and also play it due to its much broader format and codec support.
You do pay for the wider format support, however. The WDTV Live is around $90 new vs. the $70 that the MAX will set you back. But if you’re willing to buy a refurb, you can pick one up from Amazon for less than what a MAX will run you. Just remember that by selecting a WDTV Live, you will definitely be getting access to fewer Internet streaming services.
Though I’ll continue to use the WDTV Live because of my local playback needs, the NeoTV MAX is a great value for Internet streaming content. And since I have a spare HDMI port on my TV, maybe I’ll leave the NeoTV MAX connected too and enjoy the best of what both devices have to offer.