Introduction
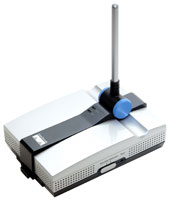
Linksys’ WRE54G Wireless-G Range Expander [reviewed here] is a WDS-based 802.11b / g repeater. Its purpose is to receive a signal from an Linksys WAP54G access point or WRT54G and WRT54GS wireless router and relay it to extend a wireless LAN’s range.

The Linksys manuals make the setup sound easy. It is, if you have no
security turned on, do not plan to use security and there is only one
AP near by. If any of these criteria is not true, you will probably
need to do a manual set up since the Auto-Configure button on the WRE54G will just not work with
security enabled. Trying to use Auto-Configure with multiple APs in-range is also dicey and can waste loads of time.
NOTES:
– The WRE54G’s firmware has changed significantly from 2004, when our first How-To was published. This version reflects the Version 3.01.01 firmware that is current as of this writing. If your WRE54G’s firmware is pre-version 3, then refer to our original instructions.
– References to "AP" can be interpreted to mean access point or wireless router.
Most network gear can be initially installed where it will be used. But for a manual install, this is not true of the WRE54G. We recommend that you start setup with the WRE54G located next to the target AP and use a computer connected via Ethernet.
You will need to gather the following information before you can begin setting up the WRE54G:
- The AP’s IP address and gateway address (logon to the AP’s control panel, usually at http://192.168.1.1). The first three numbers also give you the IP range of your LAN. So if your AP’s address is 192.168.1.1, your IP Range is 192.168.1.XXX, where XXX is a number from 1 to 254.
-
If you have more than one AP, then you need the IP and MAC address of the AP that you want the WRE54G to connect to (a MAC address looks like 00:14:BF:7B:E7:84). If you only have one AP,
don’t worry about the MAC address, but you will need to know the IP. -
Your WLAN SSID (wireless network name). You will find
it in the AP’s control panel or in the wireless properties of a WLAN client. - The type of security the AP uses: WEP or WPA-PSK and the key used. This is also located somewhere in your AP’s admin interface.
- Make sure that the WRE54G’s default address (192.168.1.240) is not in use. If you have a small LAN with only a few clients, you’re probably ok. If you are using DHCP to assign client IP address information (most small LANs do), just check the list of DHCP clients that you can usually find in your AP’s admin interface.
Get the WRE54G Connected, Steps 1 & 2
We’re first going to get the WRE54G connected to your wireless LAN. After we get a successful connection, we’ll go back and secure the WRE54G.
Step 1: Reset the WRE54G to factory defaults
Use the reset button in the hole on the side of the Expander. Push and hold the button until you see the Link light turn steady red. If the Link light starts flashing and/or turns blue, repeat the reset until you get a steady red Link light.
Step 2: Connect to the WRE54G from a wired client
You will need a computer that can connect to the WRE54G via Ethernet. You might be able to get a reliable wireless connection to the WRE54G, but using a cable guarantees the connection. Note that it doesn’t matter where the WRE54G and computer physically are for this procedure. They just both need to connect to the same LAN.
NOTE: If you are using an access point instead of a wireless router, you connect the computer you’ll be using to the LAN switch that the access point is connected to instead of the switch built into the wireless router.
The WRE54G comes set to a default IP address of 192.168.1.240 (some versions use 192.168.1.245). If your LAN has an IP range other than 192.168.1.XXX, you’ll need to temporarily set the computer’s IP address to one in the 192.168.1.xxx range.
TIP: Write down the old settings or make
a Restore Point (if you are using Windows XP) before making any changes. That will make it easy to restore your settings when you are done.
A) On Win XP navigate to Start > Control Panel > Network Connections and open the Connection properties for the computer’s Ethernet adapter. Change your computer’s IP address info to one in the 192.168.1.XXX range (such as 192.168.1.239) with a subnet mask of 255.255.255.0. (The Gateway and DNS settings won’t matter for now and you can leave them blank.
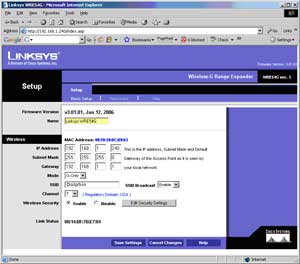
B) Open a web browser and type in: http://192.168.1.240. Log in using a blank username and the password admin. You should see the WRE54G Setup screen (Figure 1).
Figure 1: WRE54G setup screen
C) Change the WRE54G’s Wireless IP address from 192.168.1.240 to something in your LAN’s IP range. Make sure that it is outside the range of your LAN’s DHCP server. Write down the new address!
Example: Your LAN uses the 10.168.3.XXX range with the DHCP server handing out addresses from 10.168.3.100 to 10.168.3.150. The WRE54G can be set to an IP address of 10.168.3.1 to 10.168.3.99 or 10.168.3.151 to 10.168.3.254.
D) Save the WRE54G settings. Since the WRE54G now has a new IP address in a new subnet, you won’t get a "Settings changed" page in your browser. Wait about 10 seconds to ensure that the settings were saved, then power cycle the WRE54G to get the WRE54G to use the new settings. (Power cycling means unplug power from the WRE54G, wait about 5 seconds, then reapply power.)
E) Change your computer back to its previous IP address in your LAN’s IP address range and enter that address into your web browser. You should now be able to connect to the WRE54G at its new address. If you can’t, try power cycling the WRE54G and try connecting again. If you still can’t connect, reset the WRE54G to factory defaults using the recessed reset button and try repeating the address change.
Get the WRE54G Connected, Steps 3 & 4
Step 3: Configure the WRE54G
Now that the WRE54G has been moved to your LAN’s IP address range, you should be able to reach it from any LAN machine. For reliability, however, you should still complete the setup from a wired computer.
You are now ready to configure the WRE54G’s wireless settings.
A) Enter the WRE54G’s IP address (the default or the new one if you had to change it) into your browser and log in. You should see the setup screen (Figure 1) again.
B) Set the Gateway to the IP address of your LAN gateway. This is usually the IP address of your LAN’s router. Most Linksys routers use 192.168.1.1 so the default is probably OK, unless your LAN uses a different IP address range. In that case enter the proper information.
C) Mode:
If you do not know what mode your equipment uses, leave this on Both or
Auto. If you are using only 802.11g equipment you can change this to
G-Only and maybe get a little better speed.
TIP: If you notice hesitation or intermittent connection problems when connecting through the WRE54G, change this setting back to Auto or Both.
D) Enter your wireless LAN’s SSID. The SSID on the AP and the WRE54G must match exactly for the WRE54G to connect. Older WRE54G firmware versions allow different SSID’s for the AP and WRE54G. But Version 3 series firmware requires that the SSID’s match.
E) Channel: The WRE54G must be set to the same channel as the AP it is connecting to.
TIP: Make sure your AP is set to an unused or least-used channel, choosing among channels 1, 6 and 11. This is especially important if you are in a high-density area such as a dorm, apartment building or even a neighborhood of closely-spaced individual dwellings.
Windows’ built-in wireless client (Wireless Zero Configuration) does not show the channels used by in-range networks. So you will need to use the wireless utility provided with your wireless adapter (or with your notebook if it has built-in wireless). If you don’t have such a client, borrow a friend’s notebook that does have such a client.
F) Wireless Security: Leave this disabled for now. We’ll set it up after we get the WRE54G connected. If you have security enabled on your AP, temporarily disable it.
G) Save the settings and power cycle the WRE54G. As before, you must power cycle the WRE54G to get it to use the new settings.
Step 4: Test the Connection
At this point, you should have a WRE54G that is connected to your AP. But it is a good idea to check that the WRE54G is connecting to the AP before you move it to its final home. Do these initial checks with the WRE54G in the same room as your AP.
After the power cycle, the indicators on the WRE54G should both be blue. It takes a few minutes to self test and make
a connection, so be patient. Log back into the WRE54G and look at the setup
screen. Near the bottom, there is a line labeled Link Status. There should be a MAC address there if it has successfully connected.
If one of the WRE54G lights is red, you are probably not connected. You can confirm this by logging into the WRE54G and checking the Link Status. If youl see a set of dashes, you’re definitely not connected.
If you’re not connected, go back and recheck the WRE54G settings. You can also try shutting off both your AP and WRE54G and power up the AP first, waiting until it is fully up, then powering up the WRE54G.
If you’re still not connecting, the problem could be interference from nearby networks. Microwave ovens and cordless phones can also be a problem. You can also try changing channels (using 1, 6, or 11) on both the AP and WRE54G.
Step 5: Security Setup and Final Install
Now that the WRE54G is successfully connected, we can restore wireless security and take a few other security precautions.
A) Restore your AP’s security settings. If you turned them off earlier, restore the settings you had. If you did not have security enabled (like to live dangerously, eh?) then this is a good time to enable it.
Find the Wireless Security section of your AP and see what options it provides. Older equipment will probably show only WEP encryption, but newer products should allow selection of WEP or WPA-PSK (Pre-Shared Key). Use WPA-PSK if at all possible, but you’ll have to use WEP if only one of your wireless clients can’t support WPA-PSK.
While you’re at it, if you haven’t changed your SSID from the default of "linksys", now would be a good time. The main reason to do this is that it might help keep your wireless clients (and the WRE54G) connected to your WLAN instead of your neighbor’s. Pick an SSID that’s not obvious and that also doesn’t announce to the world where your WLAN is located.
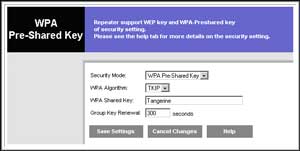
B) After you’ve set up / restored your WLAN’s security and tested it, you can set it up on the WRE54G. Log back into the WRE54G and click on the Edit Security Settings button in the lower middle of the screen. You should then see the screen in Figure 2.
Figure 2: WRE54G Edit Security screen
Just change the WRE54G’s security settings to match those on your AP. Everything must be exactly the same. The Group Key Renewal setting, however, can be left at the default.
Save the settings and close the window and you should now be again looking at the main Setup screen. While you’re there, change the SSID to match your AP’s, if you changed it.
C) Change the WRE54G password. Anyone who knows the Linksys default password (and who doesn’t?) will be able to access your WRE54G’s controls and
change the settings. Worse, since the shared key is the same on the WRE54G and
the AP, they will also have access to your wireless network (assuming they logged into the WRE54G from a wired connection). So, the WRE54G can be a really large security hole.
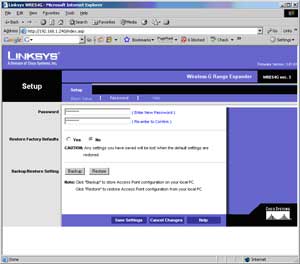
To change the WRE54G’s access password click the Password link on the main Setup screen to bring up the screen shown in Figure 3.
Figure 3: WRE54G Password screen
Enter a new strong password, write it down, save the settings and power cycle the WRE54G to get all of your changes into effect. Make
sure you put the password someplace where you can find it.
Otherwise, the only solution will be to reset the WRE54G’s settings to their defaults and redo the whole setup.
TIP: Just Google strong password generator to find one of many tools that will create a nice, new, secure password for you.
D) Move the WRE54G to its location. Now that your have a working and secured WRE54G, you can move it so that it starts doing what you purchased it for. That WRE54G’s location needs to be someplace where there is still a good signal from the target AP.
If you locate the WRE54G in an area with poor signal reception, wireless throughput will suffer since speed will be limited by the WRE54G’s connection back to your main AP. So choose a location somewhere between the targeted AP and the computer(s) that needs to connect.
Also keep in mind that the actual throughput you get through the WRE54G will be less than half what you would get from a direct AP connection, even if your computer is right next to the WRE54G. That’s because the repeating action performed by the WRE54G involves a single radio that has to both receive and retransmit. Still, a slower signal is better than none at all, as long as what you’re doing with the connection doesn’t depend on speed.
Once you’ve chosen a location, move the WRE54G to and power it up. In a minute or two
you should get two blue lights. Now watch the lights for a few minutes. If you see the
top light changing between red and blue, the WRE54G is probably too far from the AP. You may have to experiment to get a location that’s a good compromise between speed and range.


