Introduction
Update 11/19/2007: Update with the X509v3 extensions for Windows.
In Part 1, we set up the concepts behind how industrial strength WPA2-Enterprise security works and why it’s important for the security of your wireless network. In this article we’ll show you how to implement WPA2-Enterprise with FreeRADIUS.
Equipment and Software Setup
Before we get into the nitty gritty of getting your own CA, public and private keys set up, here’s the run down on the equipment and software I’ll be using and the typeface conventions I’ll be following for the code listings.
When we’re talking about setting up an industrial strength security implememtation, Linux is the natural choice. I’ve tried to make this How To as general as I can, but you’ll have to be aware of the little distro-to-distro differences. So I’ve included my setup in Table 1.
| My Setup | |
|---|---|
| Distribution | Slackware 10.2 |
| Kernel | 2.6.21 Series (Custom Compiled) |
| OpenSSL Version | 0.9.8g |
| FreeRADIUS Version | 1.1.7 |
| Wireless Router/AP | D-Link DGL-4300 |
I’m going to compile everything from source which will work on every distro. But I recommend you use your distro’s package management software such as APT, or portage, if you are familiar with using it (it will make the installation that much easier).
It is very important that you use at least version 0.9.8g of OpenSSL, which was released just a few weeks before this How To was published. You’ll need this version or higher because some of the options we need to use didn’t appear until the 0.9.8g release.
Typeface Conventions
To make it easier to follow and copy/paste, I am going to provide copies of the actual shell commands that I used and their output. They’ll appear in blocks like this:
Code Goes in Here...
NOTE! Many of the blocks of shell commands are too wide for our normal SmallNetBuilder fixed 1024 px wide format and cause distorted pages. Click here to set the page to a fluid format and then expand your browser window as needed. Click here to restore the normal fixed-width format.
These controls are also located at the top right of each page in icon form.
Everything you enter will appear in boldface. The output from the command will be in normal formatting.
~ $ openssl version OpenSSL 0.9.8e 23 Feb 2007
Any parameters (such as filenames, passwords, etc.) that you’ll need to adjust for your setup will be in bold-italic.
~ $ openssl sha1 myfile.txt SHA1(myfile.txt)= da39a3ee5e6b4b0d3255bfef95601890afd80709
Ocassionally, I’ll break up long commands onto multiple lines by "escaping" the newline at the end of the command. This is done by typing a backslash (\), hitting return and continuing the command.
~ $ somecommand -that -has -a -million \
-options -and -you -have -to \
-use -them -all -on myfile.txt
For my bash shell I’ve set PS1 like this:
bash-3.1$ export PS1="\w \$ " ~ $
If you don’t know what that means, don’t worry about it. Every time you see a $ you’re just a regular user, everything before that is the current working directory ("~" in this case is short for my home directory, /home/brandon).
Some commands will require super-user privileges, so elevate yourself to super-users status by using:
~ $ su
Password: pA55w0Rd /home/brandon #
![]() Note: Ubuntu is slightly different here, you’ll need to enter "sudo su", then, when prompted, enter your user password and you’ll have a root shell.
Note: Ubuntu is slightly different here, you’ll need to enter "sudo su", then, when prompted, enter your user password and you’ll have a root shell.
We’re going to be digging into some pretty monstrous config files in a moment, so I’ll print line numbers at the beginning of the line and highlight what I’ve changed/added in bold-italic.
2123 post-proxy {
2124
2125 # If you want to have a log of replies from a home server,
2126 # un-comment the following line, and the 'detail post_proxy_log'
2127 # section, above.
2128 # post_proxy_log
2129
2130 # attr_rewrite
2131
2132 # Uncomment the following line if you want to filter replies from 2133 # remote proxies based on the rules defined in the 'attrs' file.
2134
2135 # attr_filter
2136
2137 #
2138 # If you are proxying LEAP, you MUST configure the EAP
2139 # module, and you MUST list it here, in the post-proxy
2140 # stage.
2141 #
2142 # You MUST also use the 'nostrip' option in the 'realm'
2143 # configuration. Otherwise, the User-Name attribute
2144 # in the proxied request will not match the user name
2145 # hidden inside of the EAP packet, and the end server will
2146 # reject the EAP request.
2147 #
2148 eap
2149 }
And I’ll occasionally abbreviate long uninteresting output with an ellipsis.
~ $ command
Uninteresting output that keeps going....
So, without further ado, let’s lock down our wireless network.
Setting up OpenSSL
The first step in getting the razor-wire set up around your wireless AP is to generate your very own CA (Certificate Authority).
First, download the latest version of OpenSSL. As noted earlier, this is 0.9.8g as I write this.
~ $ wget http://www.openssl.org/source/openssl-0.9.8g.tar.gz
It’s always good practice to verify the checksum of any source download (especially with security related software). For some odd reason OpenSSL doesn’t list a properly formatted md5 checksum file, so you’ll have to eye-ball it.
~ $ cat openssl-0.9.8g.tar.gz.md5
acf70a16359bf3658bdfb74bda1c4419
~ $ md5sum openssl-0.9.8g.tar.gz
acf70a16359bf3658bdfb74bda1c4419 openssl-0.9.8g.tar.gz
Next, extract OpenSSL from the tarball.
~ $ tar xvzf openssl-0.9.8g.tar.gz
Move into the newly extracted OpenSSL directory and run the config script.
~ $ cd openssl-0.9.8g
~/openssl-0.9.8g $ ./config
Finally, compile and install OpenSSL.
~/openssl-0.9.8g $ make
...
~/openssl-0.9.8g $ su -c "make install"
Password: pA55w0Rd
...
Ok, now that we’ve got OpenSSL installed, we need to set up a few directories to organize the keys we’re about to create. Depending on where you look and who you ask, there are numerous ways to do this. I’m a fan of the KISS approach, so here is how I set it up.
Change back into your home directory and create a "CA" directory with a "signed_certs" sub directory and a "private" sub directory.
~/openssl-0.9.8g $ cd
~ $ mkdir CA
~ $ mkdir CA/signed_certs ~ $ mkdir CA/private
~ $ chmod 700 CA/private
"signed_certs" will hold copies of all the certificates that we sign with our CA. That way, if we need to revoke a certificate, we’ll have a copy locally. "private" will hold the CA’s private key. It’s very important to keep the CA key secret. Because if it gets compromised, it could be used to sign untrusted certificates that might be used to trick clients into unknowingly sharing sensitive information with a untrusted machine. I’ve locked it down above, by changing the permissions so that only I can read, write and execute it.
There are quite a few command line options and even more infomation required in prompts that are pretty redundant. So it’s easiest to create a local copy of the OpenSSL config, modify it and force OpenSSL to use it with the "-config" option. (Note: the location of the original openssl.cnf file may be different if you didn’t build from source.)
~ $ cp /etc/ssl/openssl.cnf /home/brandon/CA/
Open up openssl.cnf with your favorite text editor and change the following in the "CA_default" section: (Remember that the numbers that appear first on each line are line numbers, don’t enter them into the config file.)
35 [ CA_default ]
36
37 dir = /home/brandon/CA # Where everything is kept
38 certs = $dir/ # Where the issued certs are kept
39 crl_dir = $dir/crl # Where the issued crl are kept
40 database = $dir/index.txt # database index file.
41 #unique_subject = no # Set to 'no' to allow creation of
42 # several ctificates with same subject.
43 new_certs_dir = $dir/signed_certs # default place for new certs.
44
45 certificate = $dir/cacert.pem # The CA certificate
46 serial = $dir/serial # The current serial number
47 crlnumber = $dir/crlnumber # the current crl number
48 # must be commented out to leave a V1 CRL
49 crl = $dir/crl.pem # The current CRL
50 private_key = $dir/private/cakey.pem# The private key
51 RANDFILE = $dir/private/.rand # private random number file
52
53 x509_extensions = usr_cert # The extentions to add to the cert
Update 11/19/2007
If you’re planning on using Windows to manage the wireless network on the clients, we need to add some additional extensions to the end of the config file. Add the following sections to the end of "openssl.cnf" (this happens to be line 316 for me):
316 # Windows XP TLS Extenstions
317 [ xpclient_ext ]
318 extendedKeyUsage=1.3.6.1.5.5.7.3.2
319 [ xpserver_ext ]
320 extendedKeyUsage=1.3.6.1.5.5.7.3.1
Next, head on down to line 123 and change the defaults for the "distinguished name" to suit your application. The "distinguished name" section contains little bits of useful information for labeling public keys. As we’ll see in a moment, the keys themselves are pretty ugly (even when encoded in ASCII). To help keep track of them, they’re labeled with some information, and at this point the public key is referred to as a certificate. I’ll use certificate to stay consistent with how OpenSSL refers to them, but functionally they’re equivalent.
123 [ req_distinguished_name ]
124 countryName = Country Name (2 letter code)
125 countryName_default = US
126 countryName_min = 2
127 countryName_max = 2
...
You can set a default value for any of the parameters listed here by adding "_default" to the end of the variable name. In the example above, "countryName_default" is the default value for "countryName".
Finally, touch "index.txt", a simple text-based database used to track signed certificates.
~/CA $ touch index.txt
Respect My (Certificate) Authority!
Now that we’ve got our environment set up, it’s time to create the CA and issue some keys. Since OpenSSL is so complex, it works a little bit differently than the usual *NIX commands. Most notably, it has a handful of sub-commands (the first argument) that handle the details. \
To create a new key pair, first we create a "certificate request" (sub-command "req"). The certificate request is then sent off to be signed by the CA and becomes a bonafide public key. Creating the CA key pair starts off the same way we’d create a regular key pair, using the command below.
For most of the responses, you just hit the Enter key to accept the defaults we set up in the config file. Make sure to use a strong password for the CA key; it’s the only thing standing between the hacker and your CA key if it’s ever compromised.
~/CA $ openssl req -new -keyout private/cakey.pem -out careq.pem \ -config./openssl.cnf
Generating a 2048 bit RSA private key
..........................................+++
...+++
writing new private key to 'private/cakey.pem'
Enter PEM pass phrase: pA55w0rD
Verifying - Enter PEM pass phrase: pA55w0rD
-----
You are about to be asked to enter information that will be incorporated
into your certificate request.
What you are about to enter is what is called a Distinguished Name or a DN.
There are quite a few fields but you can leave some blank
For some fields there will be a default value,
If you enter '.', the field will be left blank.
-----
Country Name (2 letter code) [US]:
State or Province Name (full name) [The Great State You Live In]:
Locality Name (eg, city) [My Town USA]:
Organization Name (eg, company) [SmallNetBuilder]:
Organizational Unit Name (eg, section) [Security Division]:
Common Name (eg, YOUR name) []:CA
Email Address []:[email protected]
Please enter the following 'extra' attributes
to be sent with your certificate request
A challenge password []:
An optional company name []:
Next, we need to "self-sign" the certificate to turn it into a CA.
~/CA $ openssl ca -create_serial -out cacert.pem -keyfile private/cakey.pem \ -selfsign -extensions v3_ca -config./openssl.cnf -in careq.pem
Using configuration from./openssl.cnf
Enter pass phrase for private/cakey.pem: pA55w0rD
Check that the request matches the signature
Signature ok
Certificate Details:
Serial Number:
f2:c8:4a:d0:f5:09:28:b7
Validity
Not Before: Oct 24 03:17:49 2007 GMT
Not After : Oct 23 03:17:49 2008 GMT
Subject:
countryName = US
stateOrProvinceName = The Great State You Live In
organizationName = SmallNetBuilder
organizationalUnitName = Security Division
commonName = CA
emailAddress = [email protected]
X509v3 extensions:
X509v3 Subject Key Identifier:
D0:1E:BF:7B:A8:26:B9:98:B0:81:98:2E:E7:96:CA:57:3D:76:F3:02
X509v3 Authority Key Identifier:
keyid:D0:1E:BF:7B:A8:26:B9:98:B0:81:98:2E:E7:96:CA:57:3D:76:F3:02
DirName:/C=US/ST=The Great State You Live In/O...
serial:F2:C8:4A:D0:F5:09:28:B7
X509v3 Basic Constraints:
CA:TRUE
Certificate is to be certified until Oct 23 03:17:49 2008 GMT (365 days)
Sign the certificate? [y/n]:y
1 out of 1 certificate requests certified, commit? [y/n]y
Write out database with 1 new entries
Data Base Updated
(Note that the DirName: line above was truncated […] because it was too wide for most browser screens!)
In the command above, "-create_serial" (new in recent versions of OpenSSL) creates a hex serial number for this key. "-extensions" specifies the section of the openssl.cnf config file to look in for specific extensions to append to the newly created certificate (public key). In this case, we’re using the v3_ca section which, among other things, contains this setting on line 234:
basicConstraints = CA:true
This allows the key to be used to sign other keys, acting as the CA.
The last step is to create a copy of the CA certificate encoded in the DER format, because Windows likes only binary encoded certificates.
~/CA $ openssl x509 -inform PEM -outform DER -in cacert.pem -out cacert.der
Creating the Client and Server Keys
Now that we’ve got our CA all set up, we need to issue key pairs for the server and all of our clients. Start by creating a new key pair:
~/CA $ openssl req -new -config./openssl.cnf -keyout server_key.pem \
-out server_req.pem
Generating a 2048 bit RSA private key
.......+++
.................................+++
writing new private key to 'server_key.pem'
Enter PEM pass phrase: pA55w0rD
Verifying - Enter PEM pass phrase: pA55w0rD
-----
You are about to be asked to enter information that will be incorporated
into your certificate request.
What you are about to enter is what is called a Distinguished Name or a DN.
There are quite a few fields but you can leave some blank
For some fields there will be a default value,
If you enter '.', the field will be left blank.
-----
Country Name (2 letter code) [US]:
State or Province Name (full name) [The Great State You Live In]:
Locality Name (eg, city) [My Town USA]:
Organization Name (eg, company) [SmallNetBuilder]:
Organizational Unit Name (eg, section) [Security Division]:
Common Name (eg, YOUR name) []: server
Email Address []:
Please enter the following 'extra' attributes
to be sent with your certificate request
A challenge password []: An optional company name []:
Now sign the key with our newly created CA:
~/CA $ openssl ca -config./openssl.cnf -in server_req.pem -out server_cert.pem
Using configuration from./openssl.cnf
Enter pass phrase for /home/brandon/CA/private/cakey.pem: pA55w0rD
Check that the request matches the signature
Signature ok
Certificate Details:
Serial Number:
f2:c8:4a:d0:f5:09:28:b8
Validity
Not Before: Nov 1 02:32:07 2007 GMT
Not After : Oct 31 02:32:07 2008 GMT
Subject:
countryName = US
stateOrProvinceName = The Great State You Live In
organizationName = SmallNetBuilder
organizationalUnitName = Security Division
commonName = server
X509v3 extensions:
X509v3 Basic Constraints:
CA:FALSE
Netscape Comment:
OpenSSL Generated Certificate
X509v3 Subject Key Identifier:
71:A0:FB:1C:35:B7:B8:1D:1C:A4:C6:DF:A5:BA:80:6E:89:09:B7:CE
X509v3 Authority Key Identifier:
keyid:D0:1E:BF:7B:A8:26:B9:98:B0:81:98:2E:E7:96:CA:57:3D:76:F3:02
Certificate is to be certified until Oct 31 02:32:07 2008 GMT (365 days)
Sign the certificate? [y/n]: y
1 out of 1 certificate requests certified, commit? [y/n] y
Write out database with 1 new entries Data Base Updated
Update 11/19/2007
Note: If you’re planning on using Windows to manage the wireless connection on the clients use the X509v3 extensions we added earlier instead:
~/CA $ openssl ca -config./openssl.cnf -extensions xpserver_ext \
-in server_req.pem -out server_cert.pem
Create key pairs for your clients using the exact same command. Just change the key filenames and the "Common Name" to something meaningful for your application. Here’s what I used for this set up:
~/CA $ openssl req -new -config./openssl.cnf -keyout linux_laptop_key.pem \
-out linux_laptop_req.pem
...
Common Name (eg, YOUR name) []: linux_laptop
And:
~/CA $ openssl req -new -config./openssl.cnf -keyout winxp_laptop_key.pem \
-out winxp_laptop_req.pem
...
Common Name (eg, YOUR name) []: winxp_laptop
Sign both certificate requests the same way we signed the server’s certificate. Here’s the command for my Linux laptop key:
~/CA $ openssl ca -config./openssl.cnf -in linux_laptop_req.pem \
-out linux_laptop_cert.pem
Update 11/19/2007
Again, use the X509v3 extensions if Windows is managing wireless on the clients:
~/CA $ openssl ca -config./openssl.cnf -extensions xpclient_ext \
-in winxp_laptop_req.pem -out winxp_laptop_cert.pem
Now we’ve got both pairs of keys created and signed. Windows needs a little help to understand all this security, so we have to package the client certificate coresponding private key into a PKCS#12 file. Linux is happy working with them either way, so we’ll package them both for consistency.
~/CA $ openssl pkcs12 -export -clcerts -in winxp_laptop_cert.pem \
-inkey winxp_laptop_key.pem -out winxp_laptop.p12
Enter pass phrase for winxp_laptop_key.pem: pA55w0rD
Enter Export Password: pA55w0rD
Verifying - Enter Export Password: pA55w0rD
The command above uses OpenSSL’s pkcs12 utility to "-export" a new PKCS#12 file. "-clcerts" tells OpenSSL to only export the client certificate and private key (in other configurations, multiple certificates and keys can be packaged into a single PKCS#12 file). Package the Linux certificate and private key using the same command.
Generating good keys relies on having a good set of "random" data to seed the key generation. While not strictly related to generating PKI keys, we’ll need this data later on for FreeRAIDUS. We’ll use OpenSSL to generate Diffie-Hellman parameters for symmetric key generation.
First, elevate yourself to superuser and create a directory that will house the CA certificate, server public and private keys, a dh file for Diffie-Hellman parameters and a random date file. I chose to put these in /etc/wireless; anywhere readable to FreeRADIUS is fine.
~/CA $ su
Password: pA55w0rD
/home/brandon/CA # mkdir /etc/wireless
Now, copy the server’s public and private key and the CA’s certificate to /etc/wireless:
/home/brandon/CA # cp cacert.pem server_cert.pem server_key.pem /etc/wireless/
Create 1024-bit Diffie-Hellman parameters with the following:
/etc/wireless # openssl dhparam -out dh 1024
Next create a random file to seed key generation:
/etc/wireless # dd if=/dev/urandom of=random count=2
Installing and Configuring FreeRADIUS
Now it’s time to install FreeRADIUS. Download FreeRADIUS and unpack.
~ $ tar xvzf freeradius-1.1.7.tar.gz
Configure, install and update your dynamic linked libraries after the install. By default, FreeRADIUS installs in /usr/local and reads its configuration files from /usr/local/etc/raddb.
~ $ cd freeradius-1.1.7
~/freeradius-1.1.7 $ ./configure
~/freeradius-1.1.7 $ make
~/freeradius-1.1.7 $ su -c "make install"
Password: pA55w0rD
...
~/freeradius-1.1.7 $ su -c ldconfig
Password: pA55w0rD
...
FreeRADIUS comes packaged with a pretty monstrous, but well documented set of config files. Setting up WPA2 authentication really only scratches the surface of what FreeRADIUS is capable of. Since the default settings get us pretty close, we just need to make a few minor changes to some config files to get RADIUS authentication up and running.
Open up radiusd.conf with your favorite text editor and adjust the directory pointers (lines 23 through 40) to suit your system.
23 prefix = /usr/local
24 exec_prefix = ${prefix}
25 sysconfdir = ${prefix}/etc
26 localstatedir = ${prefix}/var
27 sbindir = ${exec_prefix}/sbin
28 logdir = ${localstatedir}/log/radius
29 raddbdir = ${sysconfdir}/raddb
30 radacctdir = ${logdir}/radacct
31
32 # Location of config and logfiles.
33 confdir = ${raddbdir}
34 run_dir = ${localstatedir}/run/radiusd
35
36 #
37 # The logging messages for the server are appended to the
38 # tail of this file.
39 #
40 log_file = ${logdir}/radius.log
The location of the log file on line 40 is especially important. FreeRADIUS usually isn’t very informative about runtime errors, instead writing everything the log. So if you have any problems with FreeRADIUS, take a look at the log.
The rest of this config file is huge—2149 lines huge. The good news is we don’t need 90% of the options FreeRADIUS has for WPA2. So we can distill the whole config file down to around 200 lines.
You can safely comment out (or delete) just about anything that doesn’t have to do with TLS or EAP (such as the module sections dealing with PEAP, CHAP, MSCHAP, etc.). Instead of walking you through every change, here is a copy of what I use (this is likely more than the absolute minimum even with all the comments removed).
One big change that needs to be made is changing to an unprivileged user and group on lines 109 and 110:
109 user = nobody
110 group = nobody
Next, open up clients.conf and add a section for your router. The router is the only true "client" to the RADIUS server; the computers that connect are called users. Use the IP address of your router and a strong secret (this is the "password" that the router will use to talk to the RADIUS server).
The "shortname" variable is used only for logging, so it can be whatever makes the most sense for you. Unless your NAS (Network Access Server) type is explicitly listed above in the clients.conf file, use "other" for the NAS type.
client 10.20.7.1 {
secret = smallnetbuilder
shortname = wireless_ap
nastype = other }
Next, edit the users file. Add the default line and lines for each of the client keys we created using the common name supplied for the key as the user name. Have some fun with the default rejection message.
# users file for FreeRADIUS
winxp_laptop Auth-type := EAP
linux_laptop Auth-type := EAP
DEFAULT Auth-type := Reject Reply-Message := "Your Computer Ain't Welcome Here!"
Now we’ll need to edit eap.conf. Change default_eap_type to TLS on line 23:
default_eap_type = tls
Adjust the TLS configuration to suit your set up:
123 tls {
124 private_key_password = pA55w0rD
125 private_key_file = /etc/wireless/server_key.pem
126
127 # If Private key & Certificate are located in
128 # the same file, then private_key_file &
129 # certificate_file must contain the same file
130 # name.
131 certificate_file = /etc/wireless/server_cert.pem
132
133 # Trusted Root CA list
134 CA_file = /etc/wireless/cacert.pem
135
136
137 #
138 # For DH cipher suites to work, you have to
139 # run OpenSSL to create the DH file first:
140 #
141 # openssl dhparam -out certs/dh 1024
142 #
143 dh_file = /etc/wireless/dh
144 random_file = /etc/wireless/random
Configuring the Router
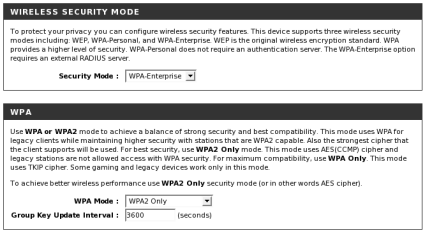
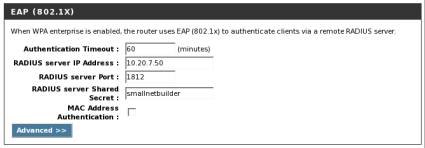
I used a D-Link DGL-4300 [reviewed], so your setup pages may differ. Open up your wireless router or AP’s wireless configuration section and find the Wireless Security settings. Change the security mode to WPA-Enterprise or WPA2-Enterprise mode, add the RADIUS server’s IP address and the shared secret (Figures 1 and 2).
Figure 1: Selecting WPA-Enterprise mode
Figure 2: EAP Configuration
Configuring a Linux Client
Connecting a Linux client using WPA or WPA2 security requires wpa_supplicant. Configure wpa_supplicant with the following options set in ".config" file in addition to the drivers and interfaces you need for your setup:
CONFIG_IEEE8021X_EAPOL=y
CONFIG_EAP_TLS=y
CONFIG_PKCS12=y
#Make sure to include any other options you need as well
Re-compile and re-install wpa_supplicant. Now create a folder on the Linux client to house the client public and private keys (PKCS#12 file) and the CA certificate. In my case, I set it up in /etc/wireless.
Next edit "wpa_supplicant.conf" and add a section similar to the following, to point to your new WPA2-Enterprise setup.
# WPA2-EAP/AES using EAP-TLS
network={
ssid="smallnetbuilder"
key_mgmt=WPA-EAP
eap=TLS
identity="linux_laptop"
ca_cert="/etc/wireless/cacert.pem"
private_key="/etc/wireless/linux_laptop.p12"
private_key_passwd="pA55w0rD"
}
The "identity" field should match the common name on the client certificate and the user we set up in FreeRADIUS’ users file. Restart wpa_supplicant and connect to the network.
Configuring a Windows XP Client
Windows users will require the WPA2 patch, if it’s not already installed. A quick way to check for this is to open up the advanced properties on any wireless network. If WPA2 is not an option available from the Network Authentication dropdown, you need the patch.
After installing the patch, transfer the CA certificate and the p12 file containing the client certificate and key securely from the server (via a USB flash drive is the easiest).
First, install the CA certificate as a trusted authority by double-clicking on it.
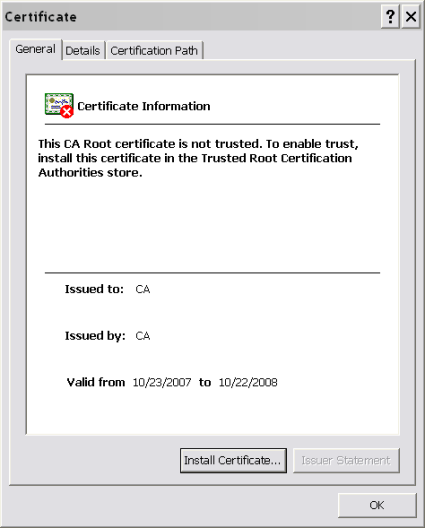
Figure 3: Installing the CA
Click "Install Certificate" and complete the wizard. Next, double-click on the p12 file that contains the client certificate and key to install it.
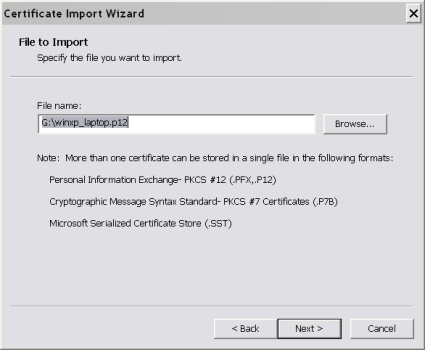
Figure 4: Installing the Client Keys
Enter the password for the client’s private key. (You can optionally require that the password is entered everytime the key is used, this gets annoying real quick, so I usually leave that unchecked.)
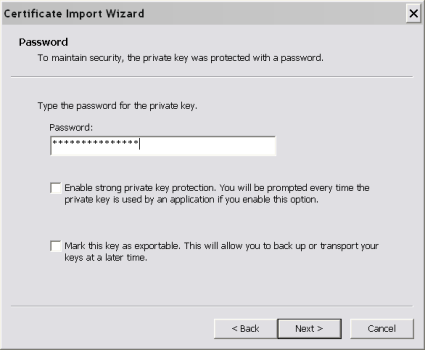
Figure 5: Client Password
Let Windows automatically store the certificate where it thinks it should go.
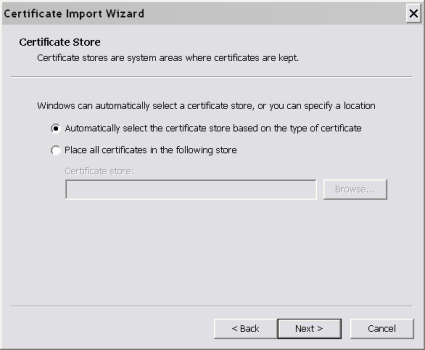
Figure 6: Storing the Client Keys
Configuring a Windows XP Client – more
Finish the wizard, and view the wireless networks by double-clicking on the wireless network icon in the taskbar. Select the your network and click on "Change Advanced Settings".
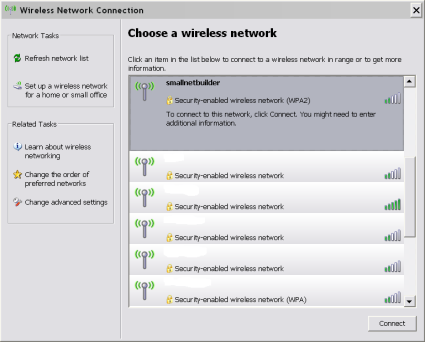
Figure 7: Wireless Networks
On the "Wireless Networks" tab, click "Add" under Preferred Networks.
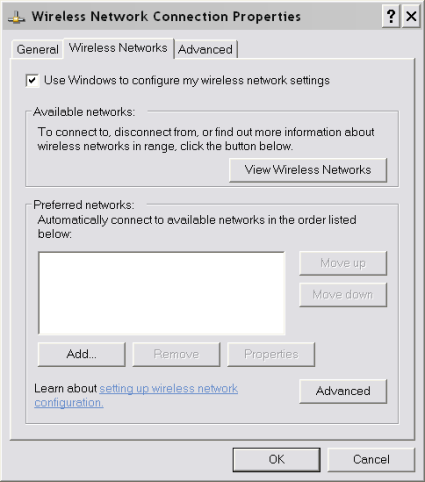
Figure 7: Advanced Configuration
Enter the SSID of your router and change the Network Authentication to WPA2.
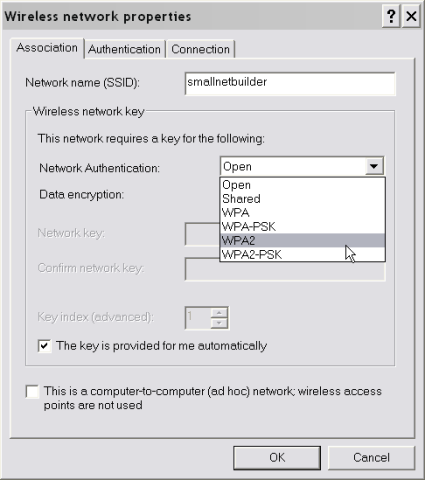
Figure 8: WPA2 Configuration
On the "Authentication" tab, click Properties under EAP Type.
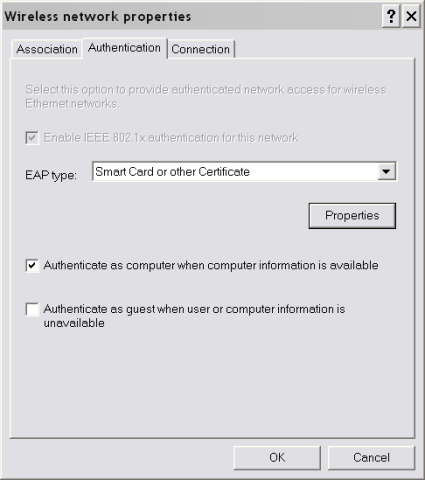
Figure 9: EAP Configuration
Select your CA from the list, and check "Use a different username for this connection".
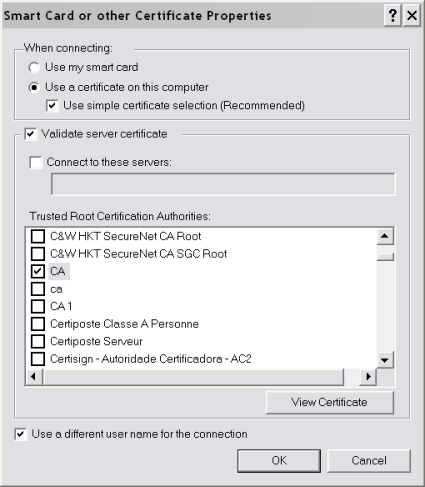
Figure 10: Certificate Selection
Hit OK to finish. Open up the wireless networks again and connect to your newly secured network.
Troubleshooting
There are quite a few pieces that have to play nicely together to get WPA2-Enterprise working. Here are a few tools that come in handy if things don’t work smoothly on the first try:
- Check the FreeRADIUS log.
There is a lot of good information in the log that can point you right to the problem. This is especially handy when tweaking the config files, as anything that doesn’t parse correctly will log an error. - Run FreeRADIUS in debug mode in the foreground with "radiusd -X".
This will show you just what FreeRADIUS is thinking. Not all the errors show up here, but the major ones that cause FreeRADIUS to quit do. - Test local connectivity with "radtest test test localhost 0 testing123".
This one comes straight out of the INSTALL file. If you runFreeRADIUS in the foreground with "radiusd -X" in another terminal you should be able to see the FreeRAIDUS dump all kinds of messages when "radtest" runs.
Conclusion
With a little extra hardware, you can add the extra level of security that authentication provides to your wireless network. This gives you better control over the clients that can connect to your network and also helps to keep clients from connecting to untrusted networks.
The combination of AES Encryption in WPA2 and secure authentication of clients will help protect your network and keep your data secured from prying eyes.

