Introduction
Updated 8/2/2013: Clarify encryption support
Updated 4 Feb 2011: Clarify throughput reduction.
Many Wi-Fi routers come equipped with wireless repeating capabilities. But properly configuring them often isn’t easy. This article will review the basics of WDS-based wireless repeating and I’ll then walk through setting up a few examples.
Please read references to access points (AP) as applying to either access points or wireless routers unless otherwise noted.
WDS Explained
WDS, which stands for Wireless Distribution System, is a feature that enables single-radio APs to be wirelessly inconnected instead of using a wired Ethernet connection.
WDS connections are MAC address-based and employ a special data frame type that uses all four of the (MAC) address fields allowed in the 802.11 standard, instead of the three addresses used in normal AP <-> STA (client) traffic. (In the 802.11 frame header, address 1 is the destination address, address 2 is the source address, address 3 is the BSSID of the network and address 4 is used for WDS, to indicate the transmitter address.)
The provision for four MAC addresses in a frame is about the only thing covered by the 802.11 standards. But it was enough to allow bridging features to first be added to enterprise-grade, i.e. expensive, 802.11b products in the late 1990’s. Many of these implementations were based around a medium access control (MAC) layer design originated by a long-defunct company called Choice Microsystems.
APs with wireless bridging features remained as high-priced items until fall 2002 when wireless bridging moved into consumer priced wireless products. D-Link first broke the artificially high wireless bridging price barrier by releasing a free upgrade to its DWL-900AP+ Access Point [reviewed]. This upgrade created the first consumer-priced WLAN product to support bridging and repeating. Other companies soon followed with similar upgrades, and also introduced dedicated Wireless Bridges, such as Linksys’ WET11 [reviewed here].
Though these products were actually making use of the WDS feature, they didn’t refer to it as such. It wasn’t until products based on Broadcom‘s 802.11g chipset started to hit the market at the beginning of 2003 that the WDS term started to be commonly used. (Broadcom apparently included WDS support in its AP reference design code.)
WDS can be used to provide two modes of wireless AP-to-AP connectivity:
- Wireless Bridging in which WDS APs communicate only with each other and don’t allow wireless clients or Stations (STA) to access them
- Wireless Repeating in which APs communicate with each other and with wireless STAs
Updated 8/3/2013
Two disadvantages to using WDS are:
- It’s more difficult to set up than non-WDS.
- Dynamically assigned and rotated encryption keys are not generally supported in a WDS connection. This means that Wi-Fi Protected Access (WPA / WPA2) and other dynamic key assignment technology might not be available. Static WEP keys are more commonly supported in WDS connections. Whatever encryption is supported in the WDS link is what the repeater’s clients must use.
Note that wireless throughput is cut approximately in half for each repeating “hop”, i.e. an AP that data flows through before hitting the wired network. This is because all transmissions use the same channel and radio and must be retransmitted to reach the wired LAN. The repeating throughput reduction applies both to WDS and non-WDS repeating.
WDS isn’t the only way to bridge and repeat, however. Some products don’t use WDS at all and instead act like wireless client adapters. But instead of connecting via USB, Cardbus or other computery interfaces, they connect via Ethernet. So they can be used to wirelessly connect devices like media players, game systems or any other networkable device that has an Ethernet connector. I’ll cover these devices in another part of this series.
WDS Interoperability
As noted earlier, detailed specifications for WDS don’t exist. Instead, the wireless networking industry has been pursuing mesh wireless, which is self-configuring and self-healing. There is no mesh wireless standard yet—the IEEE Mesh Networking Task Group (TGs) has been grinding away since 2004 and isn’t scheduled to be done until mid 2011.
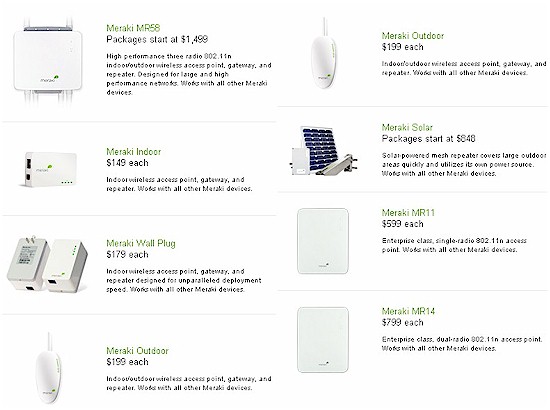
In the meantime, companies like Meraki, Proxim, Cisco and others have developed and sold wireless mesh systems. [See this review of Meraki’s system.]
Figure 1: Meraki mesh APs
These systems are intended for enterprise use and have price tags to match. But if you’re interested in playing with the technology, inexpensive 802.11g based mesh APs are available from Open-Mesh. Be warned, however, that throughput via 11g meshes is very low, in the single digit Mbps range. This is fine for basic connectivity for email, web browsing, etc. But not enough for high-quality video streaming.
On a practical basis, however, consumers’ main method for trying out wireless repeating are routers and APs with WDS built in. And with WDS added to some 802.11n routers, it’s now possible to get double-digit bandwidths through a single-hop bridge.
But WDS remains a technology, not a standard and WDS isn’t tested as part of Wi-Fi Certification. As a result, manufacturers typically include weasel-words somewhere in their product documentation that say that bridging and repeating features will work only with their own products. And even if you don’t find WDS interoperability disclaimers, good luck trying to get support from any vendor for a problem that involves any other vendor’s product!
The gist of all this is that products from different vendors with WDS bridging / repeating features are not guaranteed to work with each other! The industry has come a long way from the early days of WDS in terms of interoperability. But, again, there are no guarantees.
Tips for WDS Success
But before we forge ahead into the examples, there’s some prep work you’ll need to do to give yourself the best chance of having your WDS setup work the first time. Here are three mandatory and two optional steps to take before putting your APs in bridging mode:
- Check that your wireless client can associate and pass data through each AP.
You’ll want to do this with each AP connected to your LAN via its Ethernet port. The last thing you want is to be debugging basic wireless functionality if your bridge doesn’t work. - Assign a static IP address to each AP
This is good general practice when dealing with the gear that runs your network. But it’s especially important for APs in WDS networks, since you’ll know where to look for each AP and have one less variable to consider when trying to debug a broken connection.
Make sure that you assign the static IPs outside the range of your LAN’s DHCP server or you’ll risk getting a duplicate IP leased at some point… usually when it’s least convenient! - Set all APs to the same (clear) channel
Since all APs in a WDS network need to communicate with each other wirelessly, they need to be on the same channel. For 2.4 GHz WLANs, I recommend you use Channel 1, 6, or 11. Whichever channel you choose, make sure it’s not in use by neighboring WLANs, or at least not one right close by. See our When Wireless LANs Collide! if you have trouble getting a clear channel. - [Optional] Set each AP to a different SSID
WDS APs know each other by MAC address and could care less what their SSID is set to. On the other hand, wireless clients associate by SSID. Technically, each AP in a WDS network is part of the same Extended Service Set (ESS) and should therefore have the same SSID.But the roaming algorithms incorporated into most wireless clients don’t “aggressively” roam and tend to stay associated with an AP long after they should, resulting in poor performance. This can be especially frustrating when you’ve gone to the trouble and expense of adding repeaters to your WLAN, and your notebook refuses to use them!
By assigning different SSIDs to your WDS APs, you’ll first have the advantage of being able to see each one, even if you’re using WinXP’s built-in “Zero Config” utility, which doesn’t show multiple APs with the same SSID. You’ll also be able to easily force your client to connect to the closest AP without having to remember its MAC address.
- [Optional] Assign a static IP to your wireless clients
I’ve found that it sometimes takes awhile to lease a new IP after associating with an AP. Assigning static IP information to your wireless clients (don’t forget to include gateway and DNS info) gives you one less thing to go wrong when switching association among APs. It also works around the problem that some products have (or at least had!) with properly passing DHCP messages to bridged clients.
In addition to the above, you also need to carefully consider placement of your WDS APs. As with any other wireless LAN equipment, the speed of a WDS link depends primarily on signal strength. Since each WDS “hop” already cuts available throughput approximately in half, you don’t want to further reduce your link speed by spacing your WDS APs too far apart.
You’ll need to experiment to get an combination of range and performance that’s acceptable to you, but don’t expect good link speed if you try to place your repeater near the limit of your current wireless range! A good compromise is to place your repeater in an area where the link speed (as indicated by your client utility) is about half the maximum transmit rate. That would be around 24 Mbps for 802.11g gear and 65 Mbps for dual-stream 11N products in 20 MHz bandwidth mode.
With the preliminaries out of the way, we next need to gather the MAC address information we need and we’ll be on our way!
Gather the MAC addresses
As described earlier, WDS links are MAC address based. Some products have a mode that doesn’t require you to enter the MAC addresses of each network member. But I recommend that you disable that mode (if offered) and enter the MAC addresses. This will keep your bridge (and LAN) secure by not allowing “anonymous” APs to join your bridge. It will also, in my experience, give you the best chance of getting things working, especially if you’re trying to mix equipment from different vendors.
Your first stop for gathering AP MAC address information is the APs that you’ll be bridging. If all manufacturers followed NETGEAR‘s lead, I could write a shorter article! Figure 2 shows the WNDR3700‘s [reviewed] Wireless Repeating Function admin page, where each radio’s MAC address couldn’t be clearer! (I’ve outlined them with yellow, just in case.) Note that for simultaneous (two radio) dual-band routers, each radio has a different MAC address. So be sure you use the correct one!
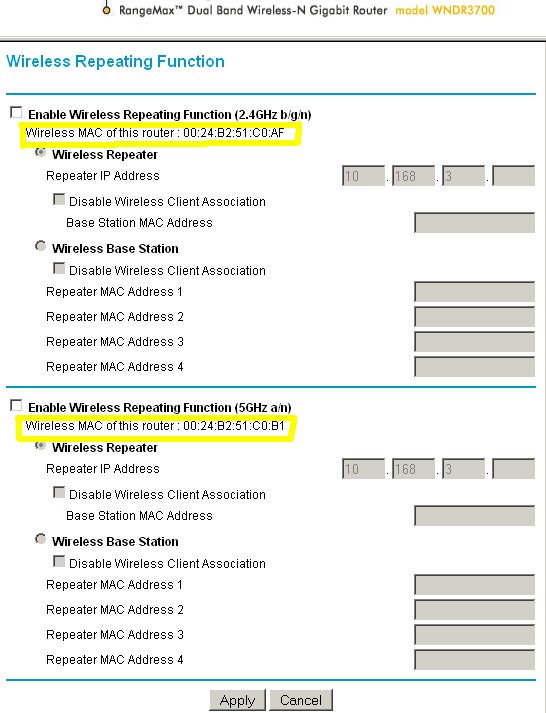
Figure 2: NETGEAR WNDR3700 clear MAC address indication
In contrast, you need to read between the lines to find the MAC address in EnGenius products. Figure 3 shows the ESR7750 dual band N router [reviewed], where the MAC address information masquerades as the BSSID.
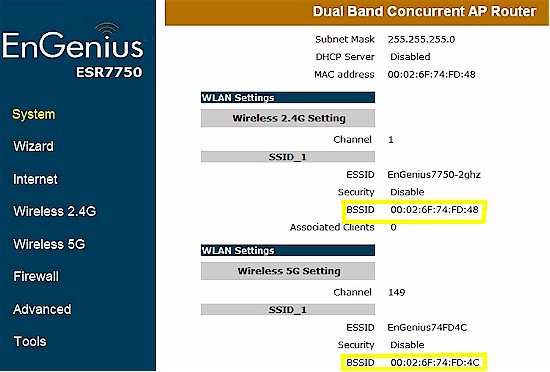
Figure 3: EnGenius ESR7750 unclear MAC address indication
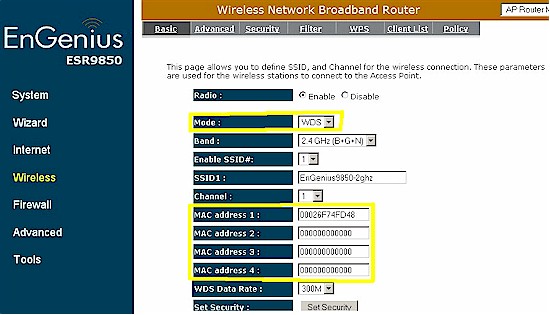
This is perfectly valid, since the BSSID in an infrastructure wireless LAN (using an AP, not client-to-client ad Hoc) , is the MAC address of the AP. But it’s not very helpful to those who aren’t versed in the details of 802.11 nomenclature. The same terminology is used in EnGenius’ ESR9850 [reviewed], which I’ve shown in Figure 4 because I’ll be using it in an example, shortly.
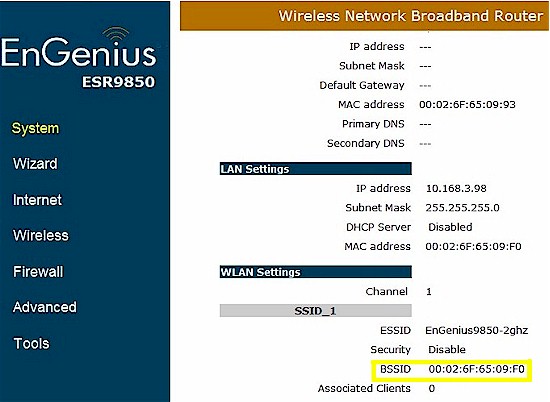
Figure 4: EnGenius ESR9850 unclear MAC address indication
IMPORTANT! If you have to go hunting around in your router’s admin pages for the MAC address, be sure to get the wireless MAC address. The WAN port also has a MAC address. And if you try to use that one to make a WDS connection, it won’t work.
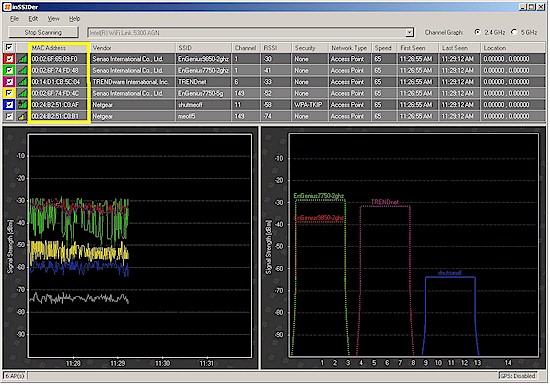
Another way to find an AP’s MAC address is from a client utility. Unfortunately, Windows’ built-in wireless utilities are no help for finding AP MAC addresses. But MetaGeek’s inSSIDer comes to the rescue. Figure 5 shows a scan I took with the EnGenius and NETGEAR routers active (there’s also a TRENDnet thrown in for good measure). By the way, as good wireless security practice, you shouldn’t use the obvious SSID’s that I did!
Figure 5: inSSIDer scan showing AP MAC addresses
Now that you have the MAC addresses of the AP’s, you can make a table similar to Table 1, so that you have all the info you’ll need in one handy place. You really need only the MAC address info when setting up the bridge. But the other info will come in handy when you go to check that the bridge is working.
| Device | SSID | MAC address | IP address |
|---|---|---|---|
| NETGEAR WNDR3700 – 2 GHz | shutmeoff | 00:24:B2:51:C0:AF | 10.168.3.254 |
| NETGEAR WNDR3700 – 5 GHz | meoff | 00:24:B2:51:C0:B1 | 10.168.3.254 |
| EnGenius ESR7750 – 2 GHz | EnGenius7750-2ghz | 00:02:6F:74:FD:48 | 10.168.3.77 |
| EnGenius ESR7750 – 5 GHz | EnGenius7750-5ghz | 00:02:6F:74:FD:4C | 10.168.3.77 |
| EnGenius ESR9850 | EnGenius9850-2ghz | 00:02:6F:65:09:F0 | 10.168.3.98 |
Table 1: AP info for WDS setup
With your table in hand, and everything else ready to go, it’s finally time to set up WDS.
Example 1: Bridge w/ WDS enabled router
Figure 6 shows a simple “one hop” repeating setup that might be typically used to extend the range of a wireless LAN if the primary wireless router supports WDS. This setup also can be used to establish a wireless bridge between the router’s wired LAN and a remote wired LAN or single Ethernet device. All you need to do for the latter mode is plug the device / LAN into the LAN port(s) of the remote bridge partner instead of making a wireless connection.
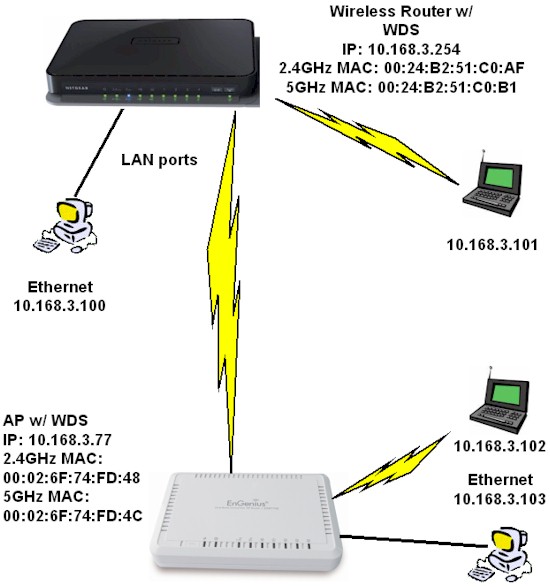
Figure 6: Bridge w/ WDS enabled router
For this example, I’ve paired the EnGenius ESR7750 with the NETGEAR WNDR3700. Since both are two-radio dual-band routers, we can use this hardware to illustrate a few alternate configurations and see their effect on throughput.
Perform all configuration via wired connections. Trying to do it via wireless is surely the way to madness…
Step 1: Convert the ESR7750 to an access point
We don’t want the ESR7750’s router firewall in the way, so we need to make it act like an access point. This is done by shutting off its DHCP server and assigning an IP address in the WNDR3700’s LAN subnet, but outside its DHCP server range.
Since I have the WNDR3700’s DHCP server range set from 10.168.3.100 to 10.168.3.250, I set the ESR7750’s address to 10.168.3.77. Figure 7 shows the ESR7750’s LAN settings page with the changes made. After the changes were saved, I connected one of the ESR7750’s LAN switch ports to my LAN switch and confirmed that I was able to reach its admin screens.
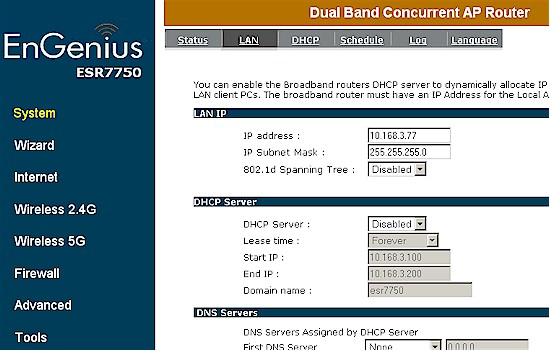
Figure 7: ESR7750 LAN settings for AP conversion
Step 2: Set up one end of the bridge
Since 2.4 GHz has greater range than 5 GHz, I’ll use those radios to make the WDS bridge. I’ll finish up the ESR7750 settings by switching to its settings for the 2.4 GHz radio and setting it up as shown in Figure 8. Mode is set to WDS, Channel to 11 (to match the WNDR3700 2.4 GHz radio’s channel) and the WNDR3700 2.4 GHz radio’s MAC address (00:24:B2:51:C0:AF) is entered in the MAC address 1 box. As mentioned earlier, you can set the SSID as you wish—WDS link participants pay it no mind.
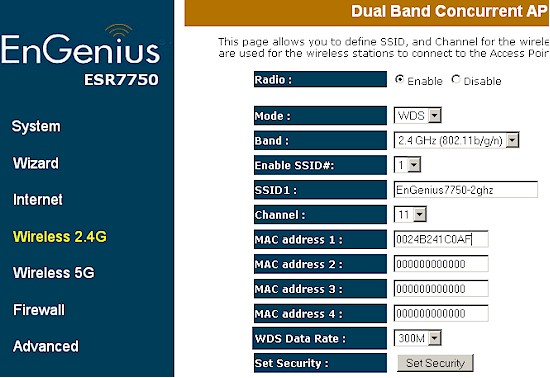
Figure 8: ESR7750 wireless settings for WDS link to WNDR3700 2.4 GHz radio
Note that the EnGenius routers don’t use the MAC address : separators and don’t automatically remove them if you try to paste in a MAC address with them. So you have to type in the MAC address…carefully! Note that the MAC address isn’t case sensitive, but I entered the alpha characters in caps. Double check everything and save the settings.
Step 3: Set up the other end of the bridge
Now we need to set up the WNDR3700 end of the WDS link. Figure 9 shows the Wireless Repeating Function screen on the WNDR3700. All we need to do here is select the Wireless Base Station mode (Wireless Repeater is for when you want to use the WNDR3700 WDS-linked to another WDS) and enter the ESR7750 2.4 GHz radio’s MAC address (00:02:6F:74:FD:48).
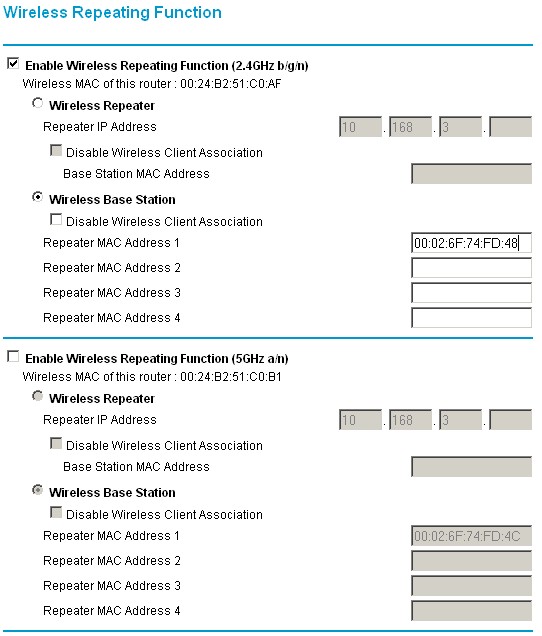
Figure 9: WNDR3700 wireless settings for WDS link to ESR7750 2.4 GHz radio
Note that the WNDR3700 likes the MAC address with the : separators and will automatically insert them if you just enter the MAC address without them. Note also that if you don’t want wireless clients connecting to the router, you’d check the Disable Wireless Client Association box. You’d do this if you wanted to dedicate the WNDR3700 to wireless bridge duty.
Step 4: Check the Link
If you’ve set everything up properly, you’ll know pretty quickly since you’ll see wildly flashing Link and Activity lights on the two WDS link partners and the switch connecting them (if you’re using one). Even though you might think gremlins have invaded your LAN, this is a good sign and is caused by the redundant network connections (two MAC addresses for the same IP address) between the APs provided by the Ethernet and WDS connections.
As soon as you disconnect the Ethernet cable from the “remote” AP—the ESR7750 in this example—the flashing should stop. Since some routers don’t like being bombarded by network floods (which causes the flashing lights), I recommend you unplug both ends of the WDS link, then power up the local WDS partner first (the WNDR3700 in this example), let it come fully up, then power up the remote WDS partner (the ESR7750). This will ensure that neither box is locked up or in an odd state.
Now, leave the "remote" par where it is, open up a Command prompt (DOS command window) and ping the remote link partner’s IP address (10.168.3.77 in our example). If the WDS link is working, you should be rewarded with a series of ping replies. The WDS link is up!
For some reason, the ESR7750 would not respond when I tried pinging it. But I could log into its web admin page just fine. So if you don’t get a ping response from the now wirelessly-connected remote link partner, try accessing its admin pages.
Now fire up your wireless notebook, check that you can see the names of both your APs in the list of available wireless networks, then choose and connect to each AP in turn. (See why it’s handy to assign different SSID’s?)
If that all works, you’re ready to power down the “remote” AP and move it to its desired location. Plug in the power, let it boot up, then repeat the tests. Congratulations! You’ve successfully made a WDS bridge!
Troubleshooting
Unfortunately, sometimes things aren’t so easy. So here are a few troubleshooting tips if you can’t get your WDS link up and running.
- If your ping test comes up with timeouts, wait a little longer and try again. I’ve found that some products seem to take awhile—up to a minute in some cases—to establish a WDS link, even after they appear to have fully booted.
- Next, double check the settings on both APs. In particular, make sure you’ve entered the MAC address of the opposite end of the WDS link in each AP’s allowed MAC address list. Also make sure that the MAC addresses themselves have been correctly entered. You don’t have to worry about confusing O’s and zeros or I’s and ones, since MAC addresses use only the letters A through F. But I’ve been bitten more than once from reading B’s as 8’s (and vice versa)!
- Then try power cycling both APs. Power down both, then power up the local (LAN-connected) one first and wait for it to come fully back up. Then power up the remote AP and wait for it to fully reboot. Then try the ping – again making sure you wait long enough before trying.
- If you’ve tried using WEP to secure the WDS link and it isn’t working, try running with no encryption. Using WEP with 802.11n gear is going to knock your throughput down to 802.11g rates anyway. And as noted earlier, you can’t use WPA or WPA2, since they use dynamically rotated keys.
If none of these steps work and you’re using APs from different manufacturers, you unfortunately may have found two products that won’t work together. In this case, there’s not much you can do besides trying another product, preferably another one of the same model for best chance of success.
Example 2: WDS bridge pair
There are more routers without built-in WDS than there are with. So you may need to resort to using a pair of WDS-enabled devices to get your bridge or repeater up and running. In my case, I found that the Atheros-based WNDR3700 didn’t play very nicely with the Ralink-based EnGeniuses. So I had to pair up the EnGeniuses to get a reliable WDS connection, as shown in Figure 10, so that I could do some throughput testing.
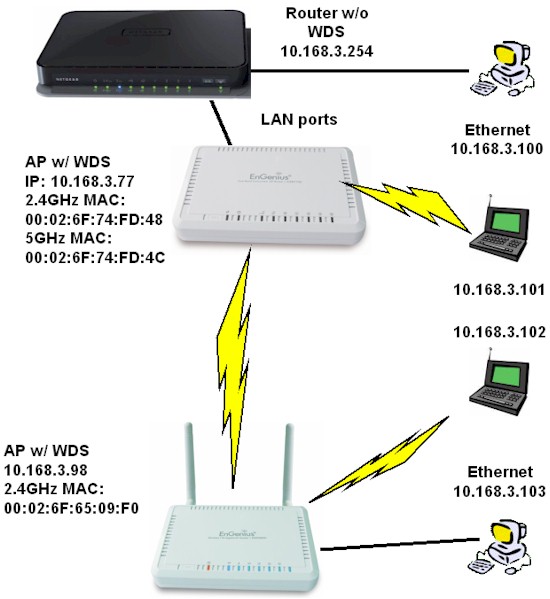
Figure 10: WDS bridge pair configuration
To set this up, I converted an EnGenius ESR9850 [reviewed] to an access point and assigned it an IP of 10.168.3.98. Then I entered each router’s 2.4 GHz radio MAC address in each other’s WDS MAC address list. I had to use the 2.4 GHz radio, because the ESR9850 is a single band router.
I also set both EnGeniuses to Channel 1, since the WNDR3700 was using Channel 11 (in 20 MHz bandwidth mode, of course). The ESR9850’s settings are shown in Figure 11.
Figure 11: EnGenius ESR9850 WDS settings
Note that the ESR9850’s Mode is set to WDS. But there is also another selector up at the top of the page. You want to leave it in the default AP Router Mode, since changing it to the Repeater Mode setting disables WDS. You set the Repeater Mode to link the ESR9850 to routers that don’t support WDS.
Almost as soon as I finished saving the settings on the second AP, the lights on both and the switch that was linking them starting the continuous flashing that indicates the network storm caused by a successful WDS link.
I then unplugged the ESR9850 and was able to ping it and reach its admin pages without even having to reboot. Just shows you what using a WDS pair with the same manufacturer chipset will do!
Performance
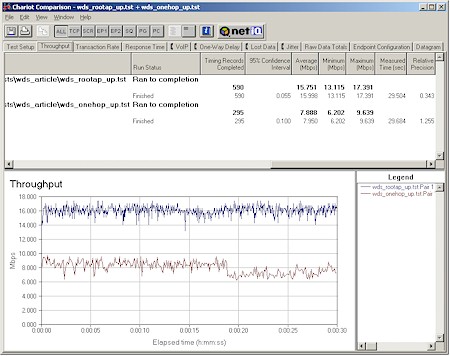
The last time I looked at WDS repeating was with 802.11g gear. Figure 12 shows the throughput that I found by associating a wireless client with the root AP (the one connected to the wired LAN) and a single-hop WDS partner.
Figure 12: 802.11g WDS throughput comparison – Base AP and one hop
The almost 16 Mbps from the root AP isn’t up to snuff with the 20 – 25 Mbps that you’ll get from present-day 11g products. But the main point is the 50% throughput reduction (15.8 Mbps to 7.9 Mbps) produced by the single WDS repeating hop. Once again, this is because the repeating AP has to receive, then retransmit with a single radio, which uses twice the radio’s bandwidth.
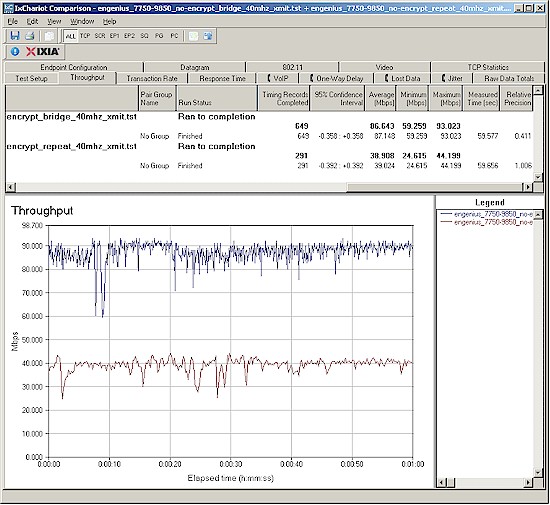
The 50% throughput hit doesn’t change when repeating with 802.11n products. But since you start with more bandwidth, you end up with more bandwidth from a repeated connection. Figure 13 illustrates a bit different scenario than Figure 12, comparing throughput from a client connected to the remote WDS partner with Ethernet and wireless connections.
Figure 13: 802.11n throughput comparison- wired and repeating connections
Since the EnGeniuses default to using Auto 20/40 MHz bandwidth mode (because they are not Wi-Fi Certified), the performance shown is a bit higher than you’d see using a Wi-Fi compliant 20 MHz channel bandwidth. But the relative performance would be similar.
The upper trace ("bridge" trace) shows almost 87 Mbps throughput between a wired client on the LAN, through a 2.4 GHz WDS connection initiated by an ESR7750, to a test client connected to one of the remote ESR9850’s Ethernet ports. The lower trace ("repeat" trace) uses the same setup, but with the client connected via 802.11n wireless to the ESR9850.
You can see once again, ~50% throughput reduction from the repeating connection (86.6 Mbps to 38.9 Mbps). But where we got around 8 Mbps from 11g repeating, the 11n repeater yields almost 40 Mbps!
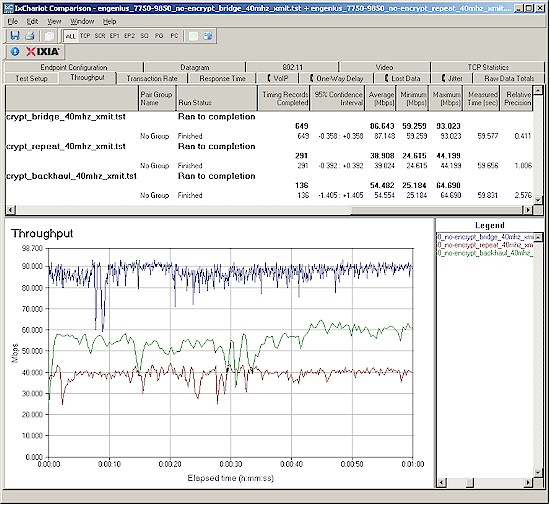
But what if you don’t want the 50% penalty from repeating, but still want a wireless connection at the remote end? With a two-radio AP at the remote end of the connection, you can set up a WDS "backhaul" link and then use the second radio for a normal, non-repeated wireless LAN.
Figure 14 shows that this method ("backhaul" trace), produces throughput somewhere in between the two other methods at 54 Mbps. To get this connection, I swapped the positions of the single-band ESR9850 and the simultaneous dual-band ESR7750, making the ESR7750 the remote WDS partner.
Figure 14: 802.11n throughput comparison- wired repeating and backhaul connections
The downside of using a dual-band simultaneous router is that you can’t set both radios to the same band. So you need to choose where you want the better range, in the backhaul link, or far-end WLAN. I’d tend toward using 2.4 GHz for backhaul and 5 GHz for the remote WLAN. But that only works if you have dual-band capable clients.
Closing Thoughts
WDS can come in very handy for extending wireless LANs or connecting wired LANs where a cable isn’t practical. But the technique is difficult to configure and has compatibility problems due to its use of non-standard technology. And since it is limited to using WEP encryption, you’re forced to sacrifice throughput when using WDS with 802.11n gear.
But there is a better and easier way to extend your wireless LAN. Next time we’ll explore bridges and repeaters that don’t need no steenking WDS to work.

