Introduction
ASUS made a bold (and perhaps foolish) move by exposing a large set of controls for the Smart Connect feature in its RT-AC3200 router. And to make matters worse, ASUS provided no documentation for them. As a result, many buyers have experiencing frequent client disconnects and have disabled Smart Connect to keep everything connected. But since you spent all that money for a router that’s supposed to automatically arrange client connections to maximize total bandwidth, don’t you want to use it?
Before writing this, I asked both ASUS and Broadcom for help. Broadcom responded with excerpts from a 47XX_53XX Applications note that were very helpful in preparing this article, but are by no means user friendly. (They’re intended for developers only.) ASUS said work on its Smart Connect documentation is underway, but with no estimated availability. So I’m plunging into the void.
To recap, Smart Connect is part of Broadcom’s XStream technology that’s at the heart of all AC3200 class routers. It is intended to automatically steer clients to one of three radios (one 2.4 GHz, one low-band 5 GHz, one high-band 5 GHz) to maximize total wireless throughput use. See this article for more info on Smart Connect.)
ASUS is the first to expose Smart Connect controls to users. NETGEAR’s R8000 Nighthawk X6 and Linksys’ EA9200 both let you only turn Smart Connect on and off. NETGEAR doesn’t do any dynamic band steering on the R8000 and doesn’t steer STAs between 2.4 and 5 GHz. Linksys’ implementation dynamically steers clients between the two 5 GHz radios only.
ASUS has configured the most aggressive Smart Connect implentation yet. The default settings steer clients dynamically, i.e. in response to changing conditions, and also between bands. But ASUS seems to have started out too aggressively with Smart Connect, because many users have reported frequent disconnects as clients are shuffled among radios. We also found in our own testing that Smart Connect made very odd choices in assigning STAs.
The purpose of this article is to document what the Smart connect controls do and offer insight into how they work so that users can intelligently tune them to their needs.
Overview
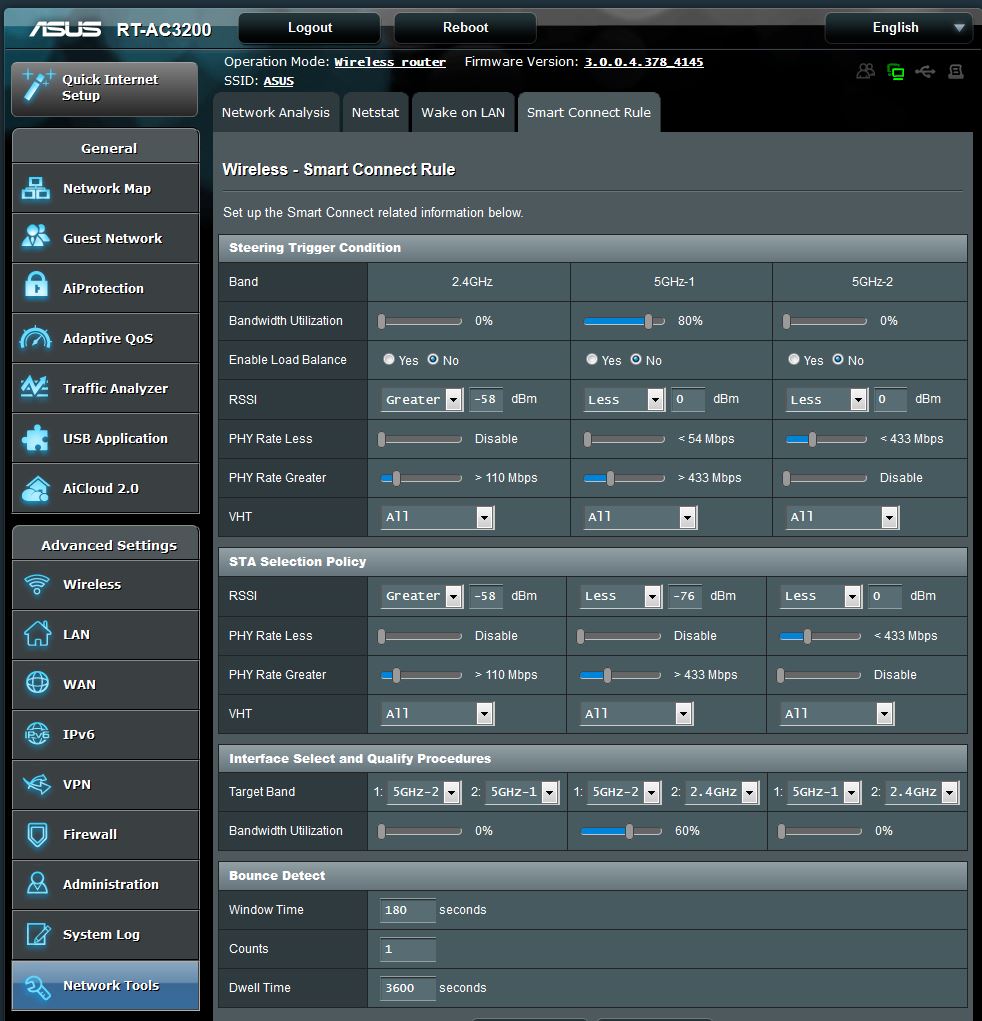
Smart Connect Rule controls are found on the Network Tools page, Smart Connect Rule tab as shown below.

Smart Connect Rules
Controls are divided into four sections:
- Steering Trigger Condition
- STA Selection Policy
- Interface Select and Qualify Procedures
- Bounce Detect
The rule set groups are logically arranged, top to bottom, in the order applied.
Steering Trigger Condition
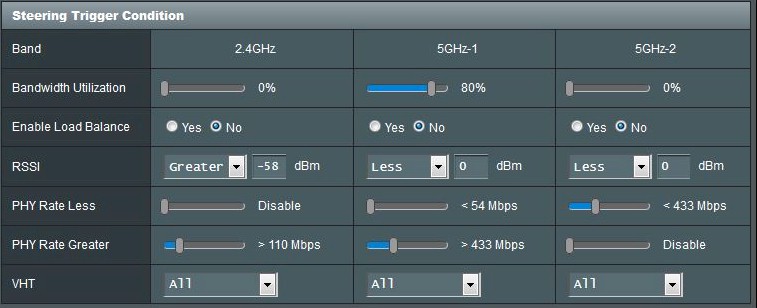
This set of controls sets the criteria to initiate band steering. Clients (STAs) are always associated first, then band-steered according to the rule sets. There are three sets of controls, one for each radio. Controls are ANDed, i.e. all conditions must be met to trigger steering.

Steering Trigger Condition Controls
Bandwidth Utilization
When bandwidth use exceeds this percentage, steering will be initiated. Broadcom’s documentation doesn’t say how utilization is measured.
Enable Load Balance
This contols load balancing. Broadcom’s documentation doesn’t indicate how balancing is done.
RSSI
If the received signal level of any associated STA meets this criteria, steering will be triggered.
PHY Rate Less / PHY Rate Greater
These contols determine STA link rates that trigger band steering.
VHT
This controls determines how 802.11ac and non-ac STAs are handled.
- ALL (default) means any type of STA can trigger steering
- AC only means a STA must support 802.11ac to trigger steering
- not-allowed means only non-802.11ac STAs will trigger steering, i.e. 802.11a/b/g/n
Now let’s see how the default settings work.
Band steering will be started on the 2.4 GHz radio when RSSI is higher than -58 dBm (moderate to strong signal level) and link (PHY) rates are greater than 110 Mbps for any type client. Bandwidth utilization doesn’t affect the steering trigger decision and load balancing is not done.
The 110 Mbps criteria is key here. It means that 802.11g STAs won’t trigger steering because their maximum link rate is only 54 Mbps, but 802.11n and ac STAs can, depending on their link rates. Keep in mind the trigger acts on actual link rates negotiated in the STA connection, which depend on many factors, most notably signal level.
Band steering will be triggered on the low band 5 GHz-1 radio (Channels 36, 40, 44, 48) when bandwidth utilization is higher than 80% and link rate is less than 54 Mbps or greater than 433 Mbps for any type client. The 0 dBm RSSI setting means signal level is basically ignored, since open air RSSIs generally don’t exceed -20 dBm and definitely don’t for 5 GHz STAs.
The PHY Rate Less setting of < 54 Mbps means any 802.11g (or 802.11a) client connecting to this radio will trigger steering. The PHY Rate Greater setting of > 433 Mbps means most 802.11n clients won’t trigger steering, but 2×2 (AC1200) and higher class AC STAs will, if they receive medium to strong signal levels. If an N450 class STA connects (it would have to be very close by to achieve the maximum 450 Mbps 3×3 N link rate), it will also trigger steering.
Band steering will be triggered on the high band 5 GHz-2 radio (Channels 149, 153, 157, 161, 165) when any STA connects with a link rate lower than 433 Mbps. Everything else is ignored. So only AC580 and higher class STAs should remain connected on this radio, if they are receiving strong signals.
STA Selection Policy
Once steering has been triggered, these controls determine STAs that get steered. The controls here are a subset of the Steering Trigger Condition controls and are somewhat redundant. After all, if a STA triggers steering, shouldn’t it end up steered?

STA Selection Policy Controls
Since the controls are a subset of those above, let’s just see what the defaults do.
On the 2.4 GHz radio, the selection policy is the same as the trigger criteria. So any STA with RSSI higher than -58 dBm (moderate to strong signal level) and link rate greater than 110 Mbps will be steered.
On the low band 5 GHz-1 radio, STAs need a moderate RSSI of -76 dBm, but a link rate higher than 433 Mbps to be steered. This generally indicates only 2×2 and 3×3 AC STAs with medium signal levels should be moved off this radio.
On the high band 5GHz-2 radio, any STA with link rate lower then 433 Mbps will be steered. The RSSI criteria of less than 0 dBm means signal level is basically ignored. Simply put, non-AC STAs and AC STAs with low signal levels (which lower link rate) will be moved off 5GHz-2.
This radio is supposed to allow high link rate clients only. But in one of the Smart Connect trials run as part of the RT-AC3200 review, all clients ended up on 5GHz-2. Clearly there are some bugs in the system!
Interface Select and Qualify Procedures
These controls determine where the steered STA will end up. The Target Band controls specify first and second choice of steering targets. STAs meeting the STA selection policy criteria for the radio will be steered to the first target if that radio’s Bandwidth Utilization is less than the set value. Otherwise, the STA will be sent to the second Target Band radio.

Interface Select and Qualify Procedures Controls
On the 2.4 GHz radio, the default settings shown above will steer the STA to the high band 5GHz-2 radio if it is is not in use, i.e. its bandwidth utilization is less then 0%. Otherwise the STA goes to the low band 5GHz-1 radio.
For the low band 5GHz-1 radio, the STA will be sent to the high band 5GHz-2 radio if its bandwidth utilization is less than 60%. Otherwise the STA goes to the 2.4 GHz radio.
For the high band 5GHz-2 radio, the STA will be sent to the low band 5GHz-1 radio if it is is not in use. Otherwise the STA goes to the 2.4 GHz radio.
Allowed values are shown in the table below. Current defaults with 3.0.0.4.378_4145 firmware are bold.
| Radio | 2.4GHz | 5GHz-1 | 5GHz-2 |
|---|---|---|---|
| Target #1 | -5GHz-1 -5GHz-2 |
-5GHz-2 -2.4GHz |
-5GHz-1 -2.4GHz |
| Target #2 | -5GHz-1 -none |
-5GHz-2 -none |
-2.4GHz – none |
Target Band values
Bounce Detect
The last set of controls determines how often a STA can be steered. This is intended to prevent STAs from constantly moving around. It does not, however, prevent STAs from disconnecting on their own, or counting them as bounces if they do. Each STA can be steered N Counts within the Window Time. When the Count limit is hit, the STA won’t be steered again for Dwell Time.

Bounce Detect Controls
Note however, that Smart Connect takes bandwidth use of the STA into account so that the target radio doesn’t get overloaded. In other words, if the STA is using a lot of bandwidth, it won’t be moved to an already busy radio. Broadcom keeps these decisions to itself and doesn’t let them be messed with even by product manufacturers.
The default settings allow each STA one move every 3 minutes. If the STA tries to be steered more often, it will be prevented from being steered for an hour.
The Dwell Time setting was the only Smart Connect changed (from 1800 seconds) between the 378_4129 and 378_4145 firmware revs.
Wrap Up
At least now you know what all these controls are supposed to do. How they actually work is subject to the usual plethora of bugs ASUS seems to like to bake into its products to keep its fans happy and RMerlin busy.
Now you can knowledgeably experiment to see if you can get Smart Connect to deliver! Be sure to share your discoveries / recipies in the Forums.
