Introduction
In Part 1, we got acquainted with the small, but mighty NanoPi NEO2 that is the heart of our Wi-Fi Analyzer and showed how to use its built in HTML 5 speed test. This time, I’ll show you how to use the WLAN Pi to choose Wi-Fi channels where you’ll have the best chance of getting your share of bandwidth.
Most of us have used one of the many apps that show you the signal strength, channel and SSID of neighboring Wi-Fi networks. My current favorite is Zoltán Pallagi’s WiFi Analyzer, but I’m sure you have yours. The good news about these apps is they quickly show you what you’re up against in choosing "best" channels for your router.
The sample screenshot taken from WiFi Analyzer’s gallery shows quite a few 2.4 GHz networks to deal with. But at least they are all using 20 MHz bandwidth and are on non-overlapping channels 1, 6 and 11.
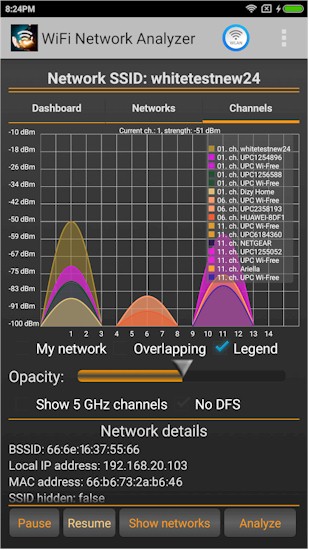
Busy 2.4 GHz Wi-Fi neighborhood
My Wi-Fi environment, with the app running on a Moto X Gen 2 smartphone, is much cleaner because I’m in a neighborhood with lots of trees and large lots. The only networks I see are my own. The 5 GHz plot is actually misleading as we’ll see in a sec.
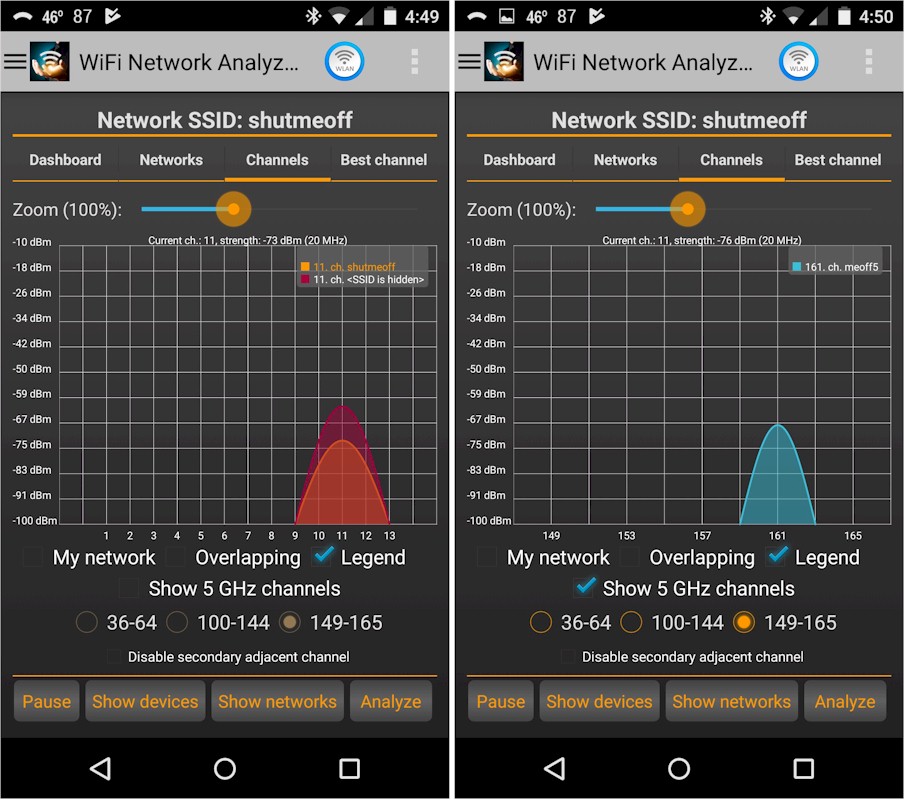
My Wi-Fi environment
Here’s another view of my neighborhood using a Galaxy Tab A and VREM Software Development’s WiFiAnalyzer (open-source). This combination picks up my neighbor’s 2.4 GHz network parked on Channel 3. But it also properly shows the 80 MHz bandwidth (four channels) that my 802.11ac 5 GHz network eats up.
My router is actually set to Channel 161, which is the "primary" channel. But since it’s a typical consumer router, it defaults to using 80 MHz of bandwidth. If I had used channel 149, 153 or 157, the plot would look the same but the numbers in the legend would change. Similarly, using any of the four 5 GHz low band channels (36-48) would also show an 80 MHz wide chunk o’ spectrum taken up.
It’s worth noting that no enterprise Wi-Fi network administrator would use 80 MHz bandwidth 5 GHz channels. 5 GHz networks—even those supporting 802.11ac—you use most anywhere other than your home use 5 GHz 20 MHz channels, or, at most 40 MHz. Using 20 MHz channels provides 8 non-overlapping channels vs. the two you get using 80 MHz (this is without using DFS channels), providing higher overall network capacity.
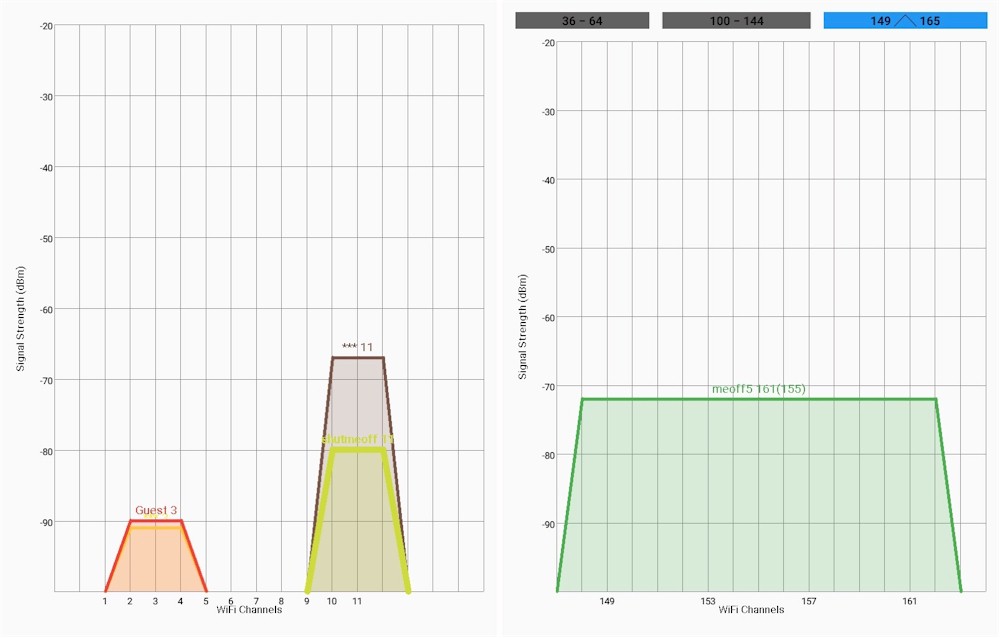
My Wi-Fi environment – alternate view
Unfortunately, none of these apps can show the most important factor about your neighboring networks, i.e. how busy they are. The reason you care about this is that all networks operating on the same channel share its bandwidth. So you want to find a channel where you’ll have a better chance at getting your share of airtime. Generally, this means you want to look for networks that have fewer and faster devices. You can’t do this with a tool that shows mainly channel and signal strength information.
Kismet
The tool we’ll be using is Kismet. This app has been around a long time and can be used for wardriving, wireless reconaissance and intrusion detection. The version that is installed on WLAN Pi is the current development version that uses the web GUI shown below.
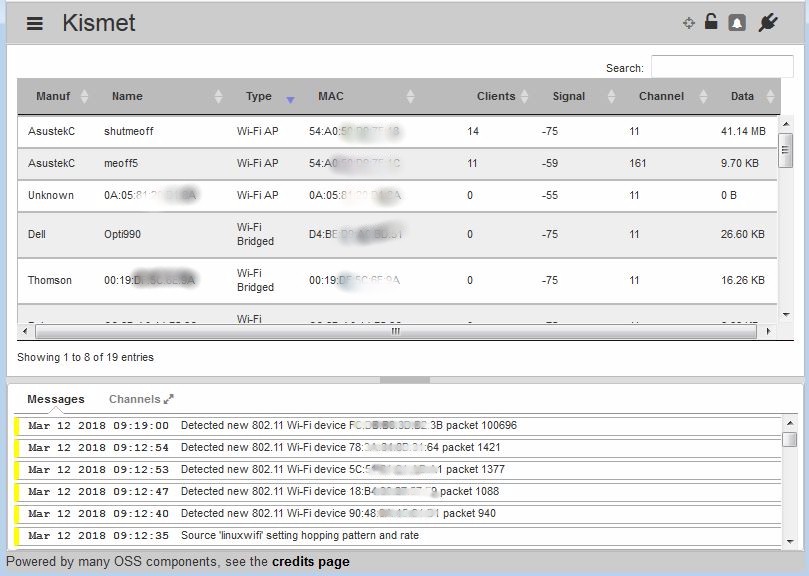
Kismet main view
Kismet is accessed by clicking on its link on the WLAN Pi landing page. The Kismet Mobile version shown in the opening image above isn’t really suited for what we want to do.
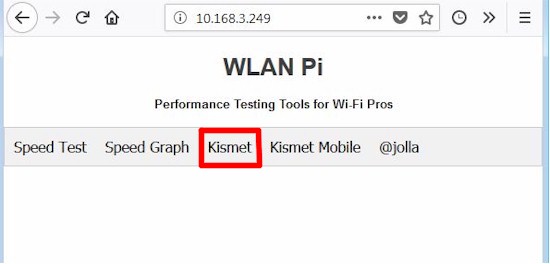
Lauching Kismet
The first time you access Kismet, you’ll get a login error. The screenshot below, taken from the Real World Mobile WLAN Testing – Part 2 WLPC session document shows how to fix this. Login credentials are stored in the browser, so you won’t have to re-enter them unless you change browsers or clear browser data.
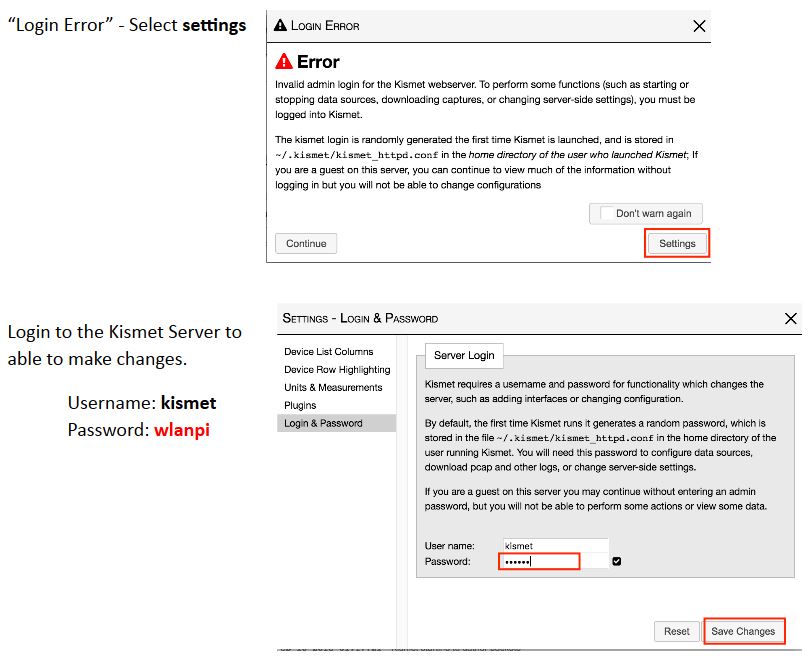
Fixing Kismet login
Although you’ll be using the web GUI most of the time, you’ll need to SSH into the WLAN Pi and use the command line interface to change some Kismet parameters that aren’t available from the GUI. I’m using Windows and used putty for SSH connection. I also used WinSCP, which is much easier to use for directory browsing, up and downloading files and even file viewing and editing. Both are free.
It’s also important that you use a dual-band 802.11a/b/g/n adapter and not any of the 802.11ac adapters mentioned in Part 1. As I worked with WLAN Pi in preparing these articles, I realized it wasn’t providing proper information. The screenshot below was taken while using the Comfast CF-912AC USB AC1200 adapter mentioned in Part 1. In addition to reporting devices on channels not actually in use, i.e. 10, 13, 48, it also misreported the meoff5 SSID on channel 165 when it was set to 161. Devices would also change channels over time and the same SSID would be shown on both 2.4 and 5 GHz channels.
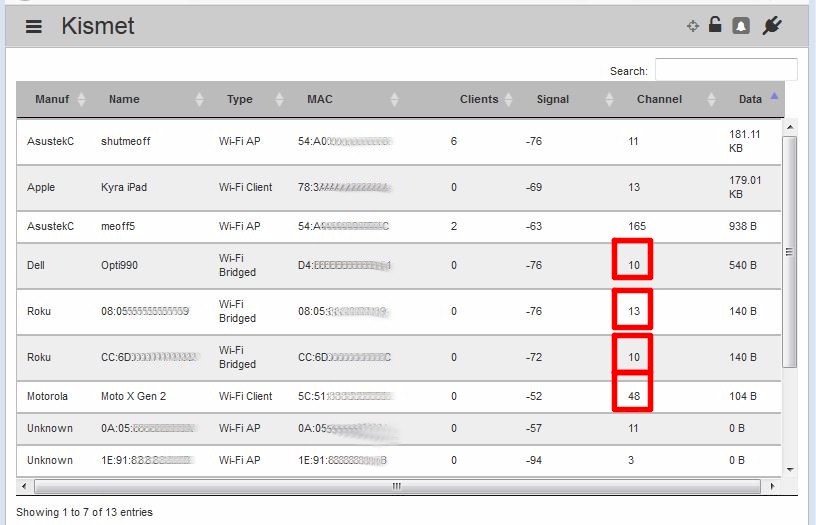
Wrong information when using 802.11ac adapter
To reinforce my point, the Kismet readme for the current development version (search for Supported Hardware) has more information about supported hardware and doesn’t recommend any 802.11ac adapters.
Switching to a dual-band N adapter that uses a Ralink RT3572 chipset yielded results that made much more sense. I used both an Alfa AWUS051NHv2 that you might have a hard time obtaining and an ASUS USB-N53, which appears to be in plentiful supply. If you don’t like those options, you can explore other options using Wikidevi’s list of Ralink RT3572 based adapters.
Kismet is controlled using text-based configuration files stored at /usr/local/etc:
- kismet.conf
- kismet_alerts.conf
- kismet_httpd.conf
- kismet_logging.conf
- kismet_memory_conf
- kismet_storage_conf
- kismet_uav.conf
However, since these files are owned by the root user and stored in a different directory than Kismet, they are cumbersome to change. Fortunately, Kismet has the option of creating an override config file, kismet_site.conf. Any options in this file replace options of the same name in any of the other conf files. Kismet looks for kismet_site.conf in the /usr/local/etc directory by default. But by changing the opt_override option in kismet.conf, you can locate this file where you like.
Since Kismet keeps its log files in the kismet directory by default, that’s where I put my kismet_site.conf file. Here are the steps to edit the default kismet.conf file to point to the new location for kismet_site.conf.
- SSH into WLAN Pi using putty or your favorite SSH client. The WLAN Pi’s IP address is shown on the OLED display. Use wlanpi for both username and password.
- Change to the /usr/local/etc directory:
cd /usr/local/etc
- Edit the kismet.conf file changing opt_override=%E/kismet_site.conf to opt_override=/home/wlanpi/kismet_site.conf. Both vi and vim editors are supported. Be sure to preface your edit command with sudo to temporarily act as root or you won’t be able to save your edits.
You can now create your kismet_site.conf in /home/wlanpi. The one I created can be downloaded and uploaded to your WLAN Pi using WinSCP. You can also create it from scratch directly in /home/wlanpi using vi or vim. My file does the following:
- Sets channels 1,6,11,36,40,44,48,149,153,157,161 to be scanned. There is also a commented-out line to use to disable channel hopping and monitor only one channel
- Sets channel hop speed to 2/sec
- Enabels logging and changes the log type to pcapng.
- Clears the device list when Kismet starts
One of the good/bad things about Kismet is that it retains captured data pretty well. This was a pain, however, once I discovered the 11ac adapter was lying to me, switched over to the dual-band 11n adapter and wanted the old data to disappear.
Including persistent_load=ondemand in the override file fixed this, clearing the main display of not only devices but also messages when Kismet was started. Restarting Kismet using sudo service kismet stop and sudo service kismet start was also pretty reliable for clearing the display and starting a new log file. If all else fails, you can power cycle the WLAN Pi to start anew.
Note: For those who want root access, WLAN Pi isn’t set up to allow you to log in as root. But you can use the su command (password=Wlanpi!) to act as root for as long as you want. Just be sure to exit by typing ex when you’re done with root duties.
I found the pcapng log more useful than using the default kismet log type and running one of the Python-based conversion tools found in /home/wlanpi/kismet/log_tools. The pcapng file can be opened with Wireshark to further explore captured packets to learn more about devices.
One more thing. Kismet is an HTML5 application and stores some of its data in web browser memory. So if you really want to start fresh, you’ll need to clear browser history and cache. This will wipe out any settings changes you made, as well as the Kismet login
Analyzing The Data
Now that Kismet is configured and running, let’s see what it can tell us. Be warned that Kismet presents a lot of data and it’s easy to get lost. But if you stay focused, you’ll do fine.
The screenshot below was taken after Kismet was running for about 15 minutes on my very quiet WLAN, which is currently using a dual-band ASUS router with shutmeoff as the 2.4 GHz SSID (Name column) and meoff5 as the 5 GHz SSID.
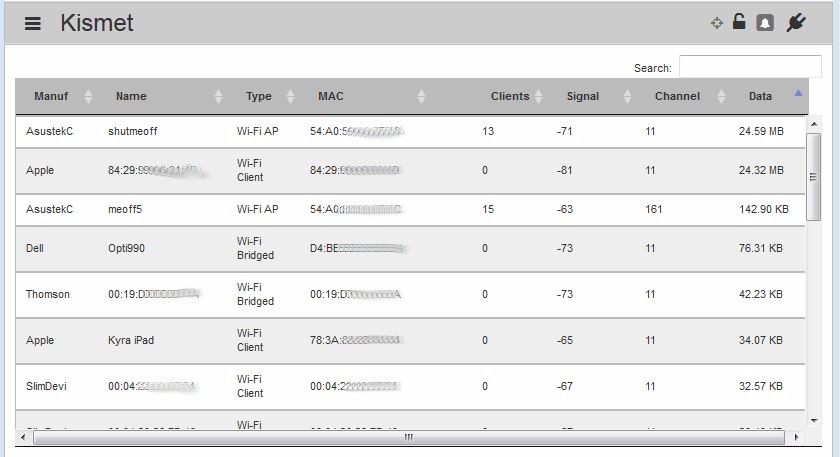
Network summary – low activity area
Just by looking at this top level screen, we can see each SSID has about same number of STAs connected (13 on shutmeoff, 15 on meoff5), but shutmeoff shows much more data used (24.59 MB vs. 142.9 KB). This looks like a slam dunk; 2.4 GHz is handling over 100X more data than 5 GHz. But remember we’re using an adapter that can’t decode 802.11ac data packets! So it will be able to report 5 GHz data only for 802.11a and 11n devices.
So what we can say about the 5 GHz SSID above is that it’s unlikely any 11a or 11n devices are very active.
The next screenshot shows a much more active area. The Search box acts like a case-sensitive filter and was used to filter the view to show only APs; it found 752 out of 1,443 devices were AP’s!
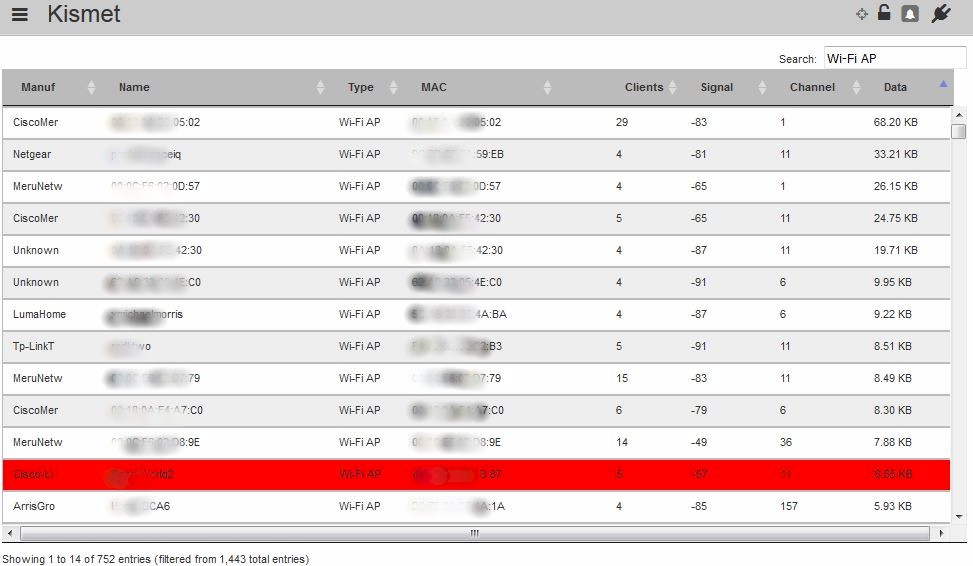
Summary of APs in busy area
Although the data totals per AP are pretty low, you’ll need to manually total the data on each channel before making a decision. Using data from just the top 13 networks shown, says we’d probably want to choose Channel 6 for 2.4 GHz.

Channel totals – busy area
The search function doesn’t support multiple search terms, so we can’t say "show me only 5 GHz access points". So we need to do more work to choose a low-usage 5 GHz channel. Since we’re not using an 11ac adapter, Kismet can’t show us data totals for 5 GHz 11ac devices, only 11a or n. So to get a more accurate view of how busy an AP is, we need to look at packet use, which is shown in the Device Details screen.
The screenshot below was created by clicking on the Channel 36 AP line (left) and top Channel 1 line (right). There is a lot more info here in multiple tabs, but what we’re looking for is in the Wi-Fi (802.11) tabs. We see the 5 GHz AP moved more packets (453 vs. 367), and had a much higher management packet overhead (347 vs. 88).
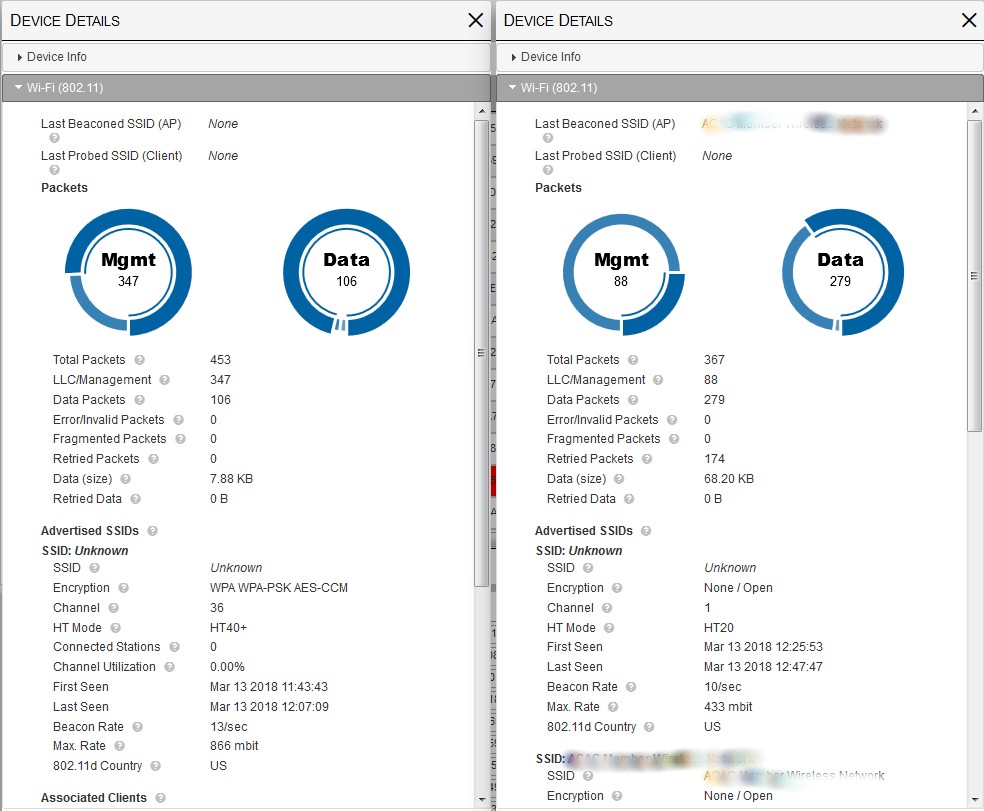
Kismet 802.11 details – top 5 GHz and 2.4 GHz APs
The LLC/Management packet total includes beacons and probe requests/responses, which don’t eat up a lot of airtime, but will always be the highest percentage of packet types seen in a network. But it also includes TCP/IP acknowledgements (acks) and block aks, which indicate data transfer activity. Unfortunately, Kismet doesn’t provide a further breakdown of LLC/Management packets, so we’ll need to make our 5 GHz judgement by comparing total LLC/Management packets.
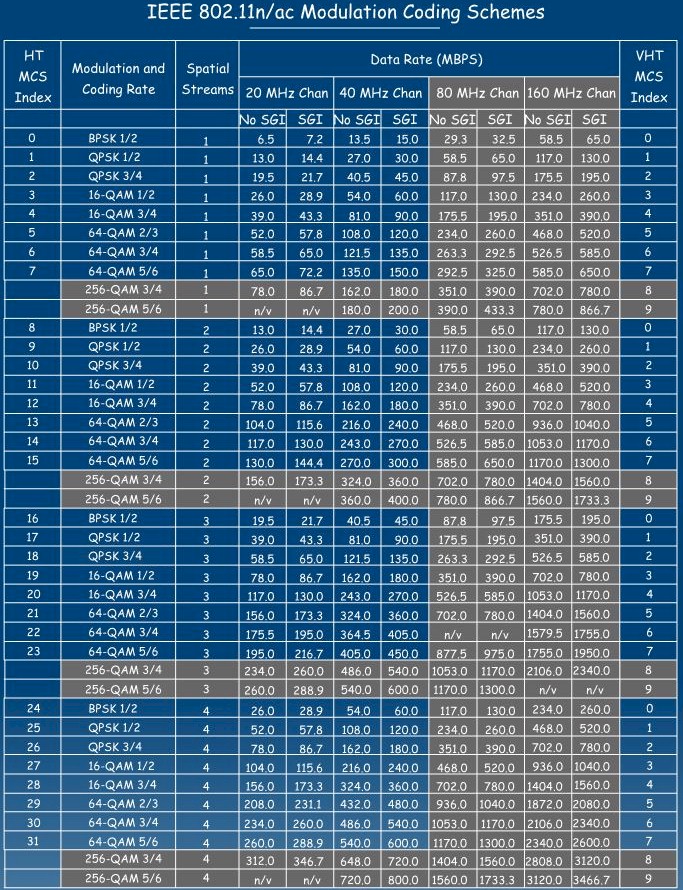
The next screenshot shows the top two 5 GHz APs in the AP sort, using Channel 36 (left) and Channel 157 (right). The Mgmt packet totals show the Channel 36 AP is likely much busier than the Channel 157 AP (347 vs. 90). Other information we can glean from the details is that the Channel 36 AP is a two-stream 802.11ac AP (866 mbit) and is set to use only 40 MHz bandwidth vs. the usual 80. This indicates it’s likely part of a business network. It also has an almost 3X faster beacon rate, which could contribute to its higher LLC/Management packet count.
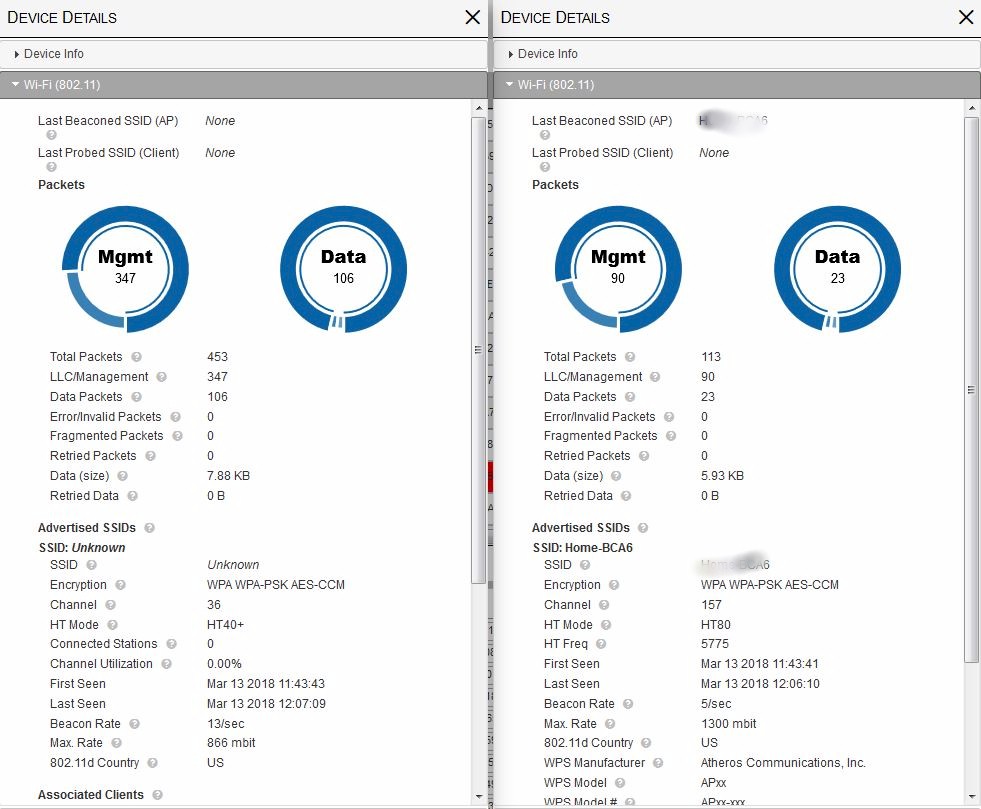
Kismet 802.11 details – top 5 GHz and 2.4 GHz APs
The Channel 157 AP is a three-stream 802.11ac AP (1300 mbit) using 80 MHz bandwidth, so it’s probably a consumer router. The fact it also supports WPS reinforces this conclusion.
The stream information is looked up from the MCS table below by going down the appropriate column until you find the displayed Max. Rate, then looking at the Spatial Streams column for that row. You’ll usually find your rate in the SGI (Short Guard Interval) column.
Kismet Wi-Fi information for SSID shutmeoff
I should note interpreting 2.4 GHz APs is a little tricky, since the Max. Rate shows the fastest rate supported by the AP. If it’s a dual-band 3×3 AP like the one shown below, you’ll see 1300 mbit reported because that’s what the 5 GHz radio maximum link rate is.
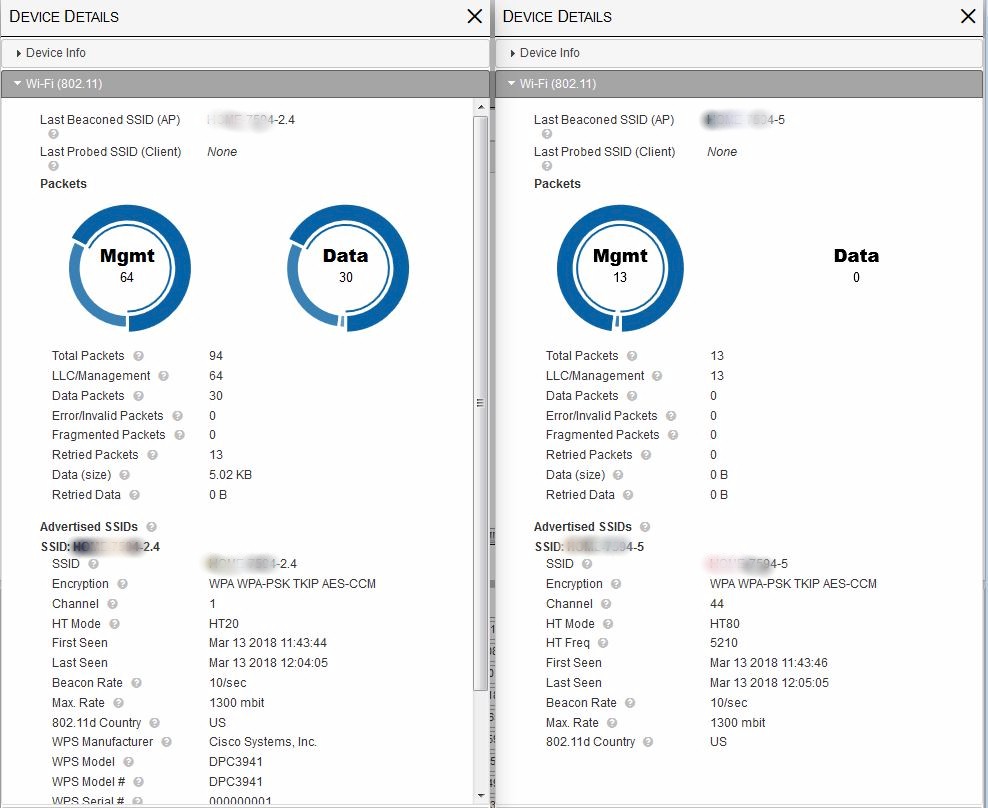
Kismet 802.11 details – dual-band AP
Kismet Tips
Kismet’s official documentation is its readme files, found on https://www.kismetwireless.net. The Old/Stable documentation describes the character-based Kismet, which is no longer being developed. Most of the information you search up on the net will be based on this version.
The Development/Git version has the web GUI and is the one found on WLAN Pi. Because it’s newer, you’ll find fewer articles about it and have to be more creative in your web searches.
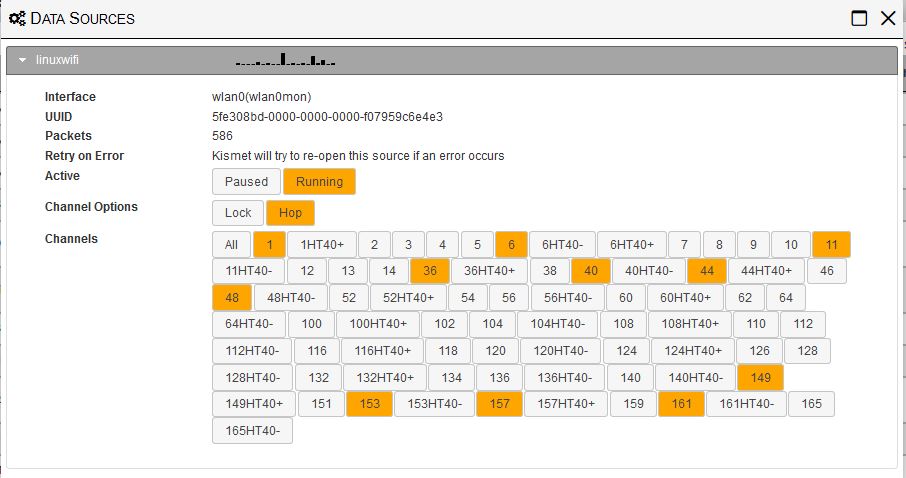
Channel selection is done via the hamburger menu Data Sources item and expanding the data source shown. First pause data capture, then select the Lock option to monitor only one channel. Hop will allow selecting multiple channels, but always starts by first selecting all channels when you change from Lock. This makes it tedious to narrow the list. That’s why the configuration in our kismet_site.conf file mentioned earlier, starts with the channel configuration shown below.
Kismet alerts
Kismet will sometimes show alerts while it’s capturing data. If you’re in a busy area, you may see warnings about dropped packets like shown below. You can try messing with settings in kismet_memory.conf as suggested. But it’s usually quicker and easier to scan fewer channels.
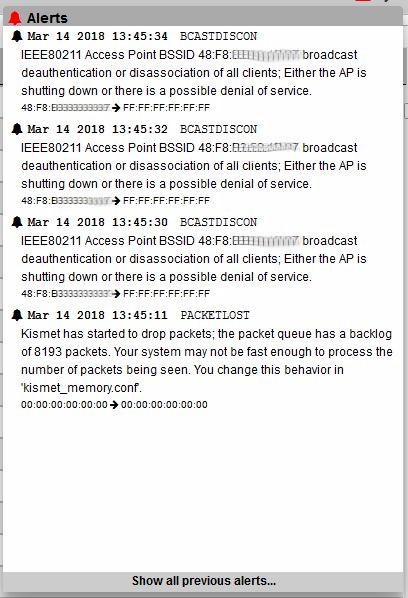
Kismet alerts
The alert also flagged up a more interesting event, announcing it had found broadcast deauthentications on that AP. These events would have forced any connected STAs off the AP. Deauthentications aren’t always bad; they’re sometimes used to, uh, encourage devices to move to another AP. This is sometimes referred to as roaming "assistance" and uses deauthentication of individual STAs.
Kismet doesn’t flag individual deauths, but does flag broadcast deauths because they can indicate a denial of service attack, at noted in the alert. Spoofed broadcast deauths are also used to generate a lot of reassociation traffic, which is a technique used for WEP and WPA key cracking.
You can customize Kismet’s display a few ways. The Settings > Device List Columns menu (under the hamburger) is where you adjust the columns shown on the main Kismet screen. I removed the Capture Phy name column because it was always 802.11.
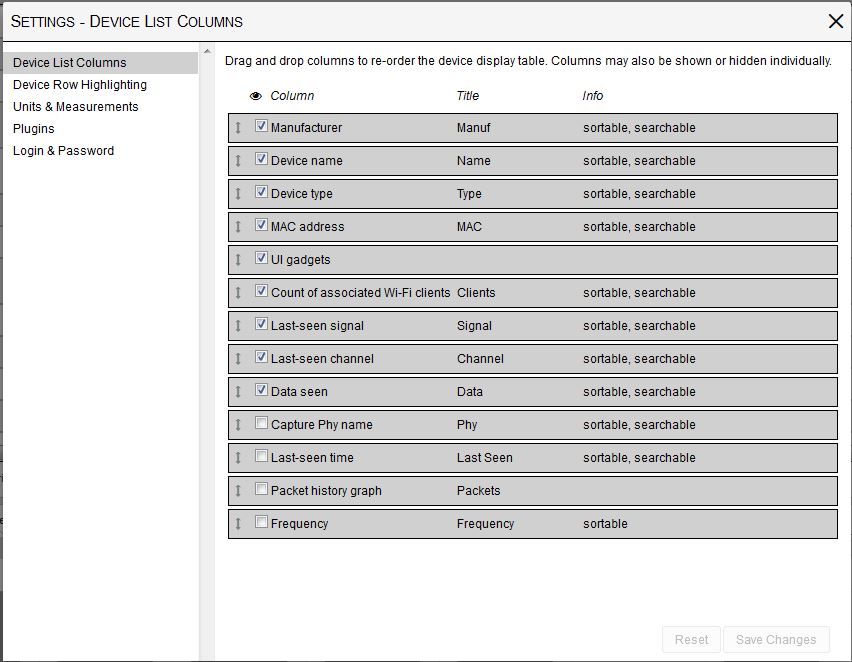
Device List Columns setting
You can change a device name in the Device Details > Device Info tab (click on an item on the main screen). This lets you more easily recognize devices. The Fing Android app does an excellent job of resolving Host, Bonjour, SNMP and NetBIOS names and is what I used to change a few names for high data-use devices. Once you change a name, or any other setting, it will stick between WLAN Pi reboots because it is stored in web browser memory.
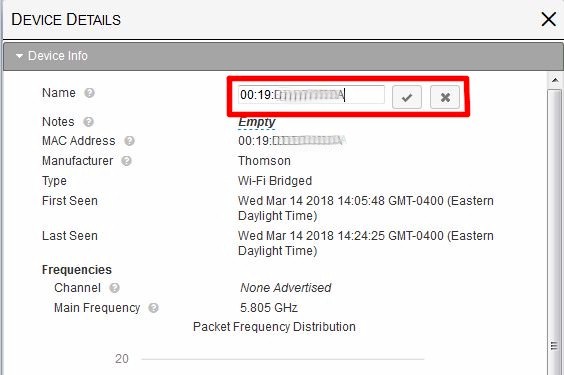
Changing device name
Some things that need work are the Device Details > Packet Graphs tab. The auto-rescaling seems too aggressive, probably due to limited screen space, and is applied per line. So you can’t get an at-a-glance sense of relative packet volume.
Similarly, the Channel display at the bottom of the main screen isn’t helpful. I couldn’t find a way to relate any of the numbers it was showing to the Clients column, even using the Historical view.
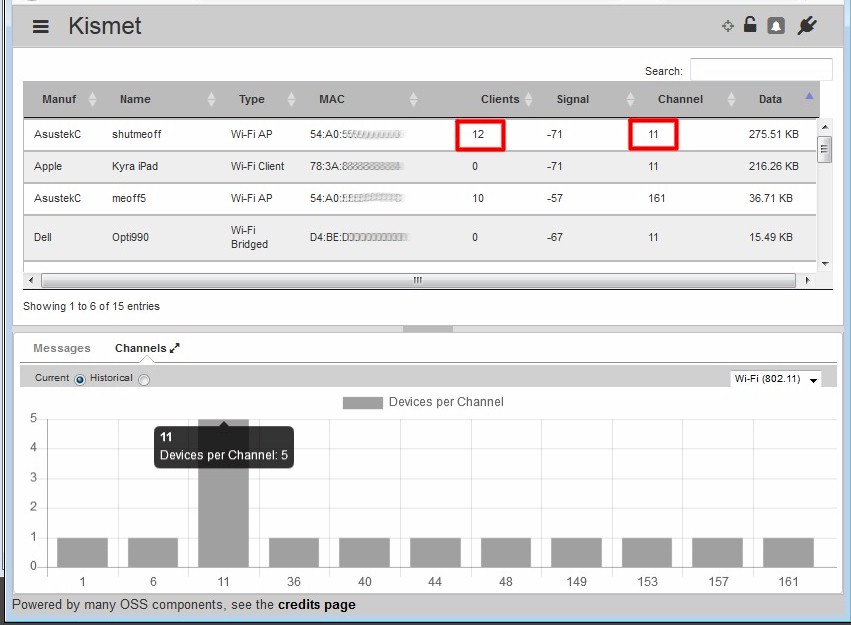
Clients per channel mismatch
One last tip: keep an eye on storage use. If you leave WLAN Pi running for long periods and are in a busy area, log files can start eating into your flash capacity. If you let them grow unchecked, you’ll run out of space and WLAN Pi will crash.
Since Kismet log files are stored in /home/wlanpi by default, they’re easy to keep track of and remove using rm. Since you (user wlanpi) own the Kismet log files, you don’t need to preface rm with sudo.
You should keep an eye on system log files in /var/log, too. Older logs are zipped (.gz) and can usually be safely removed to free up space. sudo df and sudo du can help track down space hogging files.
Closing Thoughts
I hope you can see how Kismet can help you better choose a wireless channel in a busy area. It can capture a lot of data and organize it in ways that provide insight into what’s going on in your Wi-Fi neighborhood. While it can’t do RF spectrum analysis to show you non Wi-Fi devices that could be interfering with your Wi-Fi happiness, it can do a hell of a lot to improve your insight into your Wi-Fi surroundings…and for way under $100.
That said, it’s not a perfect tool. If you’re expecting to run it and have Kismet magically announce the guaranteed bestest channel, well, it’s not gonna happen. It can help your decision process, but in the end, you have to put in the work to understand the data.
The other thing to remember is that your Wi-Fi environment is constantly changing. What could be the right channel during the middle of the day can become an overloaded hell come early evening. Fortunately, WLAN Pi and Kismet are great for ongoing monitoring too, whether continuously or when things get wonky in Wi-Fi land.
Have fun and happy hunting!
Thanks
A big tip o’ the SNB hat goes to
- Keith Parson’s Wireless LAN Professionals Conference (WLPC), where I was introduced to WLAN Pi
- Scott McDermott & Jerry Olla for their work in developing WLAN Pi
- Jerry Olla for patiently answering my WLAN Pi questions
- Mike Kershaw for his tireless work on Kismet. Support him on Patreon.
- Friendly Elec for making the NEO2
