Introduction
| Linksys Wireless-G Ethernet Bridge with 5-port Switch | |
|---|---|
| Summary | 802.11g bridge with 5 port 10/100 switch supporting VLAN and QoS features, including bandwidth limiting |
| Update | None |
| Pros | • Low-cost bandwidth management and VLAN features • Works with APs & routers without WDS • Supports WPA |
| Cons | • QoS can’t be applied on an application level • Poor wireless distance performance |
After a series of uninspired products, Linksys seems to be getting its groove back again. First the NSLU2 [reviewed here], which is re-defining the SOHO NAS market and now the WET54GS5. Given the way its product description on its website is written, I’m not sure that Linksys realizes the value of the multi-talented little box that it has produced. But by the time you’re done with this review, I hope that you will!
Features
The GS5 is much more than its long, but unassuming name implies and I’ll get to that in a minute. But first let me correct an assumption that you might have from its product number. I don’t know why, but the “GS” in the name does not mean that the WET54GS5 is part of Linksys’ SpeedBooster line that includes the WRT54GS router and WPC54GS CardBus card. Instead, it supports just good ol’ straight 802.11g, something that seems a rarity in a market rife with 11g products tarted-up with throughput enhancements of various flavors.
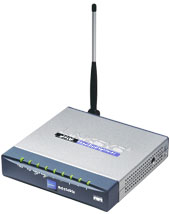
The GS5 comes in a Cisco-era charcoal and silver box that’s mostly metal and is intended to sit horizontally on your desk, or can be wall-mounted via the built-in screwhead slots on its bottom. Power, Diag, separate Wireless-G Link and Activity and Link / Activity LEDs for each of its five 10/100 Ethernet switch ports are all on the front surface of the box, but were a bit too dim and had too limited a viewing angle for my taste.
The rear panel contains five 10/100 BaseT Ethernet connectors, recessed Reset-to-Factory-Defaults button and single RP-SMA antenna connector. Given the size of the box and all those Ethernet connectors, something had to give, so the Power connector ended up on the right side of the box. Looks kinda ugly – and prone to damage – sticking out there and I would have preferred to see Linksys provide a power wart with right-angle connector.
The supplied single dipole antenna uses an RP-SMA connector and is jointed so that it locks in 45 and 90 degree positions and can be rotated 360 degrees when you screw it onto its mating connector. Basically, you’ll be able to orient the antenna as desired no matter how you position or mount the box.
All Ethernet ports are auto MDI / MDI-X which lets you plug any device, including expansion switches, into any port with either Normal or Crossover cables. Unlike the WET54G, however, the GS5 is not set up for Power over Ethernet (PoE) on any of its ports.
If you’re unfamiliar with the difference between a “wireless Ethernet bridge”, access point, wireless bridge, and other combinations of the words, “bridge”, “wireless”, and “Ethernet”, you can read the Wireless Bridging NTK. The key points to understand about the GS5 are:
- It can’t function as an access point, i.e. wireless clients set to Infrastructure mode can’t associate with it
- It doesn’t require that WDS be supported in any of the devices that it connects to
- It supports Infrastructure (connecting to a wireless router or AP) and Ad Hoc (connecting to another GS5 or Ad Hoc client) modes.
TIP: Although I couldn’t find this info anywhere in Linksys’ documentation, a check with Linksys revealed that the GS5 supports not just five, but up to a total of 32 clients attached to its switch ports.
Construction Details
The GS5 continues in the WET54G tradition and uses a Conexant PRISM-based radio instead of one based on the Broadcom AirForce chipset. The radio is integrated into the main board as a cost-savings measure, the same as now done in the WET54GV2 (the original WET54G used a CardBus radio).
I couldn’t figure out from Conexant’s website whether the combination of ISL3893 WiSOC (Wireless System on a Chip) and ISL3692 Dual-Band Radio would be considered a Duette or GT chipset, but it probably doesn’t matter. What is important is that the WiSOC not only handles wireless MAC and Baseband duties, but serves as the GS5’s main processor too, again keeping Linksys’ manufacturing cost down.

Figure 1: WET54GS5 board
(click on the image for a larger view)
Figure 1 also shows a Marvell 88E6063 Link Street 88E6063 7-Port Fast Ethernet Managed Switch that provides all of the GS5’s nifty VLAN and QoS features that I’ll get into shortly. 4MB of Flash and 128MB of SRAM round out the GS5’s components.
Basic Setup
As you can see from Figure 2, basic wireless setup for the GS5 is essentially the same as for the WET54G (the GS5 even has the same default IP address of 192.168.1.226). So click on over to that review if you need the details and I’ll just cover the differences here.

Figure 2: Setup screen
(click on the image for a larger view)
The main difference I found from the original WET54G is that the GS5 supports both 802.1x authentication and WPA-PSK and WPA RADIUS (aka “Enterprise”) mode in addition to 64 and 128 bit WEP. (From perusing Linksys’ download page, I found that the newer WET54GV2 has firmware that supports WPA, but the original WET54G doesn’t.)
The GS5’s 802.1x authentication settings let you enter a RADIUS server IP address, RADIUS port number, pre-shared key and re-authentication timeout. There’s even a View Log button that shows the results of the authentication process.

Figure 3: Security settings
Figure 3 shows the Security screen with RADIUS EAP authentication selected. You can also choose MD5 and TTLS EAP methods and the screen will change to present the proper entries for you to fill in. Of special note is that the GS5 supports WPA only in Infrastructure mode. WEP 64 / 128 will have to suffice if you use it in Ad Hoc mode.
Fun with VLANs
Though the GS5’s bridging features are nice, I was much more intrigued by its VLAN and QoS (Quality of Service) features, some of which are a first for a product at this price point. The nice thing about these features – normally found in “smart” or “managed” switches – are that they can be used with or without the wireless part of the GS5.
It might seem silly to buy a wireless bridge and not use the wireless part, but I can think of plenty of cases where you might want to do just that. Note however, that Linksys doesn’t provide a way to shut off the GS5’s radio, although the GS5 provides plenty of ways to keep wireless and wired traffic separate, most notably via its VLAN features.
VLANs (Virtual LAN) originated in enterprise-grade switches for the purpose of separating the logical organization of network segments (the way packets are handled) from their physical configuration (the physical ports and devices users are plugged into) in large networks.
But VLANs also are handy in small networks because they provide a way to keep users’ data separate. Putting users in different VLANs, even in the same physical switch and even in the same subnet, prevents any data flow between VLANs, even broadcast traffic such as ARP, NetBIOS discovery and DHCP requests.
The GS5 handles both port and 802.1q-based VLANs or can be set to disable VLAN capability entirely. The default is port-based with all ports enabled, so if you never access the VLAN screen, you’ll never see a problem with data flow. Note that when I say port, I mean physical switch port and not service port (as in HTTP Port 80, for example).
802.1q VLANs operate by tagging packets so that they can be identified and handled by other 802.1q-aware devices in the network. You can choose from 802.1q Check and 802.1q Secure modes, with the key difference being that the Secure mode will drop an incoming packet if its VLAN ID isn’t among those programmed into the GS5. These modes are most useful if the GS5 is used with other 802.1q-compliant devices and I won’t go into more detail here.

Figure 4: VLAN port-based screen
(click on the image for a larger view)
But the port-based VLAN feature is handy even with one GS5. Figure 4 shows the top half of the GS5’s VLAN page with an example of a physical port-based VLAN setup. Each checkbox represents a physical port where data is allowed to exit. (Since data can always enter a port, each port’s same-numbered checkbox is greyed-out, i.e. not changable.)
So that you can’t accidentally VLAN yourself out of being able to access the GS5’s internal management server that lives on (internal) Port 6, Port 1and Port 6 are checked and greyed-out in the VLAN Port table. But note that since the wireless bridge also sits on Port 6, this means that you can’t disable management of the GS5 over its wireless link.
If you examine Figure 4 closely, you’ll see that I put Ports 1 and 5 into one VLAN that allows connection to each other, the GS5’s wireless bridge and its admin server. Ports 2, 3 and 4 are grouped into a separate VLAN where connected devices can access only each other. Note that if you needed more physical ports in either VLAN, you could just uplink regular switches to the appropriate port. Clients then connected to those uplinked switches would become part of the GS5 port’s assigned VLAN.
QoS Features
The other features you’re sure to find a use for are the GS5’s QoS (Quality of Service) controls. QoS is a term that we’re seeing more and more lately, due to the growing popularity of applications like VoIP and streaming video that care about how packets are treated as they flow across the network. Think of QoS as a collection of techniques aimed at identifying data whose delivery across the network is time sensitive, and managing its delivery through both bandwidth allocation and prioritization schemes.
Although many vendors – Linksys included – don’t make the differentiation between QoS and CoS (Class of Service) features (explained nicely by this searchSmallBizIT.com article), the GS5’s includes both types in its “QoS” controls. The features that will be most useful to you will depend on what your network provider and applications support.

Figure 5: QoS controls
(click on the image for a larger view)
The top section in Figure 5 shows the CoS or packet prioritization controls. The GS5’s Help and User Guide explain that it has four output queues per port with four different priorities. The Global QOS Mode has choices of Weighted Fair Queue or Priority. The Priority mode always forwards packets in the higher priority queue first. So if you have a lot of packets in the, say, Critical queue, packets waiting in the High queue may wait longer than you’d think before being sent along. The Weighted Fair Queue mode attempts to even the playing field by forwarding packets in each of the queues with a 8:4:2:1 ratio, for example, for every one Low queue packet, eight Critical queue packets will be sent.
The Diff Serv Map and 802.1p PRI Map controls allow specifying the bits used by these two different CoS techniques. How you set them depends on your service provider and / or application’s requirements.
The lower section of Figure 5 is where you actually set each port’s QoS / CoS features. Again, these settings are for physical, not logical ports, which is the main catch in the GS5’s otherwise powerful set of QoS features. The physical port control limitation means that the GS5 would help ensure that a VoIP phone or adapter plugged into it could go to the head of the packet parade. But you couldn’t, for example, lower the priority for a user’s FTP activity, while letting all other Internet applications run at full tilt. Simply put, the GS5 lets you control priority and bandwidth use for devices, but not applications.
In addition to the priority features, you can also set Ingress and Egress Rate, i.e. bandwidth use of each port. Rates are settable from 128 kbps to 8 Mbps in doubled steps, or you can leave the No Limit default in place. Ingress Rate Mode allows even finer control by letting you specify whether the Ingress Rate limiting applies to All, Flooded (packets that the switch doesn’t know where to forward), Multicast and Broadcast or just Broadcast packets. Finally, Flow Control can let upstream devices that support this feature tell the GS5 to hold off forwarding packets until the device is ready to accept it.
Other Switch Features
The Marvell switch chip gives the GS5 plenty of other managed switch capabilities normally seen in products costing about twice as much. Experienced networkers may find more use for some of these features than newbies, but don’t let that stop you from exploring them. But I’ll warn you that playing with some of them and not knowing what you’re doing can mess you up enough to require hitting the ol’ reset-to-defaults button.
Enabling the Spanning Tree Protocol (STP) feature (off by default) allows the GS5 to be used in redundancy applications and larger network configurations. Linksys provides global controls for Maximum Age, Hello Time and Forward Delay and per-port control of Priority and Cost and readout of STP State. The User Guide and on-line Help provide a little helpful information about each control, but again, not enough to help you to really understand how to use them.
The RMON Statistics page (Figure 6) provides more than you’ll probably need to know about the low-level Ethernet statistics of each port. But the nice thing is that you can remotely check each port to see if traffic is flowing.

Figure 6: RMON stats
(click on the image for a larger view)
If you’ve ever tried to run a network protocol analyzer (or “sniffer”) such as the free, Open Source Ethereal, you’ve probably discovered that you can only see the traffic for the machine that the analyzer is running on and not other devices plugged into a switch. One solution to this problem is to dig up an old network hub, which sends data received on any port to all other ports.
The preferred solution, however, is to use a switch with Port Mirroring capability (Figure 7), which is precisely what the GS5 provides. The GS5’s controls enable you to copy traffic from the From Port that contains the device you want to monitor to the To Port where you would connect your network analyzer.
The feature is disabled by default, but can be set to Monitor egress (traffic exiting the From Port) or Monitor both (traffic in and out of the From Port).

Figure 7: Port Mirroring
(click on the image for a larger view)
The top part of the page contains a handy at-a-glance status board for all the GS5’s ports, too. This is one case in which a programmable page auto-refresh would have been handy for continuous monitoring of the GS5’s status.
Even More Switch Features
Although it’s more a wireless security feature than a switch function, the Access List feature is under the Switch menu. It’s your usual MAC address filter that can be set to use an Accept or Block list of MAC addresses that will be checked for traffic flowing in both directions across the wireless bridge. As is typical for this kind of feature, you can’t save or load a list of MAC addresses to / from a file and the GS5 doesn’t present a pick list of currently in-use MAC addresses to use in building the lists.
Finally, if you really want to get anal and control the GS5’s Switch Table of MAC addresses, you can have at it. Figure 8 shows the controls at your disposal.

Figure 8: Switch Table
(click on the image for a larger view)
You can shut off the GS5’s ability to auto-learn the relationship between connected devices’ MAC addresses and physical ports or leave it in the default auto-learn and just control how long each entry is kept in the table (the range is from 32 seconds to 64 minutes in approximately doubling steps with a default of 5 minutes). If you disable auto-learning then you’ll need to manually enter the table via the controls provided. Either way, you can view the current table or Flush it out and start anew.
There are a few other features scattered about the GS5’s admin screens, so I’ll just rattle them off in concise bullet format:
-
The Password page lets you set the Password and User Name for admin access and also reset the GS5 to factory defaults. Unfortunately, there is no reboot function available.
- A handy Wireless Status page (Figure 9), which does auto-refresh but can’t have its refresh interval changed or disabled
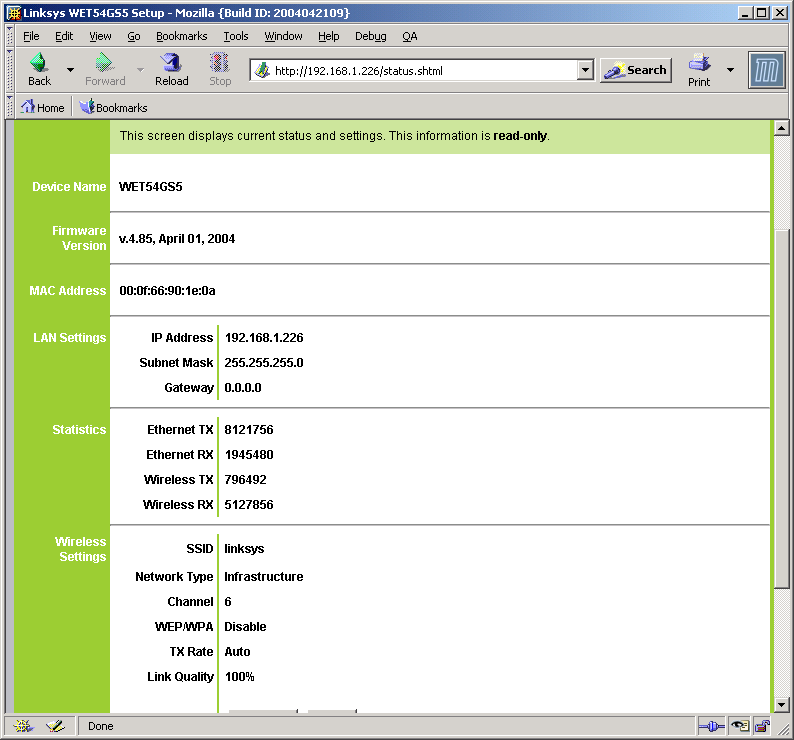
Figure 9: Wireless Status
(click on the image for a larger view)
- An SNMP page where you can set the IP addresses for machines to receive SNMP trap messages for cold start or link state change events. (The Linksys logviewer application (direct FTP download link) can be used to capture and display these traps.)
QoS Performance Tests – Priority Features
Since the GS5 can be used as a standalone switch and because I didn’t want the slower wireless link to interfere with testing, I ran Ethernet-only tests of its QoS features.
One of the things that I found is that you can’t set the QoS features so that the GS5’s switch behaves completely like a normal switch. I set up a three computer test configuration:
- Computer 1 – Athlon 64 3000+, 512MB, Win XP Pro SP1
- Computer 2 – Pentium 4 2.4GHz, 504MB, Win XP Home SP1
- Computer 3 – Celeron 1GHz, 576MB, Win XP Home SP1
and connected them to Ports 1, 2 and 3 of the GS5. I reset the GS5 to defaults, which set all the occupied ports to High priority, using the Weighted Fair Queue method. I then set up an IxChariot test that ran simultaneous TCP throughput scripts from the two slower to the one fastest machine. The only change I made to the throughput script was to raise the transfer file size from 100,000 to 1,000,000 Bytes.
Figure 10 shows that the two computers did not get equal shares of bandwidth, even though port priorities were set equally. I also tried setting all ports from High to Critical, with similar results. The exact throughput graph changed from run to run, but in no case did I get the expected equal-sharing of throughput. (Note that there is no way to completely disable the GS5’s QoS settings.)

Figure 10: Two-to-one throughput test – GS5
(click on the image for a larger view)
To ensure that there wasn’t something in my test configuration that was causing the observed behavior, I kept everything the same except for moving all three machines to three ports on my normal 10/100 LAN switch. Figure 11 shows the results of the move, which is the exact behavior I’d expect from a switch, i.e. equal sharing of bandwidth.

Figure 11: Two-to-one throughput test – regular 10/100 switch
(click on the image for a larger view)
QoS Performance Testing – Priority Features, Contiunued
I next moved everything back to the GS5 and tried changing port priorities to see if the GS5 behaved as Linksys’ documentation described. Figure 12 shows a test run with the Celeron machine’s port set to Low priority, the Pentium 4’s port set to Medium and the Athlon 64 endpoint machine set to High. With these settings and the Weighted Fair Queue method in use, I expected a 2:1 ratio between the two machines, which is just about what I got (63.3 vs. 32.1 Mbps).

Figure 12: QoS Priority Test – Medium and Low, Weighted Fair Queue Mode
(click on the image for a larger view)
I also tried this test with High and Low and Critical and Low priorities and have pulled all the results into the table below.
| Setting | Average Throughput 1 |
Average Throughput 2 |
Measured ratio | Expected Ratio | Variance |
| Medium & Low | 63.3 | 32.1 | 1.97 | 2.0 | -1.4% |
| High & Low | 76.1 | 19.4 | 3.92 | 4.0 | -1.9% |
| Critical & Low | 84.2 | 11.0 | 7.65 | 8.0 | -4.5% |
| Table 1: QoS Weighted Fair Queue Priority Variance | |||||
I doubt you’d ever notice these variances, but you would definitely notice the effect of changing the Global QoS mode from Weighted Fair Que to Priority. Figure 13 shows what happened when I did just that.

Figure 13: QoS Priority Test – Medium and Low, Priority Mode
(click on the image for a larger view)
The setup for this test was the same as for Figure 12, with the only change being the Global QoS mode. Since packets in the higher priority queue are always forwarded first, whichever test pair got started second basically had to wait until the first pair was finished or briefly stopped sending data. As you can see from the plots, IxChariot doesn’t pause often! Using this mode on a busy LAN could definitely send any user set to a Low priority back to a dial-up like experience!
QoS Performance Tests – Rate Limiting
I was most interested in the GS5’s Rate Limiting features, since they provide the most precise bandwidth control. But while I found that the Egress limiting worked pretty much as advertised, the Ingress limiting did not.
Figure 14 shows a simultaneous two-port test (one machine sending to two remote endpoint computers) with Egress Rate Limits of 8 and 1Mbps. Both measured results are 6% lower than the programmed values, but limited throughput is nice and smooth for both data streams.

Figure 14: Dual Port Egress Rate Limit
(click on the image for a larger view)
I also ran a test with an 8 Mbps Egress limit set on the single port that I directed two data streams at. The result in Figure 15 shows a total average throughput of 7.5 Mbps – again about 6% low. But you can see that the throughput experienced by each of my two clients had a much higher variance.

Figure 15: Single Port Egress Rate Limit, Two Data streams
(click on the image for a larger view)
When I tried to run similar tests using Ingress Rate limiting, the results said that this feature was essentially broken. In some cases both Chariot pairs would finish, in others, only one would complete. In all cases, throughput was below 0.5Mbps on the pair that I could get a reading for.
Wireless Performance
NOTES:
• No Link Quality or Strength readings were available
• Testing was done with a Linksys WPC54G card in AdHoc mode in a Dell Inspiron 4100 laptop running WinXP Home
• Wireless settings were Channel 6, Mixed mode
Rather than lug around the WET connected to my laptop, I plugged one set to AdHoc mode into my LAN’s switch and used a Linksys WPC54G card also set to AdHoc mode to do the testing. As both the table above and IxChariot plot below show, performance was disappointing at my more difficult test locations.

Figure 16: Four-location throughput test results
(click on the image for a larger view)
I also checked Location 1 performance with the GS5 and WPC54G card set to WEP128 mode. Figure 17 shows no measurable throughput degradation.

Figure 17: Security mode throughput comparison
(click on the image for a larger view)
Figure 17 also shows the results of a test run with a GS5 to WRT54G Infrastructure mode link with WEP 128 and then WPA-PSK enabled. Note that I couldn’t run a WPA-PSK test since only WEP is supported in Ad Hoc mode. Note also that due to its PRISM-based radio, the GS5 supports only the mandatory WPA-PSK TKIP mode and not the more secure, but optional AES mode supported by the Broadcom-based radio in the WRT54G.
You can see that using WPA-PSK TKIP reduces throughput about 16%, which, to my recollection, is consistent with what I’ve seen with other PRISM-based 11g products. Still, given 11g’s higher base throughput, I don’t hesitate to recommend that you use WPA if your WLAN equipment supports it.
802.11g Wireless Performance Test Results
| Test Conditions
– WEP encryption: DISABLED |
Firmware/Driver Versions
AP f/w: |
||||
|---|---|---|---|---|---|
| Test Description | SNR (dB) | Transfer Rate (Mbps) | Response Time (msec) | UDP stream | |
| Throughput (kbps) | Lost data (%) | ||||
| Client to AP – Condition 1 | 0 | 24.3 [No WEP] 24.2 [w/ WEP] |
1 (avg) 1 (max) |
500 | 0 |
| Client to AP – Condition 2 | 0 | 14.5 | 1 (avg) 2 (max) |
500 | 0 |
| Client to AP – Condition 3 | 0 | 3.5 | 1 (avg) 3 (max) |
436 | 0 |
| Client to AP – Condition 4 | 0 | 2.4 | 1 (avg) 4 (max) |
500 | 0 |
See details of how we test.
Wrap Up
I really like the switching tricks that the GS5 can do, especially given that you currently can’t get them in any other piece of networking gear for a similar (relatively) low price. As a result, I think that the GS5 will find its way into more than a few networks, even if they don’t need wireless bridging. But, as is too often the case, Linksys has released a product with a few problems, some of which need to be immediately addressed.
The GS5’s Ingress Rate limiting is broken and should be high on Linksys’ bugfix list. Though Egress Rate limiting works fine and can effectively put a kink in clients’ download speeds, Ingress Rate limiting is needed to precisely limit bandwidth that could be sucked up by busy uploaders or file sharers. Setting bandwidth hogs’ priority to Low is a stopgap measure since at best it limits them to 1/8 of maximum bandwidth using the default Weighted Fair Queue global QoS setting. And changing the global QoS setting to Priority mode isn’t really an option, since the resulting bandwidth allocation will probably be too unequal to be really useful.
I also found during my testing that when set to WPA mode and left idle, i.e. no traffic flowing across the wireless bridge, the GS5 disassociated from the WET54G and couldn’t reconnect until I power cycled it (the GS5). I didn’t determine the exact idle time required, but I’m pretty certain it’s longer than 5 but under 30 minutes. This problem is guaranteed to produce frustrated users pretty quickly, so should also be addressed ASAP.
The last problem is documentation. Linksys needs to face up to the fact that if it’s going to produce products with advanced features like the GS5 has, they must also produce documentation that helps users understand how to use those features. It’s not sufficient to describe the what of a feature in documentation, but “why” and “how” information also needs to be provided. To my mind, ZyXEL’s product documentation, though not the best written around, sets a good example of the type of tutorial, “why” and “how” information that Linksys needs to provide.
But once they get these problems straightened out, Linksys should have a real winner on its hands. I’m hoping, though, that the GS5 marks the beginning of general availability of VLAN and QoS features into consumer networking products. You may not know it yet, but you’ll be needing at least the QoS features soon!