| At a glance | |
|---|---|
| Product | Linksys AC1200 AMPLIFY Dual-Band Wi-Fi Range Extender (RE6700) [Website] |
| Summary | AC1200 class Mediatek based wall-plugged wireless extender with Gigabit port and audio streamer |
| Pros | • Easy setup • Browser-based placement tool • Pass-through AC power socket • Streams audio from DLNA sources |
| Cons | • Have to reset to defaults to access placement tool • AP mode not supported |
Typical Price: $46 Buy From Amazon
Introduction
I didn’t realize how long it’s been since our last wireless extender review, which was Linksys’ RE6500 last September. It’s purely coincidence that I’m looking at Linksys’ latest wireless extender, the RE6700 AC1200 AMPLIFY Dual-Band Wi-Fi Range Extender today.
Like the RE6500, the RE6700 is a simultaneous dual-band AC1200 class wireless range extender that supports maximum link rates of 300 Mbps in the 2.4 GHz band and 867 Mbps in 5 GHz. The RE6700 also shares the RE6500’s "Crossband" feature that uses the radio on one band as the “backhaul” to the router while the other radio connects to the client device.
Crossband is enabled automatically if you have created connections on both the 2.4 GHz and the 5 GHz band to your dual-band router or access point. This eliminates the 50% retransmission and higher latency penalties imposed by single band extenders and dual-band extenders that don’t have a similar feature.

Linksys Wireless Range Extender Products
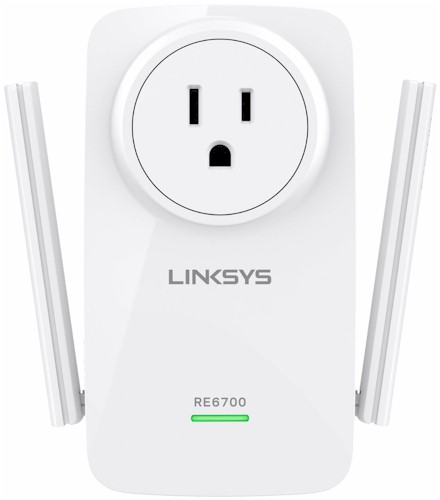
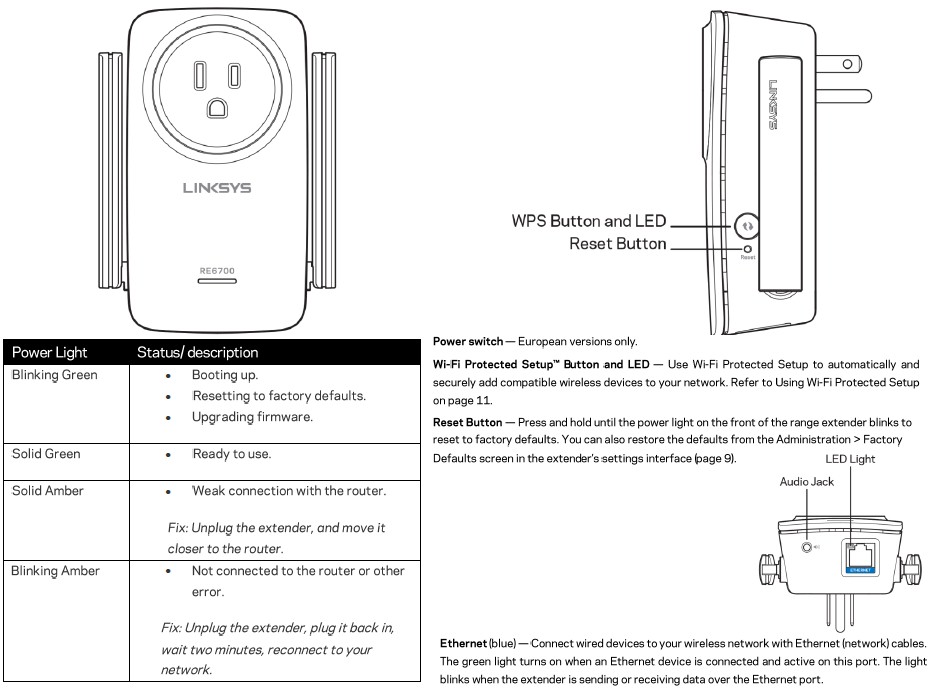
The callout diagram below shows the top, rear and bottom of the RE6700. The Linksys promo photo above shows the extender doesn’t block the second outlet in a standard U.S. duplex outlet and shows the built-in AC power pass-through socket in use. The AC socket is pass-through only; it’s neither filtered nor fused.
Linksys RE6700 callouts
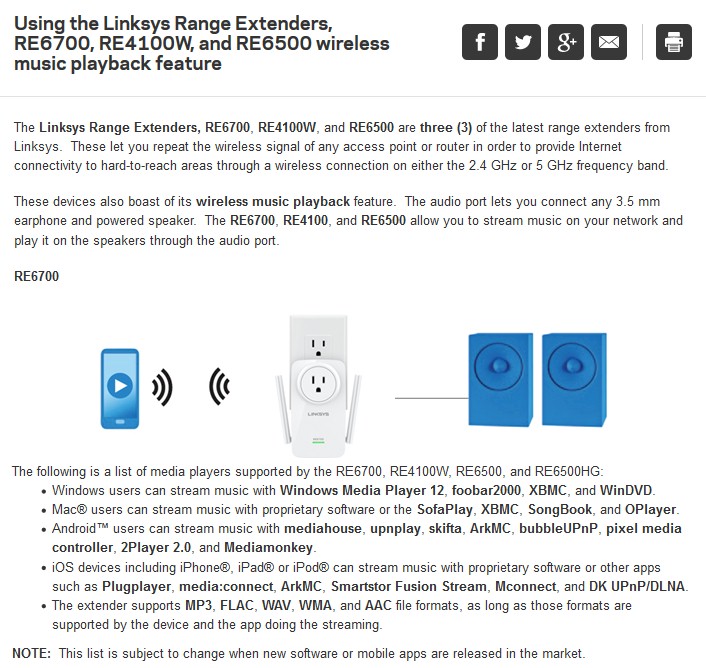
Note the single front panel light changes color and blinks to indicate wireless connection quality. But Linksys also has a better method to aid in extender placement I’ll touch on shortly. The single Ethernet port is Gigabit and the audio jack is meant to be used with powered speakers. The screenshot below is taken from this support article detailing supported music playback apps for Windows, MacOS, iOS and Android OSes.
Linksys RE6700 music playback apps
Inside
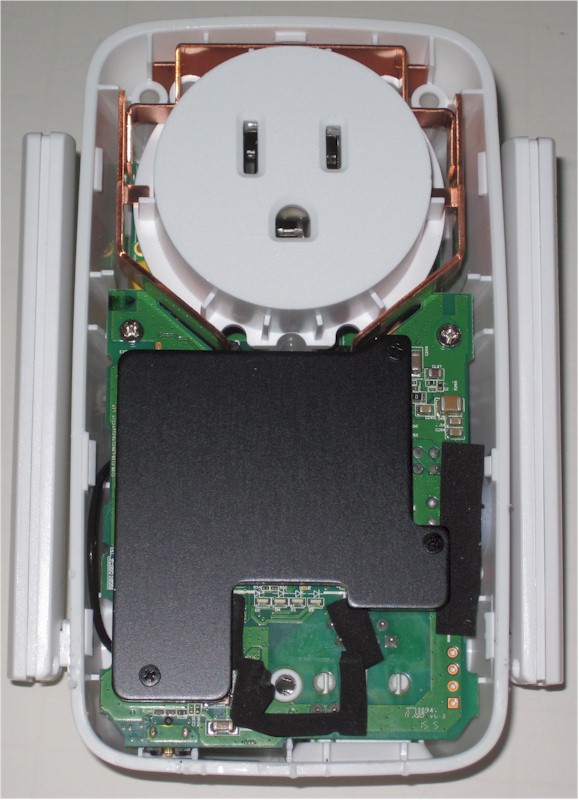
Linksys suppressed internal FCC photos until this fall, so I opened the RE6700 up after testing was completed. The image below shows the view after removing the front cover. There is a lot crammed into a pretty small space, so there is generous heatsinking, which is needed to handle the heat generated by the two radio SoCs.
The black plate is a heatsink that couples via a thermal pad to the RF can below it for the 5 GHz radio. The metal strips surrounding the pass-through power socket are tied to a plate that is heatsinking the main board bottom side components.
The RAM, wireless SoCs and power amplifiers are all coupled to their respective RF can tops via thermal pads, which are in turn coupled to heatsink plates with pads. The gallery below has other internal pictures.
Linksys RE6700 inside
The table below compares the major components of the Linksys RE6700, Linksys RE6500 and NETGEAR EX6100 dual band wireless range extenders. The NETGEAR is AC750 vs. AC1200 for both Linksyses. According to WikiDevi, the Mediatek MT7621AT has a dual-core MIPS32 processor clocked at 880 MHz, while the MT7620A has a single-core 32 bit MIPS processor clocked at 580 MHz.
| Linksys RE6700 | Linksys RE6500 | NETGEAR EX6100 | |
|---|---|---|---|
| CPU | Mediatek MT7620A 802.11bgn 2×2 WiSoC | Mediatek MT7621AT WiSoC | Mediatek MT7620A 802.11bgn 2×2 WiSoC |
| Switch / Ethernet | Realtek RTL8211E Gigabit Ethernet PHY | In Mediatek MT7621AT | Realtek RTL8211E Gigabit Ethernet Transceiver |
| RAM | 64 MB Nanya NT5TU32M16EG-AC | 64 MB Etron Tech EM68B16CWQD | 64 MB Winbond W9751G6KB DDR2 |
| Flash | 16 MB DDR2 Winbond 25Q128FV2G | 8 MB Macronix MX25L6406E | 8 MB Macronix MC25L6406 |
| 2.4 GHz Radio | – In MT7620A – Skyworks SKY85303-11 2.4 GHz 256 QAM WLAN / Bluetooth Front End (x2) |
Mediatek MT7602 2×2 11n | In MT7620A |
| 5 GHz radio | – Mediatek MT7612EN 2×2 11ac radio – Skyworks SKY85717 5 GHz 802.11ac Front End (x2) |
– Mediatek MT7612 2×2 11ac | – MediaTek MT7610EN 1×1 11ac radio – Skyworks SE5003L1 5 GHz power amp (x1) |
| Audio | Cirrus WM8960G Codec with Class D Speaker Driver | Wolfson WM8960 Codec with Class D Speaker Driver | N/A |
Table 1: Linksys RE6700 key components

Black plate is heatsink. Black foam appear to be light blockers.
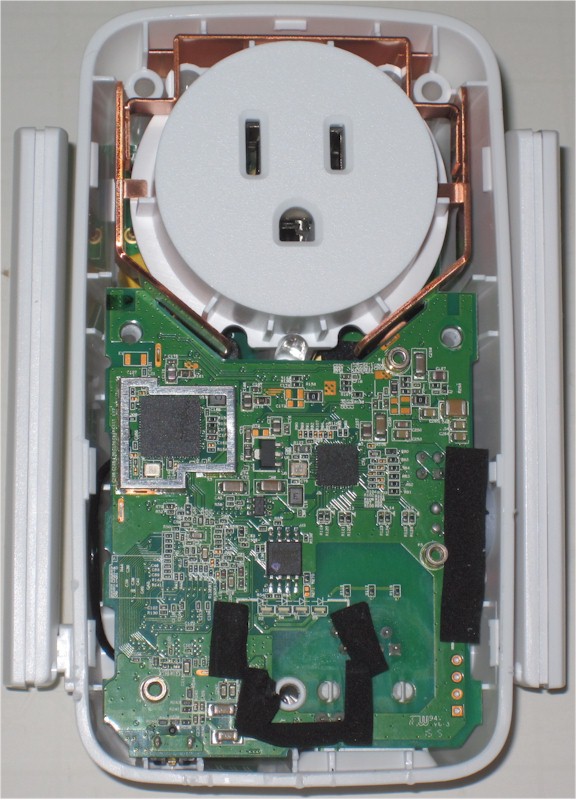
Heatsink and RF can cover removed. Mediatek MT7612EN 2×2 11ac radio at middle left, Realtek RTL8211E to right. Winbond flash lower center.
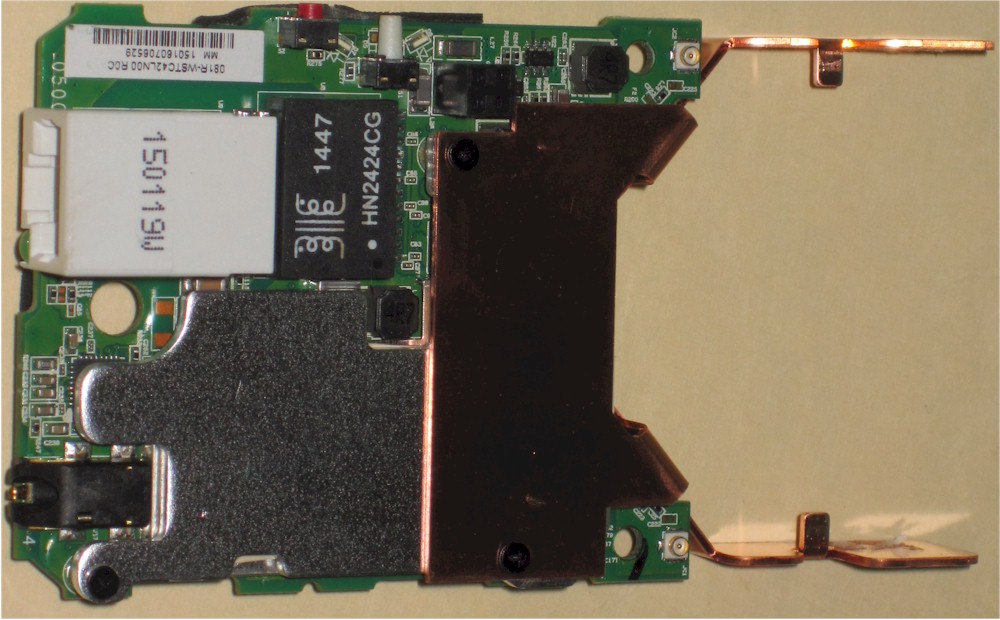
Mainboard removed to show bottom heatsinking. Note the copper-colored metal strips that couple to more heatsinking surrounding power outlet.
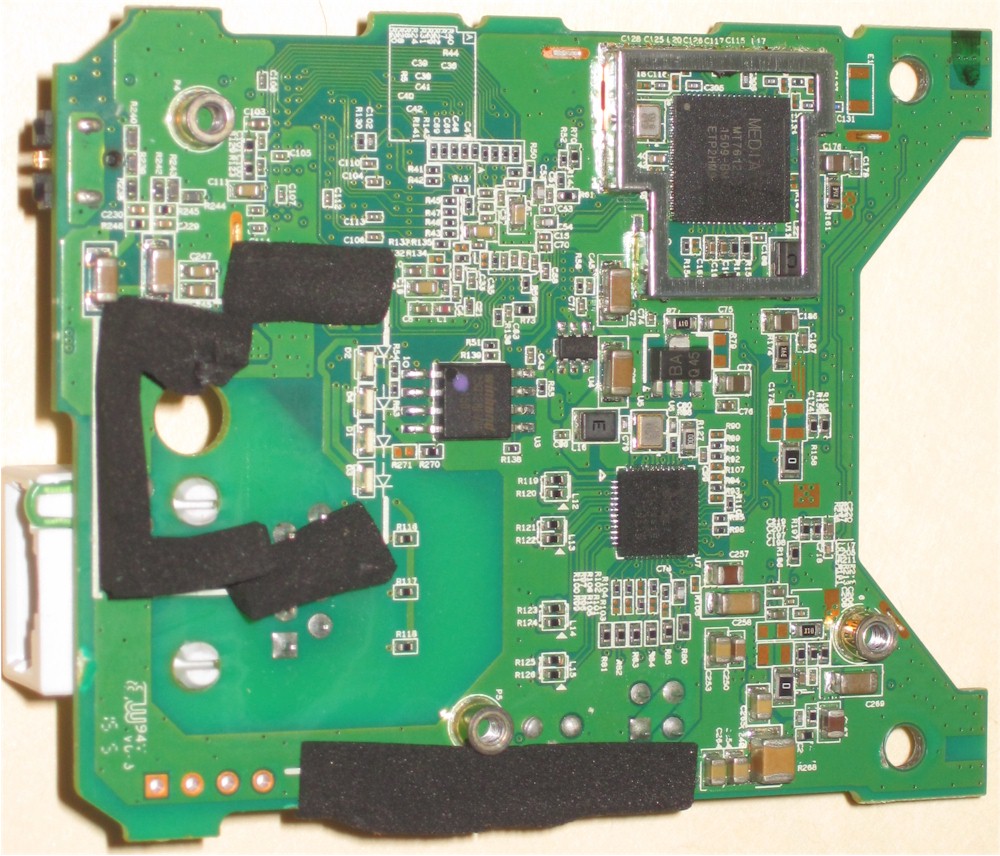
Closeup of main board top.
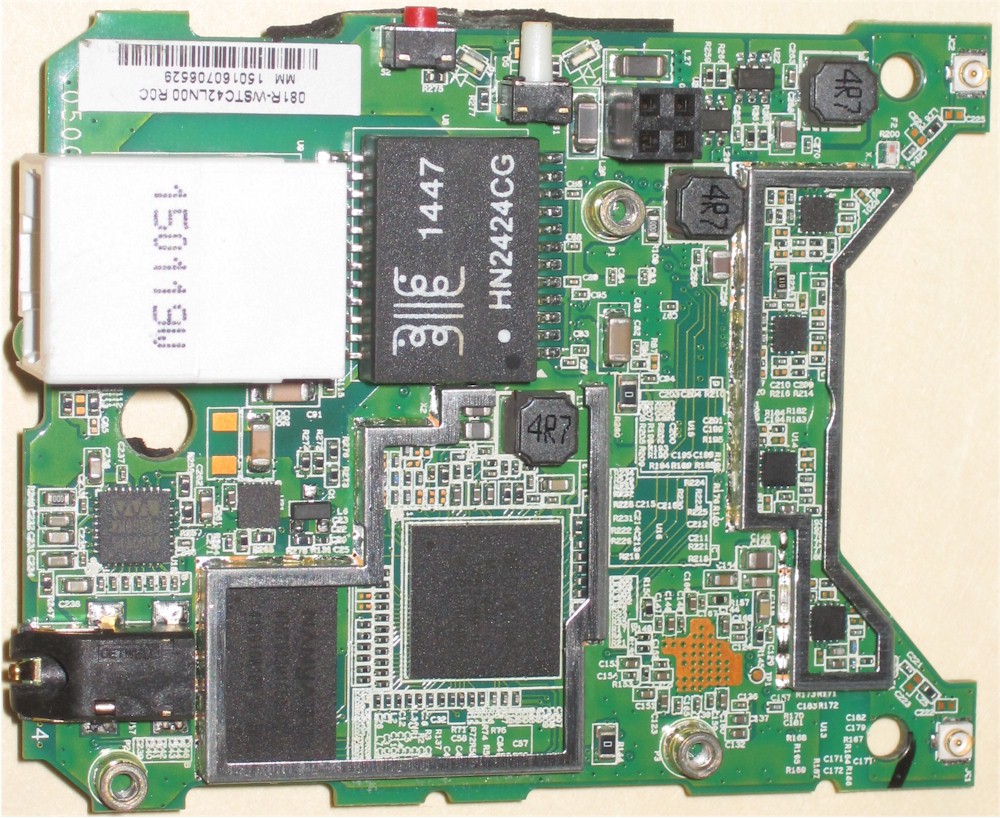
Closeup of main board bottom with heatsink and RF can covers removed. Mediatek MT7620A, Nanya RAM and Skyworks 2.4 and 5 GHz amplifiers shown

Inside with main board removed.Built-in power supply components lie under the plastic shield. The small connector at middle right brings DC power to the main board.
Setup
The RE6700 has a browser-based setup similar to the RE6500. You to connect a wireless client to a setup network named Linksys Extender Setup-XXX, where XXX is the extender’s last three MAC address characters. Opening a web browser redirects you to http://extender.linksys.com and brings up the setup wizard start page. The default IP appears to be http://192.168.1.1, which you can also use to connect.
The RE6700’s wizard includes the "Spot Finder" feature illustrated below, which helps guide proper extender placement. Unfortunately, it is available only in the setup wizard, which is itself available only by resetting the RE6700 to factory defaults. Spot Finder would be much more useful if you could bring just it up, for when you want to experiment with extender placement on a network that is already set up.
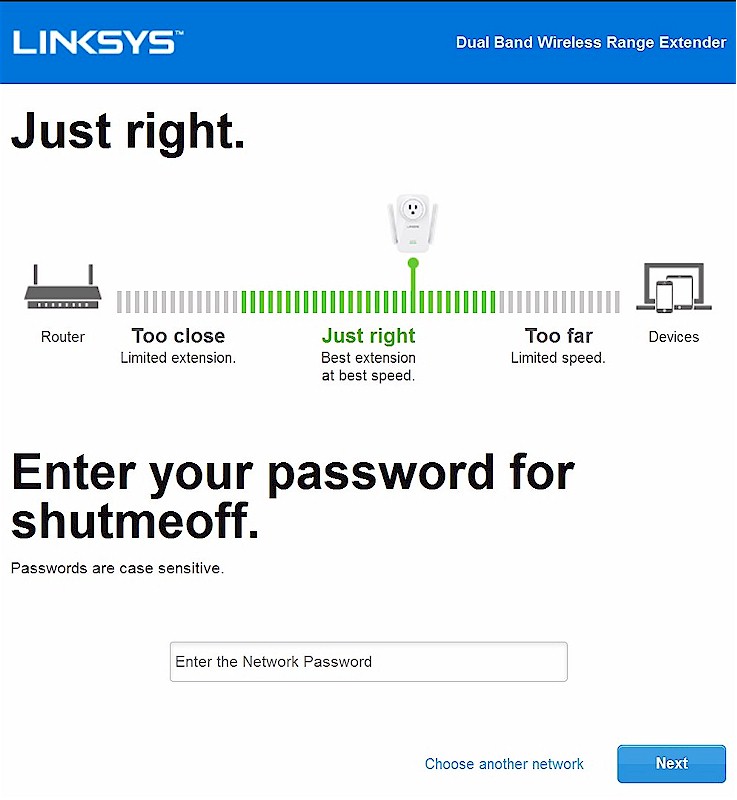
Linksys RE6700 Spot Finder setup tool
Linksys has addressed the setup quirks noted in the RE6500 review. The extender came with 1.00 firmware, which should automatically update to 1.0.01.010 (or higher) during setup if you link the extender to an internet-connected network. This new firmware automatically appends -Ext to your SSIDs on both bands, making it easy to ensure you connect to the extender and not your base router. The 1.00 firmware doesn’t modify the SSIDs.
In either case, you can change the SSIDs by logging into the admin interface. Linksys has made this easier than on the RE6500 by providing a fixed URL—http://extender.linksys.com—available only when your device is directly connected to the extender. Admin connection is HTTP only.
You can also set up the RE6700 using WPS, which I didn’t try. The User Guide describes the process and also how to connect devices to the extender after it is set up, also using WPS. The gallery below shows the key steps in the setup wizard.

Black plate is heatsink. Black foam appear to be light blockers.

Heatsink and RF can cover removed. Mediatek MT7612EN 2×2 11ac radio at middle left, Realtek RTL8211E to right. Winbond flash lower center.

Mainboard removed to show bottom heatsinking. Note the copper-colored metal strips that couple to more heatsinking surrounding power outlet.

Closeup of main board top.

Closeup of main board bottom with heatsink and RF can covers removed. Mediatek MT7620A, Nanya RAM and Skyworks 2.4 and 5 GHz amplifiers shown

Inside with main board removed.Built-in power supply components lie under the plastic shield. The small connector at middle right brings DC power to the main board.
In Use
Once you’re set up, you can log into the extender’s admin and poke around. A few things are worth specific mention. First, you can’t use the extender as an access point. The Ethernet port is to bridge wired devices only.
Second, you can independently control channel width both on backhaul (to base router) and extended (to device) connections in the Basic Settings page. The screenshot shows the 2.4 GHz settings; you also get a 5 GHz set. Not shown are fields to set the Extender name and "Friendly Name", Time Zone setting and Reboot button. The extender is set to receive its address via DHCP by default.
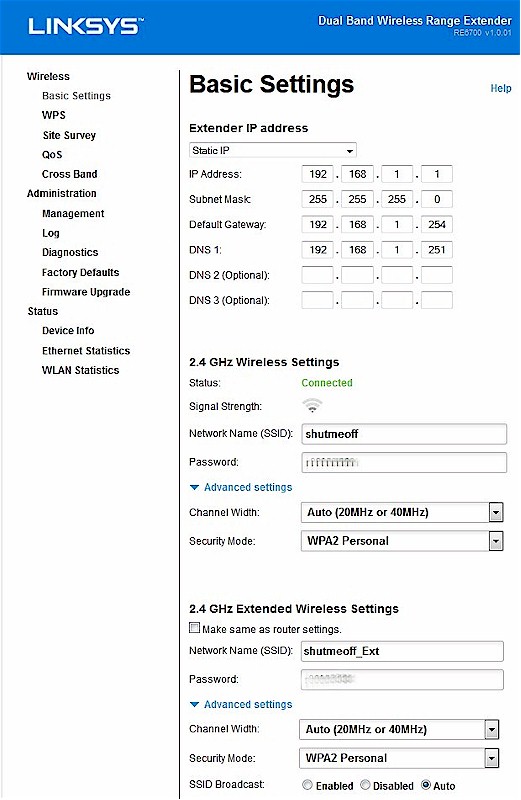
Linksys RE6700 Basic Settings
There is lots of useful information on the WLAN Statistics page. But I would have preferred actual RSSI readings for Signal Strength and like to know what Signal Quality is actually indicating. Connection link rate would be helpful too, for troubleshooting.
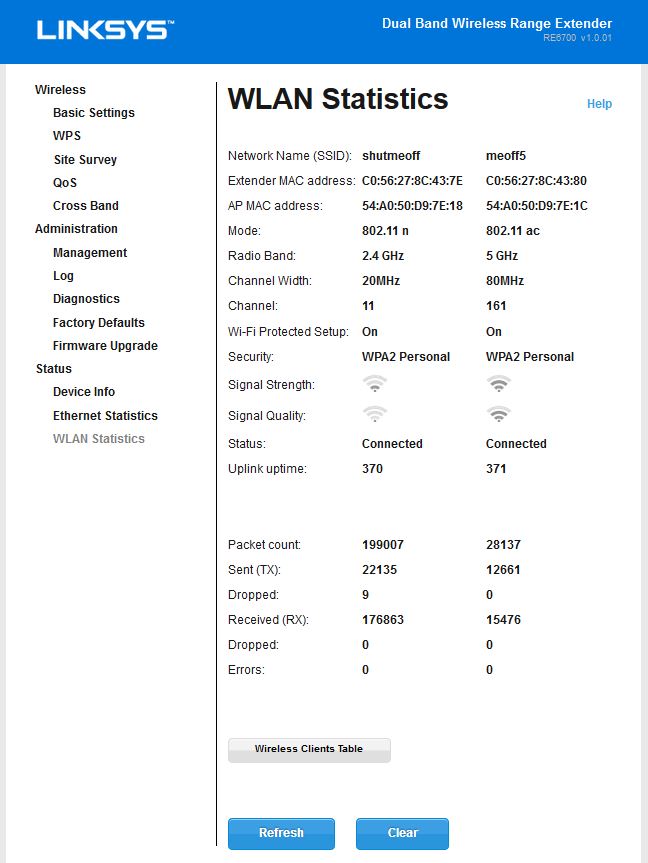
Linksys RE6700 WLAN Statistics
The Wireless Clients table is the only place where hovering over the wireless symbol brings up an actual number. I’d like to see this implemented on the WLAN Statistics page. I like that you can see which band is being used for Uplink (backhaul). Client link rate here would again be helpful.
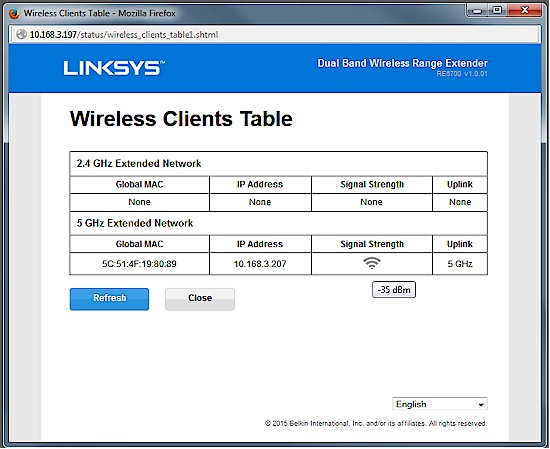
Linksys RE6700 WLAN Client Statistics
The gallery shows most of the other admin screens with descriptions.

Black plate is heatsink. Black foam appear to be light blockers.

Heatsink and RF can cover removed. Mediatek MT7612EN 2×2 11ac radio at middle left, Realtek RTL8211E to right. Winbond flash lower center.

Mainboard removed to show bottom heatsinking. Note the copper-colored metal strips that couple to more heatsinking surrounding power outlet.

Closeup of main board top.

Closeup of main board bottom with heatsink and RF can covers removed. Mediatek MT7620A, Nanya RAM and Skyworks 2.4 and 5 GHz amplifiers shown

Inside with main board removed.Built-in power supply components lie under the plastic shield. The small connector at middle right brings DC power to the main board.
Performance
The standard extender test procedure was used to test the RE6700, which was loaded with latest 1.0.01.010 firmware. The 2.4 GHz extended network was configured for 20 MHz Mode. For 5 GHz, the extender was configured for auto 20/24/80 MHz. The base router was set to Channel 6 and 20 MHz mode for 2.4 GHz and 80 MHz mode, Channel 153 for 5 GHz.
The extended results in the Benchmark Summary represent extended wireless throughput, i.e. from base router, through the RE6700 and to the test client laptop. The wired results are what we measured with the test laptop’s wireless disabled and connected to the RE6700’s Gigabit Ethernet port. In all cases, higher numbers are better.
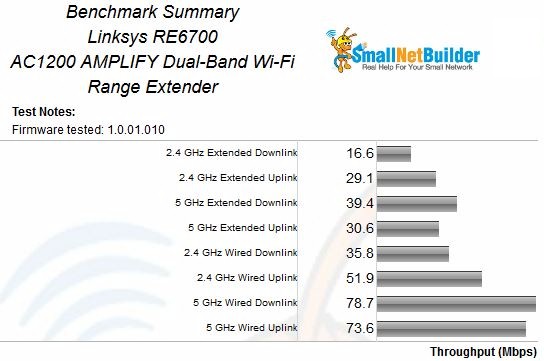
Linksys RE6700 Benchmark Summary
Crossband operation was disabled for all these tests, so extended results are approximately half the wired throughput shown. The ixChariot plots provide a better look at throughput stability. The compositie plots show throughput measured at the RE6700 Ethernet port (_extender_eth) and extended throughput at the wireless test client. The extender trace shows how well the extender receives the signal from the base router. The extended plot shows how much throughput is delivered to the test client. Without the extender, the client was either not able to see the base router or maintain a stable connection to it in its test location.
The 2.4 GHz downlink plot shows almost 17 Mbps delivered to the test client out of 36 Mbps received by the extender.
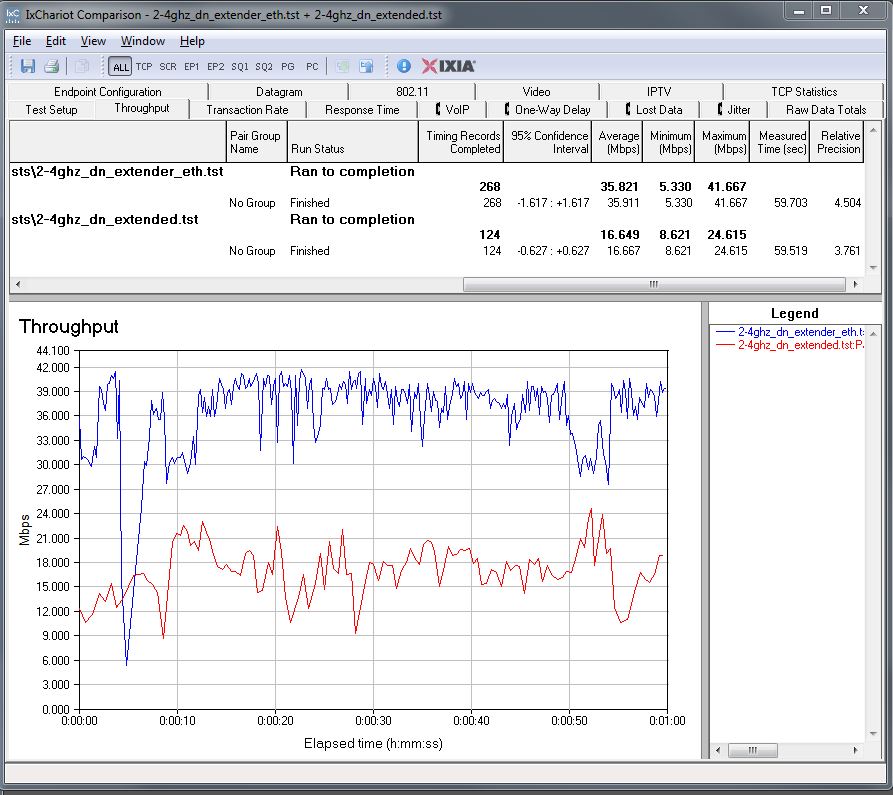
Linksys RE6700 extender throughput – 2.4 GHz downlink
2.4 GHz uplink delivered almost twice as much throughput to the client at 29 Mbps, better than half the 52 Mbps received by the extender.
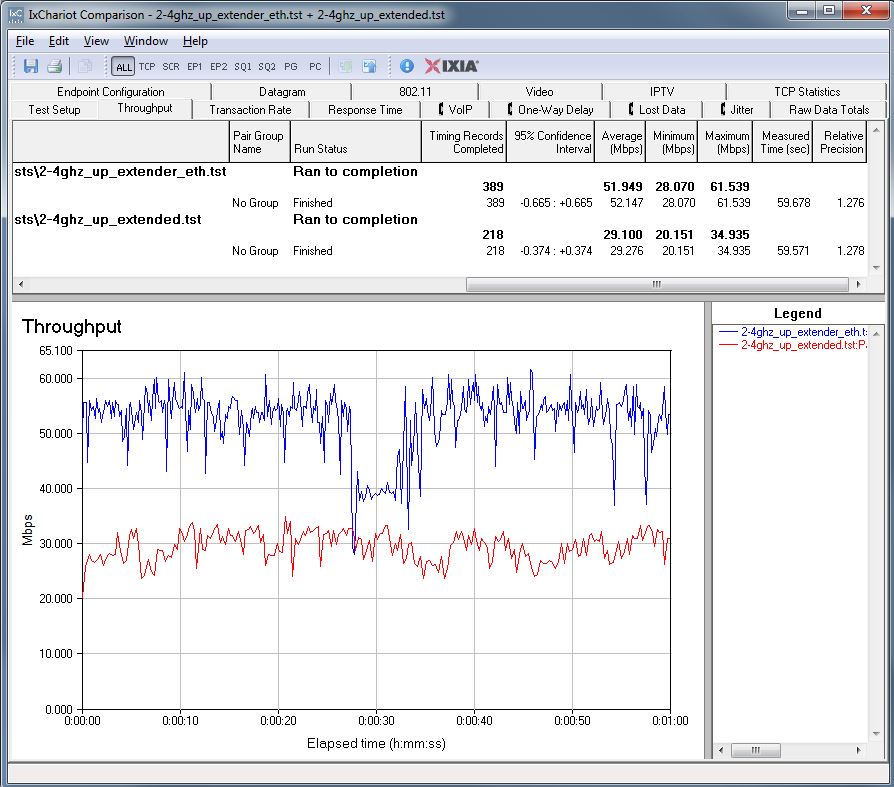
Linksys RE6700 extender throughput – 2.4 GHz uplink
5 GHz downlink provided the test client with 39 Mbps, just about half the extender received.
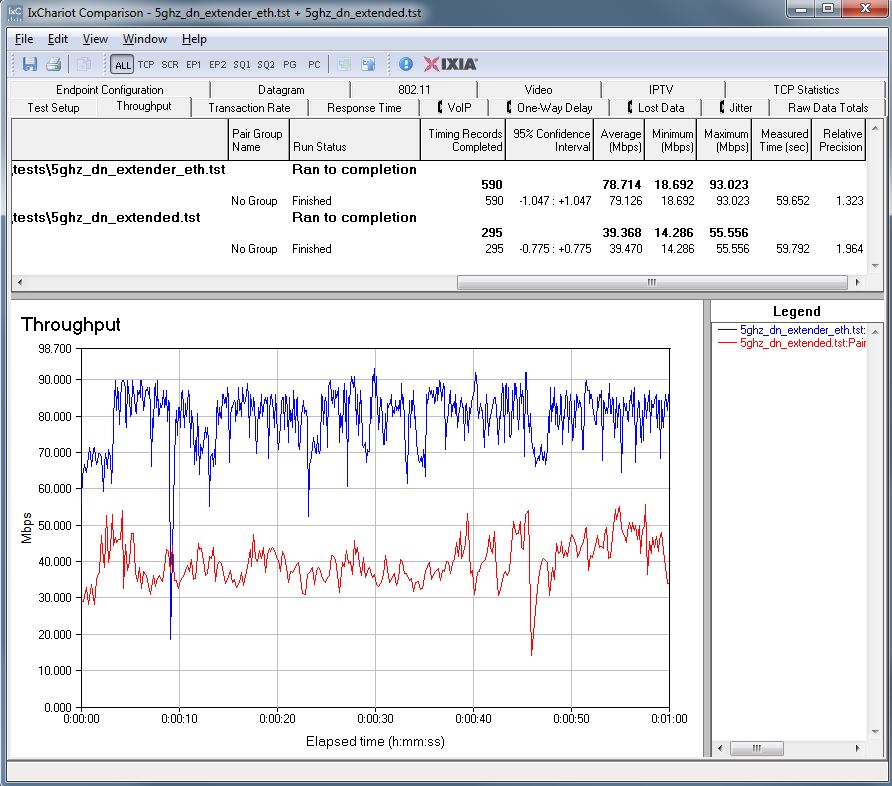
Linksys RE6700 extender throughput – 5 GHz downlink
5 GHz uplink ran a little lower at 30 Mbps, about 40% of the 74 Mbps received by the extender.
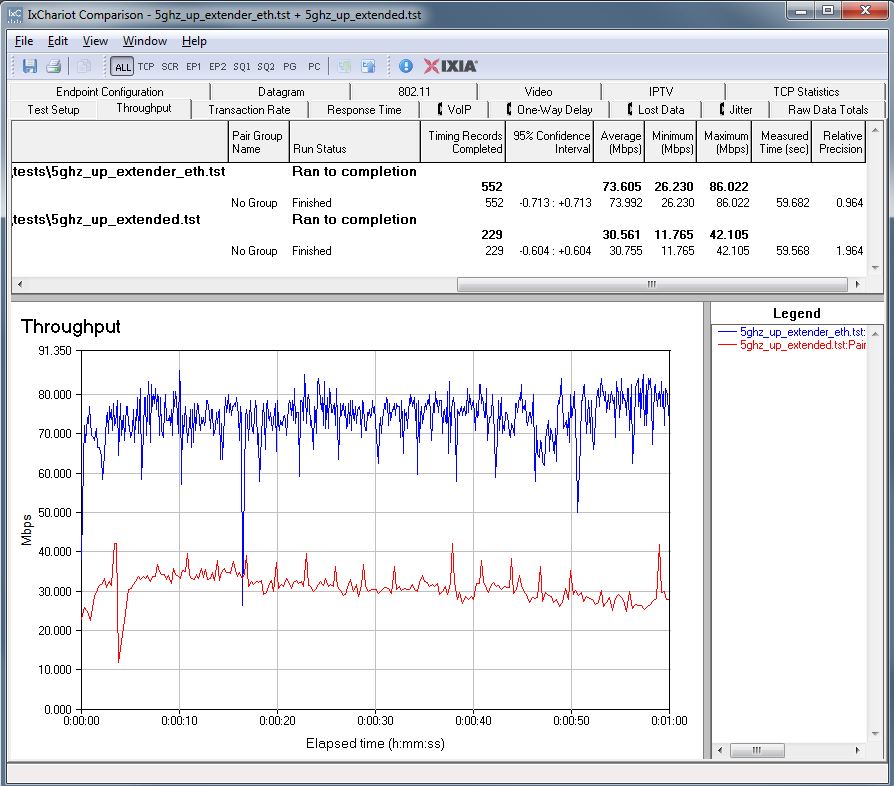
Linksys RE6700 extender throughput – 5 GHz uplink
Crossband
I then checked to see if using a different channel for backhaul and client connection could deliver higher throughput. I controlled this by leaving the RE6700’s Crossband on its default Auto setting and shutting off the desired channel on the base router. Table 2 shows three cases:
- No Crossband – Extension via same radio retransmission
- Forced – Manually set backhaul band opposite of client extension band
- Auto – Enable both bands in base router and let RE6700 Crossband decide
| 2.4 GHz Down | 2.4 GHz Up | 5 GHz Down | 5 GHz Up | |
|---|---|---|---|---|
| No Crossband | 17 | 29 | 39 | 31 |
| Forced | 55 | 44 | 35 | 40 |
| Auto | 49 | 49 | 38 | 40 |
Table 2: Delivered throughput (Mbps)
2.4 GHz extended performance was higher using Crossband than 5 GHz. This makes sense given the performance plots above; 5 GHz extender throughput was always higher than 2.4 GHz. Auto Crossband seemed to make the correct band use decision. If it hadn’t, Auto throughput would have been closer to the No Crossband values
5 GHz was a different story. Although using Crossband still provided higher throughput than not using it, the difference was lower. This is because 2.4 GHz throughput available at the extender was lower than 5 GHz. Around 36 Mbps for downlink and 52 Mbps for uplink was available to extend on the 2.4 GHz side vs. 79 Mbps down and 74 Mbps up for 5 GHz. So for 5 GHz extension, Crossband vs. no Crossband was a toss-up.
Closing Thoughts
The Wireless Extender Ranker, shows NETGEAR’s desktop-style EX6200 still continues to earn its SmallNetBuilder Ranked #1 award. But the RE6700 in the #2 slot outranked the Linksys RE6500. The Ranker Performance Summary shows the sub-rank breakdowns. Keep in mind that since we consider results within 5% of each other as equal, sub-rank ties are possible.
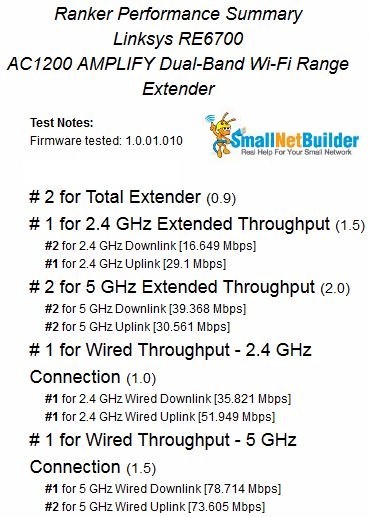
Linksys RE6700 extender throughput – 5 GHz uplink
In all, I liked the RE6700. Its wall-plugged form factor makes for convenient placement and its pass-through power socket won’t cost you an outlet. It was easy to set up and had decent performance, with its Crossband feature working as it should. Finally, as an AC1200 class extender, it will be a better match to most AC routers and be able to link up at higher 5 GHz rates than AC750 class extenders to provide higher extended throughput.
 Buy AC1200 AMPLIFY Dual-Band Wi-Fi Range Extender from Amazon
