Introduction
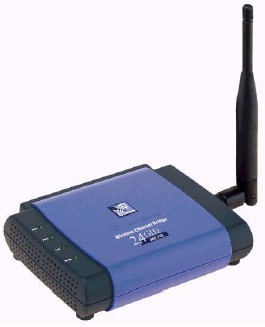
| Linksys Instant Wireless Ethernet Bridge (WET11) | |
|---|---|
| Summary | 802.11b to Ethernet bridge that can be used in AdHoc or Infrastructure mode to create interesting wireless/wired network combinations. |
| Update | 11/13/02 – Take 2, Wrap Up on WAP11 vs. WET11. Corrected MPLS info 10/31/02 – Clarified Wrap Up on WAP11 vs. WET11 |
| Pros | • Can use other antennas • Supports AdHoc and Infrastructure modes • Superior radio performance |
| Cons | • 10% WEP-enabled throughput reduction • Can’t be used as an Access Point • No MAC Address Association controls |
Linksys’ new WET11 is causing quite a stir in the wireless networking world. Some say it’s just a WAP11 stuck in AP Client mode. Others say it works great and wish it were weatherized for outdoor WISP-type use. So what’s the real story? Has Linksys managed to come up with a one-product-does-all 802.11b solution?
Features and Geektails
Let’s get the basics out of the way, then dive into the technical details. The WET11 is fairly small, having a footprint about an inch narrower than a stack of three CD jewel cases. The supplied single dipole antenna uses a reverse SMA (RP-SMA) connector and is jointed so that it can swivel 360 degrees and lock in 45 and 90 degree positions. You should be able to orient the antenna as desired, no matter how you position or mount the box.
The enclosure has no slots for mounting screws, though, and isn’t really what I’d consider stackable, since the four LEDs (Power, Diag, LAN Link/Activity and WLAN Link/Activity) are on the top surface of the box. The single 10BaseT Ethernet connector, Normal / Crossover and Reset switches are all on the rear.
TIP: The Normal / Crossover switch is a welcome inclusion, since it will ensure that you can connect to either a switch / hub port or an Ethernet client device without hunting around for a crossover cable. Just use a normal UTP cable, make sure the device you’re connecting the WET11 to is powered up, connect the WET and device together, and move the switch (wait a few seconds between moves) until the LAN light comes on.
The WET is not set up for Power Over Ethernet (POE), so if you’re thinking of using it for WISP (Wireless ISP) applications, you’ll need to roll your own. There are plenty of ways that you can add POE, including ready-made products like the SMC Power Injector or D-Link DWL-P100 Power Over Ethernet (POE) Adapters, or if you don’t mind a little cutting and soldering you can roll your own.
The WET also isn’t the only consumer 802.11b / Ethernet bridge available now either. D-Link has its DWL-810 and Hawking its WB320. But the WET11 seems to be the one getting a lot of attention, most likely because it’s from Linksys, so let’s see what makes it tick…
Let’s Get into It
Updated 11/13/02 First, the WET11 is not a repackaged WAP11 Access Point, but is based on the Ubicom IP2022 Internet Processor. Earlier information from Linksys indicated that the WET used a technique called Multi-Protocol Label Switching (MPLS), instead of more conventional bridging code, but this turned out not to be true.
Whatever technique used, the WET’s black-box magic should be invisible to the average user, who would see only the end result, i.e. the ability to have not just one, but up to 30 clients behind each WET11 connected wirelessly in the same subnet without any muss or fuss, and with the ability to share printers and files intact.
One key point about the WET11 that bears special emphasis is that it cannot be set to function as a standard Access Point, i.e. support wireless clients that are operating in Infrastructure mode. When you set the WET to Infrastructure mode, that means that it will look for an Access Point (or wireless router) to connect to, but not allow clients set to Infrastructure mode to connect to it. The difference may be difficult for wireless networking novices to understand (heck, I had to think about it for awhile before I got it!). So I’ll be doing a companion article shortly that will explain how to use the WET11 in various network configurations, so you can get a better idea of what it can do (and how to do it).
In my testing, I was able to use two WETs in AdHoc mode to create a wireless bridge between two small Ethernet networks. The resulting network acted just like a single wired one, supporting Microsoft File and Printer Sharing and access to the Internet via my main router for multiple wired clients on both sides of the wireless WET11-to-WET11 bridge.
But when I set up another test network with one WET11 in Infrastructure mode connecting to a “normal” Access Point, I found that Microsoft File and Printer Sharing worked fine, but that I was unable to connect to anything outside my LAN, i.e. the Internet. At first I thought this was just the price you had to pay for the MPLS magic inside the WET11. But after reporting my results to Linksys, they asked me to hold off for a few days, and came back with a firmware update that fixed the problem. So be sure that you check the firmware revision of your WET11, and if it’s not 1.3.2 or higher, go get the firmware update and run it. Unfortunately you’ll need a Windows machine to run the update… another thing I hope Linksys fixes in future firmware releases.
Updated 11/13/02
NOTE: I missed the significance ot the WET11’s ability (when set to Infrastructure mode) to connect to most (any?) Access Point, because I thought the WAP11’s “AP Client” mode did the same thing. But several readers have pointed out that the WAP11 “AP Client” mode works only with other WAP11s in AP mode. I apologize for my oversight!
Setup
Although Linksys says that the WET is “completely driver-free, so it works on any platform and under any operating system“, the WET11 experience is not plug-it-in-and-go. Once you get it out of the box, you’ll find that both the Quick Installation and User Guides direct you to run the Setup Wizard on the supplied CD. For that, though, you’ll need a system running Windows.

Figure 1: Setup Wizard – System Scan result
(click on the image for a full-sized view)
The Wizard is a self-contained.exe and doesn’t need to be installed on the computer you run it on, although I found it was handy to copy the Setup.exe file from the CD to my hard drive during my experimentation. Figure 1 shows the result of the Wizard’s hunt for WET11s on my network, but note that the settings are not the defaults. The wizard steps you through screens that allow you to:
- Select AdHoc or Infrastructure mode
- Set (E)SSID, Channel (AdHoc only), and Bridge Name
- Manually set IP address, subnet and Gateway, or get that info from a DHCP server
- Enable WEP and set one key using either a passphrase to generate a Hexadecimal key, or entering it directly.
When you’ve completed all the steps, the info is saved and you are prompted to power cycle the WET11 to reset it. This is fine if you’re right next to it, but would be a pain if you were trying to reset a WET11 in a remote location, an attic for example. A Reboot button would have been much simpler, and I hope Linksys adds one to the Wizard.
If you’re lucky enough to not have a Windows machine, you can still get the setup job done via the WET’s Web browser interface. But you’ll need to make sure the computer that you’re running the browser on is in the 192.168.1.X subnet. This is because the WET comes set to 192.168.1.225 (subnet 255.255.255.0, gateway 192.168.1.1) as its factory default.
Once you get your computer and the WET in the same subnet, open your browser and enter an address of 192.168.1.225, enter the default password of admin, and you should get the screen shown in Figure 2.

Figure 2: Web I/F – Info screen
(click on the image for a full-sized view)
This is a handy screen, but can be a bit misleading. The bottom Results of the most recent scan shows only WET11s, Access Points and wireless routers that are in range.. So you can’t use this screen to monitor wireless clients that are either in-range, or associated with the wireless LAN that the WET11 is part of. There are no packet statistics or other ways to tell whether the WET11 is actually passing data, and don’t look for logging, because there isn’t any either.
The BSSID info can also be a little tricky to figure out. If the WET is set to Infrastructure mode to work with an Access Point or wireless router, the value will be the MAC address of the AP or router that the WET11 is connected to. If the WET11 isn’t connected to any network, the SSID will read “non-spec” and the BSSID will show “44:44:44:44:44:44“.
If the WET is set to AdHoc mode, however, I found you need to be careful in interpreting the information shown in the Info screen. Figure 3 shows a Netstumbler display for a scan that ran for about 10 minutes. Can you tell which is the real WET11?

Figure 3: Netstumbler scan
(click on the image for a full-sized view)
Now I have to admit that I haven’t previously played with AdHoc mode, so I had to do some checking to see if what I was seeing was normal behavior. After reading the SF Wireless Introduction to 802.11, my tentative conclusion is that the WET11 was probably behaving normally. But I sure found it a challenge to figure out what was going on! The lesson I learned here is to heed the warning that Linksys provides on the Info page and refresh the screen manually every time you look at it if you really need to rely on the information.
Figure 4 shows the Wireless settings screen. You get more settings here than in the Wizard, including Access Point Density, Deny Unencrypted Data, and Shared Key Authentication (not shown in the screen shot). All are reasonably explained in the on-line Help and User Guide (although I’m still trying to figure out “Deny Unencrypted Data”…).
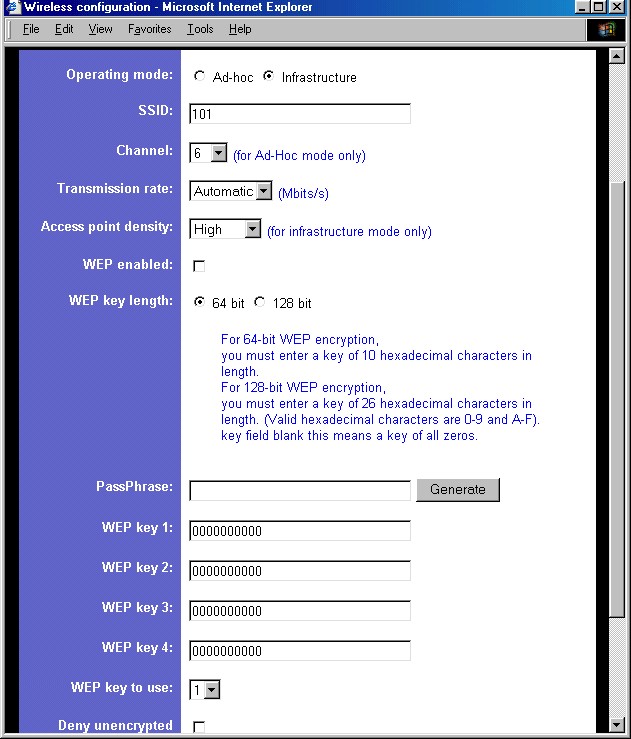
Figure 4: Web I/F – Wireless settings screen
(click on the image for a full-sized view)
Note that unlike in the Wizard, you do get Reboot (and Reset to Factory Defaults) buttons in the web interface (on the Admin screen). You also get access to the WEP keys, which are stored in clear text. Note, however, that using the Passphrase option generates the same code for all four keys, which may not be how Passphrase generation methods work on your wireless clients… if that option is offered at all! (And people wonder why users don’t enable WEP!)
Security
As I mentioned above, you get WEP, Deny Unencrypted Data, and Shared Key Authentication as your major security features. But because the WET isn’t an Access Point, it doesn’t have MAC address Association control. It doesn’t suppress broadcast of its ESSID either. So you may run a higher risk of having unwanted wireless “guests” if you are using a WET11 to add wireless capability to your network because of these limitations, and the fact that the WET does most of its neat tricks when operating in AdHoc mode, which in my opinion is a more “promiscuous” mode than Infrastructure.
If you’re still with me, I’m finally ready to move on to Performance.
Wireless Performance
• SNR readings were done with NetStumbler
• Testing was done with an ORiNOCO Gold Card in a Dell Inspiron 4100 laptop running WinXP Home
I ran my tests with the WET11 and ORiNOCO Gold card each in AdHoc mode… the first time I’ve done a test in AdHoc mode. The maximum throughput of around 4.7Mbps is similar to what I see when testing throughput using an Access Point instead of the WET11.
I was more impressed with the longer distance Condition 3 and 4 tests, however, which yielded a reliable throughput around 4Mbps… a very respectable showing. I double checked the results with a 30 Second Chariot run, which confirmed the 4.1Mbps average number but also showed a cyclical variation between 2.7 and 5.0Mbps as shown in Figure 5.
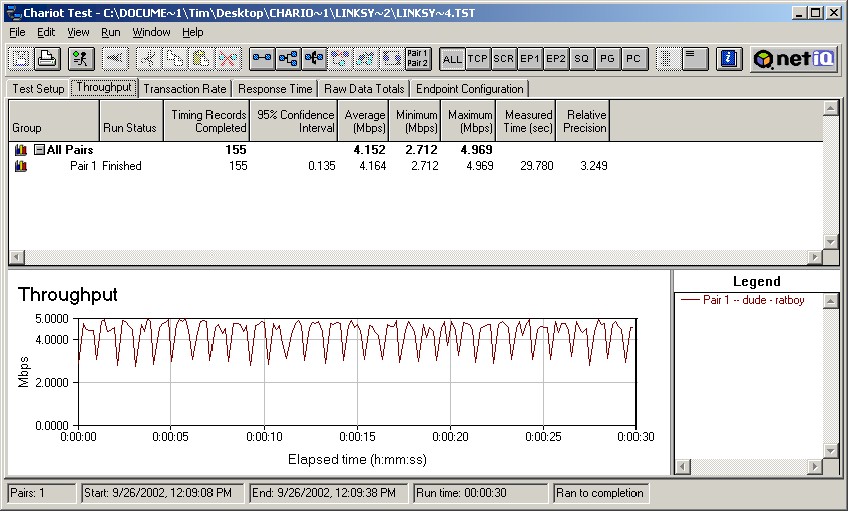
Figure 5: Chariot throughput plot
(click on the image for a full-sized view)
The mixed news on WEP is that enabling it extracted about a throughput penalty, although it was a relatively low 10%, vs. the 30+% I’ve seen with other products.
In all, I’d say the WET11 has pretty decent radio performance!
802.11b Wireless Performance Test Results
| Test Conditions
– WEP encryption: DISABLED |
Firmware/Driver Versions
AP f/w: |
||||
|---|---|---|---|---|---|
| Test Description | SNR (dB) | Transfer Rate (Mbps) | Response Time (msec) | UDP stream | |
| Throughput (kbps) | Lost data (%) | ||||
| Client to AP – Condition 1 | 67 | 4.7 [No WEP] 4.2 [w/ WEP] |
3 (avg) 4 (max) |
392 | 0 |
| Client to AP – Condition 2 | 40 | 4 [No WEP] [w/ WEP] |
3 (avg) 4 (max) |
391 | 0 |
| Client to AP – Condition 3 | 25 | 4.1 [No WEP] [w/ WEP] |
3 (avg) 6 (max) |
391 | 0 |
| Client to AP – Condition 4 | 24 | 4.1 [No WEP] [w/ WEP] |
3 (avg) 5 (max) |
391 | 0 |
Wrap Up
When I first heard about the WET11 back in May, I thought it might be a slightly interesting product for a niche market. But the product that ended up shipping turned out to have a much wider range of possible uses… once you understand the differences between the WET and an Access Point.
Once you do “get it”, you’ll find there’s a lot you can do with a WET, and its superior radio performance and ability to accept better antennas are sure to win it a number of fans, too.
Update 11/13/02 – Rewrote the following summary based on feedback from my helpful readers, particularly Fritz Riep.
The main quandry potential buyers are going to face is deciding between a WET11 and its older sibling, the WAP11 Access Point. Since both are available for about $100, how do you choose? The decision may come down to your preference in product size, and for the way you want to set up your network. The main thing to remember is that the WAP11 is intended to perform its bridging tricks with other WAP11s only, where the WET11 is intended to work with other manufacturers’ 802.11b devices. (A WAP11 in AP Client mode won’t even connect to Linksys’ own BEFW11S4 Wireless Router!) The other important difference is that the WET11 can’t be set to operate as an Access Point and won’t support support wireless clients that are set to operate in Infrastructure mode – the most common mode that 802.11b networks use.
And if you still don’t understand the difference, go buy one of each and experiment. Hell, they’re cheap enough!