Introduction
| At a Glance | |
|---|---|
| Product | TRENDnet Advanced Day/Night Wireless Internet Camera Server with Audio (TV-IP301W) |
| Summary | 802.11b/g network camera system with Infrared capability |
| Pros | • Nice industrial design • Clear real-time images • Industry-standard CS-mount lenses • IR (Infrared) LEDs for low-light conditions |
| Cons | • Inconvenient setup • Buggy FTP feature • Poor-quality recorded video • Under-powered management program for the price |
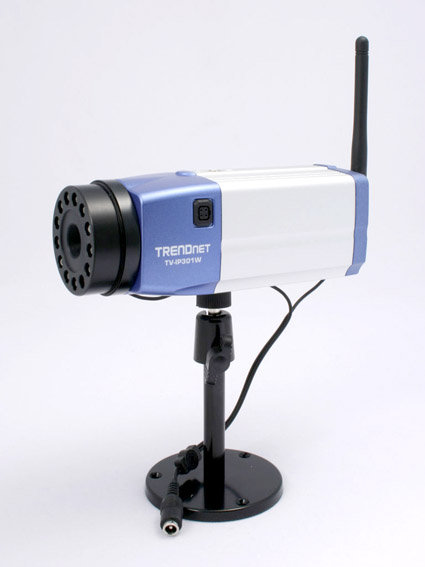
In this age of "digital eyes and ears," if you need video surveillance in your office or a way to beef up security at home, an Internet (network) camera may be a cost-effective solution. In this review, I’ll take a look at the TRENDnet Advanced Day/Night Wireless Internet Camera Server with Audio (TV-IP301W). While the name is probably one of the longest I’ve ever encountered, it does describe the product well—the TV-IP301W is an 802.11b/g wireless Internet camera.
TRENDnet offers both wireless and Ethernet-only versions of the camera. The TV-IP301 version, which connects directly to your 10/100 Ethernet network, sells at about $50 less than the wireless one that I’ll review.
The heart of the camera is a Sony 1/4-inch progressive CCD rated at 0.5 Lux. In normal lighting conditions, the TV-IP301W functions as a color camera with the ability to record VGA-quality streaming video with a resolution of 640 x 480 and frame rates of up to 30 fps. The camera is also designed to provide InfraRed (IR) illumination for night usage. The camera also contains a built-in microphone that enables audio streaming so that you can listen while you watch the video.
Figure 1 shows the 12 IR (InfraRed) LEDs and the light sensor of the TV-IP301W for low-light usage.
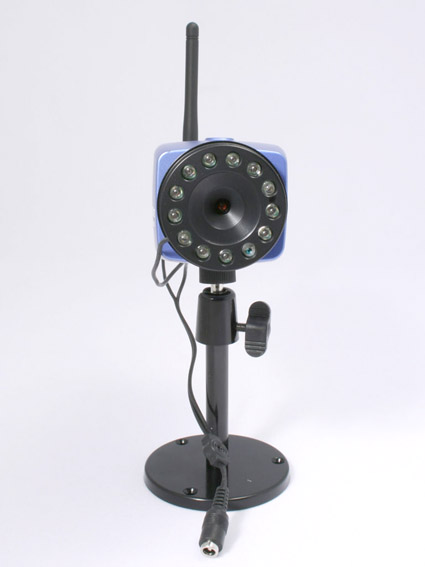
Figure 1: TV-IP301W Front View
In dark low-light situations, by turning on the ring of 12 IR (InfraRed) LEDs that surrounds the lens, the camera is able to switch to providing "clear" black and white images.
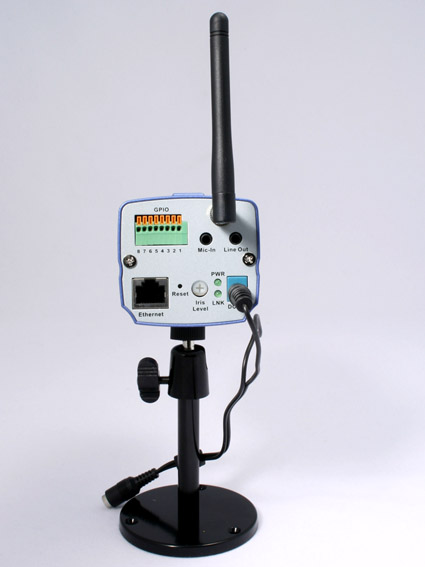
Figure 2: TV-IP301W Rear Panel
The rear panel (as shown in Figure 2 above) contains the I/O connector, Mic-In port for an external microphone, Line Out port, Ethernet connector, Reset button, Iris Level control, pair of LED indicators for Power and Link, and DC Power connector.
The eight pin connector in the upper left corner of the panel provides input and output from the camera.
- Pins 1 and 2 are relay inputs that can be used to trigger the camera. An example of a trigger might be a switch on a door.
- Pins 3 through 6 provide two pairs of normally open relay outputs that are capable of handling 100mA DC. Using an external relay, you might turn on a light or ring an alarm if the camera is triggered by either motion or by input from pins 1 and 2.
- Pins 7 and 8 are reserved for an RS-485 Interface, which you would typically use to configure and control devices that enable the camera’s special features such as motion, pan, tilt, and zoom.
If the DC-Iris lens is connected to the camera, the Iris Level control enables you to adjust the brightness of the video images from the DC-Iris lens. The camera uses a standard CS mount, so the supplied lens can be replaced with any CS or C mount lens commonly used in surveillance.
Construction Details
With an operating temperature range of 41-113 degrees F (5-45 degrees C), the TV-IP301W is clearly not designed to be an outdoor camera. It does have a heavy, solid feel since it is housed in an aluminum case and weighs in at 450g (15.9 oz).
The case is held together with two long screws that run from the back of the camera, through an extruded channel to the front of the camera. Removing those two screws and the antenna/antenna connector allows the case to slip apart.
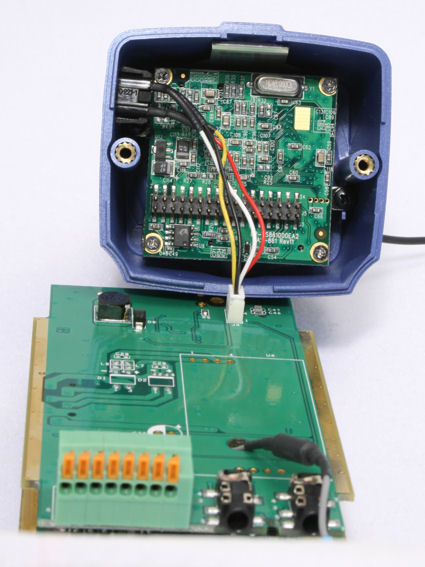
Inside, you’ll find a motherboard that’s connected to a daughter board that contains the RF components, the I/O connector, and the microphone/audio out jacks.
Figure 3: TV-IP301W Interior View with Two Circuit Boards
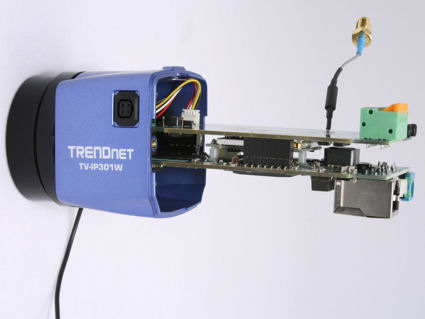
The two boards, shown in Figure 3 above, plug into a third board (refer to Figure 4) that’s mounted behind the lens assembly.
Figure 4: TV-IP301W Interior View with Circuit Board Behind Lens
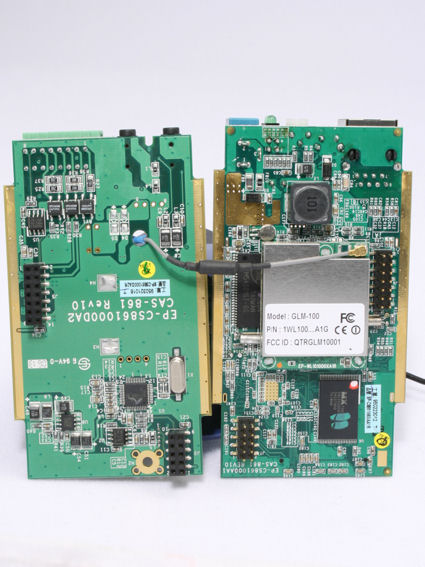
Pulling the two circuit boards apart reveals the RF module, shown in Figure 5 below. The wireless module is an OEM RF module made by Cellvision Systems in Taiwan. It uses a Ralink RT2500 802.11b/g Chipset.
Figure 5: TV-IP301W View with Two Circuit Boards
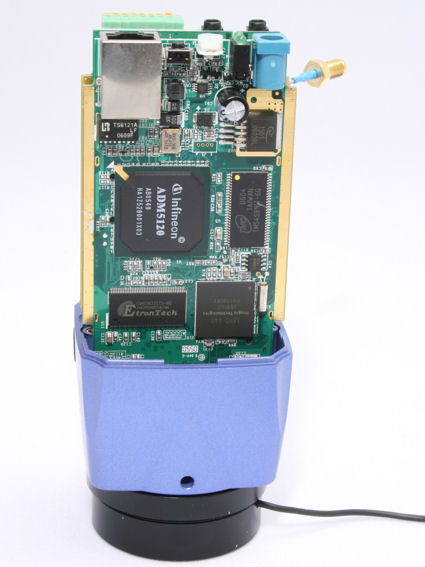
A close inspection of the main board reveals that the TV-IP301W is powered by an Infineon ADMTek 5120 processor (Figure 6). The underlying operating system is Linux. The other key components are 4 MB of ROM/Flash and 32 MB of RAM.
Figure 6: TV-IP301W Interior View with Main Circuit Board
Setup and Configuration
Though a multi-language Quick Installation Guide is included with the camera, I was still disappointed by the TV-IP301W setup and configuration. I was mainly annoyed that only the briefest description existed on how to configure the camera after installing the hardware.
The Quick Installation Guide says that you must assign a static IP address to the computer that you’ll use to connect to the camera that is on the same subnet as the camera’s fixed address. You then connect to the camera using your Web browser. By default, the camera is configured with a static IP address of http://192.168.1.30.
In all fairness, I must add that the information is covered briefly. The User’s Guide does provide a single paragraph on page 96 for changing your computer’s IP address to match the default subnet of the camera. But the directions to use the Windows TCP/IP Properties dialog were presented without the aid of screen shots. Ultimately, I felt the footnote on page 23, Note: Extensive knowledge of LAN will be helpful in configuring the camera, probably sums up what it takes to get your system working.
A far simpler method, I thought, would be for TRENDnet to default its camera to acquire an address through DHCP (Dynamic Host Configuration Protocol), and then have a utility "discover" the camera on the network.
Interestingly, TRENDnet does not supply a Setup Wizard built into the camera’s admin webserver. Instead, the Setup Wizard is available on the Utility CD-ROM. However, the User’s Guide and the Quick Installation Guide do not make any reference to it! Since Setup Wizard is only shown as a menu option in the screen image on page 62 of the User’s Guide, it can be easily overlooked.
To satisfy my curiosity, once I had the camera configured on my subnet, I ran the Setup Wizard. It, in turn, discovered the camera (as shown in Figure 7 below) and enabled me to configure the camera’s basic network settings.
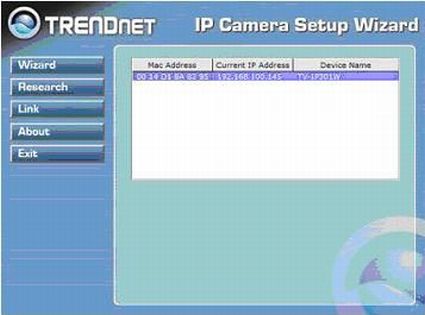
Figure 7: The Setup Wizard discovers the camera
Figure 8 shows the Setup Wizard summary screen with my camera’s basic network settings.
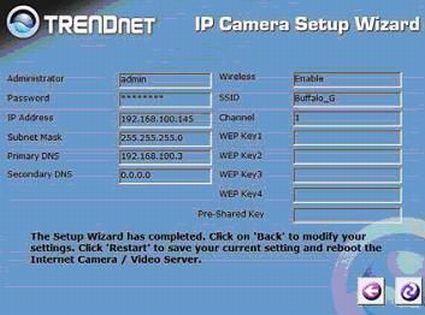
Figure 8: Basic Network Settings Summary
Since my test unit was the wireless version, I set the camera up to connect wirelessly so that I could move the camera around my home and test it in various locations.
Through the wireless configuration page, I was able to specify the name of the wireless network I wanted to connect to and define the security settings. Unlike many older cameras on the market that only support WEP (Wired Equivalent Privacy), the TV-IP301W supports WPA-PSK TKIP and AES.
The wireless configuration utility within the Web browser also offers a Site Survey option to determine which APs the camera can see. The camera saw three APs, or perhaps, the Site Survey only showed the three strongest APs. By contrast, my notebook, which sat a few feet away and was equipped with the latest 802.11n (Draft N) D-Link DWA652 Card, found 12 APs. In spite of the Site Survey‘s findings, I felt the camera had adequate coverage within my house.
Feature Tour
After logging into the admin interface, the default home page appears, displaying the main menu functions along the left side of the screen.
For configuring and checking the status of your camera, three main menu options are available:
- Information, which enables you to view the status, connections, events, and general information of the camera
- Configuration, which enables you to configure all of the video and audio functions, event handling, motion detection, ftp and mail, RS-485, and I/O ports
- System, which enables you to configure your wired and wireless network, time and date, create and manage users and tools
For viewing video images from the Web browser, two options are available in the upper left corner of the screen:
- View LiveShow | ActiveX (connects to the camera’s server using ActiveX)
- View LiveShow | Java (connects to the camera’s server using Java)
Note: You will need to download software the first time you launch either of these options
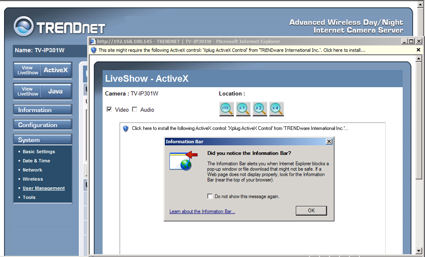
Figure 9 shows the menu options (located on the left side of the screen) and ActiveX being downloaded. Note that the first time I launched the View LiveShow | Java option and downloaded the Java applet, I received a warning that the security certificate was expired or not yet active.
Figure 9: TV-IP301W Main Menu Screen
The TV-IP301W was configured for MPEG-4 by default, but to view the image using Java, I had to change the compression format from the default to Motion JPEG (M-JPEG).
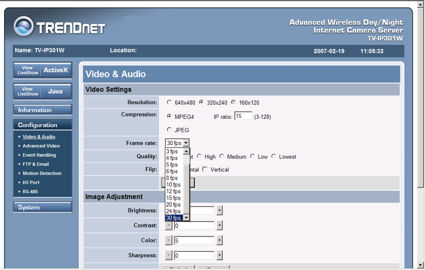
As you can see from Figure 10 below, the Video Settings section also gives you a choice of resolution, frame rate, five quality levels, and options in which to display the image (in horizontal- or vertical-mirror mode). The three resolution format choices are 640 x 480, 320 x 240, and 160 x 120; and in LiveShow mode, you can choose a 2x or 4x digital zoom, or a 1/2x zoom to save bandwidth.
The Video & Audio page also contains the Audio Settings section where you can change the audio quality of the video you’re listening to. The two audio formats (compression codecs) to choose from are ADPCM and PCM. According to the User’s Guide, PCM has better audio quality, but requires higher bandwidth (8Kbps), and ADPCM has slightly less quality and requires less bandwidth (2Kbps).
Figure 10: TV-IP301W Video Settings
For Advanced Video settings such as enabling graphic and text overlays on the screen, use the Overlay Image section of the Advanced Video page. For my tests, I enabled the Time Stamp in the upper left corner of the screen, and a MOTION DETECTED text overlay to appear on the screen if motion detection triggered.
Event Handling, FTP & Email, and Motion Detection are under the Configuration main menu option and important features for surveillance cameras, since you don’t want to always watch your cameras. You can configure the camera to detect motion within a frame, and based on the motion detected, the camera can respond by uploading a video clip via FTP or sending an email notification to you.
To test the features, I created a motion detection area on the screen and configured an event for the camera to FTP 10 seconds of video to my FTP server. I successfully triggered the motion and received an email alert. But when I checked my server, I discovered numerous 12K AVI files with no video. I had anticipated a single file with 10 seconds of video! Clearly, the TV-IP301 did not upload images to the FTP server as expected.
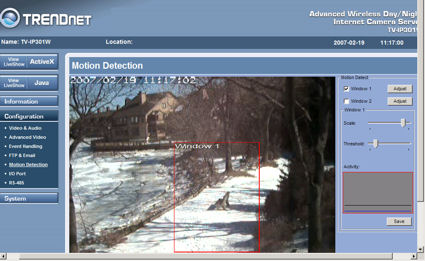
Figure 11 shows a setup of the motion detection window with the Time Stamp text overlay in the upper left corner of the screen.
Figure 11: TV-IP301W Motion Detection Setup
View & Recording Options
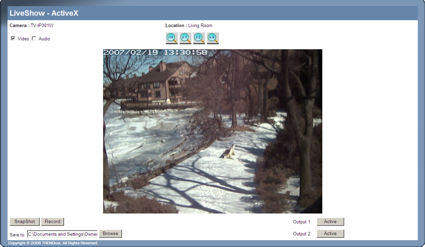
I tried the LiveShow – ActiveX option, and the video images viewed in the window looked fairly good. Even at higher resolutions which uses more bandwidth, the motion was fluid.
The LiveShow window (Figure 12) gives you the option of either taking a snapshot or recording the video directly to a networked share. While this might seem more convenient than running an application on a PC, you still need a PC running an ActiveX capable browser. So a PC is still in the picture, since the recording smarts aren’t entirely built into the camera itself.
To test this, I set up the TV-IP301W for 320 x 240 (resolution), high quality, and audio enabled. I ran multiple tests using both wired and wireless connections, and I also made recordings to a network drive and to a local disk.
Figure 12: IP301W ActiveX LiveShow
You can see from Figure 12 that the controls for digital zoom are located above the video image, and that the options for saving a snapshot or recording a video are located in the lower left corner. From the LiveShow window, you also have the option to save the file to a local drive or a network share.
I’m sorry to report that the saved video pixilated (blurred) badly with even a little motion and that the audio recorded in the file was not at all synchronized with the video. I had expected the .AVI file to look as good as the video on the screen. Whereas the live video looked fluid with little pixilation, the quality of the video in the recorded file was a real disappointment. You can download this test file (3MB zipped AVI) and see for yourself.
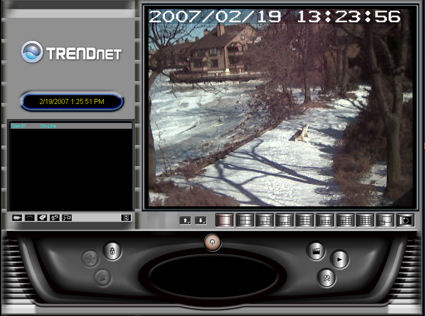
In addition to the Web browser interface, the TV-IP301W ships with IPView Pro, a Windows application that lets you monitor up to 16 cameras. From within the program, you can also launch the Web interface in a window that gives you complete access to the browser-based configuration.
IP View does enable a few additional features such as scheduled recording and recording based on motion detection, and it does allow for email notification. However, it lacks FTP capabilities.
Considering the price of the camera, I felt that the IPView Pro was underpowered compared to other applications I’ve used.
Figure 13: IPView Pro
Closing Thoughts
I’ve looked at a number of Internet cameras over the past few years, and for the most part, I’ve been disappointed. Based on the relatively high price point for the TV-IP301W, I expected to see high performance comprehensive software for managing multiple cameras and real-world surveillance system capabilities. But again, I was disappointed by the IPView Pro application.
Though I like the industrial design of the camera, its performance and quality were poor when recording files to a server or a local drive. The FTP feature didn’t work as expected, and the audio and video were not synchronous on our test files.
While the image quality of the LukWerks cameras doesn’t compare to that of the TV-IP301W when monitoring in real-time, I felt that the user interface and recording capabilities of WiLife’s Luk Werks camera system is more of what’s needed in a surveillance system than what IPView Pro provides.
A future version of the camera with greatly improved software may be worth looking at, but the current version of the TV-IP301W doesn’t justify the price.

