Introduction
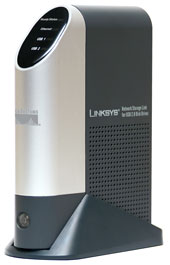
It’s been nearly two and a half years since I picked up a Linksys NSLU2 on a whim.
I found it to be an interesting little Network Attached Storage (NAS) device that
gave me the ability to add much-needed disk space to my network. It worked fine, but since there were additional features I wanted, I decided to dig deeper.
After playing
around with it a bit, I found a cgi-bin bug that allowed me to turn on a hidden
telnet daemon. Then, after hand-editing the NSLU2’s password file on my iBook, I was
able to gain command-line access to its underlying Linux operating system where I could begin to really investigate its potential.
While I was exploring the
internals of the box, I thought there might be just a handful of other people
interested, but I was wrong. It turned out there were a lot of people that thought
extending an inexpensive, tiny, silent Linux box was a worthwhile project. When word
got out that the NSLU2 was extendable, things really took off. In short order,
geeky web sites such as LinuxDevices and Slashdot
took notice and a busy developers group was
founded. I wrote a number of articles detailing how to extend the capabilities of the box and alternate firmware from the development group were being installed all over the world.
In my earlier articles, I described manually downloading, installing and using a
cross- compilation tool-chain, hand-editing source code, unpacking and packing
firmware images, etc. In short, modifying the little box was not for the technically
challenged or faint-of-heart. The instructions could be cryptic and taking a wrong
step could easily destroy the device. But that didn’t seem to slow the interest down. The developer’s group continued to gain members at a rapid pace, and custom firmware images were being released on a near-weekly basis.
My last couple of articles
described a safer way to extend the box using the Unslung custom firmware that
provided package management so end-users could painlessly install software packages.
Contributors were supplying pre-compiled packages such as an iTunes server (Figure 1), Apache, MySql, etc. for free and easy customization of the box now nicknamed the “Slug”.
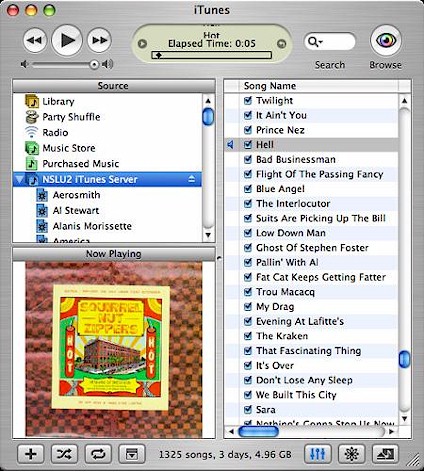
Figure 1: NSLU2 Itunes
My last article on the
NSLU2 was back in May of 2005, but since then development has continued at a rapid
pace. In this article, I’ll check out where things stand today in the NSLU2
community, and look forward a bit to see where the development group is going with this versatile little box.
Development Community & Firmware
Since the beginning, the driving force behind the NSLU2 development community has
been Rod Whitby. Rod states: “We
(nslu2-linux) are proud after two and a half years to still be the single point of nslu2 custom
firmware distribution, with no known animosity amongst the users or developers of
those firmware releases. We have 7500 subscribers on the nslu2- linux list, 4000 on
the nslu2-general list, and 200 on the nslu2-developers list.” And in addition, Rod
counts over 50,000 downloads from the firmware site, slug-firmware.net. The community has been busy!
I thought it would be interesting to get a comment from Linksys
regarding all of the activity going on with their NSLU2. Mike Wagner, director of
marketing for Linksys states: “While Linksys does not support any of the alternate
firmware available for the NSLU2, we are always delighted to see a product gain such
widespread acceptance. Like the similar community that emerged to enhance the WRT54G
before it, the creativity and ingenuity of Linksys customers inspires us to
continually improve our products.” So it sounds like Linksys is aware of the goings-on and is planning nothing to discourage it.
With a large community like the NSLU2 development group, there are going to be
differing wants and needs. Some users are going to want just a few additional
features over what the standard Linksys firmware brings, while others are going to
want a full-blown Linux system. To address these needs, a number of alternative firmware distros are available from the download site.
The first custom firmware, called Unslung, maintains the
original Linksys web-based user interface, but brings the ability to add more than
700 additional packages for customization purposes. Other firmware images remove all
of the original Linksys code. The Debian/NSLU2 firmware and installs a
standard Debian Linux system bringing along
more than 15,000 installable packages! This Debian/NSLU2 firmware has proved to be a
popular option. According to statistics gathered by Debian, the NSLU2 has propelled
the ARM to become the third most popular architecture supported by Debian.
Along with these two firmware distros are
several more variations that are designed for special needs. For example, the UcSlugC firmware installs
a minimal system that is designed for users who have a specific purpose such as a
designing a media player. UcSlugC can be run entirely from the internal flash of the NSLU2.
The OpenSlug
firmware splits the difference between the Linksys firmware and the full-blown
Debian system. While the Debian system is a complete Linux system, it’s really
designed to be run off an external hard-drive. OpenSlug, on the other hand brings
more than 3500 installable packages along and can be safely run from a flash-drive.
For a complete comparison of the available firmware images consult this table, but be
aware that as the Debian project starts to officially support the NSLU2, some of the
“unofficial” Debian-based firmware images listed in the table may become obsolete.
Installing Debian
The last time I installed an alternate firmware onto my NSLU2 was quite a while
back. At the time, the alternatives were few, so I went with the current Unslung
firmware installed to 512 MB memory stick. This combination has been up for over a
year now and is happily running a LAMP stack
supporting one of my web sites. But as mentioned above, the Unslung firmware has some
tradeoffs. When you would log into the device some things were not quite the same as
a standard Linux system. Making changes would require tweaks, or maybe an obscure
package was not available. Sometimes the busybox
version of utilities used had slight differences from the standard equivalent, or
maybe the filesystem layout was different than expected. Everything just felt a little “off”.
So to check out the bleeding-edge development status of the NSLU2
project, I picked up a new NSLU2 from my local big-box retailer and proceeded to
install the official Debian firmware. There’s a nice installation guide here, but in the following sections, I’ll show the steps I went through and the results I achieved.
I’ll skip the standard NSLU2 setup you’d do to install the of-the-shelf device. But note that
you’ll need to have your NSLU2 fully working before you proceed to install Debian.
Also note that Debian is designed to be installed on a hard drive so I wouldn’t
recommend trying to use a flash drive unless you’re willing to tweak it afterward to avoid excessive writes that could burnout a flash drive over time.
The first step in loading Debian onto your NSLU2 is to acquire and install the debian-installer that is
specifically built for the NSLU2. Debian-installer is the program that’s responsible for
bootstrapping and installing a standard Debian system on both PCs and devices like
the NSLU2. The basic idea with the NSLU2 is that you burn the debian-installer as a
new flash image, and then upon reboot, log in remotely using ssh and walk through a
standard debian installation that downloads everything it needs across the Internet.
If everything were right with the world, you’d get the debian-installer image from
the Debian site, but there are some complications. Intel wrote the Ethernet driver
used on the NSLU2, and they add some license restrictions that prevent it from being
included inside the official debian-installer. A free open-source replacement driver
is in the works, but until it’s ready, you’ll
have to pick up an unofficial debian-installer firmware here.
Once you have the image, there are a
couple of different ways to install it. I chose to install the image using the
standard Linksys firmware installation procedure. Figure 2 shows the NSLU2 upgrade screen where I have selected the debian-installer as the firmware to upgrade with.
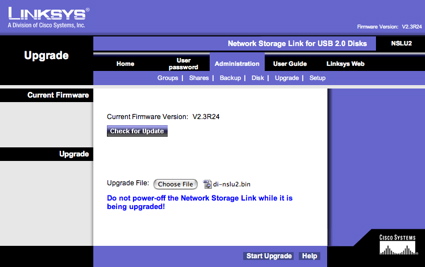
Figure 2: Firmware Upgrade
At this screen, you select your image and hit the “Start Upgrade”
button and wait for the completion message. But once again, things are sometimes more
difficult than you’d like. Linksys has a long-standing bug where they miscalculate the available memory and issue an error as seen in Figure 3.
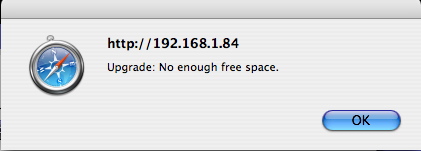
Figure 3: Firmware Upgrade Failure
Depending on your
situation, you may or may not see the same error. If you check out the Linksys support site,
you’ll see that they recommend running an “EraseAll” program to clear out flash when
this error occurs, but the NSLU2 developers strongly advise against it
because it has the potential to completely destroy your box. The easy solution, at
least for me, was to disconnect my external drive, reboot and start the upgrade over. After I had done this, the flash upgrade went smoothly.
Installing Debian – more
When the debian-installer flash installed and the box rebooted, I used ssh to log in from a terminal on my
MacBook. The default username is “installer” and the default password is “install”.
Figure 4 shows the initial screen of the Debian installer as it appeared on my terminal. Note that my terminal doesn’t
appear to understand some of the control sequences normally used to generate
terminal graphics. But since it was just a cosmetic issue, I continued on with the install.
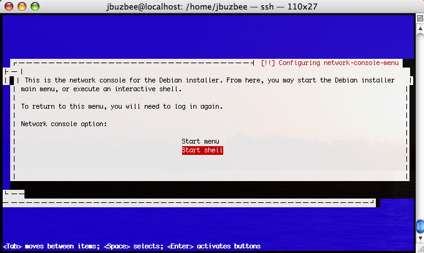
Figure 4: Debian Installation Menu
At this point, with a couple of exceptions, the installation is a standard
Debian install and you can refer to the standard Debian installation guide. For an NSLU2 installation, make sure you select the installation modules
listed in the Debian/NSLU2 installation guide here.
The next step in the
installation is formatting and partitioning of your external drive. Figure 5 shows
the process of setting up my disk. Once the disk is set up, the base system is downloaded and unpacked.
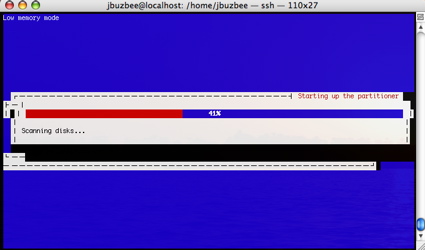
Figure 5: Partitioning the drive
This should go smoothly, but once again, be prepared in case it doesn’t. Figure 6 shows that I got bitten by a corrupted image. At least the installer detected the problem and let me know about it.
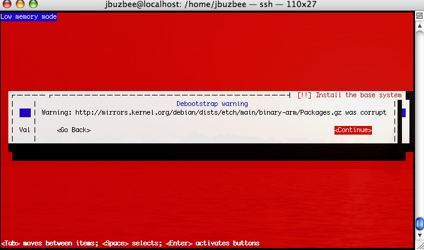
Figure 6: Corrupted Package
To correct the issue, I started over and
selected an alternate mirror site to download from. From then on, the install went
smoothly. Note that it will take some time since everything is being downloaded from
the Internet. In my case, it took around two and a half hours. Figure 7 shows the installation wrapping up.
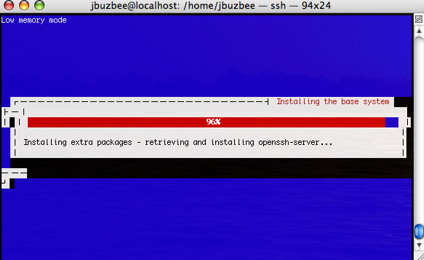
Figure 7: Debian Installation in Progress
Running Debian & Closing Thoughts
Once the installation was complete, the box rebooted and I was able to log in
using ssh. At this point, I had a standard Linux system with the normal disk layout
and utilities you’d expect. And if a tool wasn’t available, installing it was as easy
as issuing an “apt-get” command to access the 15,000 package library. For example,
when I wanted to install the ImageMagick package, loading it was as simple as:
# apt-get install imagemagick
Then a couple of minutes later, after getting all the dependencies installed, the
ImageMagick utilities were available. Of course, you’ll have to remember that you’re
running on a box that is only 133 MHz with 32 MB of RAM so you won’t be doing any
heavy-duty image manipulation or database queries. But speaking of the 133 MHz speed,
it’s been discovered that at least with the older models, Linksys intentionally under
clocked the NSLU2. If you’re brave, a procedure has been documented to double the speed, putting it back to where it was designed by Intel. I’ve yet to try it, but it’s only a matter of time before I do.
If you’re
really ambitious, some people have even added additional memory to the little box. But even as it is, people have found lots and lots of
uses for the NSLU2. Check out this page to see what others are doing. And when you get yours up and running, add
your story to the list!
So how did it finally feel to have a full Linux install on the little box?
Pretty good. It was bit slow, but I have to keep remembering that I’m not on a PC.
I’m running on a box that fits in the palm of my hand, has no moving parts and draws
about as much current as a night-light. And as I found out, you have to remember a
couple more things. The Debian install really is “bleeding-edge” and this is an
embedded device. If something goes wrong during the boot, you don’t have a nice console and keyboard to fix it.
Case in point is that I had been successfully running my new Debian Slug for a couple of days, booting and rebooting a number of times. At some point, I noticed that I couldn’t reach the slug on the
network. I don’t remember exactly what I had done last, but to bring it back, I just
unplugged and re-plugged the power. As it booted back up, everything looked normal.
The LEDs flashed, the disk clicked and all seemed right with the world. But when the boot finished, the NSLU2 was again nowhere to be found on my network.
I have a serial
console on my original NSLU2, but not on this new one. And without boot-time
visibility, you’re really in the dark. After a bit of head-scratching and more
reboots, I’d about given up and was goint to re-install when I thought maybe I’d try a
different approach. I unplugged the drive from the NSLU2 and plugged it into a
virtualized Linux instance running on my MacBook, thinking that maybe I would be able to
examine the boot logs for info. I could see the logs, but nothing looked amiss. Sigh.
The only way I could see what was happening was to add
debug statements to the boot, building my own boot log. This was a tedious process of
adding statements, unplugging the drive from my MacBook, plugging it back into my NSLU2,
rebooting the NSLU2, putting the disk back on my MacBook, examining the logs, etc. What I
finally found is that everything was normal except that the “interfaces” file, which tells
the Debian boot which network interfaces to bring up, was missing the one line that
told it to automatically configure the internal Ethernet device. Once I added this line, I rebooted and was back to normal.
I have no idea what caused this problem. Maybe there
was really somewhere else where this configuration was supposed to happen. Maybe
somehow this file got deleted and automatically re-created without this line. Maybe
it was something else I had done, or maybe I’d tripped over a Debian bug. But
regardless, this kind of problem reinforces the point that this is an embedded box
and that it’s all too easy to shoot yourself in the foot and get locked out of your own system.
Closing Thoughts
So where does the NSLU2 community go from here? Eventually, the open-source
Ethernet driver will find its way into the standard Debian tree and NSLU2 support in
the Debian tree will mature. At this point, as the Debian tree advances with the
latest applications and Linux kernel, NSLU2 users will be able to easily follow
along. And the specialized NSLU2 firmware distros such as OpenSlug and UcSlugc will also
mature for those users with specialized needs. Work is also underway on a new bootloader that will
give some additional capabilities such as a network boot and booting off new filesystems.
But one question remains: How long will Linksys produce the NSLU2? If
the supply dries up, it will be hard for new people to get involved and for the
community to continue thriving. The device has already been on the market without
change for over two and a half years. This is a long time in the fast-changing
consumer-electronics market and I can’t help but think that the enthusiasm shown by the community is a factor in keeping it around.
But in case Linksys finally does decide
to drop the "slug", the NSLU2 community has also been supporting additional, similar
devices, such as the Synology DS101, Iomega NAS100d, D-Link DSMG600, and other Intel ixp4xx-based devices. And maybe one of these days Linksys will finally get around to releasing an updated version of the NSLU2. And when they do, I have no doubt that there will be willing cadre of developers waiting.
