Introduction
Long-time readers may recall my 2008 article entitled How to write an iPhone App in 14 Days. In it, I detailed my experiences during a long Christmas break when I, as a neophyte iOS developer, wrote an iPhone app from scratch and got it into the Apple App store in 14 days flat.
If you read through the article closely you might remember that I had some problems following the rules and playing in the Apple-approved sandbox. So I ended-up uh, “straying” a bit (my Kindergarten teacher would not be surprised). I got by with this for awhile, but eventually the app-approval gnomes caught on to me and I was expelled. Oh, the shame of it all…
In reality, I couldn’t have written my app using the Apple-approved interfaces. My app used a screen-saver type display that needed access to all camera images simultaneously and the only Apple API available allowed selecting one photo at a time.
The app-store approval followed by the later rejection, coupled with the lack of an API to get the images my app needed, soured me a bit on developing for the Apple iOS ecosystem. Maybe it was time to pack my bags and go. I eventually let my Apple Developer Account lapse, picked up a new Android phone and crossed the DMZ into the Android camp where I have a brother firmly entrenched at Google.
In this article, I’ll describe how I changed allegiances and ported my original iOS app to Android. I’ll give you some basic pointers to get you started and add an overview of my real-world experiences.
When I ported my app to Android, I also changed development languages and added a lot of new online-type features. So in many senses, it was a brand-new effort just loosely based on the original. I had new considerations and additional design tradeoffs, so I’ll cover those too. And along the way, I’ll compare and contrast my Android experiences to what I found under Apple’s iOS process.
Setting Up For Development
This won’t be an Android App development-tutorial, as there are plenty of those around. But if you’re interested in trying the platform yourself, this section will be a basic overview.
The first thing you’ll need to do is get the appropriate development tools installed. A benefit for Android developers is multi-platform support. When developing for iOS, your one-and-only choice for a development platform is Mac OS. That wasn’t a problem for me, because I’ve been on the Mac platform for years. But Linux and Windows developers are left out in the cold. With Android however, Linux, Mac OS and Windows developers are all welcome.
iOS apps are also developed almost exclusively using Objective C, which is a language that few outside the Mac world use. In contrast, Android apps are typically written using Java, which has a much wider developer base, which means more utility libraries, documentation and online code examples.
As far as tools, you can build Android apps using the command-line (yep, some people still do that), but typically you’ll be using the Eclipse Integrated Development Environment (IDE) coupled with Google-provided add-ons for Android development. (Figure 1).

Figure 1: Android Development Using Eclipse
Basically, you’ll start with a valid Eclipse installation and then add the Google tools on top. This environment is easy to set up and includes an Android emulator (Figure 2), so you can start your development without having physical hardware.

Figure 2: Android Emulator
The standard emulator looks fairly boring. If you want to get fancy, you can skin the emulator to look like various devices, but that’s really just eye-candy. The main benefit for the emulator is allowing you to try your app on different variations of hardware including screen resolution, OS version, available memory, etc.
How does the emulator perform? My development platform is a fairly beefy dual-core MacBook Pro and the emulator is a bit slow to start. But once it’s going, it runs OK for normal use. Unfortunately for me, my new app, like the original iOS version, isn’t quite “normal”.
It’s OpenGL-based, which really needs direct hardware access and is not well suited for emulation. I would only get a few frame-per-second out of my app when running. And even with non-OpenGL based apps you’ll likely be much happier installing onto a device rather than using the emulator.
If you’ve got a Android phone handy, it’s quick, easy and free. Contrast this to iOS development where you’ll have to pony-up $100 before you’re allowed to install an app on a physical device. With Android, you can install your app right off the bat and pass it out to whoever you like. Nice.
Once you have the Android tools installed with your Eclipse installation, you’re ready to go. Figure 3 shows a typical Eclipse window for editing, compiling, debugging and running your app.

Figure 3: Monitoring a running Android app using Eclipse
For me, Eclipse is a familiar environment that feels much more modern and full-featured than the Xcode that is used for iOS development. The refactoring, autocomplete, continuous compilation and subversion integration made me feel right at home.
But one area where the Eclipse/Android development area lags behind is in user-interface development. The Xcode suite has nice tools that allow you to interactively create user-interfaces and automatically tie them to your code. For me, this was of little use since I wasn’t planning much in the way of a user-interface. My main functionality would be at the OpenGL level with just some simple preference interfaces.
Digging In
My iPhone development article was based on a 14 day start-to-finish concept. But one thing I learned from that experience was that 14 days was really too short for me to do any sort of complex app. There’s just too much to do.
The original app was a bit of a 3D interactive slide-show based on photos from your iPod or iPhone. For the Android app, I decided to expand the concept by dynamically bringing in additional content from the Internet. This was going to complicate things greatly, so I would just let it take as long as I needed. This turned out to be several months of on-and-off, night and weekend development.
As I started porting my app, it quickly became clear that there would be little reuse other than general architectural flow and concepts. The original code was Objective C, the new would be Java, and never the twain shall meet.
The OpenGL calls were somewhat of an exception. I’m far from an OpenGL expert, so it was good to use the original as reference, even though there were differences due to the language bindings and the general level of support from the different platforms.
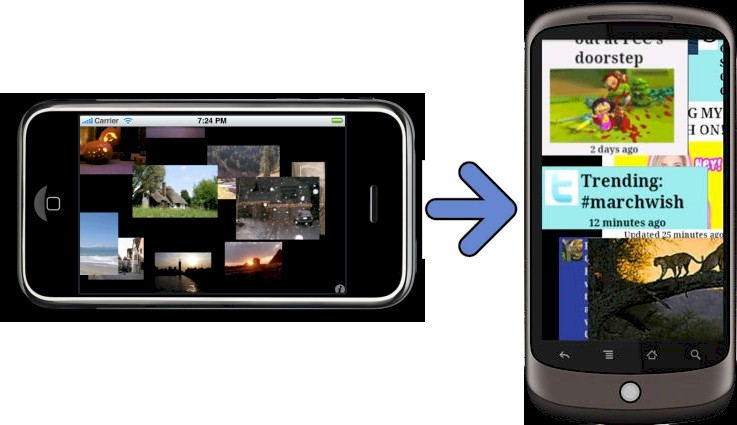
Once I got rolling, It didn’t take too long (about a week or so of part-time tinkering) to get the basic functionality of my original iOS app running under Android (Figure 4).

Figure 4: Basic functionality working.
This emulator screen-capture shows the running app with the same basic level of functionality as the iPhone version. I could fetch, re-size, display and scroll my images in a three-dimensional space with basic user-interaction. And this time, there wasn’t anybody around to slap my hand with a ruler when I scanned the file-system for images.
Going Online
Once I had the basic app running, I moved on to fetching additional content online. Since I was dealing with images, I started with a few online photo sharing services – Flickr, Panorama, and Pic Plz.
Most online services these days have opened up an external application programming interface (API) for folks like me who want to do a bit of mash-up with their content. Each API is a bit different, so part of your task will be to abstract these differences away so the bulk of your code won’t know where the content came from.
For me, the initial cut at fetching online images came pretty quickly, since I was familiar the the basic Java operations. But when you’re writing an app that deals with external content, there are a lot of “corner-cases” and architectural decisions that need to be made with respect to external communications to really make it bullet-proof.
For example, if your app starts up and you can’t get online, what action do you take? Continue and hope the connection comes in later? Give up? Have some level of reduced level of functionality? These are all questions that you’ll have to address and they are specific to the app.
If you have a good Internet connection, there’s no problem. And if you have no connection it’s fairly easy to deal with. But what if you have a “bad” or intermittent link? This is where it gets tricky and you have to think about what this means for your application.
When the app starts up, you can check the online state. But there’s no guarantee that it won’t be different a second later. You have to be prepared to deal with changes. In my case, I had problems that would show up when I had a spotty connection. My checks would indicate that I was online, but when I went to fetch content, I wouldn’t get anything. This would manifest itself as a mostly back screen as I had nothing to show.
The eventual solution was to dig deeper into the Java APIs, adding a timeout to the low-level socket being used to fetch content. If it was taking too long, I would give up. This can still be a bit tricky, as you don’t want to get into a state where you “thrash” a bit as you try to make a connection give up, and then try again forever.
For my app, I had to add a number of checks inside the code to query for online state and then fall back to a set of built-in photos if I couldn’t get any from the Internet. I’m still not totally satisfied with this solution, as I suspect my users will get tired of seeing the same images frequently. But the alternative is to show a black screen until I can get the “real” images.
I toyed with the idea of using a cache for those times when I couldn’t get online or when I wanted to conserve bandwidth. But the problem for me was the type of data I was using. Caching is useful when you are using the same data over and over. But for my app, this isn’t the case.
I’m fetching new data fairly often, so a long-term cache isn’t all that useful. In addition, there isn’t a lot of storage space on these devices, so I didn’t want to fill it up with transient data. In the end, I decided to just cache small images such as Facebook icon photos or RSS icons because these tended to show up over and over.
Another issue you’ll have to deal with when fetching anything from the Internet is unknown content. It isn’t uncommon to try and fetch data only to find out it’s missing, corrupt or too large. For handling missing or corrupt content, you just have to be paranoid and make sure you check whatever you can and wrap critical code in the proper exception handlers.
For large images, the problem is that too big of an image could cause the app to run out of memory. There’s no guarantee that today’s hottest image on Flickr isn’t a 500 MB candid shot of Justin Bieber eating a hot dog at the mall.
So I just had to decide on a maximum image size that I would even try to handle. Anything too large would just get discarded before I even tried to read it all in. This maximum was adjusted based on the capabilities of the device I was running on. Available memory can be queried when your app starts up to give you some idea of what you’re dealing with.
This brings up yet another facet of Android development: Dealing with potentially hundreds of device variations. When you’re targeting only iOS devices, you’re just dealing with the few variations of the iPod, iPhone and the iPad, which are likely up to date with the latest OS.
But with Android you have to consider numerous screen resolutions, CPU speed, physical capabilities and wide variations in OS version. For me, this meant extra time in the emulator and lots of time rounding up friends and family to test the app on their phones.
Moving Past Images
Another feature in my plan for the app was including content in addition to images. For starters, I knew I would bring in Facebook and Twitter. Then once I had the ability to handle generic text data, I would bring in RSS feeds to greatly expand the possibilities for content.
Dealing with Facebook and Twitter meant some architectural changes in my app. Both of these feeds would obviously need to handle user authentication, something I had avoided to this point. I don’t have enough room in this article to describe the process of authenticating against these services. But if you want to dig into it, both services use a protocol called Oauth. Facebook describes their interface here, and Twitter does the same here.
Using Oauth authentication turned out to be a big pain in my app because it is really designed for web-apps and not a native OpenGL app like mine. Figure 5 shows the screen that displays when a user has selected the “Facebook Feed” button within my app.

Figure 5: Facebook permissions
This doesn’t look too bad, but the actual sequence of screens and user responses is very awkward. The user first uses my native UI to select Facebook. Then a web browser type interface spawns to go to www.Facebook.com where approval is granted (or denied) for my app. Then the browser goes away and you’re back in my interface. Now repeat the same sequence for Twitter and it gets real awkward for the user.
Luckily, this only has to happen once per installation as the app can save and re-use the approval tokens received. It can also get real ugly, if the user tells the app “Use Facebook” and then tells Facebook, “Don’t allow the app access”. What does this mean for the app? Likewise, if the user selects one of these services when the Internet connection is down or spotty, the interaction can get even uglier. I still have a rare crash when flipping back and forth between the OpenGL display and the browser and it appears to be deep in the Android libraries. So I’m not sure I can catch it. Sigh…
Once I got these services up and going, I moved on to RSS. I wasn’t experienced in dealing with raw RSS feeds, but I had hoped that it would be standardized. Instead, what I found was that the basic text in an RSS feed was easy to extract. But to get at additional content such as images from a news story or videos from YouTube, I’d have to write a bunch of “special case” code to handle selected sites. Ugh.
Parsing through a large RSS feed also turned out to strain the processor on the phones that I was using for testing. I could tell when a RSS feed came in, because the nice smooth scroll of images on the main screen would suddenly start stuttering and stalling. I’m not sure I have this completely solved yet, because there are a lot of slow phones out there. But in general, all my content is fetched in background threads of execution.
To give the user-facing code priority, I just cranked the priority down on the background threads and in the case of RSS, added randomization to prevent me from trying to process a bunch of feeds simultaneously. Figure 6 shows the app running with many of the content types, including Facebook, Flickr, RSS, etc. displayed.

Figure 6: App with multiple content types displayed
One fun thing I added was a bit of a mashup where I used the curent twitter trending topics to search many different sources using an API from 3taps.com. Using this API, I could get access to ebay, Craig’s list, Zillow and more. It was kind of fun until I came upon an unexpected result that I luckily caught before the app went live.
One seemingly innocuous trending term brought up a triple-X image from a Craigslist personals section. Oops. So I had to put in a special case to skip the Craiglists personals section when using trending topics. If that’s your thing, you can still explicitly (ha!) search for it. But I didn’t want it to come up by accident. Note that there is still no guarantee of what you’ll get from any of the photo sharing sites when you use a query term or just look for the top images.
The final feature I added was the ability to bring up the original content when the user selects an on-screen image. For example, when the user selects a RSS headline, the selected tile first moves to the forefront and stops scrolling. Then if the tile is selected again, a web browser is spawned to bring up the associated article.
In the Android world, the spawning of the browser or other external viewer is very easy and accomplished in just a couple of lines using the very flexible Intent subsystem. Once the user is done with the external content, the back button brings him or her right back to the app.
Once you’ve gotten close to finished with your app, you’ll be ready to show it off to the world. To do that, you’ll deploy it to the Android App Store.
App Store
From a developer’s perspective, the Android App store is a breath of fresh air compared to Apple’s iOS App store. Wrote a cool app? You can have it online and for sale in minutes with no prior approval required. Fix a bug in an existing app? Upload it and you’re done. No waiting around for weeks to get an app approval gnome to look it over.
To me, it was very empowering to know that I was in control of my own destiny. I could have an idea, write an app and upload it for sale all on my own. To get into Apple’s store, you’ll be ponying up $100. For the Android store, it’s $25. Of course there are other differences in the experience. From a user’s point of view, Apple’s store is a more polished and users know that some level of vetting has gone into the apps for sale.
Some reports are saying that iOS users buy more apps. But success can be had in the Android store as well. One developer reports that he made more money in the Android store than in the iOS store. But for most of us, making any substantial amount of money in either store is a long-shot.
Amazon also has an Android app store. It’s a bit awkward to use, because users have to jump though an extra download step to get the app. Amazon’s store is also moderated just like Apple’s store so you have to get approval before your app will be listed.
To try it out, I signed up and got my app listed in a week or so. While checking out my entry one day I noticed that I had a “review” that was one star and along the lines of “Don’t buy this app, It steals your credentials and spams your Twitter feeds!!!” What? Where in the world did that idea come from?
I was sure that that review would do wonders for my Amazon sales. Sigh. I was obviously doing nothing of the sort and there was no way for me to contact the issuer of the review, so I just added my own feedback denying it all. Then I contacted Amazon about the abusive review. To Amazon’s credit, the bogus review was gone in a couple of days.
One thing this experience did was to make me go back and check the Twitter privileges I was asking for. I saw that I was at least asking for write permission. So I removed that privilege request so that there couldn’t be any question.
Life in the Android store isn’t all rosy for an app developer either. I wrote this app for fun and to learn about developing for a mobile platform. But I did put it up for sale at 99 cents. Just like the iOS store, it’s very hard to get noticed among the thousands of new apps that show up every week.
Sales have been fairly low, and very few of the purchasers have bothered to rate the app and no one has left a review. Those who did rate it, gave it medium to low marks with no indication of why. It would be valuable to know if anyone was having problems or if somehow my description didn’t match up to the experience. But I keep on plugging. I enjoy using the app myself on a day-to-day basis and hopefully the users I do have enjoy it too.
Figure 7: Video of the app in-action
Closing Thoughts
I don’t have space in this article to cover the entire process of creating and debugging an app like this. But in summary of the process: It’s hard work. Trying to get your app to be flexible, polished, bullet-proof and easy to use takes a lot of time and thought. I won’t claim that I’ve succeeded yet. I continue to tweak, add features and fix bugs.
But developing for Android is a lot of fun, educational and empowering. As a software developer, I find it an exciting time in the industry. To have Linux-based, programmable, portable and powerful devices like those running Android around is really a kick.
And compared to developing for an iOS device? For me at least, developing for Android was much easier. I can use tools and a language that I am already familiar with. If I were a full-time app developer, I know that over time I’d get comfortable with the Xcode suite and Objective C. But I’m just an enthusiast doing this in the evenings and weekends, so the Android development tools are much easier to pick up.
As far as financial success, it’s a long shot for either Android or iOS. But that wasn’t my main purpose anyway. I’m just in this for the learning experience and the fun! If you’d like to check out my app, head on over to its web site where you can see some additional screen shots, documentation and a link so you can load it on your own phone.