Introduction
| At a Glance | |
|---|---|
| Product | Quad Micro Works Square One Personal Internet Server |
| Summary | All-in-one Linux-based router, NAS, firewall, print server appliance with a suite of built-in Internet applications. |
| Pros | • Easy to configure for basic functions • Permits root access • Very good routing performance |
| Cons | • Web applications not documented – difficult to set up • Pre-configured WAN port forwarding for Telnet creates a security issue • Some functions such as NTP time set and LAN statistics didn’t appear to function properly. |
A cluttered office is often the price you pay for living in the digital age. A look around many home offices reveals a broadband modem, a router, a NAS (Network Attached Storage) and sometimes a networked print server. And if you want to run your own web server, you might actually have another “dinosaur” from a previous system upgrade that you’ve converted to Linux. Quad Micro Works promises to eliminate some of that clutter with their Square One Personal Internet Server.
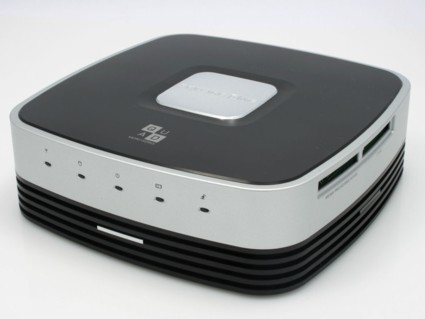
Priced at $399.95, the Square One is an affordable multi-function server that provides most of the basic functions you might need. As the name indicates, the Square One has a square form factor measuring 7 7/8″ W X 7 7/8″ D X 2 3/8″ H.
The Square One functions as a four-port router and has a built-in user configurable firewall. On the right side of the unit, there are two memory card reader slots for sharing your memory cards on the network. CompactFlash (Type I/II/III), MicroDrive, SD/MMC, xD, Memory Stick, Memory Stick Pro, and SmartMedia are all supported, though you can only insert one card at a time.
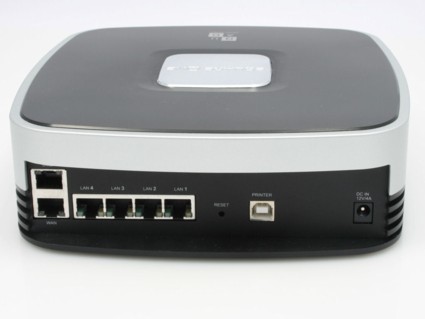
Figure 1: Square One rear panel showing WAN/LAN/DMZ ports, a reset switch, and a USB port.
The rear panel of the Square One (Figure 1) doesn’t have the five ports (one WAN and four LAN) you might expect on a typical SOHO router. It has six ports. The sixth port is a hardware DMZ port. A software IP-based DMZ is also supported. Also on the rear panel is the USB 2.0 port used for sharing USB printers on the local network, as well as a reset switch. Power is supplied from an in-line “brick” power supply whose output is rated at 12VDC @ 4 amps.
In addition to being your Internet router, firewall, print server, networked memory card reader and 320GB NAS, the Square One enables a number of Internet services by default. Out of the box, an Apache Web server, FTP, MySQL, and Telnet are enabled. The router automatically routes Web, FTP, and Telnet traffic from the WAN port, so the consumer doesn’t have to add port forwarding rules for those services. However, since Square One allows root access via Telnet (SSH is not available), it would probably be a good idea to create a rule that blocks inbound port 23 traffic, or disable the service.
Construction
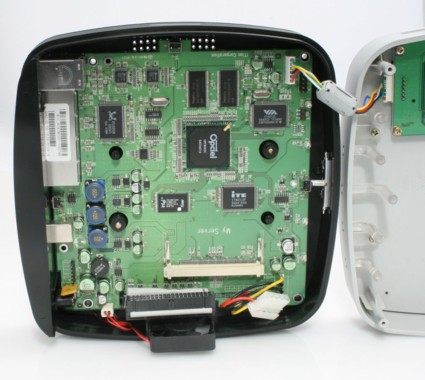
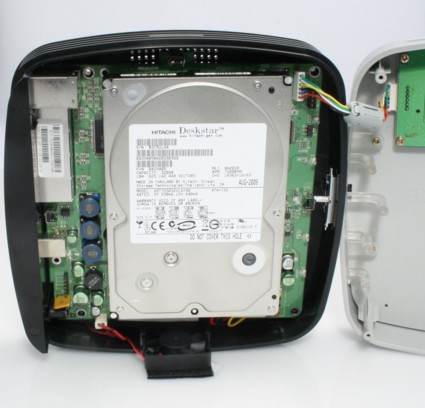
The case top pops off the Square One by removing the four screws located at the corners on the bottom of the case (Figure 2). Two additional screws on the bottom attach the 320GB Hitachi DeskStar hard drive to standoffs above the circuit board.
It’s powered by an ARM922T 32-bit RISC CPU with 16KB L1 cache, and has 64 MB of SDRAM and 4 MB of Flash ROM. As you might suspect, the underlying operating system is based on a Linux 2.4.18 Kernel.
Figure 2: Square One Interior with disk drive removed
Light pipes fit over LEDs mounted on the circuit board to provide front panel status indicators. There also appears to be an empty slot for additional memory, but Quad Micro Works didn’t supply any information about what type of memory to use for upgrades. A small, barely audible fan, located near the data connector for the disk drive, keeps the Square One cool.
Figure 3: Square One with disk drive mounted
Setup
For consumers who don’t want to use the advanced Internet features, the basic setup of the Square One is quite simple. For those who don’t read instruction manuals, a 12″ X 18″ single page quick start guide will get you up and running in five steps. Practically speaking, if your ISP provides you with an IP address automatically and doesn’t require PPPoE login, you can plug the WAN port into your modem, and your computer into one of the LAN ports, and you’ll be up and running.
By default, Square One’s DHCP server passes out addresses on the 192.168.1.0/24 network. The default web management port is on a non-standard port (since port 80 is used by the Apache server), so logging on requires you to include the port number in the URL (http://192.168.1.1:8090).
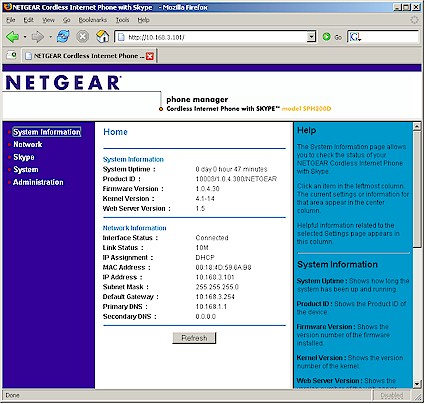
The first time you log into the Square One, you can run the Setup Wizard (Figure 4). Of course, if you’ve already confirmed that you’re connected to the Internet, you can bypass that step.
Figure 4: Square One Personal Internet Server Web Admin home page
Features
The menu system is quite straightforward. Top-level menus are listed on a horizontal bar across the top of the screen. As you choose a menu item, a sub menu with additional options appears on a vertical bar along the left side of the screen. Most of the menus are self-explanatory, so I’ll just touch on the highlights for each top-level menu.
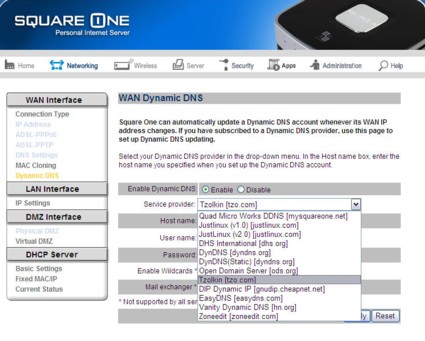
Networking – This menu lets you configure settings for both your WAN and your LAN. The built-in DHCP server, enabled by default, supports DHCP reservation and lets you clone currently-attached MAC addresses. The Square One also supports 12 DDNS (Dynamic DNS) providers (Figure 5) so you can host your web site even if your ISP provides you with a dynamic address. I tested DDNS using TZO.com as my provider and even behind two routers, the host name properly resolved to my public IP address.
Figure 5: Networking setup menu showing DDNS setup.
Wireless – There is software support for wireless networking so that you can use the Square One as a wireless access point, but my test unit didn’t have the supporting hardware installed. Quad Micro Works will be shipping a wireless version, but it wasn’t available when my review unit was shipped. I did note, however, that the wireless software is quite basic. This version of the software doesn’t support WPA (Wi-Fi Protected Access), nor can you disable SSID broadcast or turn off the radio.
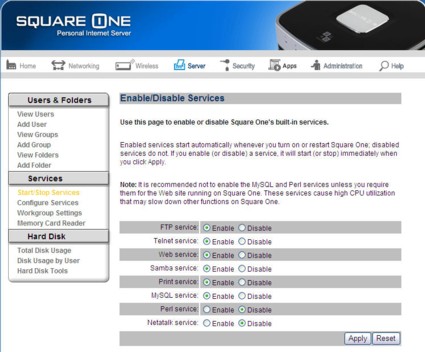
Server – This menu lets you add users and groups, set permissions, start/stop services (Figure 6) and access hard disk tools. As you create a user, a “home” directory is automatically created. You can set disk quotas for each user, as well as permissions. Default permissions are in the standard Linux format and are 770. A click of the help button opens a separate browser window with context sensitive help. I did note that under disk usage by user, the Square One improperly reported usage for my account (I copied 42GB of music to my home directory) as administrator disk usage.
Figure 6: Square One Start/Stop Services menu.
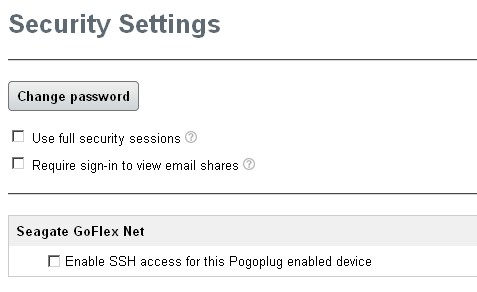
Security – This menu (Figure 7) lets you set up your firewall, as well as create rules that control local access to the Internet. You can map ports to forward traffic from the WAN to specific IP addresses, or set up port triggering for gaming applications. However, unlike some of the routers on the market, none of the lists is pre-populated with services or applications, so you’ll need to know port information before you can configure rules.
Figure 7: Square One Security Menu
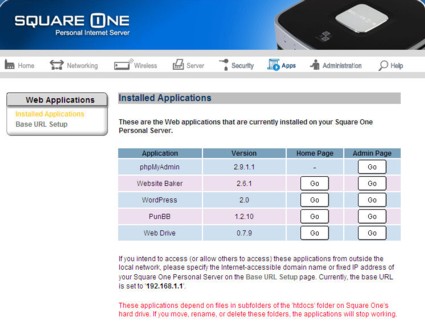
Applications – The Square One ships with a suite of Internet applications pre-installed (Figure 8). Installed applications include Website Baker, a simple tool to create web sites, WordPress, a popular blogging program, PunBB and Web Drive. Unfortunately, none of these applications came with any documentation; to use them, you’ll have to find documentation on the Internet.
Figure 8: Square One pre-installed applications
Features
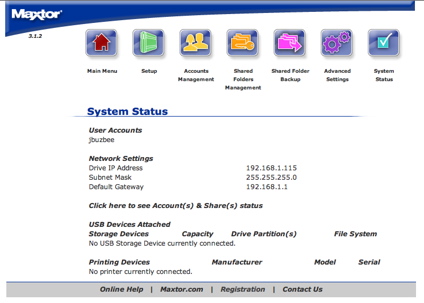
Administration – Here you’ll find typical administrative tasks such as system restart, updating firmware, setting time/date or checking system status (Figure 9). I did note that the Square One wasn’t able to set its time from any of the several NTP servers I tried (including the default), but perhaps that’s because I had it configured behind another router. Also, for some reason, the LAN traffic counter never seemed to increment even though I had put a lot of traffic through one of the LAN ports.
Figure 9: Square One System Status page
Performance
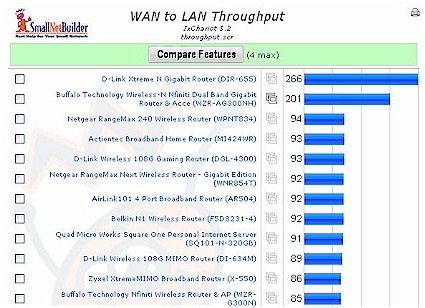
As an internet router, the Square One performed surprisingly well. Of the 43 products in our Router Performance Charts, in WAN->LAN routing, it placed ninth with a very respectable 91 Mbps—essentially 100 Mbps wire-speed.
Figure 10: WAN > LAN throughput
Similarly, in LAN->WAN routing, it measured 92 Mbps and ranked seventh. And, in a ranking important for P2P users, the Square One supported 176 simultaneous connections.
Of all of the routers in our charts, only the Netgear RangeMax 240 wireless router and the DLink 108G gaming router outperformed the Square One on the simultaneous connection test. Each of the two top ranked products for this test supported 180 connections.
As a NAS, however, performance was very disappointing, coming in at an average of only 2.3 MB/s for write and 2.0 MB/s for read with a 100 Mbps LAN connection. Only one product—the Trendnet TS-U200—was slower.
Hands On Linux
By design, Quad Micro Works decided to leave the Square One unlocked so that power users could poke around at the Linux root level. To access the CLI (command line interface), you Telnet to the router’s IP address. You’ll need to use something like HyperTerminal or PuTTY, as the keyboard mapping for Window’s command line Telnet doesn’t work with Square One’s Telnet. When you first log in, you have only limited commands available (Figure 10).
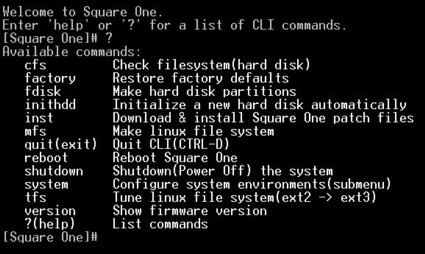
Figure 10: Square One CLI commands
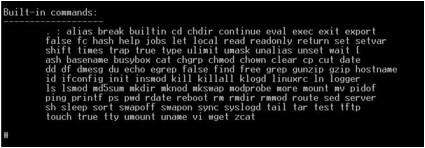
If you type “quit,” you’ll then have access to all of the commands (Figure 11). I poked around a bit, and there doesn’t seem to be a compiler installed on the system. However, those with Linux experience could certainly install a compiler for the ARM processor and turn the system into whatever they wanted it to be. Also, root access might be required to fix some of the default settings. For example, when I enabled the FTP server, I also created a file folder named FTP and assigned rights to it. However, when I FTP’d into the server, it dumped me into my home directory rather than the “FTP” folder I had set up. And even though I was in a group with rights to the FTP folder, I couldn’t change into it. With command line root access, you can correct these types of problems.
Figure 11: Complete list of commands supported by Square One’s shell
Conclusion
As a basic “personal server,” the Square One is a simple appliance that can fill the needs of a consumer who wants an all-in-one box that provides storage, a router, a firewall, and a print server. It’s a single box that combines all of those functions at a price that’s roughly the same as buying separate components.
It’s actually pretty good as a router in the throughput department and has the ability to handle many simultaneous connections. But, especially for a product touted as a “server”, its file transfer performance is abysmally slow and not becoming of a product at its price point. It is also an odd oversight that it lacks a UPnP AV server to serve up multimedia content on the LAN, especially since that is a server function that many consumers will actually want to use.
For the average consumer, the supplied suite of Internet applications will be difficult to get working without documentation, and in my experience may take some CLI tweaking to get working properly. And while the Square One allows root access, people with Linux experience are likely to want a more powerful box and will most likely “roll their own.”

