Introduction

| At a Glance | |
|---|---|
| Product | NETGEAR ProSafe Gigabit Quad WAN SSL VPN Firewall (SRX5308-100NAS) |
| Summary | Biz-class VPN router w/ quad Gigabit WAN & quad LAN Ports and lots of power supporting 125 IPsec and 50 SSL tunnels, QoS and up / down bandwidth control. |
| Pros | • > 500 Mbps routing throughput • 30 – 40 Mbps 3DES IPsec throughput • Four WAN ports • All Gigabit Ports • Built-in VLAN |
| Cons | • Only four LAN ports • No L2TP support • No jumbo frame support • Admin interface can be slow at times • Win 7 IPsec client support not complete |
Introduction
NETGEAR recently announced its newest router, the SRX5308 ProSafe Gigabit Quad WAN SSL VPN Firewall. I’m pleased to be the first to review this device, which the company proclaims as the flagship of its ProSafe firewall family!
The 5308 is equipped with four Gigabit WAN ports plus four Gigabit LAN ports, and is designed to be at the core of a network with 100+ users. NETGEAR’s specifications list capacity to handle 200,000 concurrent connections, support for up to 254 VLANs, 125 simultaneous IPSec VPN tunnels, and 50 simultaneous SSL VPN tunnels. Holy smokes!
Although brand new, the SRX5308 has similar menus and options to several NETGEAR routers and gateways I’ve reviewed, including the FVS336G, the FVS318G, and the UTM10. Throughout this review, I’ll be referencing sections from those reviews as appropriate.
The SRX is a 1U height device, measuring 13” x 1.7” x 8.2”. It is enclosed in a metal case with NETGEAR’s ProSafe grey and blue metal exterior and intended for a data room, not a desktop. The exhaust fan on the left side is quite loud, so it is not a device you want in your office or work area. The chassis supports side brackets for rack mounting in a data center.
The front of the device has both the LAN and WAN ports, with simple status indicator lights as shown in Figure 1.
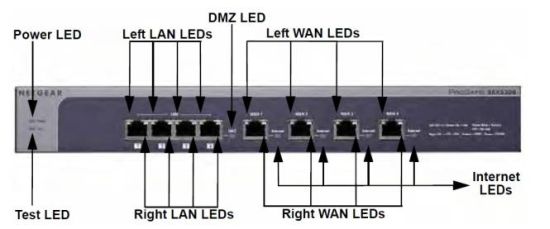
Figure 1: SRX5308 Front Panel
The rear of the device (Figure 2) has a serial console port, security port to physically lock the device to a physical structure, AC power connector and power switch.

Figure 2: SRX5308 Rear Panel
Inside
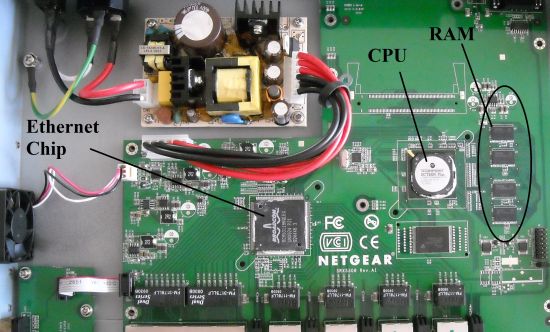
The motherboard is neatly laid out with plenty of room for airflow through the chassis. The SRX runs on a 700Mhz Cavium CN5010 CPU, 512 MB of DDR2 of RAM, 64 MB of Flash and a Broadcom BCM53118 9-Port GbE Switch with 8 Integrated 10/100/1000 PHYs chip. The latter is also used in NETGEAR’s FVS318G. The CPU and Ethernet chips have passive heatsinks, removed for the picture. I’ve called out some of the components in Figure 3.
Figure 3: SRX5308 board
Feature Tour
The SRX5308 uses the same menu structure as the FVS336G, FVS318G, and UTM10 with multiple top menu options across the upper part of a web page. Once selected, additional sub menus appear below the top menu options. Clicking on a submenu reveals one or more tabbed configuration screens. Table 1 lists the menu options for the SRX.
| Menus | Sub Menus | |||||||
|---|---|---|---|---|---|---|---|---|
| Network | WAN | Protocol Binding | Dyn DNS | LAN | DMZ | Routing | ||
| Security | Services | Schedule | Firewall | Address Filter | Port Triggrng | UPnP | Bandwth Profile | Content Filtering |
| VPN | IPSec VPN | SSL VPN | Certs | Status | ||||
| Users | Users | Groups | Domains | |||||
| Admin | Remote Mgt | SNMP | Backup and Upgrade | Time Zone | ||||
| Monitoring | Status | Active Users | Traffic Meter | Diagnstcs | Logs and Email | VPN Logs | ||
| Web Support | Overview | Knowldg Base |
Docu mentation |
|||||
Table 1: Menu structure
I’ve used quite a few NETGEAR products and I find the menus intuitive. However, they could be better organized. In the Network menu, you’ll find configuration options for WAN ports and Protocol Binding. In the Security menu, you’ll find the configuration option for Bandwidth Profiles. In the Monitoring menu, you’ll find the option for configuring Traffic Metering. As all these options apply to the WAN ports and are related, it would make more sense to me if they were in the same menu or sub menu.
Configuration stability was generally good and I didn’t experience crashing of the router as I changed menus and options. Intermittently, I experienced several seconds of lag when going from menu to menu, especially when manipulating WAN configurations.
The Web Support menu in Table 1 is worth pointing out. This menu provides links to NETGEAR’s knowledge base, as well as the full manual for the device, which is handy.
WAN
A distinguishing feature of the SRX5308 is its four WAN ports. All four ports are Gigabit Ethernet with DHCP, Static, PPPoE, and PPTP Internet connections all supported. The MTU value on each port is adjustable, with a maximum value of 1500 bytes. So jumbo frame capability on the WAN ports is not supported.
There is a nice display providing status for all eight router ports in the Monitoring menu. As shown in Figure 4, it provides an up/down status on each WAN port and the IP addresses for both the WAN and LAN ports.
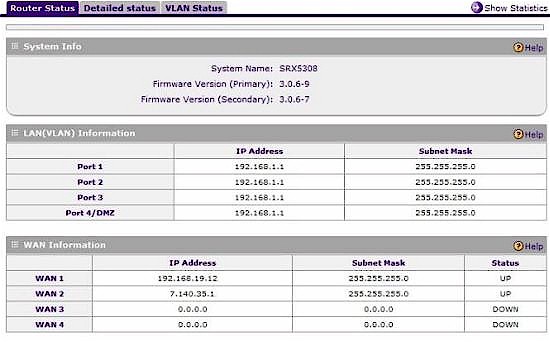
Figure 4: Port status
With four WAN ports, you definitely need a good toolset to manage them well. NETGEAR provides multiple tools to leverage all your network’s bandwidth, including Load Balancing, Auto Failover, and Protocol Binding.
Load balancing mode is used to distribute traffic over multiple WAN connections, with options for weighted load balancing or round-robin load balancing.
Auto-rollover mode is best used when you have only two WAN connections, since it allows for just a primary and failover interface—the other two interfaces are disabled in this mode. I tested this mode and simulated a WAN interface failure by disconnecting the WAN 1 interface while running a continuous ping to an Internet destination. I was impressed. Only one or two ping packets were lost as the router detected the port down and routed the traffic to the other interface. This is a dramatic improvement over the failover performance of the FVS336G, which took over a minute!
Protocol Binding allows for directing specific traffic to any one of the four WAN ports. There are 63 predefined services or traffic types, which along with source and destination IP values, can be used to direct specific traffic out over certain WAN ports. Additional custom services can be added based on port and protocol. For example, in networks using VoIP, it might be useful to run SIP traffic in and out the WAN 1 interface while sending web traffic to the WAN 2 interface.
WAN Mode options include NAT or Classical Routing. The option is global, however, meaning all four interfaces must be in NAT mode or in Classical Routing mode. I’d like to have the option to enable NAT or Classical Routing per interface. Let’s say your network has a cable modem, DSL modem and a T1 for WAN connectivity, all using NAT mode. It could be useful to use the fourth WAN port to route internal traffic in Classical Routing mode if the SRX had the option to configure NAT and Classical Routing on a port by port basis.
The SRX has tools to manage traffic volume through the WAN interfaces. If one of your WAN interfaces is usage sensitive, total monthly traffic can be limited by Megabytes per WAN interface. If you enable Traffic Metering, with or without a limit, the SRX produces a running total of traffic, as shown in Figure 5.

Figure 5: Traffic Statistics
If you’re wondering what type of traffic is generating usage on your network, an additional report is available that provides a simple breakdown of traffic by three types: Email, HTTP and Other, shown in Figure 6.
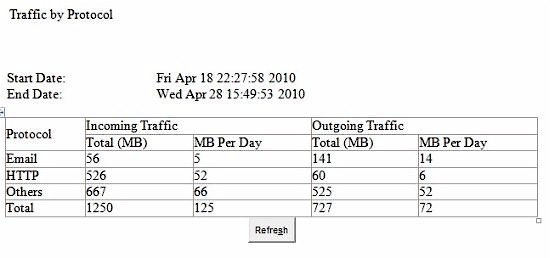
Figure 6: Traffic detail
LAN
The four LAN ports are also Gigabit Ethernet. Like the WAN ports, the LAN ports’ Maximum Transmission Unit (frame size) is not adjustable. I tested for jumbo frame capability anyway and found the LAN ports support up to 1962 byte frames as you can see in Figure 7. Although this is higher than a standard 1500 (or 1518) Byte frame size, it’s not large enough to be of much use.

Figure 7: You can get jumbo-ish frames
The SRX5308, FVS318G and UTM10 all have Gigabit Ethernet LAN ports, yet none support true jumbo frames. I think the SRX would have more utility if the option existed to adjust MTU by LAN port, or even if they automatically passed up to 9K jumbo frames. I asked NETGEAR about this and they said jumbo frame support is on their “road map and it’ll just be a matter of time”.
VLAN
VLAN tagging capability adds a lot of functionality to a network. VLANs are often used to separate LAN traffic, which is useful to improve network security and performance. I really like the VLAN capability of the SRX, which is spec’d to support up to 254 VLANs. The manual refers to the VLAN functionality as port-based, yet it supports 802.1q VLAN tagging as well.
Each LAN port on the SRX must be assigned to at least one VLAN, which becomes its Port VLAN Identifier, or PVID. If you assign more than one VLAN to a port, the port becomes a trunk for connection to a switch or another router. Untagged frames are assigned the PVID of the port. Tagged frames are forwarded to the appropriate port(s) based on the VLAN assignments.
To test the SRX’s VLAN tagging capability, I added VLANs 5 and 6 and assigned them both to port 3. I enabled the DHCP server on the SRX for both VLANs, using subnet 192.168.5.0/24 for VLAN 5 and 192.168.6.0/24 for VLAN 6, as shown in Figure 8.

Figure 8: VLAN config
I next connected a NETGEAR GS108T smart switch to the SRX. I connected the SRX’s port 3 to port 1 of a NETGEAR GS108T switch and configured port 1 as a trunk port. I then configured the GS108T’s port 2 in VLAN 5 and port 3 in VLAN 6.
When I connected a PC to port 2 on the GS108T, it was assigned an IP address in the 192.168.5.0/24 subnet, the proper range for VLAN5. And likewise, when I connected a PC to port 3 on the GS108T, it was assigned an IP address in the 192.168.6.0/24 subnet, the proper range for VLAN6.
This little test verified the SRX is tagging the frames it sends and receives over ports with multiple VLANs. I also tested the SRX’s VLAN capability with a Linksys SRW2008 and had the same solid results. So it appears the SRX5308 plays well with other brands of switches.
VLANs are also a best practice if there are VoIP devices on your network. It is a good idea to put VoIP traffic in its own VLAN to ensure VoIP call quality.
In addition to supporting VLANs, the SRX can perform as a SIP Application Layer Gateway (ALG). This simple function enables the router to change the IP address in the SIP header of a VoIP packet to match the public IP address of the router for outgoing SIP messages.
NETGEAR lists the SRX as compatible with VoIP devices from Linksys, SNOM, Cisco, X-Lite, D-Link, Grandstream, Polycom, Siemens, and Aastra. Enabling the ALG is a simple check box in the Advanced menu section of the Firewall (Figure 9).

Figure 9: SIP Application Layer Gateway (ALG)
VPN
The SRX supports three kinds of VPN connections. It supports Site-to-Site IPSec connections to other routers, Client-to-Site IPSec connections for remote PCs, and SSL VPN connections for remote users. As mentioned earlier, the SRX supports 125 simultaneous IPSec VPN tunnels and 50 simultaneous SSL VPN tunnels.
NETGEAR’s Site-to-Site IPSec VPN menu is easy to configure. I’ve set up Site-to-Site IPSec VPN connections on Cisco, SonicWall, Linksys, Draytek, Zyxel, and other brand routers. In my opinion, NETGEAR’s VPN configuration menu is the most intuitive.
The SRX5308 supports DES, 3DES and AES encryption, plus MD5 and SHA-1 authentication. There is a simple wizard for setting up a Site-to-Site IPSec VPN tunnel, which makes setting up an IPSec tunnel between two NETGEAR routers quite easy. As with NETGEAR’s other IPsec routers, the SRX includes a Mode Config option that allows remote VPN clients to be assigned an IP address in a different subnet than the devices on the LAN. This is a useful feature to restrict remote clients from accessing various services on the LAN.
Manually setting up a tunnel isn’t difficult. I had no issues setting up a Site-to-Site VPN connection between the SRX5308 and a SonicWall TZ100W using 3DES and SHA-1 for VPN encryption and authentication. My active tunnel is shown in Figure 10.

Figure 10: Active Site-to-Site IPsec tunnel status
The SRX comes bundled with a single-user license of VPN Client software. Because of issues with Windows 7 support, NETGEAR is using a different IPSec client with the SRX5308. Instead of the Safenet client that came with the FVS336G and FVS318G, Netgear is going with software from TheGreenbow. Netgear supplied me with a beta client version, which I installed on a Windows 7 64 bit PC.
Setting up the router for IPSec VPN client access is easy via the Netgear VPN Client Wizard. Simply give the connection a name, enter a pre-shared key, and click apply. The Wizard configures the router with default local and remote IDs, 3DES, SHA-1, Aggressive mode, PFS, and DH2.
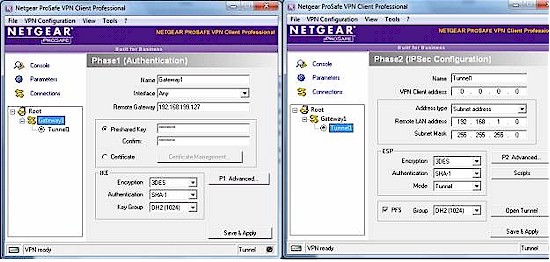
Setting up the IPSec client software took a few more steps, however. You must enter each of the parameters for the Phase 1 and Phase 2 configurations, as shown in Figure 11.
Figure 11: SRX5308 IPsec Phase 1, 2 test configuration
While I was waiting for NETGEAR to get me a copy of the Win 7 32 bit TheGreenbow client, I tried using Win 7’s built-in VPN connection wizard, but without success. This is probably because the SRX5308 doesn’t support L2TP, which made setting up an IPsec tunnel a breeze when Tim tried it with the Draytek 2130n, which does support L2TP.
I remain a fan of NETGEAR’s SSL VPN solution (check the FVS336G review for details). It’s a no-brainer. You just enter a user name and password as a SSL VPN user on the SRX and you’re good to go. There are no encryption or authentication options, no software to install on the PC, and it just works.
With Dynamic DNS configured on the WAN port, all you have to do is browse to https://(your Dynamic DNS domain) and enter the SSL VPN username and password. While on a recent business trip, I was able to access my network via the NETGEAR SSL VPN from the airport and my hotel many miles away from home.
The SRX supports SSL VPN connections using IE, Opera, Netscape Navigator, Mozilla, and Firefox running on Windows 2000 / XP / Vista / Windows 7 (32, 64 bit) and MAC OS X 10.4+ operating systems. Note that there is no SSL or IPsec support for any Linux-based OSes.
Firewall and Bandwidth Controls
There are eight sub menus in the Security menu, including Services, Schedule, Firewall, Address Filter, Port Triggering, UPnP, Bandwidth Profile, and Content Filtering.
The Services menu allows for defining TCP/UDP/ICMP traffic flows, which can then be permitted or denied through the firewall. The Schedule menu allows for creating three different Time of Day and Time of Week schedules for applying traffic profiles.
Traffic profiles are created in the QoS Profile menu and Bandwidth Profile menus. QoS Profiles allow you to define traffic marking for prioritization of traffic such as VoIP. Bandwidth Profiles allow you to define bandwidth limits for specific types of traffic, such as FTP or web surfing.
Services, Schedules, QoS Profiles and Bandwidth Profiles are used to create each Firewall rule via the Firewall menu. In this menu, Services can be permitted or denied on inbound or outbound traffic flows between the WAN, LAN, and DMZ interfaces.
Figure 12 has a screen shot of a rule I created to allow inbound traffic. This rule uses a Service I created called iperf to permit inbound TCP port 5001 traffic from the WAN to go to a PC with IP address 192.168.1.4. (In other routers, this could be called a port forwarding rule.)
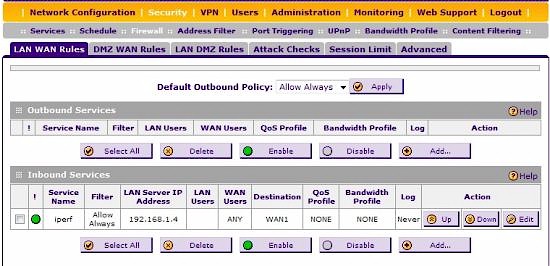
Figure 12: Firewall rules
Address Filtering adds another measure of traffic control, providing the ability to control traffic by MAC address. Port Triggering is a way to dynamically open inbound ports in response to outbound traffic.
Figure 13 shows a port triggering rule for SIP based VoIP calling. A SIP device will send out periodic SIP messages, typically to port 5060. When the SIP device sends an outbound message to port 5060, this rule triggers the firewall to open ports 1-65535 (all) for incoming traffic to that SIP device. I’ve found this to be a useful firewall rule in many routers to resolve one-way calling or no-audio issues for VoIP traffic.

Figure 13: Port triggering rules
Also in the Security section, UPnP traffic can be permitted or denied, and there is a basic Content Filter. The SRX’s Content Filter will block web browsing technologies including Proxy Servers, Java, Active X and Cookies. In addition, user defined keywords and domains can be blocked. Users surfing to a website with a blocked browsing technology, keyword, or domain will receive a “Blocked by NETGEAR” message.
I ran a port scan on the SRX to see if there were any open ports other than the ones I had intentionally opened. An NMAP port scan on a WAN interface of the router only showed port 443 open, which is expected since it is used for SSL VPN connections. NMAP also indicated the SRX is running on a Linux 2.6 kernel.
The SRX’s port 4 can be configured as a DMZ port by simply clicking a checkbox. This works identically to the FVS318G’s port 8, including the indicator light that illuminates when the DMZ port is enabled.
Although not part of the Security menu, authenticating users is a key element of network security. The SRX5308 supports user authentication via a Local Database (stored on the router) or over a network via RADIUS, WIKID, MIAS, NT Domains, Active Directory and LDAP.
Finally, the SRX supports writing log entries over a network to a syslog server and automatically emailing log files to an email address you specify. Further, the SRX can be configured to communicate to a network management system via SNMP.
Performance – Routing
Testing and analysis by Tim Higgins
With up to 4 WAN connections and Gigabit ports on the both sides, routing throughput is important. NETGEAR advertises the router as having “1 Gbps of stateful firewall throughput,” although they list it in their spec sheet as capable of 924 Mbps from LAN-WAN.
I ran the SmallNetBuilder standard routing throughput tests on the SRX5308, with the results summarized in Table 2. Note that these results were taken using one LAN and one WAN port.
| Test Description | Throughput – (Mbps) |
|---|---|
| WAN – LAN | 449 |
| LAN – WAN | 582 |
| Total Simultaneous | 535 |
| Maximum Simultaneous Connections | 48,924 (test limit) |
| Firmware Version | 3.0.6-9 |
Table 2: Routing throughput
When testing products, we frequently run results past the vendor for a "sanity check". For the SRX5308, our results were much lower than NETGEAR’s, which, as you might imagine, started a good deal of back-and-forth to try to achieve better correlation.
In the end, it turned out that a major source of difference between our measurements and NETGEAR’s is that NETGEAR has standardized on using Linux-based clients for its performance testing (currently Red Hat Enterprise Linux Release 4, Nahant update 5). And it appears that the TCP/IP handling in RHEL is much more efficient than in any of the Windows OSes that we tried, with significantly higher throughput as a result. NETGEAR provided IxChariot test files to me to verify its claims, which I have no reason to question.
So the bottom line is that SmallNetBuilder and NETGEAR’s much higher routing throughput results are both correct. But, if you’re running a Windows client, your throughput will be more like we’ve shown in Table 2.
Another difference in NETGEAR’s performance claims and our results is the Maximum Simultaneous Connections results. NETGEAR’s claim is 200,000 Concurrent Connections, which is a hellaciously high number! It’s way beyond the limit of what our recently-updated test process can test, however, so we have no way of verifying that claim. (NETGEAR used IxExplorer with 1280 Byte frames to verify their spec.) Our result of 48,924 connections is essentially the limit of what our process can do.
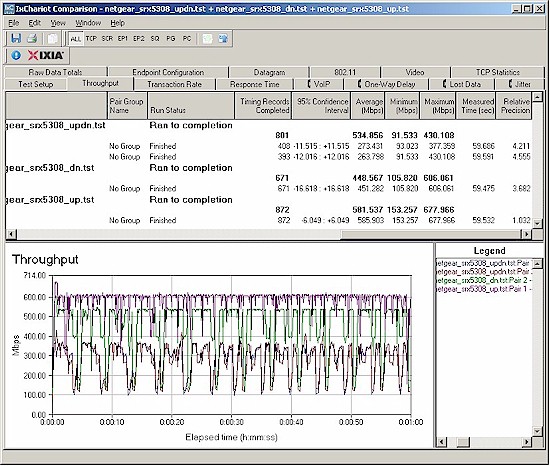
Figure 14 shows our IxChariot results, which show a good deal of routing throughput variation. Note that the minimum throughput in the dips is around 90 Mbps.
Figure 14: SRX5308 router throughput
Performance – VPN
Testing and analysis by Doug Reid
To test IPSec throughput, I connected a PC running Win 7 (32 bit) and the TheGreenBow IPsec client to one of the SRX’s WAN ports and a client running Win 7 (64 bit) on its LAN side. Both machines were running iperf with default settings to measure TCP throughput. (iperf’s defaults are TCP Window Size: 8KB, MSS: 1460 Bytes and Buffer Length: 8KB).
iperf’s defaults don’t produce the best throughput that a Windows-based client can achieve. But I’ve used the defaults of my other tests of VPN routers, so I’m sticking with them for consistency.
Netgear specs the SRX’ IPSec VPN throughput with 3DES tunnel encryption as 180 Mbps. But our results in Table 3 were nowhere near that.
| Test Description | Throughput – (Mbps) |
|---|---|
| Client to SRX5308 | 31.8 |
| SRX5308 to Client | 42.6 |
Table 3: IPsec client-to-router throughput
This difference prompted a series of retests that culminated in a conference call with NETGEAR where we tried to resolve our differences. We found that NETGEAR’s 180 Mbps throughput spec was once again based on using Linux clients on both ends of a site-to-site tunnel using two SRX5308’s.
But even when we fell back to both using the same setup (client-to-gateway, using TheGreenBow client with Win 7 systems), our results were still much lower than NETGEAR’s. It wasn’t until I took NETGEAR’s suggestion to reset my SRX to defaults and then run the test that I achieved the measurements shown in Table 3, which were close enough to what NETGEAR measured using the same conditions.
I also checked the performance of an SSL tunnel, using PCs running 32 bit Windows XP Pro and 64 bit Windows 7 Pro. With my 64 bit Windows 7 machine, I had to use the 64 bit version of IE. But other than that, I had no issues. Table 4 summarizes the results.
| Test Description | Throughput – (Mbps) |
|---|---|
| Client to SRX5308 | 0.72 |
| SRX5308 to Client | 13.2 |
Table 4: SSL client-to-router throughput
The upstream (client to gateway) SSL tunnel throughput results are pretty disappointing, although the opposite direction is plenty fast. NETGEAR was able to duplicate these results, but hasn’t yet tracked down the source of the upstream / downstream difference. Note that, once again, NETGEAR’s 21 Mbps spec for SSL tunnel throughput is based on using a Linux client, which isn’t officially supported.
Closing Thoughts
I’ve tested numerous dual WAN routers and VPN Firewalls, but none with quad WAN ports, VLAN and VPN capability. The closest thing to the SRX5308 that I’ve previously tested is the triple WAN port PepLink Balance 30.
The PepLink can be found on line for $465, but doesn’t include VLANs, VPNs or Gigabit ports. Even with slightly higher street pricing around $500, without question, the SRX5308 is head and shoulders above the PepLink.
Another comparison to the SRX5308 is NETGEAR’s own FVS336G, which has dual WAN ports and four Gigabit LAN ports. The FVS336G is an older model router, and can be found on line for around $250. While the FVS336G was impressive in 2008, it has far lower throughput, lacks VLAN capability and has only two WAN ports.
I would like to see the SRX’s VPN performance with Windows-based clients more closely match NETGEAR’s Linux-based specs. Nevertheless, the IPSec throughput numbers are higher than any other router I’ve tested to date.
The SSL VPN throughput numbers were asymmetric, which simply means remotely uploading data to the SRX LAN via the SSL VPN will be slower than downloading data from the SRX LAN via the SSL VPN. If you’re using the SRX VPN to remotely access your network, odds are you’ll be doing more downloading than uploading.
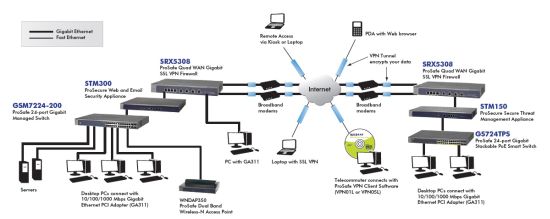
The SRX5308 is the most powerful router NETGEAR has produced to date and also the most powerful that I’ve reviewed. NETGEAR designed it to be at the core of a complex network such as the one in Figure 15.
Figure 15: SRX5308 in use
With the capability of connecting up to four Internet connections as well as VLAN, VPN, and security (but not UTM) features, plus a lifetime hardware warranty, the SRX5308 certainly earns the title as flagship of NETGEAR’s ProSafe business-class VPN Firewall line!

